社区微信群开通啦,扫一扫抢先加入社区官方微信群

社区微信群
最近,在Apache软件基金会(ASF, Apache Software Foundation)发起了一个开源的社区项目Mynewt,其最新的稳定版本1.0.0-b1刚刚发布。Mynewt是一个专注于物联网(IoT,Internet of Things)应用的实时操作系统,包括低功耗蓝牙(BLE4.2)无线传输协议栈NimBLE。
Mynewt支持丰富的实时操作系统特征,可以在不同的硬件平台上运行,包括ARM Cortex M0-M4微控制器,以及基于MIPS和RISC-V架构的处理器。有许多现有的微控制器开发板可以直接运行Mynewt,使得在其上进一步开发应用程序就非常容易。其完整的特性介绍和支持的开发板列表可以在Mynewt的网页上找到。
对于物联网应用的开发人员来说,使用Mynewt可以得到两个方面显而易见的好处。首先,应用开发变得很简单,那些复杂的和底层硬件打交道的工作都交给了实时操作系统。应用Mynewt的硬件抽象层(HAL, Hardware Abstraction Layer),开发板支持包(BSP, Board Support Packages),以及Mynewt操作系统的任务调度和管理系统,开发人员不需要像传统的嵌入式应用的开发那样去照顾应用程序的方方面面。特别是对于那些需要多个不同优先级任务的复杂应用程序,就可以很方便的进行开发。其次,应用开发变得很自由。由于是开放源代码系统,应用开发人员可以根据需要自由裁剪整个操作系统包括无线通信协议栈。这对于硬件资源有限的物联网应用来说非常重要,那些不需要的模块就可以在应用程序的编译中不包括,从而节省了宝贵的系统资源。
下面以Nordic的nRF52832开发板PCA10040为例来介绍如何开始使用Mynewt实时操作系统,并且如何在PCA10040上运行其开源的蓝牙低功耗协议栈NimBLE。NimBLE协议栈遵从于BLE 4.2标准,支持BLE 4.2的新特征如长数据包传输等。Mynewt使用入门介绍包括三个方面的内容:
本节内容介绍开发环境的设置,包括硬件和软件方面的设置。
一台笔记本电脑,一个nRF52832开发板PCA10040,以及连接电脑和PCA0040开发板的USB连接线,这就是需要的全部硬件。下面以苹果电脑的macOS系统为例介绍软件开发环境的设置,Linux系统类似。
按照如下步骤安装好newt工具:
1.安装macOS的套件管理器Homebrew。如果macOS系统没有安装好Homebrew,打开一个命令行终端控制台,使用如下命令进行安装。安装提示需要用户密码时,输入sudo密码
$ ruby -e "$(curl -fsSL https://raw.githubusercontent.com/Homebrew/install
/master/install)"
例如,在命令行终端的安装输出结果如下
==> This script will install:
/usr/local/bin/brew
/usr/local/share/doc/homebrew
/usr/local/share/man/man1/brew.1
/usr/local/share/zsh/site-functions/_brew
/usr/local/etc/bash_completion.d/brew
/usr/local/Homebrew

Press RETURN to continue or any other key to abort
==> /usr/bin/sudo /bin/mkdir -p /Library/Caches/Homebrew
Password:
==> /usr/bin/sudo /bin/chmod g+rwx /Library/Caches/Homebrew
==> /usr/bin/sudo /usr/sbin/chown jiachengwang /Library/Caches/Homebrew
==> Downloading and installing Homebrew...
remote: Total 0 (delta 0), reused 0 (delta 0), pack-reused 0
HEAD is now at b6f3399 Merge pull request #1930 from vitorgalvao
/set-permissions-sudo
==> Cleaning up /Library/Caches/Homebrew...
==> Migrating /Library/Caches/Homebrew to
/Users/jiachengwang/Library/Caches/Homebrew...
==> Deleting /Library/Caches/Homebrew...
Already up-to-date.
==> Installation successful!

==> Homebrew has enabled anonymous aggregate user behaviour analytics.
Read the analytics documentation (and how to opt-out) here:
  https://git.io/brew-analytics

==> Next steps:
- Run `brew help` to get started
- Further documentation:
https://git.io/brew-docs
当然,也可以用其它的方式进行安装,例如直接提取Homebrew的安装包(或者git clone),并拷贝到/usr/local目录。
2.安装Go编程语言。Go语言需要专门的目录作为其工作空间,其中包含有三个目录src,pkg 和bin。从其名字就可以知道,src目录是Go的源代码目录,在其中的一个子目录就是一个源代码包,pkg目录是源代码包相应的目标文件,bin目录中包含一些可执行的命令文件。环境变量GOPATH决定了工作目录,因此需要设置好GOPATH环境变量。为此,创建一个dev目录并在其中进一步创建go目录,并把GOPATH环境变量设置为这个目录。这样,就可以把newt工具的repo克隆到本地的这个目录。
$ cd $HOME
$ mkdir -p dev/go
$ cd dev/go
$ export GOPATH=`pwd`
可以把环境变量GOPATH的设置加入到~/.bash_profile 文件中,这样就可以在以后启动一个新的命令行终端控制台时,自动应用环境变量GOPATH。
$ vi ~/.bash_profile
...
export GOPATH=~/dev/go
...
$ source ~/.bash_profile
现在,就可以应用brew安装Go了。安装好后,Go就为开发者提供了一个开发环境,编译Go代码,构建Go包,从github上载入Go代码。接下来,就可以应用Go命令把newt的repo载入到本地的Go开发环境中
$ brew install go
==> Downloading https://homebrew.bintray.com/bottles/go-1.7.5.sierra.bottle.tar.gz
######################################################################## 100.0%
==> Pouring go-1.7.5.sierra.bottle.tar.gz
==> Caveats
As of go 1.2, a valid GOPATH is required to use the `go get` command:
https://golang.org/doc/code.html#GOPATH

You may wish to add the GOROOT-based install location to your PATH:
export PATH=$PATH:/usr/local/opt/go/libexec/bin
==> Summary
/usr/local/Cellar/go/1.7.5: 6,440 files, 250.8M
当然,也可以直接从https://golang.org/dl/下载Go的安装包,并安装在/usr/local目录
3.创建本地的repo。应用Go命令把newt拷贝到本地,请耐心等待,需要花费几分钟。在等待过程中,可以检查安装的目录以确认安装在进行
$ go get mynewt.apache.org/newt/...
检查安装的文件
$ ls $GOPATH/src/mynewt.apache.org/newt
DISCLAIMER  LICENSE     README.md   build.sh    newtmgr     util        yaml
INSTALLING.md   NOTICE  RELEASE_NOTES.md    newt    newtvm      viper
4.编译newt工具。应用Go运行newt.go程序以编译newt工具,命令go install 编译并创建其可执行的结果文件newt,并最后安装到$GOPATH/bin目录
$ cd $GOPATH/src/mynewt.apache.org/newt/newt
$ go install
$ ls "$GOPATH"/bin/
newt    newtmgr newtvm
到了这一步,就可以应用newt命令了。例如,可以应用命令“newt version”得到其版本号,也可以用命令“newt -h”得到帮助信息以了解更多的命令选项
$ newt version
Apache Newt (incubating) version: 1.0.0-dev
$ newt -h
Newt allows you to create your own embedded application based on the Mynewt
operating system. Newt provides both build and package management in a single
tool, which allows you to compose an embedded application, and set of projects,
and then build the necessary artifacts from those projects. For more information
on the Mynewt operating system, please visit https://mynewt.apache.org/.

Please use the newt help command, and specify the name of the command you want
help for, for help on how to use a specific command

Usage:
  newt [flags]
  newt [command]

Examples:
  newt
  newt help [<command-name>]
For help on <command-name>.  If not specified, print this message.

Available Commands:
  build        Builds one or more targets.
  clean        Deletes build artifacts for one or more targets.
  complete     Performs Bash Autocompletion (-C)
  create-image Add image header to target binary
  debug        Open debugger session to target
  info         Show project info
  install      Install project dependencies
  load         Load built target to board
  mfg          Manufacturing flash image commands
  new          Create a new project
  pkg          Create and manage packages in the current workspace
  run          build/create-image/download/debug <target>
  size         Size of target components
  sync         Synchronize project dependencies
  target       Command for manipulating targets
  test         Executes unit tests for one or more packages
  upgrade      Upgrade project dependencies
  vals         Displays valid values for the specified element type(s)
  version      Display the Newt version number.

Flags:
  -j, --jobs int          Number of concurrent build jobs (default 1)
  -l, --loglevel string   Log level (default "WARN")
  -o, --outfile string    Filename to tee output to
  -q, --quiet             Be quiet; only display error output
  -s, --silent            Be silent; don't output anything
  -v, --verbose           Enable verbose output when executing commands

Use "newt [command] --help" for more information about a command.
6.更新newt工具。更新newt工具包含如下步骤
根据如下命令更新newt工具
$ cd $GOPATH/src/mynewt.apache.org/newt
$ git pull
$ cd newt
$ go install
$ cd ../newtmgr
$ go install
$ cd ../newtvm
$ go install
$ ls "$GOPATH"/bin/
  newt newtmgr newtvm
这就把工具newt,newtmgr和newtvm更新到最新版本。
在电脑上安装好工具链后,就可以用电脑和运行Mynewt操作系统的基于ARM的硬件进行直接交互,例如可以直接在电脑上进行应用程序调试。
1.安装工具链。安装好PX4工具链并检查安装好的版本。ARM维护一个已经编译好的针对嵌入式ARM处理器(包括Cortex-R和Cortex-M系列处理器)的GCC工具链。安装完成后,要确保用Homebrew安装的符号连接是连接于正确的调试器版本。
$ brew tap PX4/homebrew-px4
$ brew update
$ brew install gcc-arm-none-eabi-49
==> Installing gcc-arm-none-eabi-49 from px4/px4
==> Downloading https://launchpad.net/gcc-arm-embedded/4.9/4.9-2015-q3-update
/+download/gcc-arm-none-eabi-4_9-2015q3-20150921-mac.tar.bz2
==> Downloading from https://launchpadlibrarian.net/218827447
/gcc-arm-none-eabi-4_9-2015q3-20150921-mac.tar.bz2
######################################################################## 100.0%
==> Copying binaries...
==> cp -rv arm-none-eabi bin lib share
/usr/local/Cellar/gcc-arm-none-eabi-49/20150925/
/usr/local/Cellar/gcc-arm-none-eabi-49/20150925:
 4,945 files, 324.9M, built in 16 minutes 46 seconds
$ /usr/local/bin/arm-none-eabi-gcc --version
arm-none-eabi-gcc (GNU Tools for ARM Embedded Processors) 4.9.3 20150529 (release)
 [ARM/embedded-4_9-branch revision 227977]
Copyright (C) 2014 Free Software Foundation, Inc.
This is free software; see the source for copying conditions.  There is NO
warranty; not even for MERCHANTABILITY or FITNESS FOR A PARTICULAR PURPOSE.
$ ls -al /usr/local/bin/arm-none-eabi-gdb
lrwxr-xr-x  1 jiachengwang  admin  61  2  3 12:14 /usr/local/bin/arm-none-eabi-gdb
 -> ../Cellar/gcc-arm-none-eabi-49/20150925/bin/arm-none-eabi-gdb
注:如果没有明确指明安装的版本号,brew就安装最新的版本。Mynewt操作系统的最终目标是能够应用包括最新的版本在内的多版本工具链,但是目前的源代码仅在这个版本的交叉编译工具链上测试完成,所以作为开始使用的出发点,推荐使用这个版本。
OpenOCD (Open On-Chip Debugger) 是一个开源软件,使得可以使用电脑通过JTAG调试连接器和各种硬件开发板进行交互。而JTAG连接可以调试和测试各种嵌入式设备,关于OpenOCD的更进一步信息,可以参考 http://openocd.org。
$ brew install open-ocd
$ which openocd
/usr/local/bin/openocd
$ ls -l $(which openocd)
lrwxr-xr-x  1 jiachengwang  admin  36 11  5 11:08 /usr/local/bin/openocd ->
 ../Cellar/open-ocd/0.9.0/bin/openocd
在后面运行Mynewt程序时将应用到串口通信和开发板进行交互。由于串口通信是作为一个通信接口已经使用很长一段时间,几乎所有的现代电脑上都已经没有串口通信接口了。但是,在nRF52开发板PCA10040上,有一个USB转串口的接口,把nRF52开发板通过USB线缆连接上电脑的USB接口后,就可以在电脑上有一个虚拟的串口通信接口。
在macOS中,把nRF52开发板通过USB线缆连接电脑后,可以应用串口通信程序如picocom等和nRF52开发板建立串口通信连接,也可以在终端控制台应用macOS的内建命令“screen”建立串口通信连接。
无论是应用内建命令screen还是串口通信程序picocom,首先需要知道建立连接的串口通信设备号。当nRF52开发板连接上电脑的USB后,通过如下的命令可以查看串口通信设备号
$ ls -la /dev/*usb*
crw-rw-rw-  1 root  wheel   20,  31  2  3 23:20 /dev/cu.usbmodem14111
crw-rw-rw-  1 root  wheel   20,  30  2  4 00:41 /dev/tty.usbmodem14111
串口通信设备号就是/dev/tty.usbmodem14111,其中数字“14111”在每次的连接中可能不同,也可能相同。通过如下命令就可以建立连接
$ screen /dev/tty.usbmodem14111 115200
要退出screen,需要按键control-A后紧跟按键control-,就退回到终端控制台。
$ screen /dev/tty.usbmodem14111 115200
[screen is terminating]
$
如果要使用串口通信程序picocom,通过如下命令就可以建立连接
$ picocom -b 115200 /dev/tty.usbmodem14111
picocom v1.6
port is        : /dev/tty.usbmodem14111
flowcontrol    : none
baudrate is    : 115200
parity is      : none
databits are   : 8
escape is      : C-a
local echo is  : no
noinit is      : no
noreset is     : no
nolock is      : no
send_cmd is    : sz -vv
receive_cmd is : rz -vv
imap is        :
omap is        :
emap is        : crcrlf,delbs,

Terminal ready
要退出picocom,按键control-A后紧跟按键control-X,就退回到终端控制台。
...
emap is        : crcrlf,delbs,

Terminal ready
...

Thanks for using picocom
$
当nRF52开发板和电脑建立串口通信连接后,在后面的BLE应用程序中,就可以通过电脑的终端控制台,得到一些BLE的连接请求、配对等信息。
准备好开发环境后,就可以在nRF52开发板PCA10040上运行Mynewt操作系统和LED灯闪烁应用程序blinky。
通过Mynewt操作系统的应用程序repo程序包,在nRF52开发板上创建第一个“hello world”应用程序(LED灯闪烁应用程序)。应用newt工具创建一个应用程序开发的工程(project),该工程包含有Mynewt操作系统以及一个简单的应用程序blinky,并应用newt工具编译应用程序后,就可以下载到nRF52开发板上运行使得LED灯闪烁。
为了和nRF52开发板上的SEGGER J-Link调试器进行通信,就需要下载 J-Link GDB服务器软件并安装在电脑上,可以从https://www.segger.com/jlink-software.html的“Software and documentation pack for Mac OS X”下载。
根据如下步骤创建一个工程
$ cd ~/dev
$ newt new myproj
Downloading project skeleton from apache/incubator-mynewt-blinky...
Installing skeleton in myproj...
Project myproj successfully created.
$ cd myproj
$ newt install -v
apache-mynewt-core
Downloading repository description for apache-mynewt-core...
success!
Downloading repository incubator-mynewt-core
 (branch: master; commit: mynewt_1_0_0_b1_tag) at
https://github.com/apache/incubator-mynewt-core.git
/newt-repo748636054'...
remote: Counting objects: 51116, done.
remote: Compressing objects: 100% (230/230), done.
remote: Total 51116 (delta 79), reused 0 (delta 0), pack-reused 50873
Receiving objects: 100% (51116/51116), 75.26 MiB | 164.00 KiB/s, done.
Resolving deltas: 100% (30413/30413), done.
apache-mynewt-core successfully installed version 0.9.9-none
创建2个目标,一个是引导装载程序(Bootloader),一个是nRF52开发板的运行程序blinky。
$ newt target create blink_nordic
Target targets/blink_nordic successfully created
$ newt target set blink_nordic app=apps/blinky
Target targets/blink_nordic successfully set target.app to apps/blinky
$ newt target set blink_nordic bsp=@apache-mynewt-core/hw/bsp/nrf52dk
Target targets/blink_nordic successfully set target.bsp to
@apache-mynewt-core/hw/bsp/nrf52dk
$ newt target set blink_nordic build_profile=debug
Target targets/blink_nordic successfully set target.build_profile to debug

$ newt target create nrf52_boot
Target targets/nrf52_boot successfully created
$ newt target set nrf52_boot app=@apache-mynewt-core/apps/boot
Target targets/nrf52_boot successfully set target.app
@apache-mynewt-core/apps/boot
$ newt target set nrf52_boot bsp=@apache-mynewt-core/hw/bsp/nrf52dk
Target targets/nrf52_boot successfully set target.bsp to
@apache-mynewt-core/hw/bsp/nrf52dk
$ newt target set nrf52_boot build_profile=optimized
Target targets/nrf52_boot successfully set target.build_profile to optimized

$ newt target show
targets/blink_nordic
    app=apps/blinky
    bsp=@apache-mynewt-core/hw/bsp/nrf52dk
    build_profile=debug
targets/my_blinky_sim
    app=apps/blinky
    bsp=@apache-mynewt-core/hw/bsp/native
    build_profile=debug
targets/nrf52_boot
    app=@apache-mynewt-core/apps/boot
    bsp=@apache-mynewt-core/hw/bsp/nrf52dk
    build_profile=optimized
$ newt build nrf52_boot
Building target targets/nrf52_boot
Compiling boot.c
Archiving boot.a
...
Linking /Users/jiachengwang/dev/myproj/bin/targets/nrf52_boot/app/apps/boot
/boot.elf
Target successfully built: targets/nrf52_boot

$ newt build blink_nordic
Building target targets/blink_nordic
Compiling main.c
Archiving blinky.a
...
Linking /Users/jiachengwang/dev/myproj/bin/targets/blink_nordic/app/apps/blinky
/blinky.elf
Target successfully built: targets/blink_nordic
要应用newt工具下载应用程序到目标开发板,需要对应用程序的镜像文件进行版本号签名。可以应用newt工具的“create-image”命令,并且版本号可以的任意的(例如,1.0.0)。
$ newt create-image blink_nordic 1.0.0
Archiving nordic.a
App image succesfully generated:
/Users/jiachengwang/dev/myproj/bin/targets/blink_nordic/app/apps/blinky/blinky.img
用USB线缆连接开发板和电脑的USB接口。
首先下载引导装载程序nrf52_boot,再下载LED灯闪烁的应用程序镜像blink_nordic到开发板。如果LED灯没有开始闪烁,重置(reset)一下开发板,即按一下nRF52开发板的reset按键,或者断开和电脑的USB连接后再重新连接。
$ newt -v load nrf52_boot
Loading bootloader
Load command: BOOT_LOADER="1" FEATURES="BASELIBC_PRESENT BOOT_LOADER BSP_NRF52
OS_CPUTIME_FREQ SANITY_INTERVAL SPI_0_MASTER_SS_PIN SPI_1_MASTER_SS_PIN TIMER_0
FLASH_OFFSET="0x0" IMAGE_SLOT="0" CORE_PATH="/Users/jiachengwang/dev/myproj
/apache-mynewt-core/hw/bsp/nrf52dk" BIN_BASENAME="/Users/jiachengwang/dev/myproj
/bin/targets/nrf52_boot/app/apps/boot/boot"  /Users/jiachengwang/dev/myproj/repos
/myproj/repos/apache-mynewt-core/hw/bsp/nrf52dk /Users/jiachengwang/dev/myproj
/bin/targets/nrf52_boot/app/apps/boot/boot
Successfully loaded image.
Successfully loaded image.

$ newt -v load blink_nordic
Loading app image into slot 1
Load command: FEATURES="BASELIBC_PRESENT BSP_NRF52 CLOCK_FREQ CONSOLE_BAUD
FLASH_MAP_MAX_AREAS MSYS_1_BLOCK_COUNT MSYS_1_BLOCK_SIZE OS_CPUTIME_FREQ
UART_0_PIN_RTS UART_0_PIN_RX UART_0_PIN_TX WATCHDOG_INTERVAL XTAL_32768"
/repos/apache-mynewt-core" BSP_PATH="/Users/jiachengwang/dev/myproj/repos
/targets/blink_nordic/app/apps/blinky/blinky"  /Users/jiachengwang/dev/myproj
/dev/myproj/repos/apache-mynewt-core/hw/bsp/nrf52dk /Users/jiachengwang/dev
/myproj/bin/targets/blink_nordic/app/apps/blinky/blinky
Successfully loaded image.
Successfully loaded image.
注:如果要擦除开发板的闪存并重新下载镜像文件,可以应用JLinkExe的“erase”命令
$ JLinkExe -device nRF52 -speed 4000 -if SWD
SEGGER J-Link Commander V5.02d ('?' for help)
Compiled Sep 18 2015 20:26:23
Info: Device "NRF52" selected.
DLL version V5.02d, compiled Sep 18 2015 20:26:17
Firmware: J-Link OB-SAM3U128-V2-NordicSemi compiled Aug 28 2015 19:26:24
Hardware: V1.00
S/N: 682105491
Emulator has Trace capability
VTarget = 3.300V
Info: Found SWD-DP with ID 0x2BA01477
Info: Found Cortex-M4 r0p1, Little endian.
Info: FPUnit: 6 code (BP) slots and 2 literal slots
Info: CoreSight components:
Info: ROMTbl 0 @ E00FF000
Info: ROMTbl 0 [0]: FFF0F000, CID: B105E00D, PID: 000BB00C SCS
Info: ROMTbl 0 [1]: FFF02000, CID: B105E00D, PID: 003BB002 DWT
Info: ROMTbl 0 [2]: FFF03000, CID: B105E00D, PID: 002BB003 FPB
Info: ROMTbl 0 [3]: FFF01000, CID: B105E00D, PID: 003BB001 ITM
Info: ROMTbl 0 [4]: FFF41000, CID: B105900D, PID: 000BB925 ETM
Info: ROMTbl 0 [5]: FFF42000, CID: B105900D, PID: 003BB923 TPIU-Lite
Info: ROMTbl 0 [6]: F0000000, CID: 00000000, PID: 00000000 ???
Cortex-M4 identified.
Target interface speed: 1000 kHz
J-Link>erase
Erasing device (nRF52)...
Info: J-Link: Flash download: Only internal flash banks will be erased.
To enable erasing of other flash banks like QSPI or CFI, it needs to be enabled
via "exec EnableEraseAllFlashBanks"
 0.000s, Erase: 0.263s, Program: 0.000s, Verify: 0.000s, Restore: 0.009s)
Erasing done.
通过以上步骤,创建、设置、编译了在nRF52开发板PCA10040上的LED灯闪烁的应用程序blinky,并进一步把镜像文件下载到开发板进行运行该程序,使得开发板上的LED灯开始闪烁。
BLE外设(Peripheral)应用程序bleprph实现了一个BLE外围设备的如下功能:
准备好BLE中心设备的应用程序App,使得运行BLE外设应用程序bleprph 的nRF52开发板能够连接上。在macOS或者iOS上,应用LightBlue,就可以扫描到BLE外设并连接上。
通过如下步骤创建、设置、编译、下载并运行BLE外设应用程序bleprph
$ newt target create myperiph
Target targets/myperiph successfully created
$ newt target set myperiph bsp=@apache-mynewt-core/hw/bsp/nrf52dk
Target targets/myperiph successfully set target.bsp to @apache-mynewt-core/hw/bsp
/nrf52dk
$ newt target set myperiph app=@apache-mynewt-core/apps/bleprph
Target targets/myperiph successfully set target.app to @apache-mynewt-core/apps
/bleprph
$ newt target set myperiph build_profile=optimized
Target targets/myperiph successfully set target.build_profile to optimized
$ newt build myperiph
Building target targets/myperiph
Compiling gatt_svr.c
Compiling main.c
...
Linking /Users/jiachengwang/dev/myproj/bin/targets/myperiph/app/apps/bleprph
/bleprph.elf
Target successfully built: targets/myperiph
$ newt create-image myperiph 1.0.0
...
Linking /Users/jiachengwang/dev/myproj/bin/targets/myperiph/app/apps/bleprph
/bleprph.elf
App image succesfully generated:
/Users/jiachengwang/dev/myproj/bin/targets/myperiph/app/apps/bleprph/bleprph.img
$ newt load nrf52_boot
Loading bootloader
$ newt load myperiph
Loading app image into slot 1
注:在下载程序到开发板之前,和前面的LED灯闪烁应用程序一样,如果要擦除开发板的闪存,可以应用JLinkExe的“erase”命令。
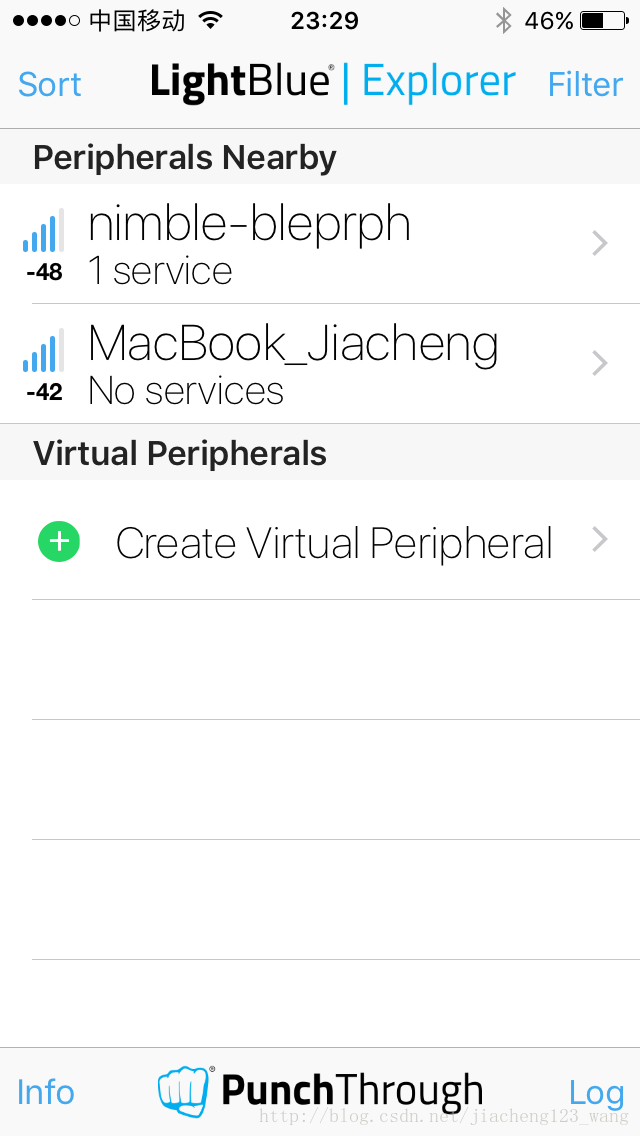
现在,可以重置一下开发板,运行BLE中心设备的应用程序LightBlue,就可以扫描到一个名为“nimble-bleprph”的BLE外设。
现在已经看见了BLE外设设备,就可以和其广播服务进行交互。点击设备名就可以建立连接。
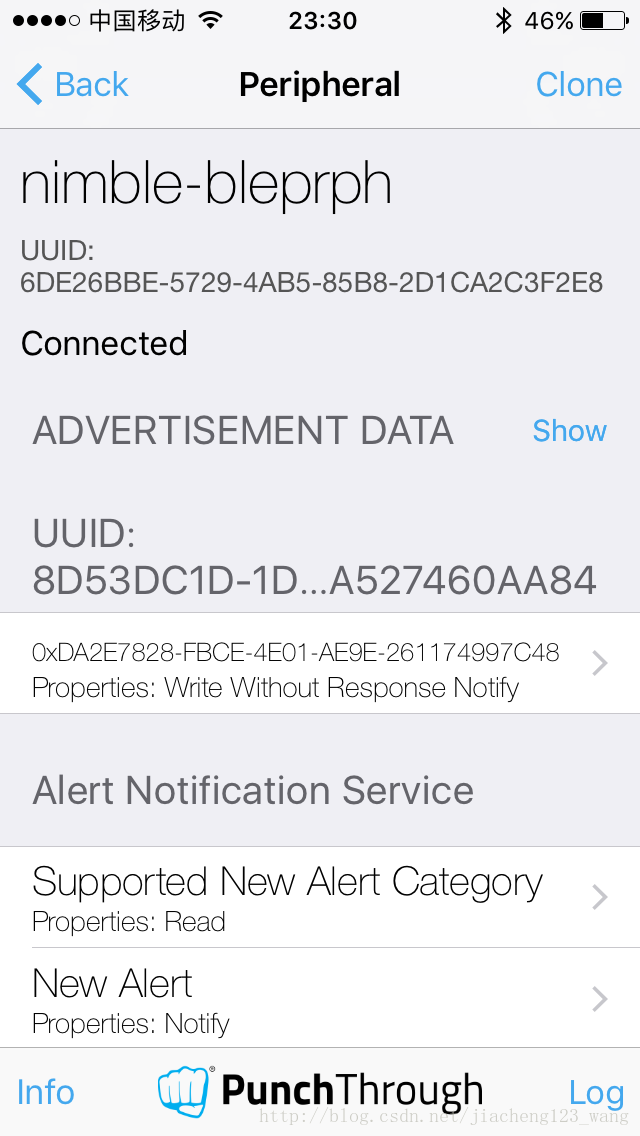
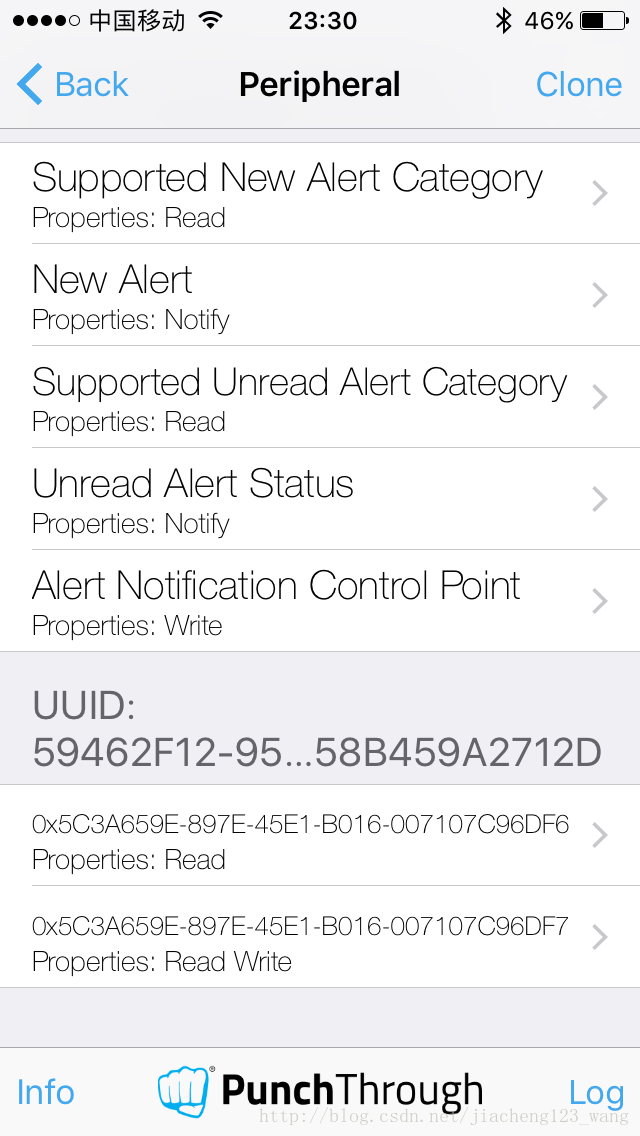
就这样建立起了BLE连接,并看到了其广播的服务。向下滚到底部,就可以看到读特征(Read Characteristic),以及读/写特征(Read/Write Characteristic)
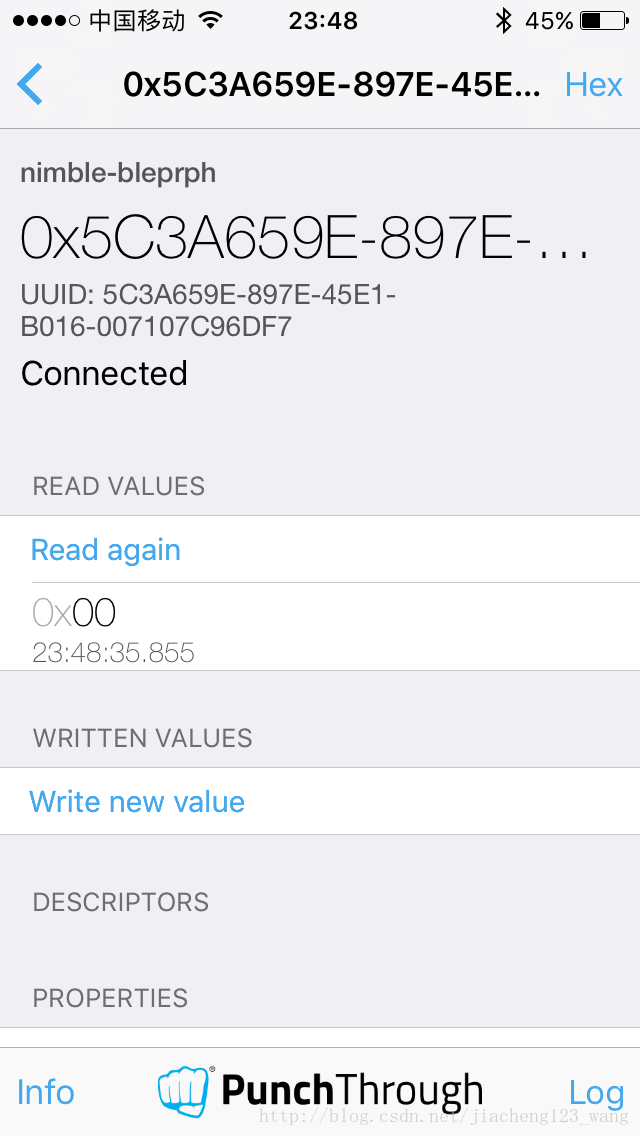
点击读/写特征就可以看见现有的值
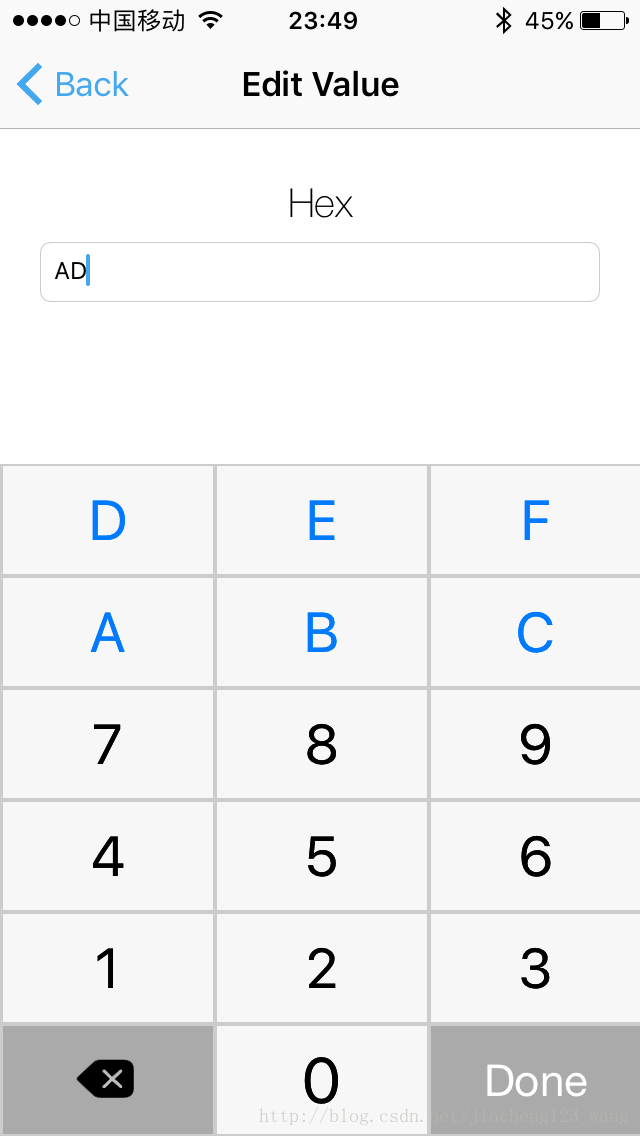
写入一个新的值
就可以看见刚刚写入的新值
如果电脑的命令行终端控制台通过串口通信程序screen或者picocom连接上nRF52开发板,可以在控制台看到在开发板上的BLE连接请求、配对等输出信息如下
289546:[ts=2262078120ssb, mod=64 level=1] connection established; status=0
handle=1 our_ota_addr_type=0 our_ota_addr=0a:0a:0a:0a:0a:0a our_id_addr_type=0
peer_id_addr_type=1 peer_id_addr=42:6b:bb:c8:ba:dd conn_itvl=24 conn_latency=0
supervision_timeout=72 encrypted=0 authenticated=0 bonded=0
289556:[ts=2262156240ssb, mod=64 level=1] mtu=185
289628:[ts=2262718704ssb, mod=64 level=1] subscribe event; conn_handle=1
attr_handle=14 reason=1 prevn=0 curn=0 previ=0 curi=1
292082:[ts=2281890568ssb, mod=64 level=1] encryption change event; status=0
our_id_addr=0a:0a:0a:0a:0a:0a peer_ota_addr_type=1 peer_ota_addr=42:6b:bb:c8:ba:dd
supervision_timeout=72 encrypted=1 authenticated=0 bonded=1
292092:[ts=2281968688ssb, mod=64 level=1]
就这样,通过设置好电脑上的开发环境,并创建、设置、编译了在nRF52832开发板PCA10040上的LED灯闪烁应用程序blinky以及BLE外设应用程序bleprph,下载到开发板,并成功运行,初步了解如何使用开源IoT操作系统Mynewt和BLE协议栈NimBLE。
如果觉得我的文章对您有用,请随意打赏。你的支持将鼓励我继续创作!