社区微信群开通啦,扫一扫抢先加入社区官方微信群

社区微信群
项目当中,我们可能因为一些需求,去修改其中的一个方法,因此需要切面编程。
切面有两种代理方式:
1.jdk动态代理(只能修改接口中的方法)
2.cglib代理(只能修改类中的方法)
项目源码:https://gitee.com/jia_xing_lao/springAop
首先写个类,随便写两个方法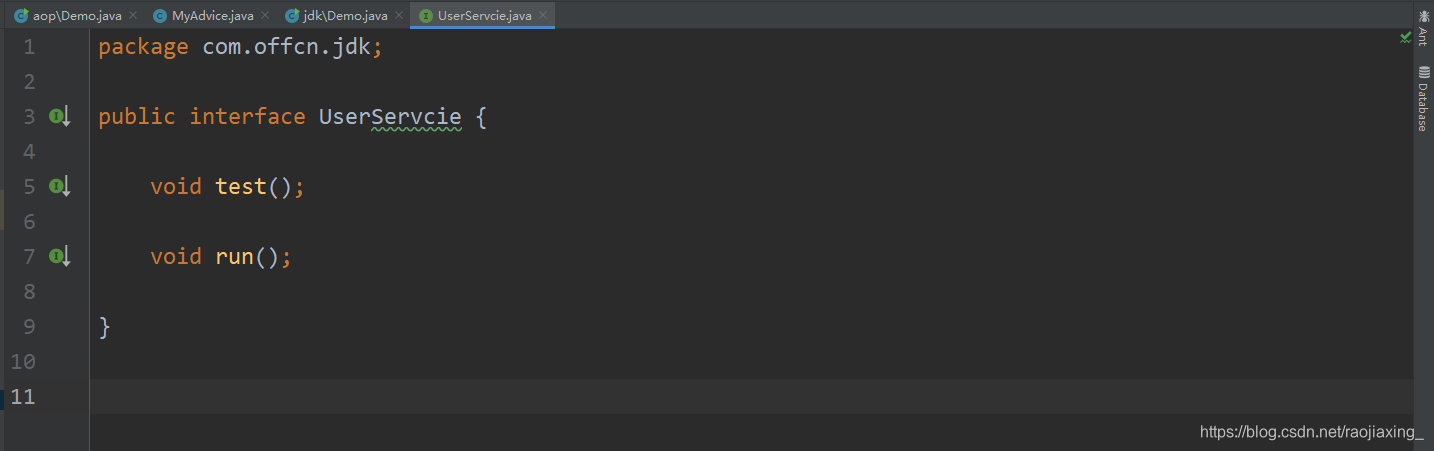
写一个接口类去实现: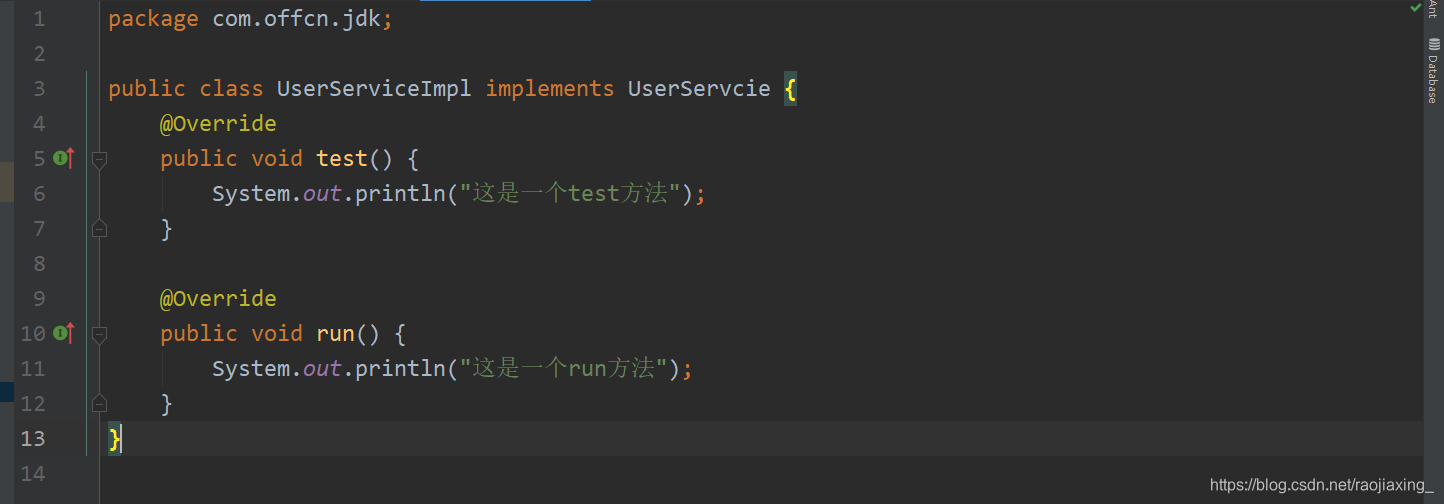
写一个JDK代理类: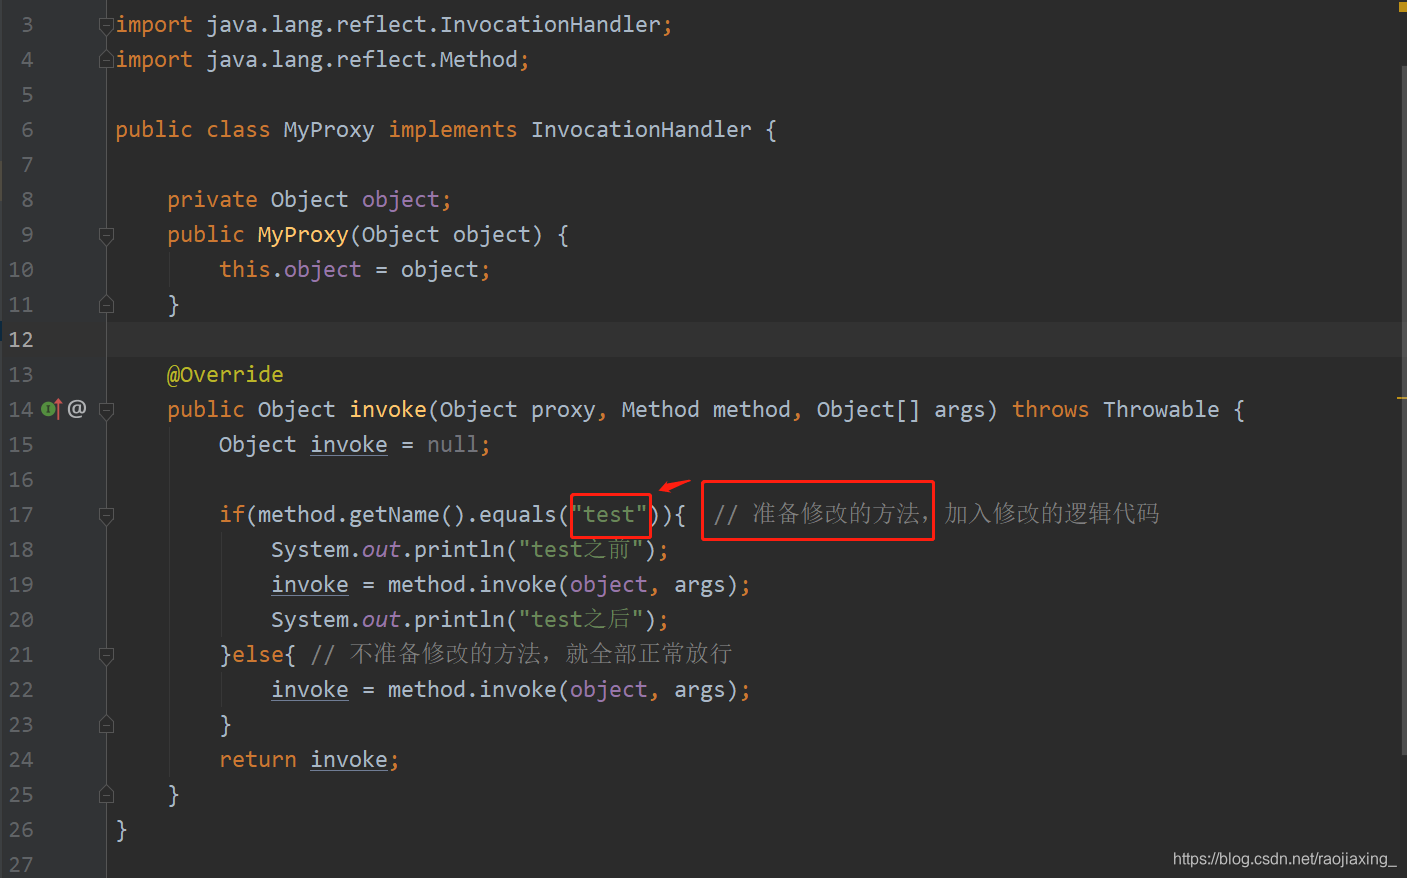
进行测试:
测试结果: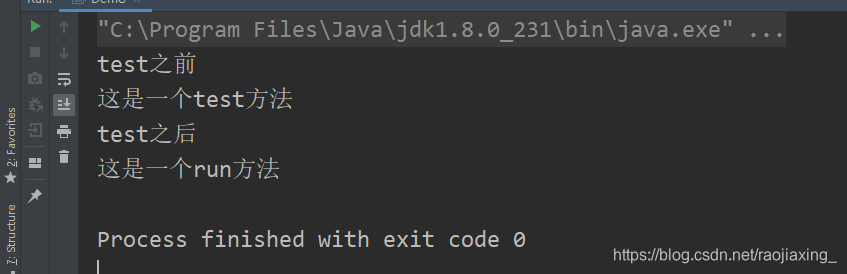
首先写个类,随便写两个方法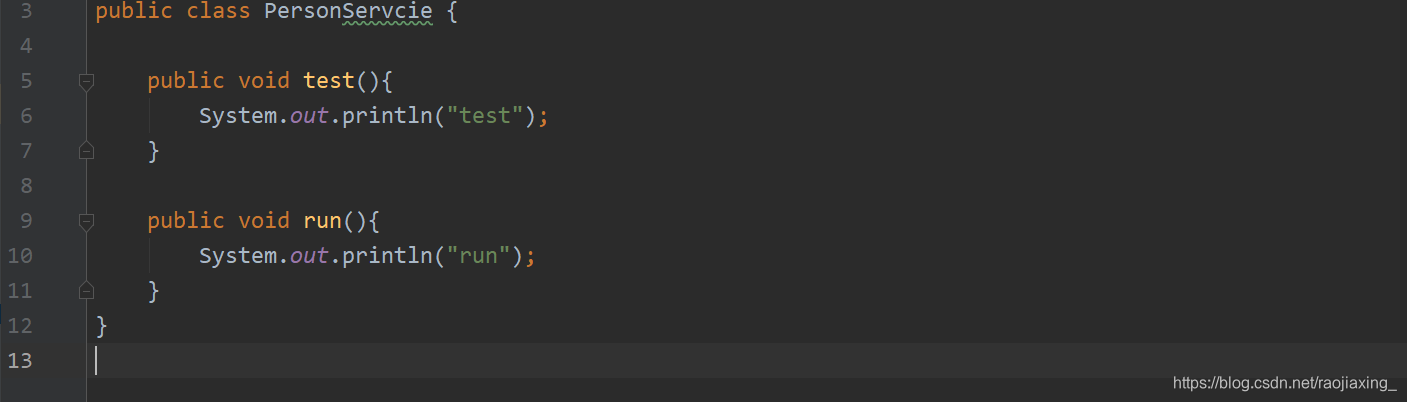
写一个cglib代理类:
测试: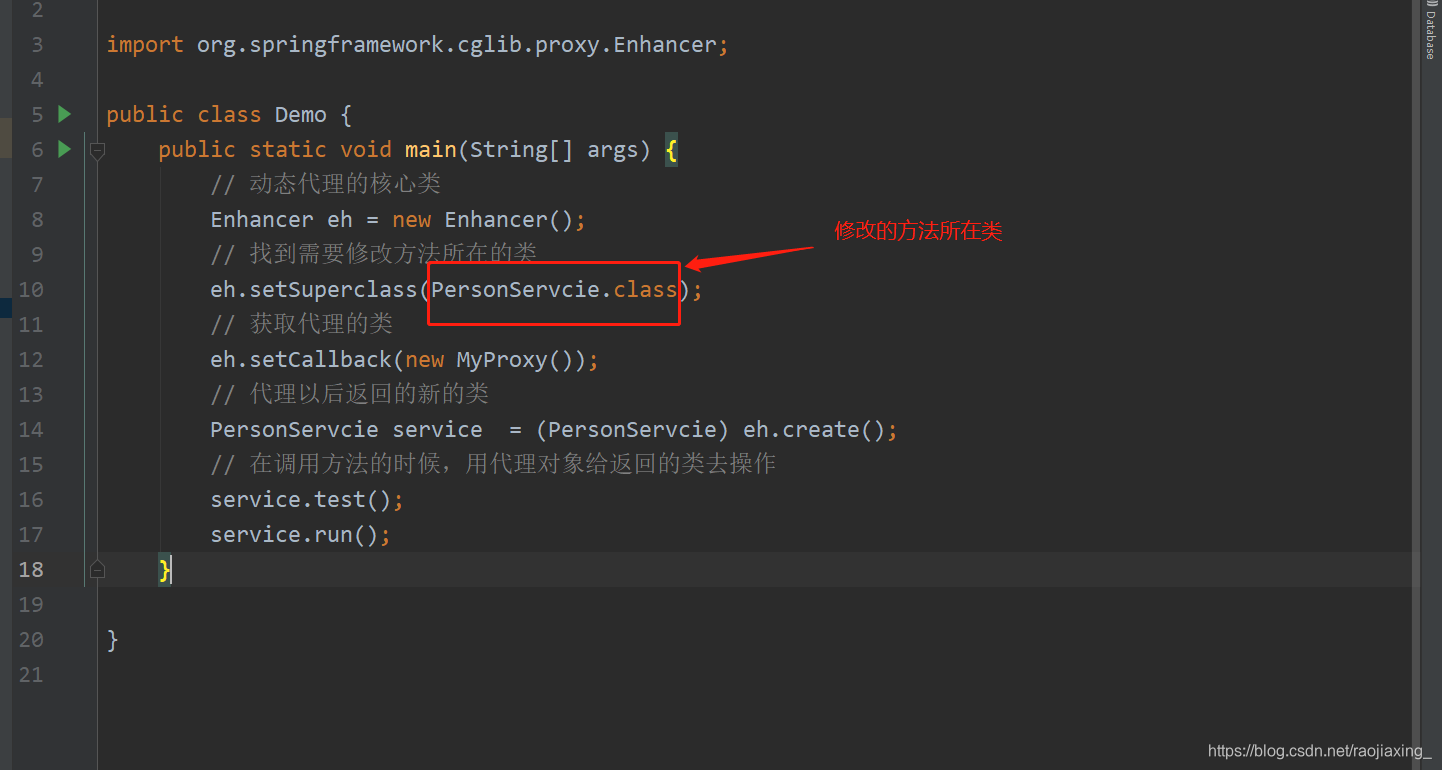
测试结果: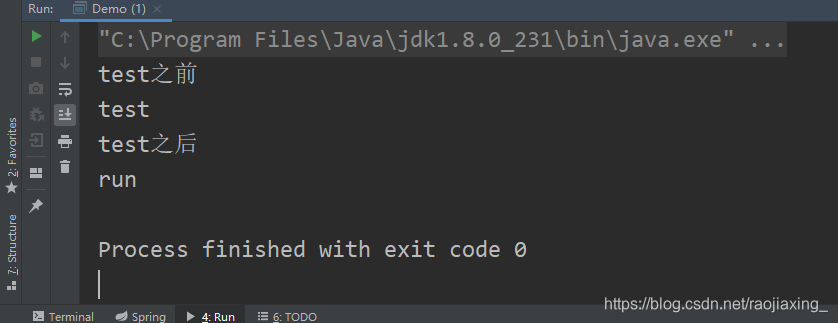
名词解释:
JoinPoint(连接点) 在需要修改的类中,将要修改的方法
PointCut(切入点) 在需要修改的类中,已经修改过的方法
Advice(通知) 在原有的功能上新添加的功能
aspect(增强) 在原有的功能上新添加的功能
Target(目标对象) 被代理的对象
weaving(织入) 增强代码的过程
第一步:
导入jar包。
第二步:
写一个目标类。
import com.offcn.service.AopService;

public class AopServiceImpl implements AopService {
    @Override
    public void save() {
        int i = 10;
        int j  = i / 0;
        System.out.println("这是一个save方法");
    }

    @Override
    public void update() {

        System.out.println("这是一个update方法");

    }

    @Override
    public void delete() {

        System.out.println("这是一个delete方法");
    }

    @Override
    public void test() {

        System.out.println("这是一个test方法");
    }
}
写一个通知类:
import org.aspectj.lang.ProceedingJoinPoint;

public class MyAdvice {
    /**
     * 在对方法进行增强的时候,有几种方式可以进行增强
     * 前置通知(在原来的代码之前新增功能)
     * 后置通知(在原来的代码之后新增功能)
     * 环绕通知(在原来的代码的前后都新增功能)
     * 异常通知(在原来的代码出现异常的时候,才能添加新的功能)
     */

    void before(){
        System.out.println("前置通知");
    }

    void after(){
        System.out.println("后置通知");
    }

    Object huanrao(ProceedingJoinPoint pjp) throws Throwable {
        System.out.println("环绕的头");
        Object proceed = pjp.proceed();
        System.out.println("环绕的结束");
        return  proceed;
    }

    void excep(){
        System.out.println("异常通知");
    }
}
第三步:
写配置文件。
<?xml version="1.0" encoding="UTF-8"?>
<beans xmlns="http://www.springframework.org/schema/beans"
       xmlns:context="http://www.springframework.org/schema/context" xmlns:p="http://www.springframework.org/schema/p"
       xmlns:aop="http://www.springframework.org/schema/aop" xmlns:tx="http://www.springframework.org/schema/tx"
       xmlns:xsi="http://www.w3.org/2001/XMLSchema-instance"
       xsi:schemaLocation="http://www.springframework.org/schema/beans http://www.springframework.org/schema/beans/spring-beans-4.2.xsd
	http://www.springframework.org/schema/context http://www.springframework.org/schema/context/spring-context-4.2.xsd
	http://www.springframework.org/schema/aop http://www.springframework.org/schema/aop/spring-aop-4.2.xsd http://www.springframework.org/schema/tx http://www.springframework.org/schema/tx/spring-tx-4.2.xsd
	http://www.springframework.org/schema/util http://www.springframework.org/schema/util/spring-util-4.2.xsd">


    <!--创建AopService对象-->
    <bean id="aopService" class="com.offcn.service.impl.AopServiceImpl"></bean>
    <!--创建通知类对象-->
    <bean id="myAdvice" class="com.offcn.aop.MyAdvice"></bean>
    <!--配置增强aop-->
    <aop:config>
        <aop:pointcut id="pc" expression="execution(* com.offcn.service.impl.AopServiceImpl.delete(..))"></aop:pointcut>
        <aop:aspect ref="myAdvice">
            <aop:before method="before" pointcut-ref="pc"></aop:before>
            <aop:after method="after" pointcut-ref="pc"></aop:after>
            <aop:around method="huanrao" pointcut-ref="pc"></aop:around>
            <aop:after-throwing method="excep" pointcut-ref="pc"></aop:after-throwing>
        </aop:aspect>
    </aop:config>

</beans>
切入点表达式的规范:
execution();
修饰符   可以省略不写
方法的返回值    不能省略但是可以用*表示
目标类所在的包  不能省略,但是可以用*   *..*
目标类的名称    不能省略但是可以用*
方法名          不能省略但是可以用*
方法的参数      用..带表示
第四步:
测试
package com.offcn.aop;

/**
    测试springAop切面编程
 **/

import com.offcn.service.AopService;
import org.springframework.context.support.ClassPathXmlApplicationContext;

public class Demo {
    public static void main(String[] args) {
        ClassPathXmlApplicationContext app = new ClassPathXmlApplicationContext("applicationContext.xml");
        AopService service = (AopService) app.getBean("aopService");
//        service.save();
        service.delete();
    }
}
测试结果: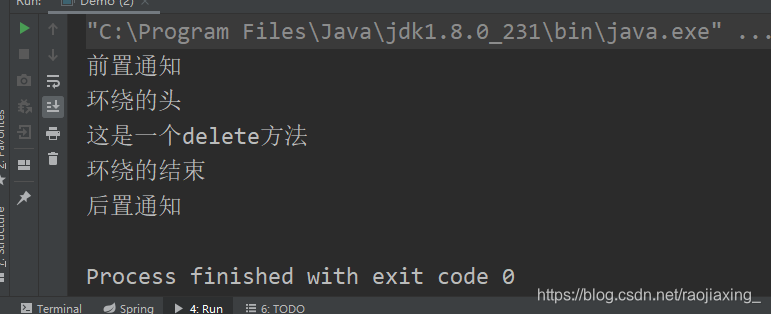
写一个实现类接口
package com.offcn.aopZhujie;

public class UserServiceImpl  implements UserService{
    @Override
    public void save() {

        System.out.println("sava");
    }

    @Override
    public void dele() {

        System.out.println("test");
    }
}
写通知类:
package com.offcn.aopZhujie;

import org.aspectj.lang.annotation.*;
import org.springframework.stereotype.Component;

@Aspect  //开启注解
public class AopAdvice {

    @Before("execution(* com.offcn.aopZhujie.UserServiceImpl.save(..))")
    void before(){
        System.out.println("前置通知");
    }

    @After("execution(* com.offcn.aopZhujie.UserServiceImpl.save(..))")
    void after(){
        System.out.println("后置通知");
    }

}
写配置文件:
<?xml version="1.0" encoding="UTF-8"?>
<beans xmlns="http://www.springframework.org/schema/beans"
       xmlns:context="http://www.springframework.org/schema/context" xmlns:p="http://www.springframework.org/schema/p"
       xmlns:aop="http://www.springframework.org/schema/aop" xmlns:tx="http://www.springframework.org/schema/tx"
       xmlns:xsi="http://www.w3.org/2001/XMLSchema-instance"
       xsi:schemaLocation="http://www.springframework.org/schema/beans http://www.springframework.org/schema/beans/spring-beans-4.2.xsd
	http://www.springframework.org/schema/context http://www.springframework.org/schema/context/spring-context-4.2.xsd
	http://www.springframework.org/schema/aop http://www.springframework.org/schema/aop/spring-aop-4.2.xsd http://www.springframework.org/schema/tx http://www.springframework.org/schema/tx/spring-tx-4.2.xsd
	http://www.springframework.org/schema/util http://www.springframework.org/schema/util/spring-util-4.2.xsd">


    <!--创建AopService对象-->
    <bean id="userService" class="com.offcn.aopZhujie.UserServiceImpl"></bean>
    <!--创建通知类对象-->
    <bean id="myAdvice" class="com.offcn.aopZhujie.AopAdvice"></bean>
    <!--开启aop的注解-->
    <aop:aspectj-autoproxy></aop:aspectj-autoproxy>

</beans>
最后测试:
package com.offcn.aopZhujie;

import org.springframework.context.support.ClassPathXmlApplicationContext;

public class AopDemo {
    public static void main(String[] args) {
        ClassPathXmlApplicationContext app = new ClassPathXmlApplicationContext("applicationContextaop.xml");
       UserService service = (UserService) app.getBean("userService");
       service.dele();
       service.save();
    }
}
测试结果: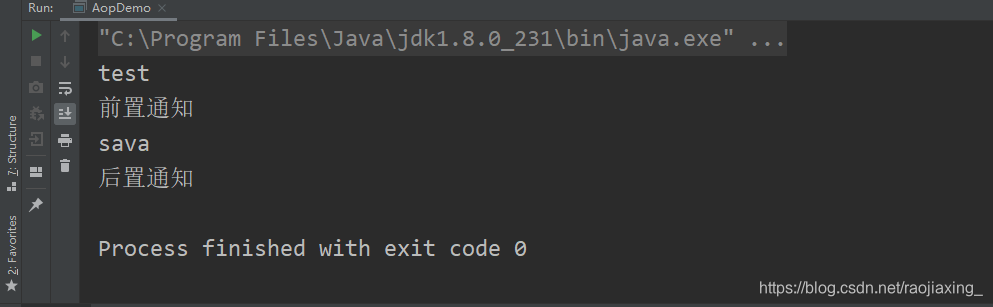
springAop注解与不使用注解的区别就在于: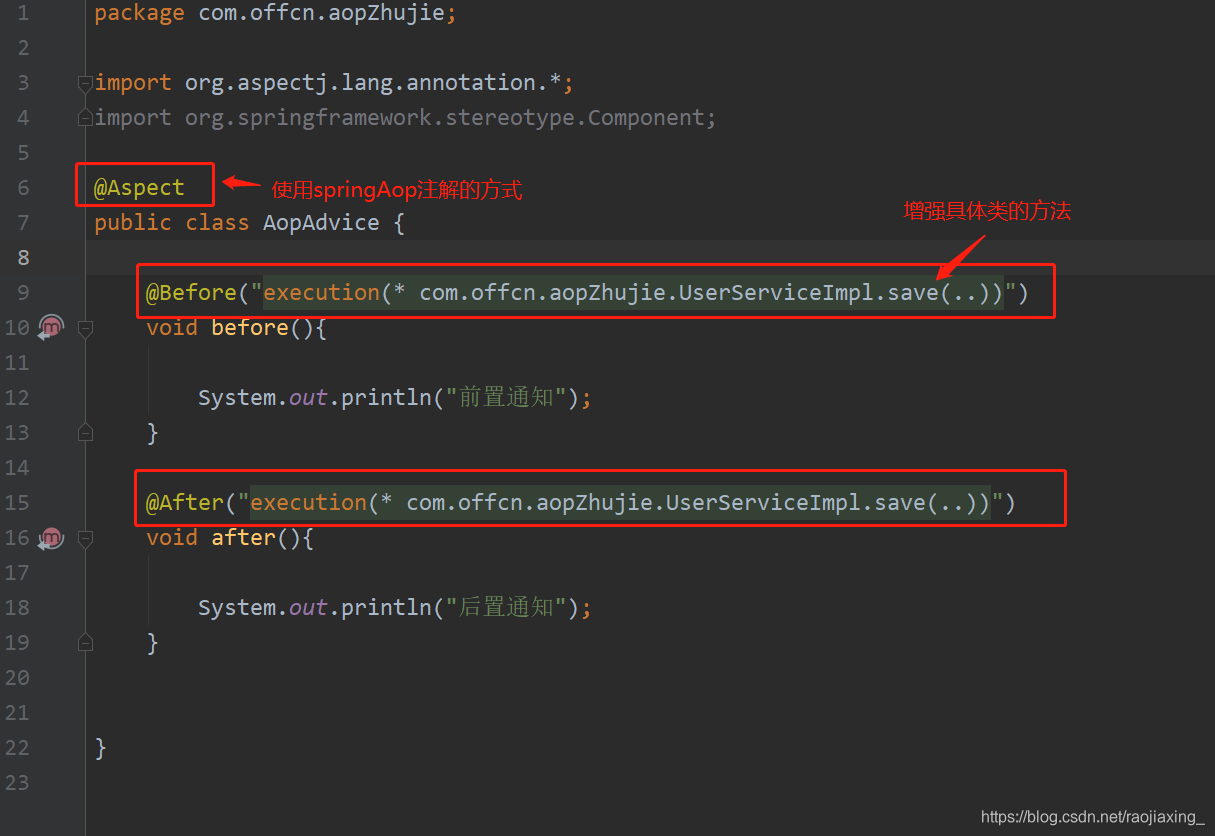
如果觉得我的文章对您有用,请随意打赏。你的支持将鼓励我继续创作!
