社区微信群开通啦,扫一扫抢先加入社区官方微信群

社区微信群
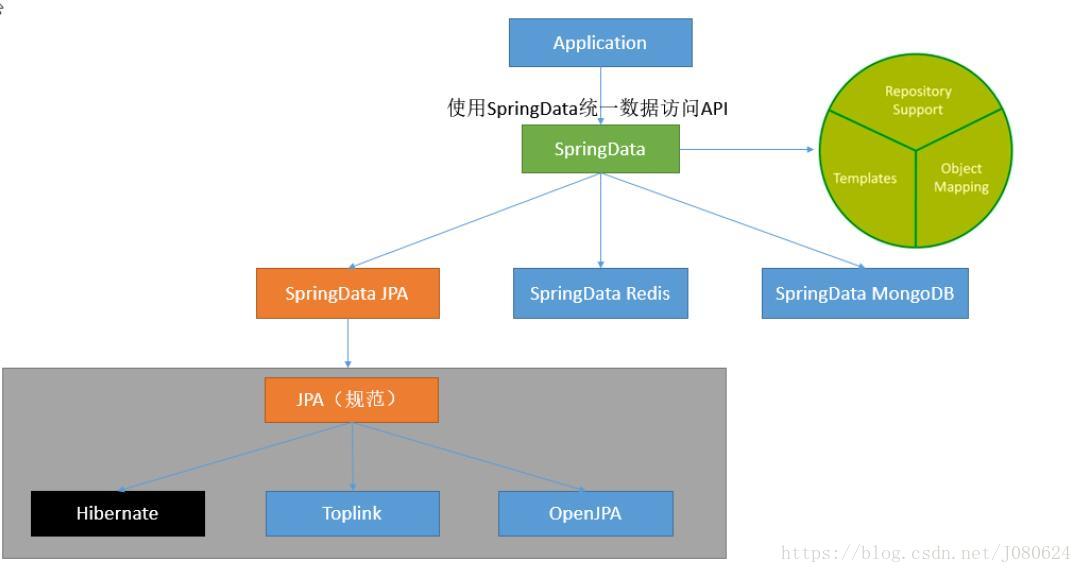
前面说过对于数据访问层,无论是SQL还是NOSQL,Spring Boot默认采用整合Spring Data的方式进行统一处理,添加大量自动配置,屏蔽了很多设置。引入各种xxxTemplate,xxxRepository来简化我们对数据访问层的操作。对我们来说只需要进行简单的设置即可。
结构示意图如下:
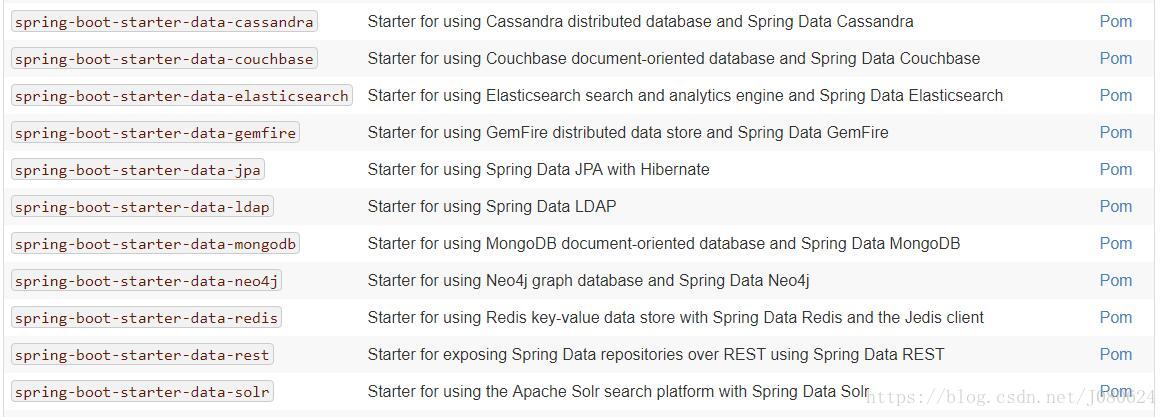
如下图所示,SpringBoot提供了许多data-starter(地址):
Spring Data 项目的目的是为了简化构建基于Spring 框架应用的数据访问技术,包括非关系数据库、Map-Reduce 框架、云数据服务等等。另外也包含对关系数据库的访问支持。
① Spring Data 包含多个子项目:
–Spring Data Commons
–Spring Data JPA
–Spring Data KeyValue
–Spring Data LDAP
–Spring Data MongoDB
–Spring Data Gemfire
–Spring Data REST
–Spring Data Redis
–Spring Data for Apache Cassandra
–Spring Data for Apache Solr
–Spring Data Couchbase (community module)
–Spring Data Elasticsearch (community module)
–Spring Data Neo4j (community module)
② SpringData特点
SpringData为我们提供使用统一的API来对数据访问层进行操作-----这主要是Spring Data Commons项目来实现的。
Spring Data Commons让我们在使用关系型或者非关系型数据访问技术时都基于Spring提供的统一标准,标准包含了CRUD(创建、获取、更新、删除)、查询、排序和分页的相关操作。
③ 统一的Repository接口
接口结构图如下:
说明如下:
Repository<T, ID extends Serializable>:统一接口

RevisionRepository<T, ID extends Serializable, N extends Number & Comparable<N>>:基于乐观锁机制

CrudRepository<T, ID extends Serializable>:基本CRUD操作

PagingAndSortingRepository<T, ID extends Serializable>:基本CRUD及分页
④ 提供数据访问模板类xxxTemplate
如:MongoTemplate、RedisTemplate等。在使用相关产品的时候通常你会遇到这些模板类。
参考博文:SpringBoot2.0整合Redis
① 定义符合规范的方法命名
按照 Spring Data 的规范,查询方法以 find | read | get开头, 涉及条件查询时,条件的属性用条件关键字连接,要注意的是:条件属性以首字母大写。
在接口中只需要声明符合规范的方法,即拥有对应的功能,如下表所示为方法中支持的关键字(官网地址):
| Keyword | Sample | JPQL snippet |
|---|---|---|
| And | findByLastnameAndFirstname | … where x.lastname = ?1 and x.firstname = ?2 |
| Or | findByLastnameOrFirstname | … where x.lastname = ?1 or x.firstname = ?2 |
| Is,Equals | findByFirstnameIs,findByFirstnameEquals | … where x.firstname = ?1 |
| Between | findByStartDateBetween | … where x.startDate between ?1 and ?2 |
| LessThan | findByAgeLessThan | … where x.age < ?1 |
| LessThanEqual | findByAgeLessThanEqual | … where x.age ⇐ ?1 |
| GreaterThan | findByAgeGreaterThan | … where x.age > ?1 |
| GreaterThanEqual | findByAgeGreaterThanEqual | … where x.age >= ?1 |
| After | findByStartDateAfter | … where x.startDate > ?1 |
| Before | findByStartDateBefore | … where x.startDate < ?1 |
| IsNull | findByAgeIsNull | … where x.age is null |
| IsNotNull,NotNull | findByAge(Is)NotNull | … where x.age not null |
| Like | findByFirstnameLike | … where x.firstname like ?1 |
| NotLike | findByFirstnameNotLike | … where x.firstname not like ?1 |
| StartingWith | findByFirstnameStartingWith | … where x.firstname like ?1 (parameter bound with appended %) |
| EndingWith | findByFirstnameEndingWith | … where x.firstname like ?1 (parameter bound with prepended %) |
| Containing | findByFirstnameContaining | … where x.firstname like ?1 (parameter bound wrapped in %) |
| OrderBy | findByAgeOrderByLastnameDesc | … where x.age = ?1 order by x.lastname desc |
| Not | findByLastnameNot | … where x.lastname <> ?1 |
| In | findByAgeIn(Collection ages) | … where x.age in ?1 |
| NotIn | findByAgeNotIn(Collection age) | … where x.age not in ?1 |
| TRUE | findByActiveTrue() | … where x.active = true |
| FALSE | findByActiveFalse() | … where x.active = false |
| IgnoreCase | findByFirstnameIgnoreCase | … where UPPER(x.firstame) = UPPER(?1) |
如使用And条件连接时,应这样写:
findByLastNameAndFirstName(String lastName,String firstName);

//where lastName like ?% and id <?
List<User> getByLastNameStartingWithAndIdLessThan(String lastName,Integer id);
条件的属性名称与个数要与参数的位置与个数一一对应 。
② 查询方法流程解析
假如创建如下的查询:findByUserDepUuid(),框架在解析该方法时,首先剔除 findBy,然后对剩下的属性进行解析,假设查询实体为Doc。
第一步:先判断 userDepUuid (根据 POJO 规范,首字母变为小写)是否为查询实体的一个属性,如果是,则表示根据该属性进行查询;如果没有该属性,继续第二步。
第二步:从右往左截取第一个大写字母开头的字符串(此处为Uuid),然后检查剩下的字符串是否为查询实体的一个属性(此处为userDep)。如果是,则表示根据该属性进行查询;如果没有该属性,则重复第二步,继续从右往左截取;最后假设 user 为查询实体的一个属性。
第三步:接着处理剩下部分(DepUuid),先判断 user 所对应的类型是否有depUuid属性。如果有,则表示该方法最终是根据 “ Doc.user.depUuid” 的取值进行查询;否则继续按照步骤 2 的规则从右往左截取,最终表示根据 “Doc.user.dep.uuid” 的值进行查询。
可能会存在一种特殊情况,比如 Doc包含一个 user 的属性,也有一个 userDep 属性,此时会存在混淆。可以明确在属性之间加上"_" 以显式表达意图,比如 “findByUser_DepUuid()" 或者 "findByUserDep_uuid()”
特殊的参数: 还可以直接在方法的参数上加入分页或排序的参数,比如:
Page<UserModel> findByName(String name, Pageable pageable);
List<UserModel> findByName(String name, Sort sort);
③ @Query自定义查询,定制查询SQL
这种查询可以声明在 Repository 方法中,摆脱像命名查询那样的约束,将查询直接在相应的接口方法中声明,结构更为清晰,这是 Spring data 的特有实现。
该注解源码如下:
@Retention(RetentionPolicy.RUNTIME)
@Target({ ElementType.METHOD, ElementType.ANNOTATION_TYPE })
@QueryAnnotation
@Documented
public @interface Query {

	/**
	 * Defines the JPA query to be executed when the annotated method is called.
	 */
	String value() default "";

	/**
	 * Defines a special count query that shall be used for pagination queries to lookup the total number of elements for
	 * a page. If non is configured we will derive the count query from the method name.
	 */
	String countQuery() default "";

	/**
	 * Defines the projection part of the count query that is generated for pagination. If neither {@link #countQuery()}
	 * not {@link #countProjection()} is configured we will derive the count query from the method name.
	 *
	 * @return
	 * @since 1.6
	 */
	String countProjection() default "";

	/**
	 * Configures whether the given query is a native one. Defaults to {@literal false}.
	 */
	boolean nativeQuery() default false;

	/**
	 * The named query to be used. If not defined, a {@link javax.persistence.NamedQuery} with name of
	 * {@code $ domainClass}.${queryMethodName}} will be used.
	 */
	String name() default "";

	/**
	 * Returns the name of the {@link javax.persistence.NamedQuery} to be used to execute count queries when pagination is
	 * used. Will default to the named query name configured suffixed by {@code .count}.
	 *
	 * @see #name()
	 * @return
	 */
	String countName() default "";
}
④ Specifications查询(Spring Data JPA支持JPA2.0的Criteria查询)
通常在动态查询的时候,会用到该类。
这里使用单个示例进行过程讲解。
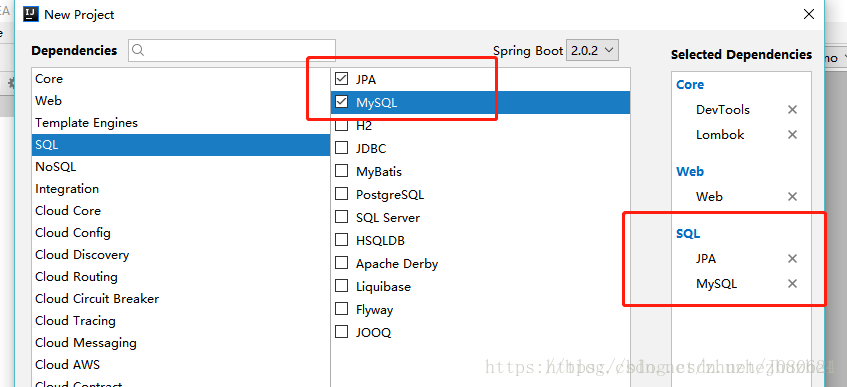
① 创建工程,添加依赖
pom文件依赖如下:
		<dependency>
			<groupId>org.springframework.boot</groupId>
			<artifactId>spring-boot-starter-data-jpa</artifactId>
		</dependency>
		<dependency>
			<groupId>org.springframework.boot</groupId>
			<artifactId>spring-boot-starter-web</artifactId>
		</dependency>

		<dependency>
			<groupId>mysql</groupId>
			<artifactId>mysql-connector-java</artifactId>
			<scope>runtime</scope>
		</dependency>
		<dependency>
			<groupId>org.projectlombok</groupId>
			<artifactId>lombok</artifactId>
			<optional>true</optional>
		</dependency>
		<dependency>
			<groupId>org.springframework.boot</groupId>
			<artifactId>spring-boot-starter-test</artifactId>
			<scope>test</scope>
		</dependency>

		<!-- https://mvnrepository.com/artifact/com.alibaba/druid -->
		<dependency>
			<groupId>com.alibaba</groupId>
			<artifactId>druid</artifactId>
		</dependency>
② 在application.yml文件中对jpa进行配置
示例如下:
spring:
    datasource:
      url: jdbc:mysql://localhost:3306/test
      username: root
      password: 123456
      driver-class-name: com.mysql.jdbc.Driver
      type: com.alibaba.druid.pool.DruidDataSource
      initialSize: 50
      maxActive: 200
      maxWait: 60000
      minIdle: 20
      timeBetweenEvictionRunsMillis: 60000
      minEvictableIdleTimeMillis: 300000
      validationQuery: SELECT 1 FROM DUAL
      testWhileIdle: true
      testOnBorrow: true
      testOnReturn: false
      poolPreparedStatements: true
  #   配置监控统计拦截的filters,去掉后监控界面sql无法统计,'wall'用于防火墙
      filters: stat,wall,log4j
      maxPoolPreparedStatementPerConnectionSize: 20
      useGlobalDataSourceStat: true
      connectionProperties: druid.stat.mergeSql=true;druid.stat.slowSqlMillis=500
    jpa:
      #Target database
      database: mysql
      #控制台显示SQL
      show-sql: true
      #Whether to initialize the schema on startup,可不配
      generate-ddl: false
      # mappingResources用于指定和实体相关的的hibernate配置文件 可不配,通常在实体上面使用注解
      mappingResources:
        - classpath: /hibernate/User.hbm.xml
        - classpath: /hibernate/Address.hbm.xml
      # Register OpenEntityManagerInViewInterceptor 默认为true
      open-in-view: true
      hibernate:
        #更新或者创建数据表结构
        ddl-auto: update
        naming:
          implicit-strategy: org.hibernate.boot.model.naming.ImplicitNamingStrategyJpaCompliantImpl
          physical-strategy: org.hibernate.boot.model.naming.PhysicalNamingStrategyStandardImpl
注意,如果通过jpa在数据库中建表,将jpa.hibernate,ddl-auto改为create,建完表之后,要改为update,要不然每次重启工程会删除表并新建。
参考博客:Hibernate5中实体命名策略
③ 编写一个实体类(bean)和数据表进行映射,并且配置好映射关系
源码示例如下:
//使用JPA注解配置映射关系
@Entity //告诉JPA这是一个实体类(和数据表映射的类)
@Table(name = "tbl_user") //@Table来指定和哪个数据表对应;如果省略默认表名就是user;
public class User {

    @Id //这是一个主键
    @GeneratedValue(strategy = GenerationType.IDENTITY)//自增主键
    private Integer id;

    @Column(name = "last_name",length = 50) //这是和数据表对应的一个列
    private String lastName;
    @Column //省略默认列名就是属性名
    private String email;

    public Integer getId() {
        return id;
    }

    public void setId(Integer id) {
        this.id = id;
    }

    public String getLastName() {
        return lastName;
    }

    public void setLastName(String lastName) {
        this.lastName = lastName;
    }

    public String getEmail() {
        return email;
    }

    public void setEmail(String email) {
        this.email = email;
    }
}
④ 编写一个Dao接口来操作实体类对应的数据表(Repository)
UserRepository 源码示例如下:
//继承JpaRepository来完成对数据库的操作
public interface UserRepository extends
			JpaRepository<User,Integer> {
	List<User> findByEmail(String email);
}
JpaRepository接口示例如下(注意其继承了PagingAndSortingRepository和QueryByExampleExecutor):
@NoRepositoryBean
public interface JpaRepository<T, ID extends Serializable>
		extends PagingAndSortingRepository<T, ID>,
		QueryByExampleExecutor<T> {

	/*
	 * (non-Javadoc)
	 * @see org.springframework.data.repository.CrudRepository#findAll()
	 */
	List<T> findAll();

	/*
	 * (non-Javadoc)
	 * @see org.springframework.data.repository.PagingAndSortingRepository#findAll(org.springframework.data.domain.Sort)
	 */
	List<T> findAll(Sort sort);

	/*
	 * (non-Javadoc)
	 * @see org.springframework.data.repository.CrudRepository#findAll(java.lang.Iterable)
	 */
	List<T> findAll(Iterable<ID> ids);

	/*
	 * (non-Javadoc)
	 * @see org.springframework.data.repository.CrudRepository#save(java.lang.Iterable)
	 */
	<S extends T> List<S> save(Iterable<S> entities);

	/**
	 * Flushes all pending changes to the database.
	 */
	void flush();

	/**
	 * Saves an entity and flushes changes instantly.
	 *
	 * @param entity
	 * @return the saved entity
	 */
	<S extends T> S saveAndFlush(S entity);

	/**
	 * Deletes the given entities in a batch which means it will create a single {@link Query}. Assume that we will clear
	 * the {@link javax.persistence.EntityManager} after the call.
	 *
	 * @param entities
	 */
	void deleteInBatch(Iterable<T> entities);

	/**
	 * Deletes all entities in a batch call.
	 */
	void deleteAllInBatch();

	/**
	 * Returns a reference to the entity with the given identifier.
	 *
	 * @param id must not be {@literal null}.
	 * @return a reference to the entity with the given identifier.
	 * @see EntityManager#getReference(Class, Object)
	 */
	T getOne(ID id);

	/* (non-Javadoc)
	 * @see org.springframework.data.repository.query.QueryByExampleExecutor#findAll(org.springframework.data.domain.Example)
	 */
	@Override
	<S extends T> List<S> findAll(Example<S> example);

	/* (non-Javadoc)
	 * @see org.springframework.data.repository.query.QueryByExampleExecutor#findAll(org.springframework.data.domain.Example, org.springframework.data.domain.Sort)
	 */
	@Override
	<S extends T> List<S> findAll(Example<S> example, Sort sort);

}
其中PagingAndSortingRepository又继承自CrudRepository,PagingAndSortingRepository源码如下:
@NoRepositoryBean
public interface PagingAndSortingRepository<T, ID
		extends Serializable> extends CrudRepository<T, ID> {

	/**
	 * Returns all entities sorted by the given options.
	 *
	 * @param sort
	 * @return all entities sorted by the given options
	 */
	Iterable<T> findAll(Sort sort);

	/**
	 * Returns a {@link Page} of entities meeting the paging restriction provided in the {@code Pageable} object.
	 *
	 * @param pageable
	 * @return a page of entities
	 */
	Page<T> findAll(Pageable pageable);
}
即 UserRepository 拥有JpaRepository、PagingAndSortingRepository和CrudRepository的所有方法!!!还可以根据需要添加自己的方法!!!
⑤ 编写Controller进行简单测试
UserController源码如下:
@RestController
public class UserController {

    @Autowired
    UserRepository userRepository;

    @GetMapping("/user/{id}")
    public User getUser(@PathVariable("id") Integer id){

        User user = userRepository.findOne(id);
        List<User> list = userRepository.findByEmail("aa@qq.com");
        System.out.println(list.get(0));
        return user;
    }

    @GetMapping("/user")
    public User insertUser(User user){
        User save = userRepository.save(user);
        return save;
    }

}
⑥ 主类添加注解
@SpringBootApplication
@EntityScan(basePackages={"com.jane.model"})//最好添加
@EnableJpaRepositories(basePackages = {"com.jane.dao"})//最好添加
public class JpaApplication {

	public static void main(String[] args) {
		SpringApplication.run(JpaApplication.class, args);
	}
}
通过该注解@EnableJpaRepositories可以实现以下在xml中的功能:
<!-- 配置Spring Data JPA扫描目录 -->
<jpa:repositories base-package="com.xxx.**.dao"
     repository-impl-postfix="Impl"
     entity-manager-factory-ref="entityManagerFactory"
     transaction-manager-ref="transactionManager" />
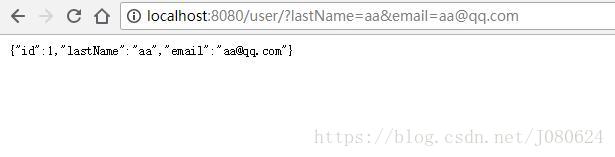
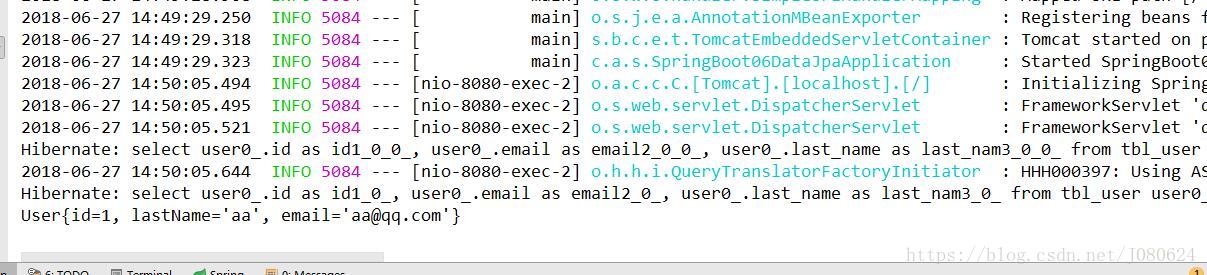
启动项目,测试结果如下:
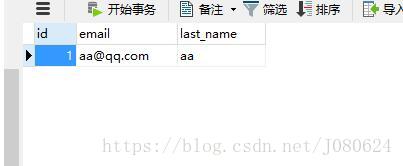
1)插入数据
数据库显示:
② 获取数据
默认创建的表ENGINE=MyISAM DEFAULT CHARSET=latin-1,我们期望是ENGINE=InnoDB DEFAULT CHARSET=utf8;。
自定义MySQL方言:
public class MySQL5DialectUTF8 extends MySQL5InnoDBDialect {

    public String getTableTypeString() {
        return " ENGINE=InnoDB DEFAULT CHARSET=utf8";
    }
}
application.yml中配置如下:
jpa:
      database: mysql
      hibernate:
        ddl-auto: update
        naming:
          implicit-strategy: org.springframework.boot.orm.jpa.hibernate.SpringImplicitNamingStrategy
          physical-strategy: org.springframework.boot.orm.jpa.hibernate.SpringPhysicalNamingStrategy
      show-sql: true
      properties:
        hibernate.dialect: com.jane.utils.MySQL5DialectUTF8
更多JPA的使用参考博客:博客地址
博文项目代码:GitHub下载地址
如果觉得我的文章对您有用,请随意打赏。你的支持将鼓励我继续创作!