社区微信群开通啦,扫一扫抢先加入社区官方微信群

社区微信群
Ethash是以太坊目前使用的共识算法,其前身是Dagger-Hashimoto算法,但是进行了很大的改动。
Dagger-Hashimoto算法想要达到以下几个目标:
实际上Dagger-Hashimoto是由两种不同的算法Dagger和Hashimoto融合而成的:
Hashimoto算法由Thaddeus Dryja发明,旨在通过“内存读取”瓶颈来抵制ASIC矿机。ASIC矿机可以通过设计专用电路来提升计算速度,但是很难提升“内存读取”速度,因为经历了这么多年的发展,内存访问已经经过了极致的优化。Hashimoto算法直接采用区块链数据,也就是区块中的交易作为输入源。
注:为了减小计算量,Dagger-Hashimoto中实际上只使用了低64位参与移位。
Dagger算法由Vitalik Buterin发明,旨在通过DAG(有向无环图)来同时获得“memory-hard计算”和“memory-easy验证”这两个特性,其主要原理是针对每一个单独的nonce只需要访问数据集中的一小部分数据。Dagger曾经被认为可以替代一些memory-hard的算法(如Scrypt),但是后来被Sergio Lerner证明该算法易于遭受共享内存硬件加速的攻击,从而逐渐被废弃。
Dagger-Hashimoto和Hashimoto的主要区别是:
Hashimoto直接使用区块链数据作为输入源,而Dagger-Hashimoto使用一个定制的1GB的dataset(数据集)作为输入源,该dataset每隔N个区块会被更新。dataset是通过Dagger算法生成的,轻客户端验证算法可以针对每一个nonce对其中一个子集完成高效计算。
Dagger-Hashimoto和Dagger的主要区别是:
与Dagger不同,Dagger-Hashimoto用于查询区块的dataset是半持久化(semi-permanent)的,需要间隔很长一段时间才会更新。这样生成dataset的工作量比例接近于0,Sergio Lerner用于共享内存加速的参数就可以忽略不计了。
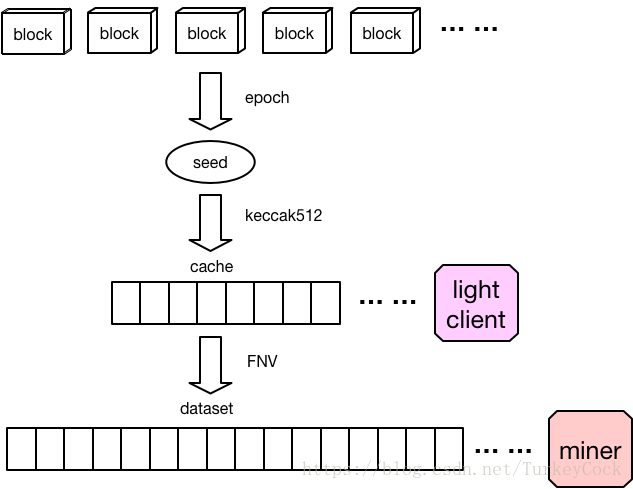
Ethash算法主要分为以下几个步骤:
下面分别讨论这几个部分的实现。
consensus/ethash/ethash.go:
func (d *dataset) generate(dir string, limit int, test bool) {
    ... ...
    seed := seedHash(d.epoch*epochLength + 1)
    ... ...
}

func seedHash(block uint64) []byte {
    seed := make([]byte, 32)
    if block < epochLength {
        return seed
    }
    keccak256 := makeHasher(sha3.NewKeccak256())
    for i := 0; i < int(block/epochLength); i++ {
        keccak256(seed, seed)
    }
    return seed
}
这里有个epoch(纪元)的概念:epochLength等于30000,也就是每30000个区块形成一个纪元,每个纪元更新一次数据集(就是前面提到的“半持久化”)。
seed初始值为0,每过一个纪元会取前一个seed的哈希值作为下一个纪元的seed。
接下来就是用这个seed生成16MB的cache了。首先看一下cache大小的计算:
func cacheSize(block uint64) uint64 {
    epoch := int(block / epochLength)
    if epoch < maxEpoch {
        return cacheSizes[epoch]
    }
    return calcCacheSize(epoch)
}

func calcCacheSize(epoch int) uint64 {
    size := cacheInitBytes + cacheGrowthBytes*uint64(epoch) - hashBytes
    for !new(big.Int).SetUint64(size / hashBytes).ProbablyPrime(1) {
        size -= 2 * hashBytes
    }
    return size
}
前2048(maxEpoch)个纪元的cache大小是硬编码在代码里的,如果超过这个数量就需要自己计算了。
cache的大小是线性增长的,size的值等于(2^24 + 2^17 * epoch - 64),用这个值除以64看结果是否是一个质数,如果不是,减去128再重新计算,直到找到最大的质数为止。
接下来分析cache数据的生成:
func generateCache(dest []uint32, epoch uint64, seed []byte) {
    ... ...
    // Create a hasher to reuse between invocations
    keccak512 := makeHasher(sha3.NewKeccak512())

    // Sequentially produce the initial dataset
    keccak512(cache, seed)
    for offset := uint64(hashBytes); offset < size; offset += hashBytes {
        keccak512(cache[offset:], cache[offset-hashBytes:offset])
        atomic.AddUint32(&progress, 1)
    }
    ... ...
}
看明白没?先用seed的哈希值生成第一个数(64字节),然后以新生成的数作为seed,生成下一个数,依次迭代,直至填充满整个cache。当然这只是第一步,后面还要跟之前cache中的数据按一定规则做一次异或,然后再求一次哈希,具体细节参见一下代码:
    for i := 0; i < cacheRounds; i++ {
        for j := 0; j < rows; j++ {
            var (
                srcOff = ((j - 1 + rows) % rows) * hashBytes
                dstOff = j * hashBytes
                xorOff = (binary.LittleEndian.Uint32(cache[dstOff:]) % uint32(rows)) * hashBytes
            )
            bitutil.XORBytes(temp, cache[srcOff:srcOff+hashBytes], cache[xorOff:xorOff+hashBytes])
            keccak512(cache[dstOff:], temp)

            atomic.AddUint32(&progress, 1)
        }
    }
dataset大小的计算和cache类似,量级不同:2^30 + 2^23 * epoch - 128,然后每次减256寻找最大质数。
生成数据是一个循环,每次生成64个字节,所以看generateDatasetItem()就可以了。代码分为下面几个部分:
    // Calculate the number of theoretical rows (we use one buffer nonetheless)
    rows := uint32(len(cache) / hashWords)

    // Initialize the mix
    mix := make([]byte, hashBytes)

    binary.LittleEndian.PutUint32(mix, cache[(index%rows)*hashWords]^index)
    for i := 1; i < hashWords; i++ {
        binary.LittleEndian.PutUint32(mix[i*4:], cache[(index%rows)*hashWords+uint32(i)])
    }
    keccak512(mix, mix)
    // Convert the mix to uint32s to avoid constant bit shifting
    intMix := make([]uint32, hashWords)
    for i := 0; i < len(intMix); i++ {
        intMix[i] = binary.LittleEndian.Uint32(mix[i*4:])
    }
2)计算FNV哈希
    // fnv it with a lot of random cache nodes based on index
    for i := uint32(0); i < datasetParents; i++ {
        parent := fnv(index^i, intMix[i%16]) % rows
        fnvHash(intMix, cache[parent*hashWords:])
    }
4)整数转回字节数组,再计算一次哈希
    // Flatten the uint32 mix into a binary one and return
    for i, val := range intMix {
        binary.LittleEndian.PutUint32(mix[i*4:], val)
    }
    keccak512(mix, mix)
这里用到了FNV哈希算法,这是一种不需要使用密钥的哈希算法,以它的三位发明者的名字命名:Glenn Fowler, Landon Curt Noll, Kiem-Phong Vo。
这个FNV算法很简单:a乘以FNV质数0x01000193,然后再和b异或。
首先用这个算法算出一个索引值,利用这个索引从cache中选出一个值(data),然后对mix中的每个字节都计算一次FNV,得到最终的哈希值:
func fnv(a, b uint32) uint32 {
    return a*0x01000193 ^ b
}

func fnvHash(mix []uint32, data []uint32) {
    for i := 0; i < len(mix); i++ {
        mix[i] = mix[i]*0x01000193 ^ data[i]
    }
}
从这里可以看出,dataset的每个值都是根据对应的cache中的值生成的,因此轻客户端无需存储dataset,只需要在验证的时候按需生成即可。
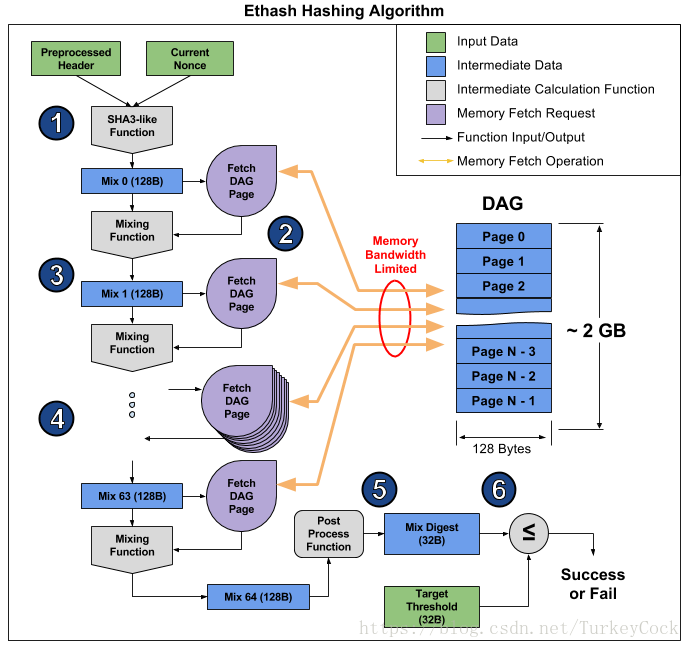
挖矿流程参见下图:
具体代码参见consensus/ethash/algorithm.go中的hashimotoFull()函数:
func hashimotoFull(dataset []uint32, hash []byte, nonce uint64) ([]byte, []byte) {
    lookup := func(index uint32) []uint32 {
        offset := index * hashWords
        return dataset[offset : offset+hashWords]
    }
    return hashimoto(hash, nonce, uint64(len(dataset))*4, lookup)
}
首先提供了一个lookup()函数,用于从dataset中查找数据。接着就是调用hashimoto()函数计算哈希了:首先根据hash和nonce生成一个seed,填充到mix数组中,然后用lookup()函数获取data,最后把mix和data送入fnvHash()函数中计算哈希值。具体代码这里就不分析了。
在节点收到新区块时,需要验证根据区块头的hash和nonce计算出来的FNV哈希值是否确实小于设定的难度值。入口位于core/blockchain.go的insertChain()方法:
func (bc *BlockChain) insertChain(chain types.Blocks) (int, []interface{}, []*types.Log, error) {
    ... ...
    for i, block := range chain {
        headers[i] = block.Header()
        seals[i] = true
    }
    abort, results := bc.engine.VerifyHeaders(bc, headers, seals)
    ... ...
}
继续跟踪consensus/ethash/consensus.go中的VerifyHeaders()方法,最终会调用verifyHeader():
func (ethash *Ethash) verifyHeader(chain consensus.ChainReader, header, parent *types.Header, uncle bool, seal bool) error {
    ... ...
    if seal {
        if err := ethash.VerifySeal(chain, header); err != nil {
            return err
        }
    }

    ... ...
}
这里会调用VerifySeal()方法验证区块头是否符合要求:
func (ethash *Ethash) VerifySeal(chain consensus.ChainReader, header *types.Header) error {
    ... ...
    digest, result := hashimotoLight(size, cache.cache, header.HashNoNonce().Bytes(), header.Nonce.Uint64())

    ... ...
    target := new(big.Int).Div(maxUint256, header.Difficulty)
    if new(big.Int).SetBytes(result).Cmp(target) > 0 {
        return errInvalidPoW
    }
    return nil
}
可以看到,这里调用hashimotoLight()函数计算FNV哈希值,然后跟目标难度比较,确认是否低于目标难度。这个hashimotoLight()就是为轻客户端节点计算FNV哈希值的,会根据需要通过cache生成少量dataset的值完成计算,有兴趣的同学可以再仔细研究一下具体细节。
Ethash是一种“memory-hard计算”和“memory-easy验证”的哈希算法,通过内存访问速度的瓶颈抵抗ASIC矿机,同时利用两级数据集实现挖矿和轻客户端验证的分离。
参考:
https://github.com/ethereum/wiki/wiki/Dagger-Hashimoto
https://github.com/ethereum/wiki/wiki/Ethash
https://github.com/ethereum/wiki/wiki/Ethash-Design-Rationale
https://www.vijaypradeep.com/blog/2017-04-28-ethereums-memory-hardness-explained/
更多文章欢迎关注“鑫鑫点灯”专栏:https://blog.csdn.net/turkeycock
或关注飞久微信公众号:
如果觉得我的文章对您有用,请随意打赏。你的支持将鼓励我继续创作!