社区微信群开通啦,扫一扫抢先加入社区官方微信群

社区微信群
npm install mongoose -S链接时特别注意几点:
(1)参数一是 mongodb。(2)路径中间不能有空格。
(3)后边的mongo_test 是要连接的数据库的名称,如果没有该数据库,会创建。
(4)如果有账号和密码可以在 mongodb://账号:密码@localhost:27017/mongo_test 添加,后边用@区分。
// 连接本地mongodb服务器
let connect = mongoose.connect('mongodb://localhost:27017/mongo_test',{useNewUrlParser: true})
.then(res => {
    console.log('连接成功++++++++++++++++',res)
})(1)Schema: 数据库储存格式的约定协议,可理解为数据表的字段类型声明
常用的字段类型: String、Number、Date、Buffer(二进制)、Boolean、Mixed(混合类型,就是啥都可以存储)、ObjectId(对象id)、Array
// 主要用于定义db中集合里document文档的结构
let userSchema = new mongoose.Schema({
    name: String,
    age: {
        type: Number,
        default: 20
    }
})
(2)Model : 由Schema转化的数据模型,具有抽象属性和行为的数据库操作,可以进行查询操作。
let User = mongoose.model('User', userSchema)
let userInstance = new User({
    name: '吕星辰'
})
(3)instance: 由Model创建的实体操作对象,可以对数据库进行完整的CRUD(增删改查)操作。
(4)关于字段的一些属性:
type:字段的类型;
require:true或false,指定该字段是否必填(默认false,不是必填的);
max与min:数字,只能用在Number类型,可以表示最大值与最小值是多少;
maxlength与minlength:只能用于String字符串类型,表示最长或最短字符串长度;
enum: ['男', '女'],可枚举类型,后边是一个数组,也就是值必须在枚举值中,并且枚举类型必须是String;
例:sex: { type: String, enum: [ '男', '女' ] } sex字段的值必须在枚举值中,且必须为字符串。
defalt: 'xxx', 默认值,如果没有传参数时,会取默认值,存入数据库。
trim: true, 去除字符串两端空格(保存前对字段进行 .trim());
uppercase:true , 只能用于字符串,表示把所有小写字母转为大写字母(保存前对字段进行.toUpperCase());
lowercase:true , 只能用于字符串,表示把所有大写字母转为小写字母(保存前对字段进行.toLowerCase());
例:test{ type: String, lowercase: true }。
select: true/false,指定该字段在查询出的数据中是否显示,true表示查询数据过滤该字段;
get: () => {} 和set:() => {},两个函数使用Object.defineProperty( ) 来定义getter、setter。
validate: ()=>{ } ,为该字段添加校验。
(5)关于Mixed
一个啥都可以放的SchemaType,非常便利,但是不太好维护,Mixed可以通过:Schema.Types.Mixed 或 一个空对象来定义,下边三种效果一致:
mongoose.Schema({any: {}})
mongoose.Schema({any: Object})
mongoose.Schema({ any: Schema.Types.Mixed })
连接mongodb,声明一个Schema模型
const mongoose = require('mongoose');
mongoose.connect('mongodb://localhost:27017/mongo_test', {userNewUrlParser: true})
.then(r => {
    console.log('连接成功:', r)
})
// 声明一个Schema模型,定义用户名和年龄
let Schema = mongoose.Schema;
let userSchema = new Schema({
    name: String,
    age: {
        type: Number,
        default: 20
    }
})
将声明的Schema转化为Model, 并将Model实例转化为Instance
// mongoose.model('User', userSchema, 'userName') 参数三是设置数据集的名称,默认是参数一的小写负数形式。
// 相当于mysql中的表名。。。。
let User = mongoose.model('User', userSchema);
// 平时开发,一般是把上边User导出去,然后再路由文件中引入。 module.export = {User}
let userInstance = new User({
    name: '吕星辰'
})
// 把数据保存到数据库
uesrInstance.save((err, res) => {
    if(err) {
        console.log(err)
    }
    console.log('保存成功, 插入的数据为', res)
})
上边的 userInstance 可以进行数据库的增删改查操作,执行上边代码:

打开navicat,显示的数据如下(我之前已经插入好多数据了):
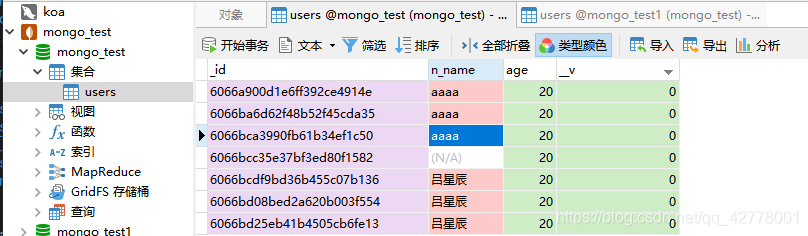
注意:
_id 每一个文档document都会被mongoose添加一个不重复的 _id, _id 的数据类型不是字符串,而是ObjectID类型。如果在查询语句中要使用_id,则需要使用findById语句。而不能使用find或findOne语句。
下边方法返回的是一个promise
1、插入单条(两种方法):
// 下边User是mongoose.model('User', Schema) 创建的
// 方法一:
const user = new User({ name: 'xxx', age: 20 });
user.save().then(r => {
    console.log('新增成功,新增的数据为:', r)
})
// 方法二:
User.create({
    name: 'xxx', age: 20
}).then(r => {
    console.log('新增成功,新增的数据为:', r)
})
// 输出结果为:{ name: 'xxx', age: 20, _id: 6073e2897f6a8d3b18170792, __v: 0 }
2、插入多条:
User.insertMany(arr, callback) 或 User.insertMany(arr).then().catch()
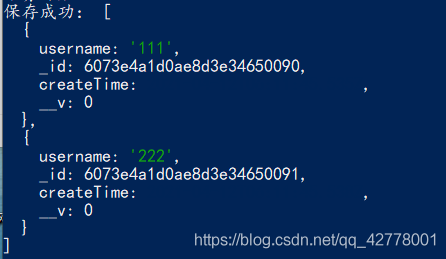
// 插入多条数据
User.insertMany([{username: '111'}, {username: '222'}]).then(r => {
    console.log('保存成功:', r)
}).catch(err => {
    console.log('保存失败:', err)
})
打印结果:
(1)User.find( ) 查询全部数据
(2)User.find( {name: 'xxx'}, [options] ) 根据某个字段来查询, 参数二可选对象,可以过滤字段
例1:
User.find().then(r => {
    console.log('查询全部数据: ', r)
})
例2:
// 跳过前6条数据,查询剩余的数据
User.find(null, null, {skip: 6}).select("username age")
(2.1)控制字段,
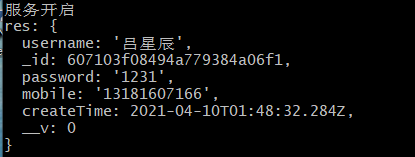
把字段设置为true,表示显示的字段,设置为false,表示隐藏的字段, _id默认会被输出,如果不想被输出,设置为false即可。
const r = await User.find({username: '吕星辰'}, {username: true})
console.log("res:", r)
(2.2)过滤字段,
还可以在后边添加 select() 方法, 参数可以是数组、对象、字符串:
// 下边三种过滤字段的方法:

// select参数可以是数组或对象,查询出的数据只显示username和password
await User.find({username: '吕星辰'}).select(['username', 'password'])
// select参数为对象
await User.find({username: '吕星辰'}).select({username: true, password: true})
// select参数为字符串(字段之间以空格隔开)
await User.find({username: '吕星辰'}).select('username password')
(2.3)还有种方式是select('+xxx +xxx') 或select('-xxx -xxx'),注意多个字段中间以空格隔开,+ 意思是包含xxx字段,- 的意思是过滤掉xxx字段。
例:
// 后边要有select属性
const UserSchema = mongoose.Schema({
    username: {type: String, default: '吕星辰', select: false},
    password: {type: String, selelct: false},
    name: String
})
User = mongoose.model('User', UserSchema, 'user')
User.find({username: '吕星辰'}).select("+password -username -name")
(3)User.findOne({ id: xxx }) 获取单条数据
(4)常用的约束条件查询
4.1、where() 过滤查询
User.where( ) 或 user.find( ).where( )
// 例1:查询年龄大于20小于60的数据 :
     User.find().where("age").gte(20).lte(60)
// 等同于:
     User.find({age: {$gte: 20, $lte: 60}})
// 例2:查询age为50的数据 :
     User.where('age', 50)
4.2、or() 或
// or参数为数组
// 查询年龄为20或30的数据
User.find().or([{ age: 20 }, { age: 30 }])
4.3、nor() 不是xx 或 xx的数据
// 查询年龄不为20或30的数据
User.find().nor([{ age: 20 }, { age: 30 }])
4.4、and() 且
// 查询username为"吕星辰" 且 password为 '1231'
await User.find().and([{username: '吕星辰'}, {password: '1231'}]).select("username")
4.5、gt() 大于、gte() 大于等于
注:使用 gt()或 gte()必须使用where作为查询字段
// 查询username为"吕星辰" 且 password为 '1231'
await User.find().where("age").gte(32).select("username age")
4.6、lt() 小于、lte() 小于等于
注:使用 lt()或 lte()必须使用where作为查询字段
---------------------------------------------------------------------------------------------------------------------------------------
4.7、sort( ) 排序
// 按照age从小到大排序
await User.find().sort('age').select("username age")
// 按照age从大到小排序
await User.find().sort('-age').select("username age")
4.8、skip( ) 跳过
// 跳过前2条数据,输出余下的数据
await User.find().skip(2).select("username age")
4.9、limit( ) 限制
// 获取前2条数据
await User.find().limit(2).select("username password mobile")
4.10、select( ) 控制显示字段
4.11、exect( ) 执行
4.12、count( ) 计数
await User.find().count()4.13、distinct( ) 去重
通过创建出来的Schame在模型的实例上定义实例方法:
// user.js
const mongose = rquire('mongoose');
const UserSchema = mongose.Schema({})
// 添加一个实例方法,特别注意:this.model('User') User参数是模型的名称,也就是在
// mongose.model('User')参数一中定义的User
UserSchema.methods.findByUserName = async function(username) {
    return await this.model('User').findOne({username})
}
exports.User = mongose.model('User', UserSchema)

// 在路由中使用findByUserName方法
const user = new User();
// 通过实例username方法查询
user.findByUserName('吕星辰').then(res => {
    console.log('res:', res)
}).catch(err => console.log("err:", err))
(4)也可以添加静态方法,通过User来获取静态方法,同上。
(2.1)修改单个数据:
User.update({ id: 1 }, { name: 'xxx' })
把id为1的数据中的name改为 xxx
User.update({n_name: '吕星辰'}, {n_name: '吕星辰111'}).then(r => {
    console.log('r: ',r )
})
![]()
(2.2)修改单个数据:
User.updateOne({ id: 1 }, { name: 'xxx' })
把id为1的数据中的name改为 xxx
(2.3)修改一条数据中的多个字段值:
User.updateMany({ id: 1 }, { name: 'xxx', age:20 })
把id为1的数据中的name改为 xxx,age更改为 20
补充:
1、有时候查询的时候需要忽略某个字段,比如:密码等敏感字段。可以在创建Schema的时候,在字段后边加上 select: true,这样查询时mongoose会自动过滤掉此字段。
const schema = mongoose.Schema({
    name: { type: String, require: true },
    password: {
        type: String, require: true, select: true
    }
})
2、mongoose使用的时间类型会自动转化为格林尼治时间(零时区的时间)。而我们当前的时区为东八区,换算成零时区需要将我们的时间减去八小时,如果你贸然的把时间加上八小时,这种操作会返回一个错误的时间,因为世界各地转化为格林尼治标准的时差不同。
解决此问题,安装: moment-timezone
如果你知道用户所在的时区,可以使用 moment.tz.guess( ) 来获取当前时区:
const moment = require('moment-timezone');
moment('2021-04-08 02:31:29.859').tz("Asia/Shanghai").format("YYYY年MM月DD日 HH:mm:ss")
// 输出结果为: 2021年04月08日 02:31:29

//猜测时区: moment.tz.guess()  -> Asia/Shanghai
3、新增数据前的处理
schema.pre( )
在mongoose.Schema( ) 时,我们会拿到创建好的schema, 它上边有一个pre钩子方法,此钩子会在save保存之前执行:
注:必须调用next() 方法才能执行保存操作,否则不会执行任何以外操作。
const UserSchema = mongoose.Schema({
    name: { type: String }
})
UserSchema.pre('save', function(next) {
    console.log('新数据为:', this) // this为保存的新数据
    next()
})
如果觉得我的文章对您有用,请随意打赏。你的支持将鼓励我继续创作!
