社区微信群开通啦,扫一扫抢先加入社区官方微信群

社区微信群
*介绍一下原型对象
一句话概括就是每个构造函数都有一个原型对象,原型对象都包含一个指向构造函数的指针,而实例都包含一个指向原型对象的内部指针。如下图所示
function Person() {
}
Person.prototype.name = "Nicholas";
Person.prototype.age = 29;
Person.prototype.job = "Software Engineer";
Person.prototype.sayName = function () {
    alert(this.name);
};
var person1 = new Person();
person1.sayName(); //"Nicholas"
var person2 = new Person();
person2.sayName(); //"Nicholas"
alert(person1.sayName == person2.sayName); //true 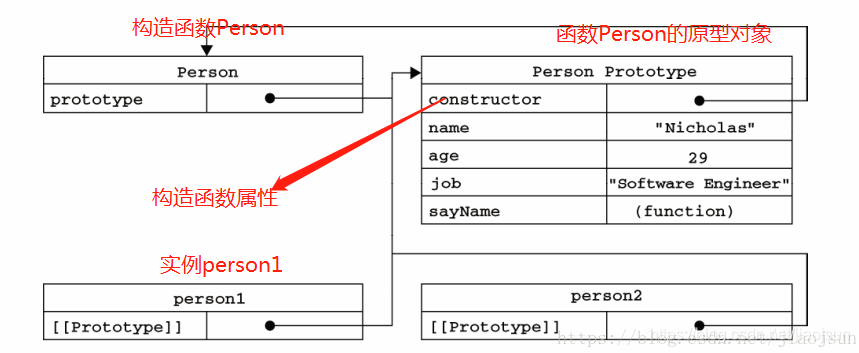
使用原型对象的好处是可以 让所有对象实例共享它所包含的属性和方法。换句话说,不必在构造函数中定义对象实例的信息,而是 可以将这些信息直接添加到原型对象中。但是也会存在问题:包含引用类型值的属性会被共享。
*介绍下原型链(解决的是继承问题吗)
假如我们让原型对象等于另一个类型的实例,那么就出现了原型链
function SuperType() {
    this.property = true;
}
SuperType.prototype.getSuperValue = function() {
    return this.property;
};

function SubType() {
    this.subproperty = false;
}
//继承了 SuperType
SubType.prototype = new SuperType();
SubType.prototype.getSubValue = function() {
    return this.subproperty;
};
var instance = new SubType();
alert(instance.getSuperValue()); //true
*ES6中class的原型链
class A {
}

class B extends A {
}

B.__proto__ === A // true
B.prototype.__proto__ === A.prototype // true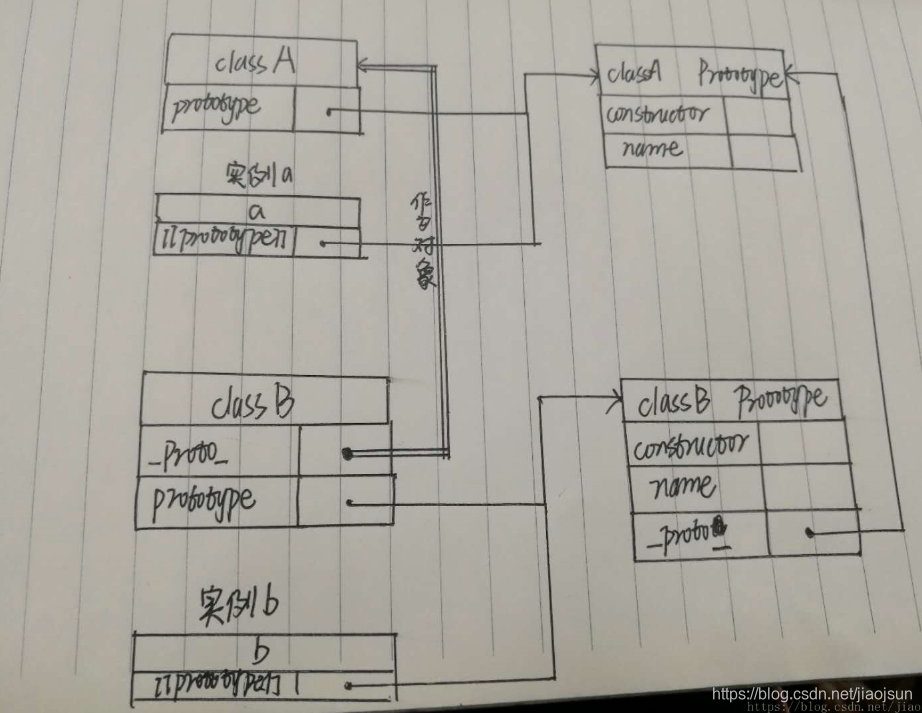
*css水平居中
子元素定宽margin法。满足以下三个条件margin:0 auto
1.子元素定宽
2.子元素为块级元素(行内元素设置为display:block也算)
3.子元素的margin-left和margin-right都必须为auto
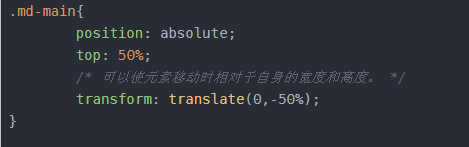
*css垂直居中
子元素不定高或者定高定位法。水平居中:定位法
1.子元素不定高或者不定高
2.子元素为绝对定位,并设置top:50%
3.子元素添加transform: translate(0,-50%);
*css水平垂直居中
1.父元素上设置display:flex
2.子元素元素上设置margin:auto。
*经典布局(左右)(固定+自适应)
父级:display: flex
left: flex: 0 0 200px(固定200px,不放大也不缩小)
right: flex: 1(会随父级变化)
<!DOCTYPE html>
<html lang="en">
<head>
    <meta charset="UTF-8">
    <title>Title</title>
    <!-- 参考阮一峰里面的百分比布局,要实现和上面一样的效果(一侧固定,一侧随父级进行变化) -->
    <!-- flex: 1 =? 1 1 0%
    flex: auto => 1 1 auto
    flex: none => 0 0 auto;
    flex-basis优先级 自身设定 > 0%(flex:1按字体的高度) > auto(采用height) -->
    <style>
      .wrap {
        margin: 0 auto;
        width: 80%;

        display: flex;
      }
      #left {
        flex: 0 0 200px; /* 左侧固定200px */
        height: 500px;
        background: red;
      }
      #right {
        /* 此处解释下
        flex: 1 1 0%
        0%表示此处宽度是按照自身内容宽度来,此处自身内容宽度为0,但是分配剩余的空间,所以可以自适应变化
         */
        flex: 1; /* 随父级变化 */
        height: 500px;
        background: burlywood;
      }
    </style>

</head>
<body>
<div class="wrap">
  <aside id="left"></aside>
  <section id="right">5555</section>
</div>

</body>
</html>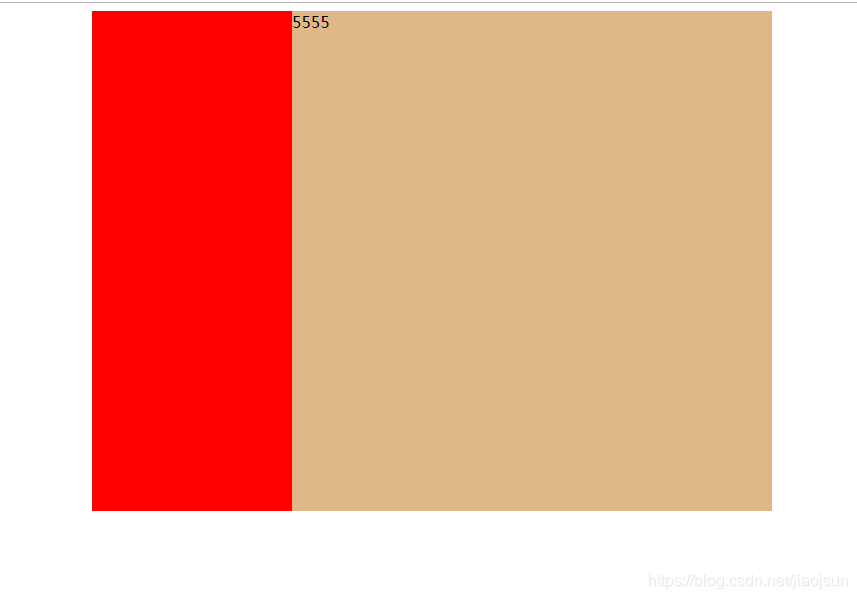
*经典布局(双飞翼布局)上下定高,中间自适应
vw和vh是相对于视口(viewport,也可以叫做视区、视界或可视范围)的宽度和高度。1vw等于视口宽度(viewport width)的百分之一,也就是说100vw就是视口的宽度。同理,1vh等于视口高度(viewport height)的百分之一。
<!DOCTYPE html>
<html lang="en">
<head>
    <meta charset="UTF-8">
    <title>Title</title>
    <style>
        .wrap{
          margin: 0 auto;
          width: 80%;
          height: 100vh; //重点
          display: flex;
          flex-direction: column;
        }
        #left{
          background: #ccffff;
          flex: 0 0 100px;
        }
        #right{
          background: #ccffff;
          flex: 0 0 100px;
        }
        #main{
          background: #ffcccc;
          flex: 1;
        }
    </style>
</head>
<body>

<div class="wrap">
    <aside id="left"></aside>
    <section id="main"></section>
    <aside id="right"></aside>
</div>

</body>
</html>简易版
<!DOCTYPE <!DOCTYPE html>
<html>
<head>
  <meta charset="utf-8" />
  <meta http-equiv="X-UA-Compatible" content="IE=edge">
  <title>Page Title</title>
  <meta name="viewport" content="width=device-width, initial-scale=1">
  <style>
  </style>
  <script>
    Function.prototype.customeBind = function(thisArg,...list){
      let self = this; // 目标函数
      console.log(this);  //指向func

      return function(...arg2){
        self.apply(thisArg,[...list,...arg2])
      }
    }

    function func(...arg){
      console.log(this);//this已经改变,指向{a:1}
      console.log(arg);//{1,2,3,4,5,6,7,8}
    }

    // let newFunc = func.bind(1,2,3);
    // newFunc(5, 6, 7, 8);
    let newFunc2 = func.customeBind({a:1},1,2,3,4);
    newFunc2(5,6,7,8);
  </Script>
</head>
<body class="Site">

<div class="parent">

</div>
</body>
</html>
构造函数版
<!DOCTYPE <!DOCTYPE html>
<html>
<head>
  <meta charset="utf-8" />
  <meta http-equiv="X-UA-Compatible" content="IE=edge">
  <title>Page Title</title>
  <meta name="viewport" content="width=device-width, initial-scale=1">
  <style>
  </style>
  <script>
    Function.prototype.customeBind = function(thisArg,...list){
      let self = this; // 目标函数

      // 自己实现的bind函数,如果把返回的新函数当成了构造函数,此时会遇到问题,
      // 就是找不到目标函数原型上的方法
      // 解决:让新函数继承目标函数的原型
      let Bound = function(...arg2){
        self.apply(thisArg,[...list,...arg2])
      }
      // 以某个对象作为原型创建一个新的对象出来
      Bound.prototype = Object.create(self.prototype);
      Bound.prototype.custructor = self;

      return Bound;
    }

    function func(...arg){
      console.log(this);//this已经改变,指向{a:1}
      console.log(arg);//{1,2,3,4,5,6,7,8}
    }

    func.prototype.miaov = function(){
      console.log(this);
    }


    let newFunc = func.bind({ a: 1 }, 1, 2, 3);
    let newFunc2 = func.customeBind({ a: 1 }, 1, 2, 3, 4);
    console.log('原生------------------');
    let f1 = new newFunc(5, 6, 7, 8);
    console.log(f1.miaov);
    console.log('自定义-----------------');
    let f2 = new newFunc2(5, 6, 7, 8);
    console.log(f2.miaov);
    console.log('看看f2');
    console.log(f2);
  </Script>
</head>
<body class="Site">

<div class="parent">

</div>
</body>
</html>
*如何实现继承
ES5组合继承(使用原型链实现对原型属性和方法的继承,通过借用构造函数来实现对实例属性的继承。)
function SuperType(name) {
    this.name = name;
    this.colors = ["red", "blue", "green"];
}
SuperType.prototype.sayName = function () {
    alert(this.name);
};
function SubType(name, age) {
    //继承属性
    SuperType.call(this, name);
    this.age = age;
}
//继承方法
SubType.prototype = new SuperType();
/* 每创建一个函数,就会同时创建它的 prototype 对象,
这个对象也会自动获得 constructor 属性 */
SubType.prototype.constructor = SubType;
SubType.prototype.sayAge = function () {
    alert(this.age);
};
var instance1 = new SubType("Nicholas", 29);
instance1.colors.push("black");
alert(instance1.colors); //"red,blue,green,black"
instance1.sayName(); //"Nicholas";
instance1.sayAge(); //29
var instance2 = new SubType("Greg", 27);
alert(instance2.colors); //"red,blue,green"
instance2.sayName(); //"Greg";
instance2.sayAge(); //27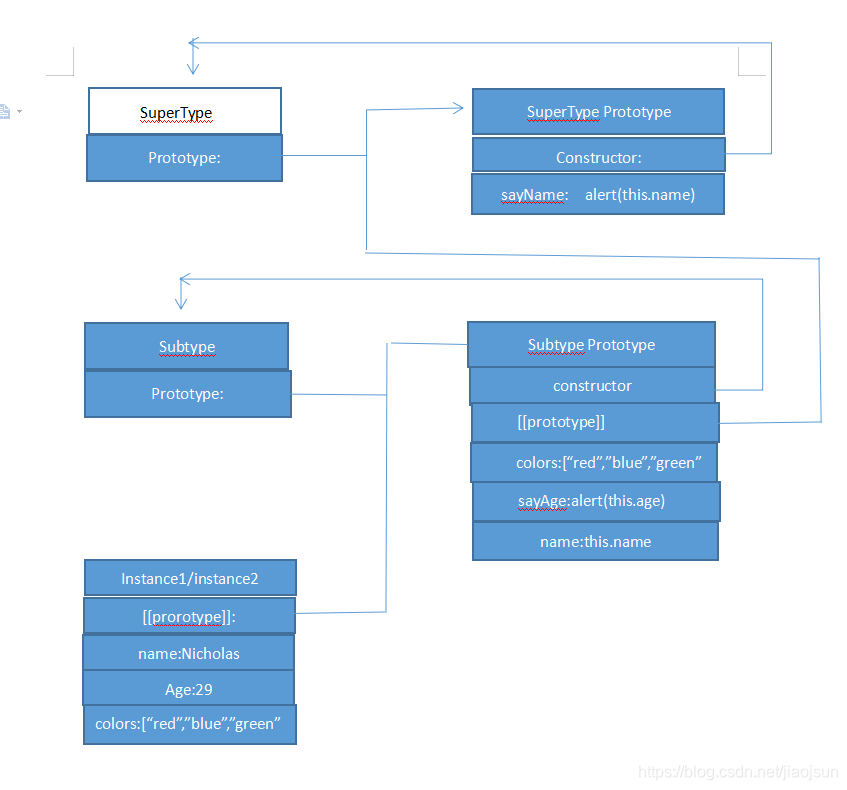
原型式继承(Object.create())
var person = {
    name: "Nicholas",
    friends: ["Shelby", "Court", "Van"]
};
var anotherPerson = Object.create(person, {
    name: {
        value: "Greg"
    }
});
console.log(anotherPerson);
alert(anotherPerson.name); //"Greg"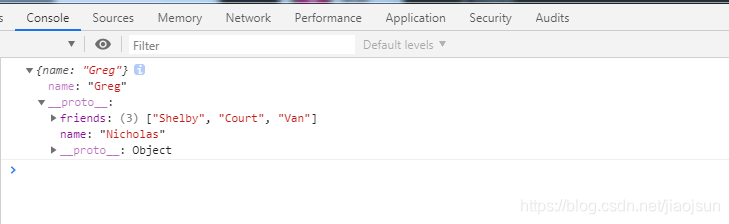
class继承
直接调用super(name),super是代替的是父类的构造函数,super(name)相当于sup.prototype.constructor.call(this, name)
class sup {
        constructor(name) {
            this.name = name
        }

        printName() {
            console.log(this.name)
        }
}

class sub extends sup{
    constructor(name,age) {
        super(name) // super代表的事父类的构造函数
        this.age = age
    }

    printAge() {
        console.log(this.age)
    }
}

let jack = new sub('jack',20)
    jack.printName()    //输出 : jack
jack.printAge() //输出 : 20如果觉得我的文章对您有用,请随意打赏。你的支持将鼓励我继续创作!
