社区微信群开通啦,扫一扫抢先加入社区官方微信群

社区微信群
NoSQL,指的是非关系型的数据库。NoSQL有时也称作Not Only SQL的缩写,是对不同于传统的关系型数据库的数据库管理系统的统称。
NoSQL用于超大规模数据的存储。(例如谷歌或Facebook每天为他们的用户收集万亿比特的数据)。这些类型的数据存储不需要固定的模式,无需多余操作就可以横向扩展。
随着大数据时代的到来,越来越多的网站、应用系统需要支撑海量数据存储,高并发请求、高可用、高可扩展性等特性要求,传统的关系型数据库在应付这些调整已经显得力不从心,暴露了许多能以克服的问题。由此,各种各样的NoSQL(Not Only SQL)数据库作为传统关系型数据的一个有力补充得到迅猛发展。
Redis 是完全开源免费的,遵守BSD协议,是一个高性能的key-value数据库。
Redis 与其他 key - value 缓存产品有以下三个特点:
apiVersion: v1
kind: ReplicationController
metadata:
  name: redis
spec:
   replicas: 1
   selector:
     app: redis
   template:
     metadata:
       labels:
         app: redis
     spec:
       containers:
       - name: redis
         image: redis
         resources:
           requests:
             cpu: 100m
             memory: 100Mi
         ports:
         - containerPort: 6379
b)创建redis-svc.yaml文件
apiVersion: v1
kind: Service
metadata:
  name: redis
spec:
  type: NodePort
  ports:
   - port: 6379
     nodePort: 30009
  selector:
    app: redis
c)kubectl运行下上面的yaml文件即可创建redis

查看下是否创建成功,

下面访问下是否可以使用,

可以正常访问并存储和读取数据。
命令这块网上有很多例子,大家可以百度下,建议每个命令都实地执行 下。
常用命令链接:https://www.runoob.com/redis/redis-commands.html
下面只说下常用的命令如下:
redis默认有16个数据库,从0~15库,默认情况下使用0库
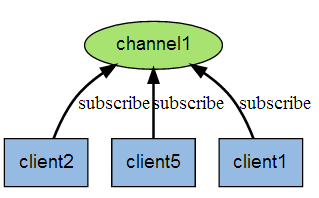
Redis 发布订阅(pub/sub)是一种消息通信模式:发送者(pub)发送消息,订阅者(sub)接收消息。
Redis 客户端可以订阅任意数量的频道。
下图展示了频道 channel1 , 以及订阅这个频道的三个客户端 —— client2 、 client5 和 client1 之间的关系:
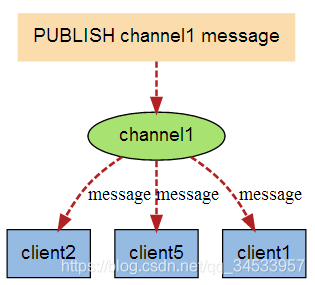
当有新消息通过 PUBLISH 命令发送给频道 channel1 时, 这个消息就会被发送给订阅它的三个客户端:
实例
以下实例演示了发布订阅是如何工作的。在我们实例中我们创建了订阅频道名为 redisChat:
redis 127.0.0.1:6379> SUBSCRIBE redisChat
Reading messages… (press Ctrl-C to quit)
现在,我们先重新开启个 redis 客户端,然后在同一个频道 redisChat 发布两次消息,订阅者就能接收到消息。
redis 127.0.0.1:6379> PUBLISH redisChat “Redis is a great caching technique”
(integer) 1
redis 127.0.0.1:6379> PUBLISH redisChat “Learn redis by runoob.com”
(integer) 1
订阅者的客户端会显示如下消息
Redis 事务可以一次执行多个命令, 并且带有以下三个重要的保证:
批量操作在发送 EXEC 命令前被放入队列缓存。
收到 EXEC 命令后进入事务执行,事务中任意命令执行失败,其余的命令依然被执行。
在事务执行过程,其他客户端提交的命令请求不会插入到事务执行命令序列中。
一个事务从开始到执行会经历以下三个阶段:
以下是一个事务的例子, 它先以 MULTI 开始一个事务, 然后将多个命令入队到事务中, 最后由 EXEC 命令触发事务, 一并执行事务中的所有命令:
redis 127.0.0.1:6379> MULTI
OK
redis 127.0.0.1:6379> SET book-name “Mastering C++ in 21 days”
QUEUED
redis 127.0.0.1:6379> GET book-name
QUEUED
redis 127.0.0.1:6379> SADD tag “C++” “Programming” “Mastering Series”
QUEUED
redis 127.0.0.1:6379> SMEMBERS tag
QUEUED
redis 127.0.0.1:6379> EXEC
| 命令 | 描述 |
|---|---|
| DISCARD | 取消事务,放弃执行事务块内的所有命令。 |
| EXEC | 执行所有事务块内的命令。 |
| MULTI | 标记一个事务的开始 |
| Unwatch | 用于取消 WATCH 命令对所有 key 的监视。 |
| Watch | 用于监视一个(或多个) key ,如果在事务执行之前这个(或这些) key 被其他命令所改动,那么事务将被打断。 |
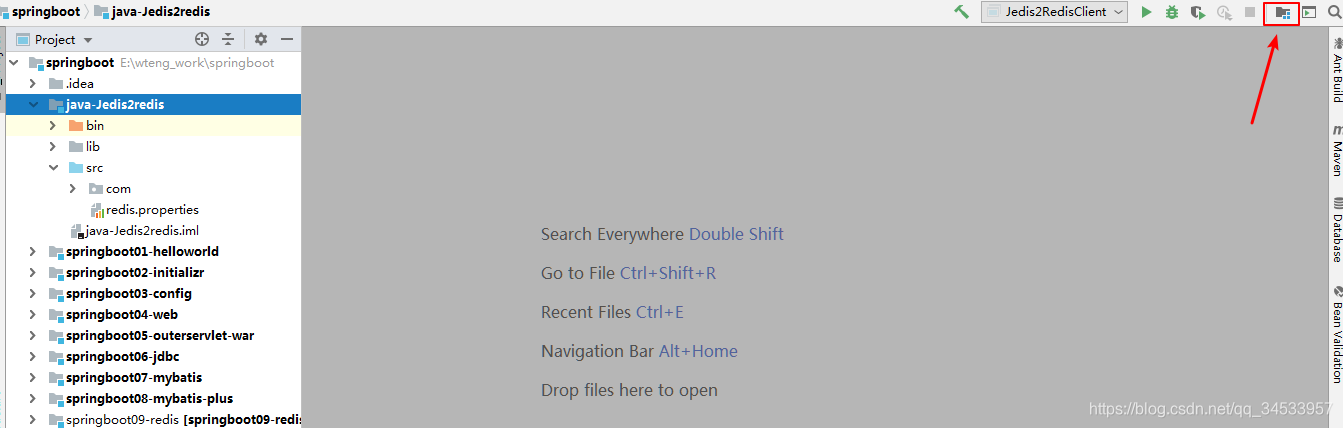
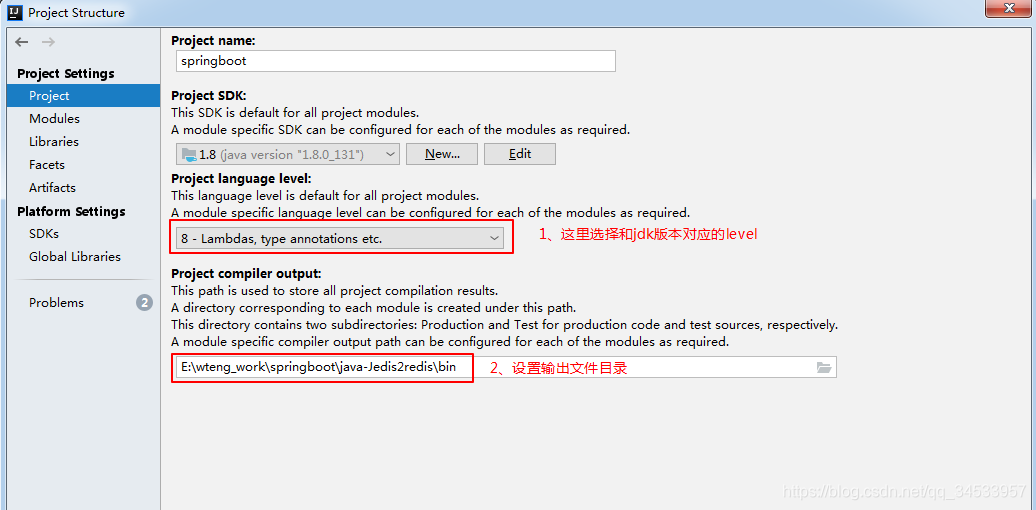
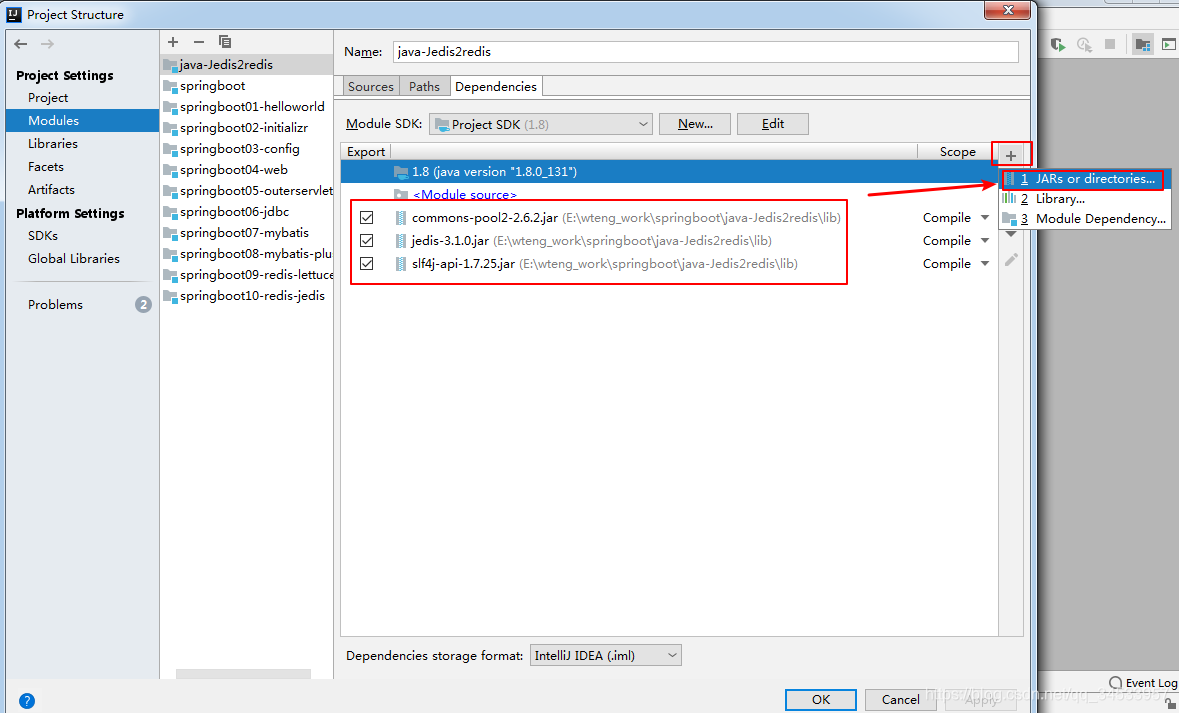
这里主要讲解下非springboot项目如何通过Jedis访问redis数据库,实现方法大体下6.2.1的通过jedis访问redis数据库类似。

#redis jedis配置
# Redis数据库索引(默认为0)
redis.database=0
# Redis服务器地址
redis.host=127.0.0.1
# Redis服务器连接端口
redis.port=6379
# Redis服务器连接密码(默认为空)
#redis.password=
# 连接池最大连接数(使用负值表示没有限制)
redis.jedis.pool.max-active=200
# 连接池最大阻塞等待时间(使用负值表示没有限制)
redis.jedis.pool.max-wait=-1
# 连接池中的最大空闲连接
redis.jedis.pool.max-idle=10
# 连接池中的最小空闲连接
redis.jedis.pool.min-idle=3
# 连接超时时间(毫秒)
redis.timeout=0
package com.nick.jedis.demo;

import org.slf4j.Logger;
import org.slf4j.LoggerFactory;
import redis.clients.jedis.Jedis;
import redis.clients.jedis.JedisPool;
import redis.clients.jedis.JedisPoolConfig;

import java.io.IOException;
import java.io.InputStream;
import java.util.Properties;

/**
 * @author Nick
 */
public class Jedis2RedisClient {

    private static JedisPool jedisPool;

    static {
        Properties props = new Properties();
        InputStream in = Jedis2RedisClient.class.getResourceAsStream("/redis.properties");
        try {
            props.load(in);
        } catch (IOException e) {
            e.printStackTrace();
        }
        //创建jedis池配置实例
        String maxActive = props.getProperty("redis.jedis.pool.max-active");
        String maxWaitMillis = props.getProperty("redis.jedis.pool.max-wait");
        String maxIdle = props.getProperty("redis.jedis.pool.max-idle");
        String minIdle = props.getProperty("redis.jedis.pool.min-idle");
        String host = props.getProperty("redis.host");
        String port = props.getProperty("redis.port");
        String password = props.getProperty("redis.password");
        String timeout = props.getProperty("redis.timeout");

        JedisPoolConfig jedisPoolConfig = new JedisPoolConfig();
        jedisPoolConfig.setMaxIdle(Integer.valueOf(maxIdle));
        jedisPoolConfig.setMaxWaitMillis(Integer.valueOf(maxWaitMillis));
        jedisPoolConfig.setMaxTotal(Integer.valueOf(maxActive));
        jedisPoolConfig.setMinIdle(Integer.valueOf(minIdle));
        jedisPool = new JedisPool(jedisPoolConfig,host,Integer.valueOf(port),Integer.valueOf(timeout),password);
        System.out.println("JedisPool注入成功!");
        System.out.println("redis地址:" + host + ":" + port);
    }

    public static Jedis getResource() {
        return jedisPool.getResource();
    }

    @Deprecated
    public static void returnResource(Jedis jedis) {
        if (jedis != null){
            jedis.close();
        }
    }

    public static void main(String[] args) throws IOException {
        Jedis jedis = null;
        jedis = getResource();
        jedis.set("wangteng", "Hello World");
        System.out.println("向redis插入数据成功.........");
        String value = jedis.get("wangteng");
        System.out.println("从redis数据库中获取数据,key=wangteng, value=" + value);
    }
}
备注:
这里建议导入下
import org.slf4j.Logger;
import org.slf4j.LoggerFactory;
以上两个文件依赖,否则,会导致报错“SLF4J: Failed to load class "org.slf4j.impl.StaticLoggerBinder"”
但是,报错信息不影响操作redis数据库。
至此本章节就讲解完了,有疑问的读者欢迎留言讨论。
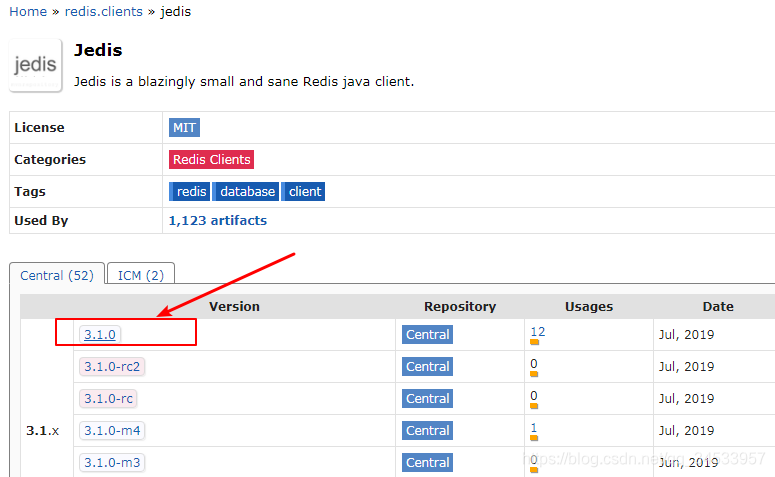
操作方法:
        <dependency>
            <groupId>redis.clients</groupId>
            <artifactId>jedis</artifactId>
        </dependency>
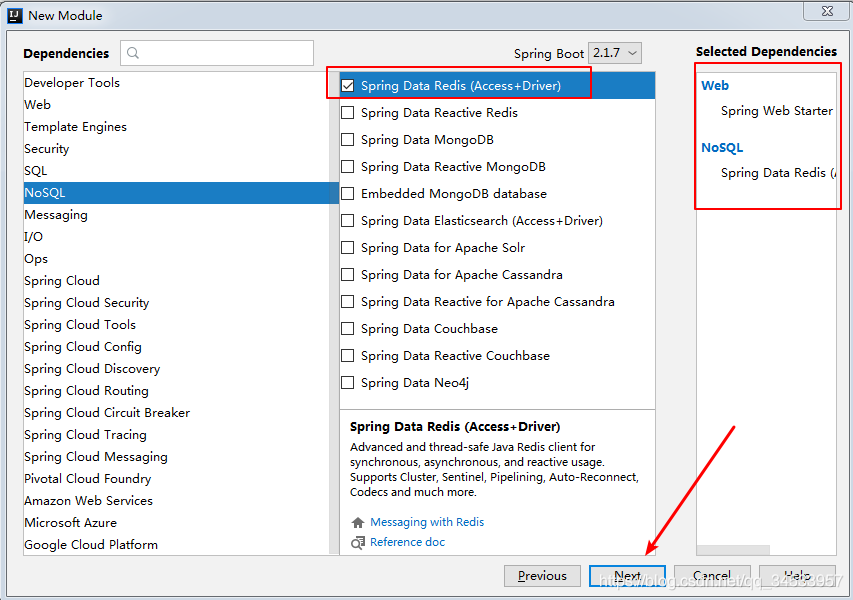
这里补充说明下,如果项目中添加了spring-boot-starter-data-redis这个启动器,在springboot2.xx之后的版本,这个启动器由原来springboot 1.xx版本的jedis修改为lettuce来实现访问redis数据库的。如果非要使用jedis访问的话,可以exclusion去掉lettuce,然后手动添加jedis。
<dependency>
<groupId>org.springframework.boot</groupId>
<artifactId>springbootstarterdataredis</artifactId>
<!--springboot2.o默认使用的redis客户端是lettuce -->
<exclusions>
<exclusion>
<groupId>io.lettuce</groupId>
<artifactId>lettucecore</artifactId>
</exclusion>
</exclusions>
</dependency>
<!--jedis -->
<dependency>
<groupId>redis.clients</groupId>
<artifactId>jedis</artifactId>
</dependency>
#redis jedis配置
# Redis数据库索引(默认为0)
spring.redis.database=0
# Redis服务器地址
spring.redis.host=127.0.0.1
# Redis服务器连接端口
spring.redis.port=6379
# Redis服务器连接密码(默认为空)
#spring.redis.password=
# 连接池最大连接数(使用负值表示没有限制)
spring.redis.jedis.pool.max-active=200
# 连接池最大阻塞等待时间(使用负值表示没有限制)
spring.redis.jedis.pool.max-wait=-1
# 连接池中的最大空闲连接
spring.redis.jedis.pool.max-idle=10
# 连接池中的最小空闲连接
spring.redis.jedis.pool.min-idle=3
# 连接超时时间(毫秒)
spring.redis.timeout=0
#spring-session 使用
spring.session.store-type=none
package com.nick.config;

import org.springframework.beans.factory.annotation.Value;
import org.springframework.boot.autoconfigure.EnableAutoConfiguration;
import org.springframework.boot.context.properties.ConfigurationProperties;
import org.springframework.cache.annotation.CachingConfigurerSupport;
import org.springframework.context.annotation.Bean;
import org.springframework.context.annotation.Configuration;
import redis.clients.jedis.JedisPool;
import redis.clients.jedis.JedisPoolConfig;

import java.security.PrivilegedAction;

@Configuration
@EnableAutoConfiguration
public class RedisConfig extends CachingConfigurerSupport {
    @Value("${spring.redis.host}")
    private String host;

    @Value("${spring.redis.port}")
    private int port;

    @Value("${spring.redis.timeout}")
    private int timeout;

    @Value("${spring.redis.jedis.pool.max-active}")
    private int maxActive;

    @Value("${spring.redis.jedis.pool.max-idle}")
    private int maxIdle;

    @Value("${spring.redis.jedis.pool.min-idle}")
    private int minIdle;

    @Value("${spring.redis.jedis.pool.max-wait}")
    private long maxWaitMillis;

    @Bean
    public JedisPool redisPoolFactory(){
        JedisPoolConfig jedisPoolConfig = new JedisPoolConfig();
        jedisPoolConfig.setMaxIdle(maxIdle);
        jedisPoolConfig.setMaxWaitMillis(maxWaitMillis);
        jedisPoolConfig.setMaxTotal(maxActive);
        jedisPoolConfig.setMinIdle(minIdle);
        JedisPool jedisPool = new JedisPool(jedisPoolConfig,host,port,timeout,null);
        System.out.println("JedisPool注入成功!");
        System.out.println("redis地址:" + host + ":" + port);
        return  jedisPool;
    }
}
在此springboot项目启动的时候在控制台可以看到上面打印的日志“JedisPool注入成功“。
至此,已经连接上redis数据库,接下来就可以使用了。
可以直接创建一个进行redis数据库操作的工具类xxxUtils.java或者以接口服务的形式实现,然后使用xxxController.java的形式调用。
package com.nick.service;

import org.springframework.boot.autoconfigure.data.redis.RedisProperties;
import redis.clients.jedis.Jedis;

import java.util.Set;

public interface RedisService  {
    public Jedis getResource();
    public void returnResource(Jedis jedis);
    public String set(String key, String value);
    public String get(String key);
    public String type(String key);
    public Set<String> keysBySelect(String pattern, int database);
    public Set<String> keys(String pattern);
}
–>RedisServiceImpl.java
package com.nick.service;

import org.springframework.beans.factory.annotation.Autowired;
import org.springframework.stereotype.Service;
import redis.clients.jedis.Jedis;
import redis.clients.jedis.JedisPool;

import java.util.Set;

@Service
public class RedisServiceImpl implements RedisService{

    @Autowired
    private JedisPool jedisPool;


    @Override
    public Jedis getResource() {
        return jedisPool.getResource();
    }

    @Override
    public void returnResource(Jedis jedis) {
        if (jedis != null){
            jedisPool.returnResource(jedis);
        }
    }

    /**
     * 向redis插入string类型的数据
     * @param key value
     * @return String
     */
    @Override
    public String set(String key, String value) {
        Jedis jedis = null;
        String result = null;
        try {
            jedis = jedisPool.getResource();
            result = jedis.set(key, value);
        } catch (Exception e) {
            System.out.println(e.getMessage());
            result = "0";
        } finally {
            returnResource(jedis);
            return result;
        }
    }

    /**
     * 返回指定Key的value值
     * @param key
     * @return String
     */
    @Override
    public String get(String key) {
        Jedis jedis = null;
        String result = null;
        try {
            jedis = jedisPool.getResource();
            result = jedis.get(key);
        } catch (Exception e) {
            System.out.println(e.getMessage());
        } finally {
            returnResource(jedis);
            return result;
        }
    }

    /**
     * 返回指定Key的数据类型
     * @param key
     * @return String
     */
    @Override
    public String type(String key) {
        Jedis jedis = null;
        String result = null;
        try {
            jedis = jedisPool.getResource();
            result = jedis.type(key);
        } catch (Exception e) {
            System.out.println(e.getMessage());
        } finally {
            returnResource(jedis);
            return result;
        }
    }

    /**
     * 返回满足pattern和指定redis数据库的所有key
     * @param pattern
     * @return Set<String>
     */
    @Override
    public Set<String> keysBySelect(String pattern, int database) {
        Jedis jedis = null;
        Set<String> result = null;
        try {
            jedis = jedisPool.getResource();
            jedis.select(database);
            result = jedis.keys(pattern);
        } catch (Exception e) {
            System.out.println(e.getMessage());
        } finally {
            returnResource(jedis);
            return result;
        }
    }

    /**
     * 返回满足pattern的所有key
     * @param pattern
     * @return Set<String>
     */
    @Override
    public Set<String> keys(String pattern) {
        Jedis jedis = null;
        Set<String> result = null;
        try {
            jedis = jedisPool.getResource();
            result = jedis.keys(pattern);
        } catch (Exception e) {
            System.out.println(e.getMessage());
        } finally {
            returnResource(jedis);
            return result;
        }
    }
}
package com.nick.controller;

import com.nick.service.RedisService;
import jdk.nashorn.internal.ir.ReturnNode;
import org.springframework.beans.factory.annotation.Autowired;
import org.springframework.web.bind.annotation.RequestMapping;
import org.springframework.web.bind.annotation.RestController;


@RestController
public class RedisController {

    @Autowired
    private RedisService redisService;

    @RequestMapping("set")
    public String set(String key, String value){
        System.out.println("-----开始写入----");
        String result = redisService.set(key,value);
        System.out.println("-----写入-------成功----");
        return  result;

    }

    @RequestMapping("get")
    public String get(String key){
        String result = redisService.get(key);
        System.out.println("---------key=" + key+", value=" + result);
        return redisService.get(key);
    }

    @RequestMapping("type")
    public String type(String key){
        String result = redisService.type(key);
        return result;
    }

}

这个可以参考我的另一个博客地址的示例学习下,
https://blog.csdn.net/qq_34533957/article/details/97981189#74_Springbootredis_1944
如果觉得我的文章对您有用,请随意打赏。你的支持将鼓励我继续创作!
