社区微信群开通啦,扫一扫抢先加入社区官方微信群

社区微信群
————————– 2018.03.27 更新————————-
便携版已更新,点此获取便携版
已知BUG:中文目录无法正常调试
用于cpptools 0.15.0插件的配置文件更新
新的launch.json
// Available variables which can be used inside of strings.
// ${workspaceRoot}: the root folder of the team
// ${file}: the current opened file
// ${fileBasename}: the current opened file's basename
// ${fileDirname}: the current opened file's dirname
// ${fileExtname}: the current opened file's extension
// ${cwd}: the current working directory of the spawned process

{
    "version": "0.2.0",
    "configurations": [
        {
            "name": "(gdb) Launch",
            "preLaunchTask": "build",
            "type": "cppdbg",
            "request": "launch",
            "program": "${fileDirname}/${fileBasenameNoExtension}.exe",
            "args": [],
            "stopAtEntry": false,
            "cwd": "${workspaceFolder}",
            "environment": [],
            "externalConsole": true,
            "MIMode": "gdb",
            "miDebuggerPath": "C:/Program Files (x86)/MinGW/bin/gdb.exe", // GDB的路径,注意替换成自己的路径
            "setupCommands": [
                {
                    "description": "Enable pretty-printing for gdb",
                    "text": "-enable-pretty-printing",
                    "ignoreFailures": true
                }
            ]
        }]
}
新的tasks.json
// Available variables which can be used inside of strings.
// ${workspaceRoot}: the root folder of the team
// ${file}: the current opened file
// ${fileBasename}: the current opened file's basename
// ${fileDirname}: the current opened file's dirname
// ${fileExtname}: the current opened file's extension
// ${cwd}: the current working directory of the spawned process


{
    "version": "2.0.0",
    "tasks": [
        {
            "label": "build",
            "type": "shell",
            "group": {
                "kind": "build",
                "isDefault": true
            },
            "presentation": {
                "echo": true,
                "reveal": "always",
                "focus": false,
                "panel": "shared"
            },
            "windows": {
                "command": "g++",
                "args": [
                    "-ggdb",
                    ""${file}"",
                    "--std=c++11",
                    "-o",
                    ""${fileDirname}\${fileBasenameNoExtension}.exe""
                ]
            }
        }
    ]
}
懒得自己配置或自己配置出现不明问题的朋友可以点这里:
【VSCode】Windows下VSCode便携式c/c++环境
http://blog.csdn.net/c_duoduo/article/details/52083494
下载解压即可食用。
————————– 2017.06.10 更新 (已过时)————————-
便携版已更新,点此获取便携版
用于cpptools插件的配置文件更新
更新的launch.json
// Available variables which can be used inside of strings.
// ${workspaceRoot}: the root folder of the team
// ${file}: the current opened file
// ${fileBasename}: the current opened file's basename
// ${fileDirname}: the current opened file's dirname
// ${fileExtname}: the current opened file's extension
// ${cwd}: the current working directory of the spawned process
{
    "version": "0.2.0",
    "configurations": [{
        "name": "C++ Launch (GDB)", // 配置名称,将会在启动配置的下拉菜单中显示
        "type": "cppdbg", // 配置类型,这里只能为cppdbg
        "request": "launch", // 请求配置类型,可以为launch(启动)或attach(附加)
        "targetArchitecture": "x86", // 生成目标架构,一般为x86或x64,可以为x86, arm, arm64, mips, x64, amd64, x86_64
        "program": "${file}.exe", // 将要进行调试的程序的路径

        "miDebuggerPath": "C:\MinGW\bin\gdb.exe", // miDebugger的路径,注意这里要与MinGw的路径对应

        "args": [], // 程序调试时传递给程序的命令行参数,一般设为空即可
        "stopAtEntry": false, // 设为true时程序将暂停在程序入口处,一般设置为false
        "cwd": "${fileDirname}", // 调试程序时的工作目录,一般为${workspaceRoot}即代码所在目录
        "externalConsole": true, // 调试时是否显示控制台窗口,一般设置为true显示控制台
        "preLaunchTask": "g++"   // 调试会话开始前执行的任务,一般为编译程序,c++为g++, c为gcc
    }]
}
更新的tasks.json
{
    "version": "0.1.0",
    "command": "g++",
    "args": ["-g","${file}","-o","${file}.exe"],    // 编译命令参数
    "problemMatcher": {
        "owner": "cpp",
        "fileLocation": ["relative", "${workspaceRoot}"],
        "pattern": {
            "regexp": "^(.*):(\d+):(\d+):\s+(warning|error):\s+(.*)$",
            "file": 1,
            "line": 2,
            "column": 3,
            "severity": 4,
            "message": 5
        }
    }
}
懒得自己配置或自己配置出现不明问题的朋友可以点这里:
【VSCode】Windows下VSCode便携式c/c++环境
http://blog.csdn.net/c_duoduo/article/details/52083494
下载解压即可食用。
————————– 以下是原文 ————————-
这篇文章为blackkitty记录在windows下使用vscode编译调试c/c++的详细过程
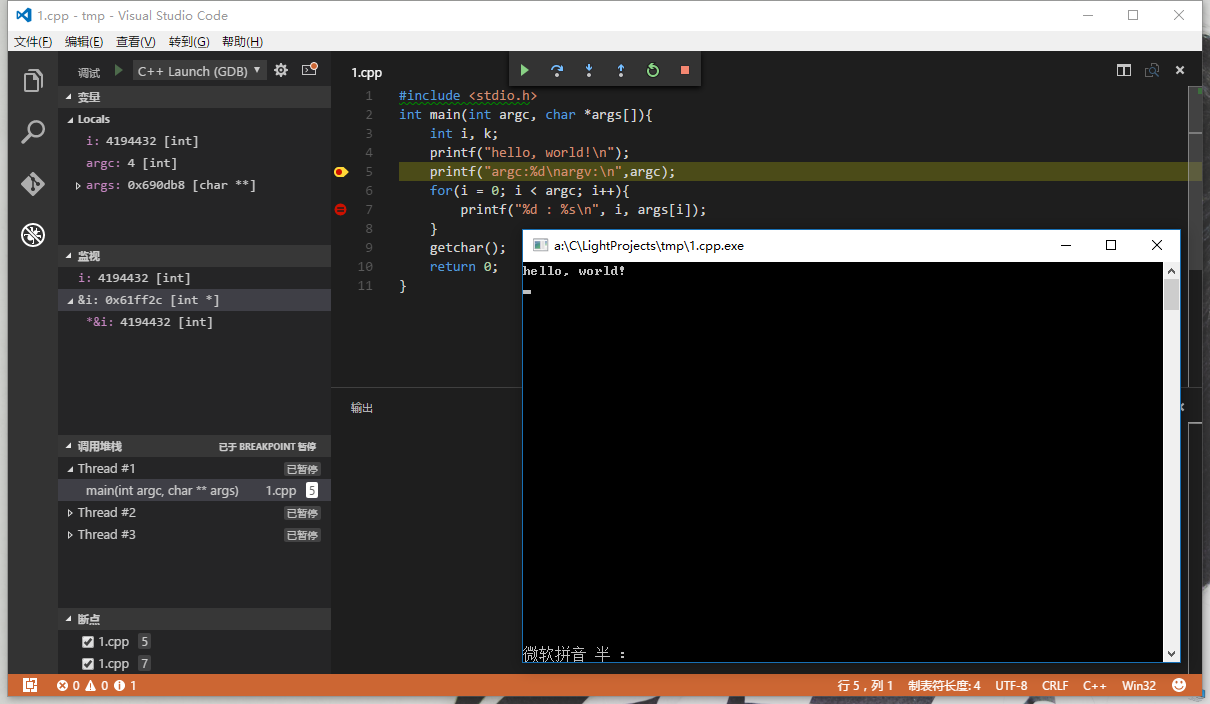
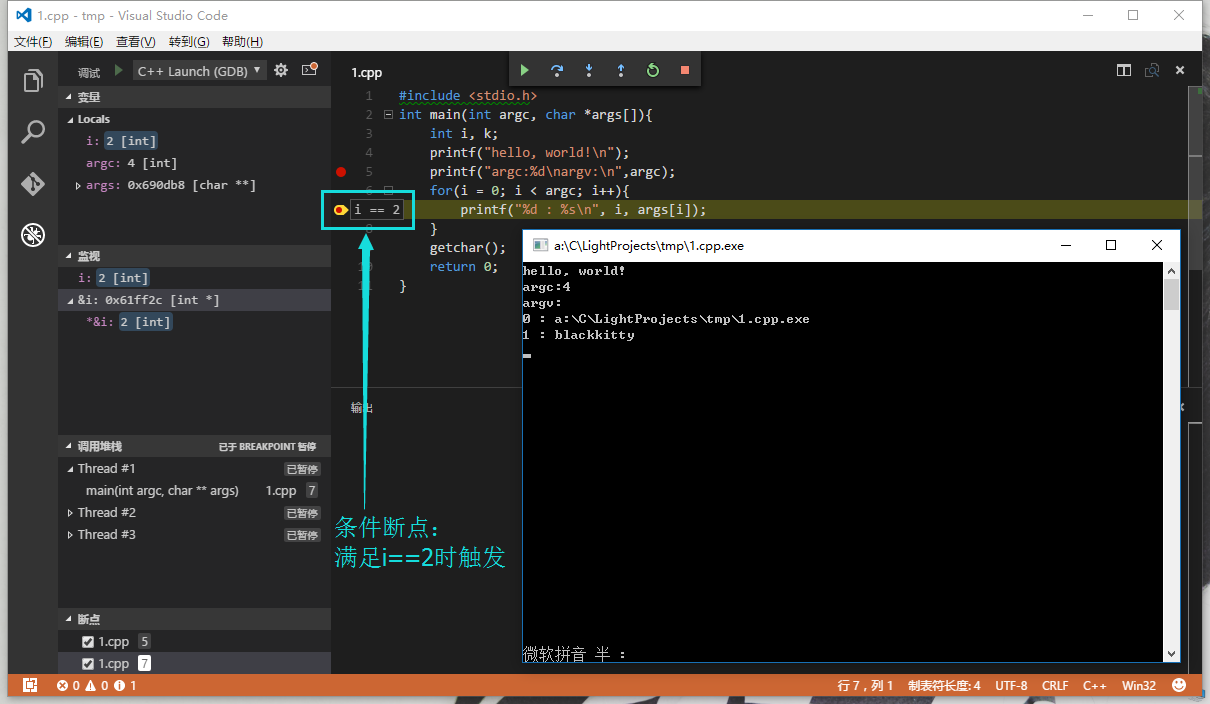
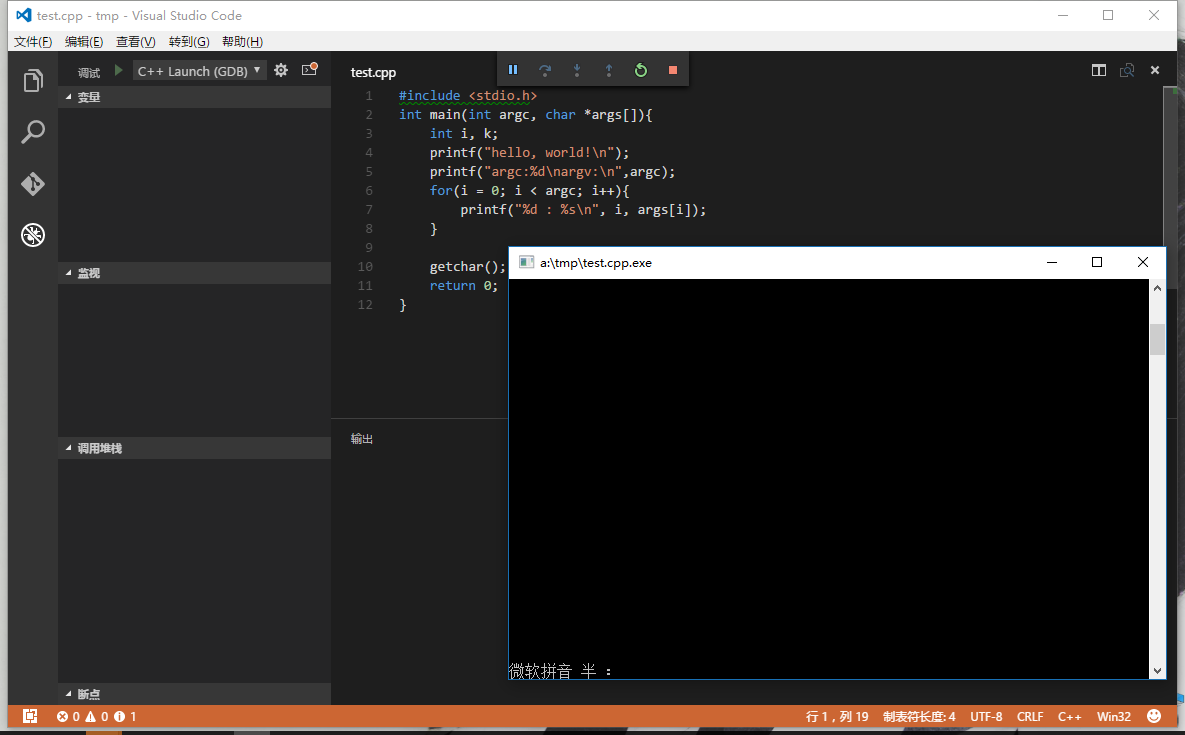
首先看效果
设置断点,变量监视,调用堆栈的查看:
条件断点的使用:
下面是配置过程:
总体流程:
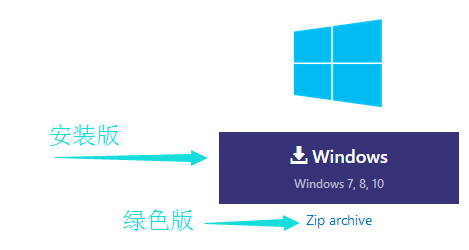
下载安装vscode
https://code.visualstudio.com/Download
点击下载自己喜欢的相应版本,绿色版解压即可食用
安装cpptools插件
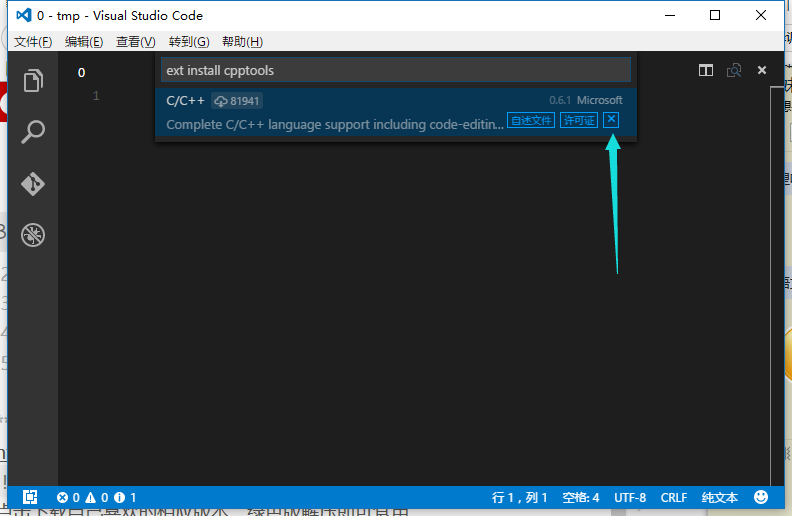
打开vscode,按ctrl+e打开快速命令框,输入以下命令后等待
ext install cpptools
vscode在短暂的联网查找后会列出插件列表,如图:
点击箭头所指处的按钮安装插件,安装过程可能会有些慢耐心等待
安装完成后vscode会提示你重启vscode,此时重启即可
安装编译、调试环境
目前windows下调试仅支持 Cygwin 和 MinGW。
这里使用的是MinGW.
下面是MinGW的安装配置过程:
http://mingw.org/
进入官网点击右侧 Download Installer下载安装器
打开安装器点击install准备安装:
选择一个安装目录,默认为C:MinGW这里选择的是A:MinGW
点击Continue开始安装,安装过程需联网,若安装时提示error则需翻墙安装
安装过程很快,结束后Continue按钮恢复为可用状态,点击完成安装。
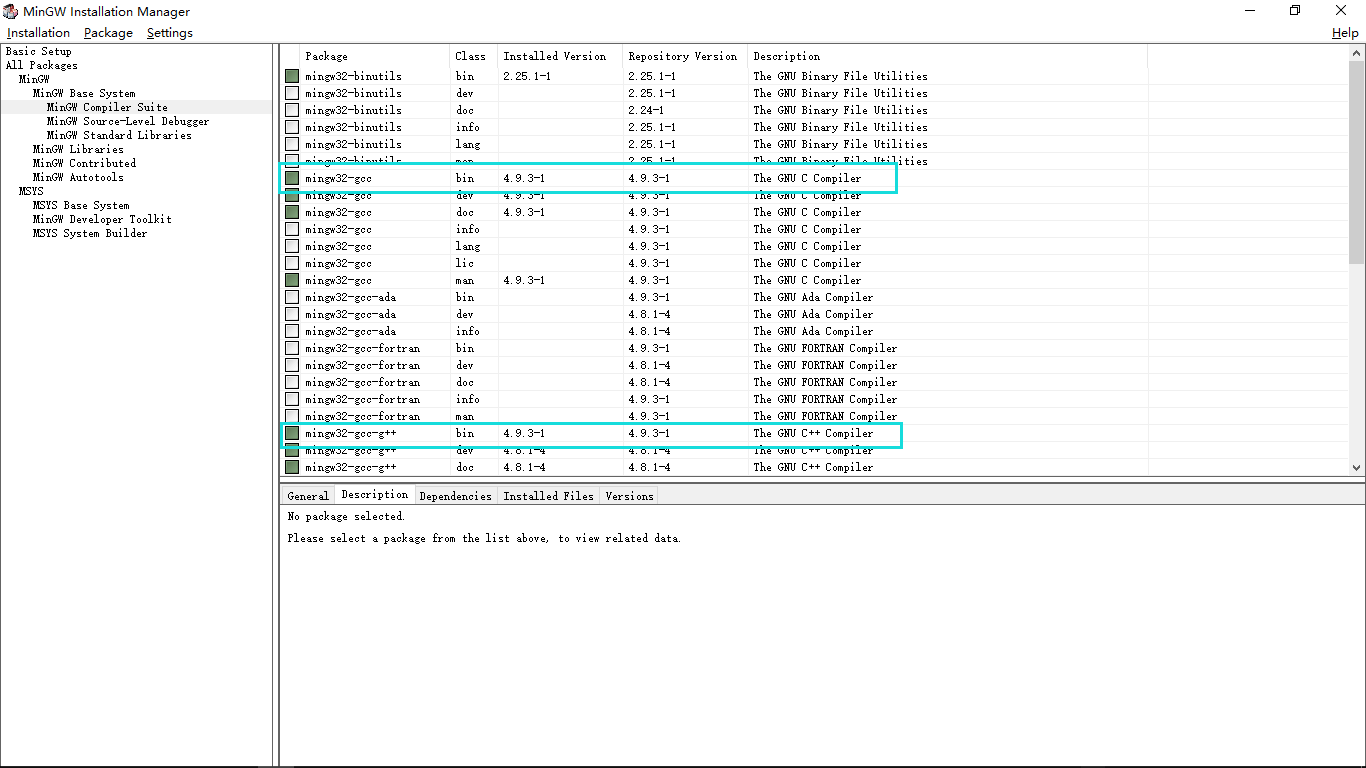
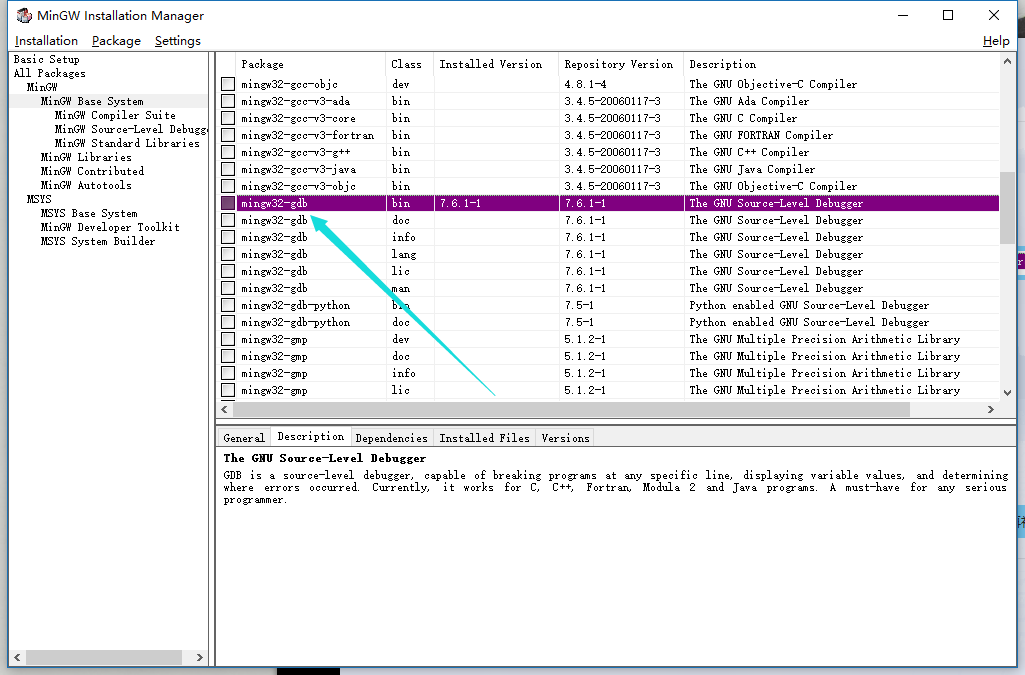
打开MinGW安装管理器进行进一步配置
注意这里gdb必选,否则无法调试
选中几个需要的项右键Make for Installation进行标记,其中gcc和g++为c和c++编译器
选择完全部想要安装的项后点击左上角Installation菜单下的Apply Changes应用修改,过程需联网,中间出现error可先继续,若最后失败则需翻墙更新,建议翻墙
然后配置系统环境变量path,这一步为必须
在 我的电脑 上右键 属性:
然后按照下面步骤做即可,注意最后新建的项要与之前MinGW安装位置相对应
修改vscode调试配置文件
再次打开vscode,注意配置系统环境变量path后重启一下vscode
注意vscode调试需要在打开的文件夹中进行
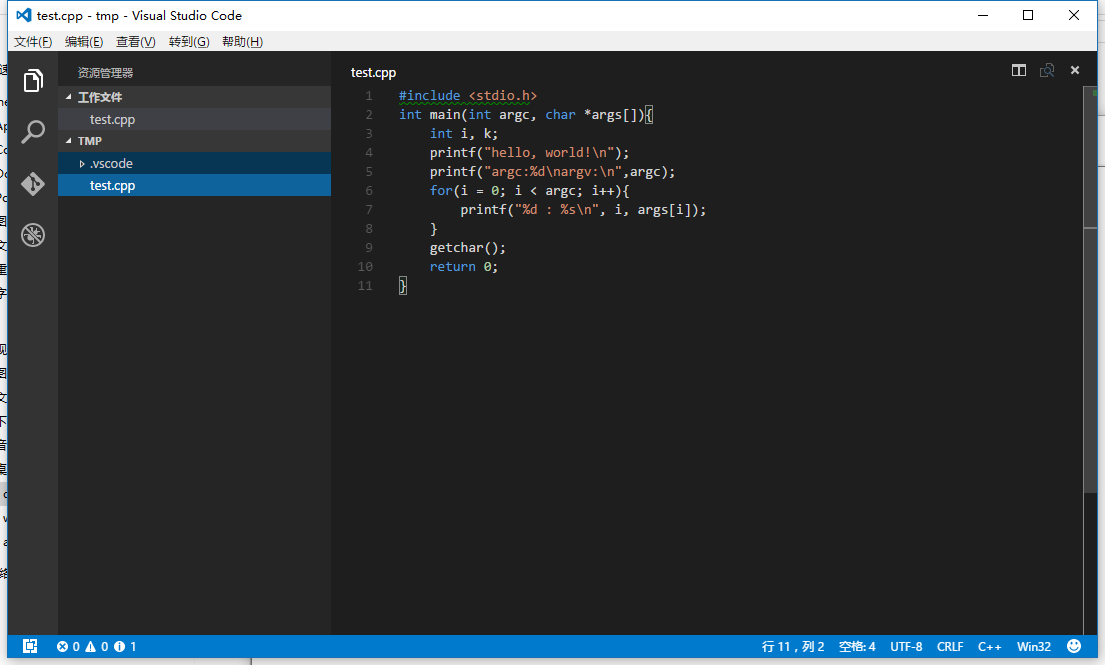
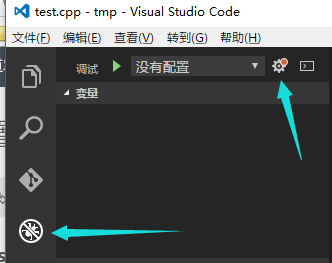
打开文件夹后,新建test.cpp进行输入代码测试:
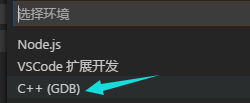
如图示进入调试界面选择C++:
然后会在工作目录下的生成一个launch.json的启动配置文件:
使用下面代码替换该文件:
{
    "version": "0.2.0",
    "configurations": [
        {
            "name": "C++ Launch (GDB)",                 // 配置名称,将会在启动配置的下拉菜单中显示
            "type": "cppdbg",                           // 配置类型,这里只能为cppdbg
            "request": "launch",                        // 请求配置类型,可以为launch(启动)或attach(附加)
            "launchOptionType": "Local",                // 调试器启动类型,这里只能为Local
            "targetArchitecture": "x86",                // 生成目标架构,一般为x86或x64,可以为x86, arm, arm64, mips, x64, amd64, x86_64
            "program": "${file}.exe",                   // 将要进行调试的程序的路径
            "miDebuggerPath":"a:\MinGW\bin\gdb.exe", // miDebugger的路径,注意这里要与MinGw的路径对应
            "args": ["blackkitty",  "1221", "# #"],     // 程序调试时传递给程序的命令行参数,一般设为空即可
            "stopAtEntry": false,                       // 设为true时程序将暂停在程序入口处,一般设置为false
            "cwd": "${workspaceRoot}",                  // 调试程序时的工作目录,一般为${workspaceRoot}即代码所在目录
            "externalConsole": true,                    // 调试时是否显示控制台窗口,一般设置为true显示控制台
            "preLaunchTask": "g++"                    // 调试会话开始前执行的任务,一般为编译程序,c++为g++, c为gcc
        }
    ]
}
注意miDebuggerPath要与MinGw的路径对应
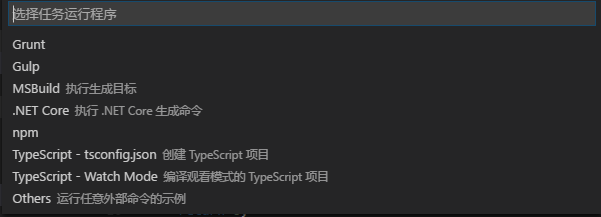
替换后保存,然后切换至test.cpp,按F5进行调试,此时会弹出一个信息框要求你配置任务运行程序,点击它~
在这里随便选一个:
然后用下面代码替换:
{
    "version": "0.1.0",
    "command": "g++",
    "args": ["-g","${file}","-o","${file}.exe"],    // 编译命令参数
    "problemMatcher": {
        "owner": "cpp",
        "fileLocation": ["relative", "${workspaceRoot}"],
        "pattern": {
            "regexp": "^(.*):(\d+):(\d+):\s+(warning|error):\s+(.*)$",
            "file": 1,
            "line": 2,
            "column": 3,
            "severity": 4,
            "message": 5
        }
    }
}
保存一下,然后切换至test.cpp,再次按F5启动调试~
完了!
如果觉得我的文章对您有用,请随意打赏。你的支持将鼓励我继续创作!