社区微信群开通啦,扫一扫抢先加入社区官方微信群

社区微信群
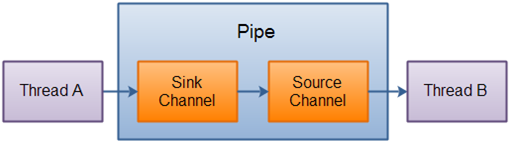
Java NIO管道用于在两个线程之间建立单向数据连接。它有一个槽通道和源通道。数据正在写入槽通道,然后可以从源通道读取该数据。
在Java NIO中,包java.nio.channel.pipe用于按顺序读取和写入数据。管道用于确保数据必须以写入管道的相同顺序读取。
下面来看看管道工作原理的示意图说明:
创建管道
要创建一个管道,可通过调用Pipe.open()方法打开管道。
打开或创建管道的语法是:
Pipe pp = Pipe.open();
从管道读取数据
要从管道读取数据,需要先访问源通道。 因此,用于访问源通道的语法是:
Pipe.SourceChannel sc= pipe.source();
要从SourceChannel读取数据,可调用read()方法,如下所示:
ByteBuffer bb= ByteBuffer.allocate(512);
int bytesRead = inChannel.read(bb);
read()方法返回的整数值用于确定读入缓冲区的字节数。
写入管道
要将数据写入管道,需要访问接收器通道。访问宿通道的语法是:
Pipe.SinkChannel sc= pipe.sink();
要将数据写入SinkChannel,可调用write()方法,如下所示:
String newData = "The new String is writing in a Pipe..." + System.currentTimeMillis();
ByteBuffer bb= ByteBuffer.allocate(512);
bb.clear();
bb.put(newData.getBytes());
bb.flip();
while(bb.hasRemaining()) {
    SinkChannel.write(bb);
}
基本管道示例:
package com.yiibai;

import java.io.IOException;
import java.nio.ByteBuffer;
import java.nio.channels.Pipe;

public class PipeExample {
    public static void main(String[] args) throws IOException {
        // The Pipe is created
        Pipe pipe = Pipe.open();
        // For accessing the pipe sink channel
        Pipe.SinkChannel skChannel = pipe.sink();
        String td = "Data is successfully sent for checking the java NIO Channel Pipe.";
        ByteBuffer bb = ByteBuffer.allocate(512);
        bb.clear();
        bb.put(td.getBytes());
        bb.flip();
        // write the data into a sink channel.
        while (bb.hasRemaining()) {
            skChannel.write(bb);
        }
        // For accessing the pipe source channel
        Pipe.SourceChannel sourceChannel = pipe.source();
        bb = ByteBuffer.allocate(512);
        // The data is write to the console
        while (sourceChannel.read(bb) > 0) {
            bb.flip();

            while (bb.hasRemaining()) {
                char TestData = (char) bb.get();
                System.out.print(TestData);
            }
            bb.clear();
        }
    }
}
执行上面示例代码,得到以下结果 -
如果觉得我的文章对您有用,请随意打赏。你的支持将鼓励我继续创作!