社区微信群开通啦,扫一扫抢先加入社区官方微信群

社区微信群
对于传统的单体应用而言,常使用配置文件来管理所有配置,比如SpringBoot的application.yml文件,但是在微服务架构中全部手动修改的话很麻烦而且不易维护。
微服务的配置管理一般有以下需求:
1.集中配置管理,一个微服务架构中可能有成百上千个微服务,所以集中配置管理是很重要的。
2.不同环境不同配置,比如数据源配置在不同环境(开发,生产,测试)中是不同的。
3.运行期间可动态调整。
4.配置修改后可自动更新。
Spring Cloud Config已经全部实现了上面几点。
本文假设小伙伴们已经有一个GitHub账号了,并且对Git的一些基本操作命令也已经熟悉了。
foo-default.properties
foo-dev.properties
foo-production.properties
foo-test.properties
内容分别是:
profile=default-1.0
profile=dev-1.0
profile=production-1.0
profile=test-1.0
为了测试版本,为该git仓库创建config-2.0分支,并修改文件中的1.0为2.0
修改pom.xml文件,添加依赖
<dependency>
            <groupId>org.springframework.cloud</groupId>
            <artifactId>spring-cloud-config-server</artifactId>
        </dependency>
修改启动类
@SpringBootApplication
@EnableConfigServer //声明是一个Config Server
public class YmkConfigServerApplication {

    public static void main(String[] args) {
        SpringApplication.run(YmkConfigServerApplication.class, args);
    }
}
修改application.yml
server:
  port: 8080
spring:
  application:
    name: config-server
  cloud:
    config:
      server:
        git:
          uri: https://github.com/youngmingkai/spring-cloud-config-repo
          username: xxxx
          password: xxxx
这样一个Config Server 就搭建好了!
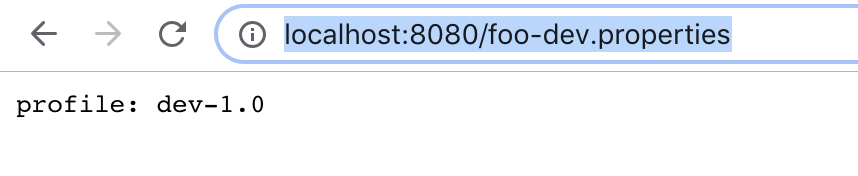
启动项目访问:http://localhost:8080/foo-dev.properties ,返回了属性值
访问:http://localhost:8080/config-2.0/foo-dev.properties 同样返回了属性值

至此,已经成功构建了Config Server ,并获得了Git仓库中的配置信息。
创建一个子项目
修改pom.xml文件,添加依赖
<dependency>
            <groupId>org.springframework.cloud</groupId>
            <artifactId>spring-cloud-starter-config</artifactId>
        </dependency>
启动类无需修改
修改application.yml配置文件
server:
  port: 8081
新建bootsstrap.yml文件,并添加
spring:
  application:
    name: foo    # 对应config server所获取的配置文件的{application}
  cloud:
    config:
      uri: http://localhost:8080/
      profile: dev            # profile对应config server所获取的配置文件中的{profile}
      label: master           # 指定Git仓库的分支,对应config server所获取的配置文件的{label}
新建一个控制器,用来测试
@RestController
public class ConfigClientController {

  @Value("${profile}")
  private String profile;

  @GetMapping("/profile")
  public String hello() {
    return this.profile;
  }
}
依次启动Config Server ,Config Client
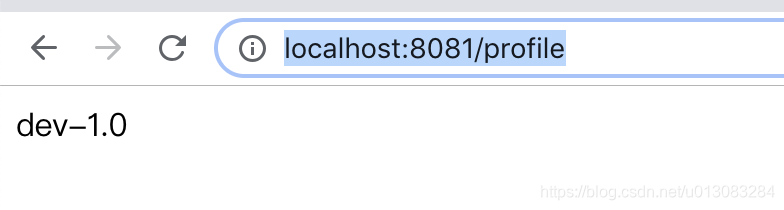
访问:http://localhost:8081/profile
至此Config Client 搭建完成!
{application}、{profile}、{label}等占位符可以用于映射配置文件,还可以用于Config Server中配置Git仓库地址
特别注意:用占位符的形式定义Git仓库地址时,配置文件的文件名必须为application*.yml或application*.properties
所以新建一个git仓库,还是上面的四个文件,只不过这次的文件以application开头
测试:修改配置文件如下
uri: https://github.com/youngmingkai/{application}
http://localhost:8080/spring-cloud-config-repo-application-dev.yml

可以通过应用程序和配置文件名称的模式匹配来支持更复杂的需求,但通常情况下不建议使用这种方式。
特殊场景如有需要可用参考Pattern Matching and Multiple Repositories。
很多场景下,可能把配置文件放在git仓库的子目录中,此时可以使用search-path指定,search-path同样支持占位符。
search-paths: foo,bar*
以上配置会加载 git根目录、foo子目录、以及所有以bar开始的子目录中查找配置文件。
默认情况下,首次请求配置时,Config Server克隆Git仓库,也可以通过clone-on-start设置Config Server启动时是否克隆git仓库。
全局配置:
spring:
  application:
    name: config-server
  cloud:
    config:
      server:
        git:
          clone-on-start: true
指定仓库:
spring:
  cloud:
    config:
      server:
        git:
          repos:
            指定仓库:
              clone-on-start: true
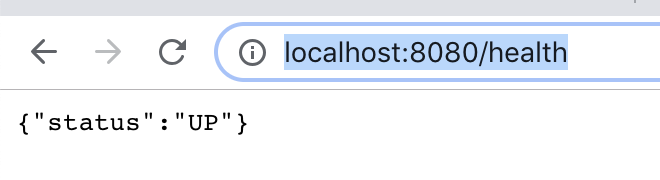
Config Server自带了健康状况指示器,为/health,用于检查配置的仓库是否可用
很多场景下,需要在运行期间动态调整配置,如果配置发生了变化,微服务要如何实现配置的刷新呢?
修改pom.xml添加依赖
<dependency>
            <groupId>org.springframework.boot</groupId>
            <artifactId>spring-boot-starter-actuator</artifactId>
        </dependency>
在控制器添加注解 @RefreshScope
@RestController
@RefreshScope
public class ConfigClientController {

  @Value("${profile}")
  private String profile;

  @GetMapping("/profile")
  public String hello() {
    return this.profile;
  }
}
修改application.yml
server:
  port: 8081

management:
  security:
    enabled: false
这样代买就改造好了!
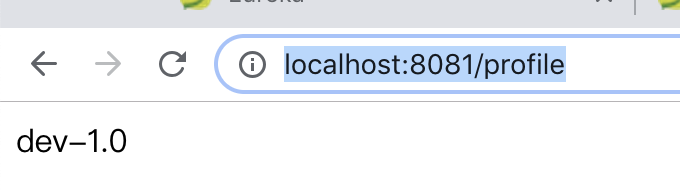
访问 http://localhost:8081/profile
修改文件内容为 dev-1.0-change
再次访问 http://localhost:8081/profile ,结果没有变化,说明配位尚未刷新。
发送POST请求,到 http://localhost:8081/refresh 返回["profile"],说明刷新成功!
再次访问 http://localhost:8081/profile
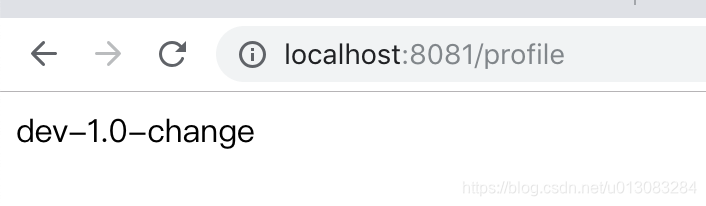
配置已经刷新了!
Spring Cloud Bus使用消息代理(RabbitMQ,Kafka等)链接分布式系统的节点,这样就可以广播传播状态的更改。微服务的所有实例都通过消息总线连接到一起,每个实例都会订阅配置更新事件,当其中一个微服务的节点的/bus/refresh端点被请求时,该实例会向消息总线发送一个配置更新事件,其他实例获取该事件后会更新配置。
安装Rabbitmq
修改项目pom文件,添加依赖
<dependency>
            <groupId>org.springframework.cloud</groupId>
            <artifactId>spring-cloud-starter-bus-amqp</artifactId>
        </dependency>
修改bootstrap.yml文件,添加rabbitmq
spring:
  application:
    name: foo    # 对应config server所获取的配置文件的{application}
  cloud:
    config:
      uri: http://localhost:8080/
      profile: dev            # profile对应config server所获取的配置文件中的{profile}
      label: master           # 指定Git仓库的分支,对应config server所获取的配置文件的{label}

  rabbitmq:
    host: xx.xxx.xx.xx
    port: 5672
    username: xxx
    password: xxx
就是这么简单!
pom.xml配置文件,添加依赖
<dependency>
            <groupId>org.springframework.cloud</groupId>
            <artifactId>spring-cloud-starter-eureka-server</artifactId>
        </dependency>
修改application.yml文件,添加
eureka:
  client:
    serviceUrl:
      defaultZone: http://localhost:8761/eureka/
修改启动类
@SpringBootApplication
@EnableConfigServer //声明是一个Config Server
@EnableEurekaClient
public class YmkConfigServerApplication {

    public static void main(String[] args) {
        SpringApplication.run(YmkConfigServerApplication.class, args);
    }
}
修改pom.xml文件添加依赖
<dependency>
            <groupId>org.springframework.cloud</groupId>
            <artifactId>spring-cloud-starter-eureka-server</artifactId>
        </dependency>
修改启动类
@SpringBootApplication
@EnableEurekaClient
public class YmkConfigClientApplication {

    public static void main(String[] args) {
        SpringApplication.run(YmkConfigClientApplication.class, args);
    }
}
修改bootstrap.yml
spring:
  application:
    name: foo    # 对应config server所获取的配置文件的{application}
  cloud:
#    config:
#      uri: http://localhost:8080/
#      profile: dev            # profile对应config server所获取的配置文件中的{profile}
#      label: master           # 指定Git仓库的分支,对应config server所获取的配置文件的{label}

#eureka 注册中心
    config:
      profile: dev
      label: master
      discovery:
        enabled: true                                  # 表示使用服务发现组件中的Config Server,而不自己指定Config Server的uri,默认false
        service-id: config-server  # 指定Config Server在服务发现中的serviceId,默认是configserver

  rabbitmq:
    host: xx.1xx.xx.xx
    port: 5672
    username: xxx
    password: xxx
    virtualHost: xx

eureka:
  client:
    serviceUrl:
      defaultZone: http://localhost:8761/eureka/
至此完成!
源码下载 :https://github.com/youngmingkai/yang-spring-boot-cloud-parent
如果觉得我的文章对您有用,请随意打赏。你的支持将鼓励我继续创作!
