社区微信群开通啦,扫一扫抢先加入社区官方微信群

社区微信群
今天终于跑通了RCNN目标检测代码,说实话为了实现目标检测我试着在windows上配置各种检测框架,fast-RCNN,faster_RCNN,RFCN,SSD。好吧最终没一个成功的,windows上的配置真心不是一般繁琐,而且的电脑配置低,只能用CPU。
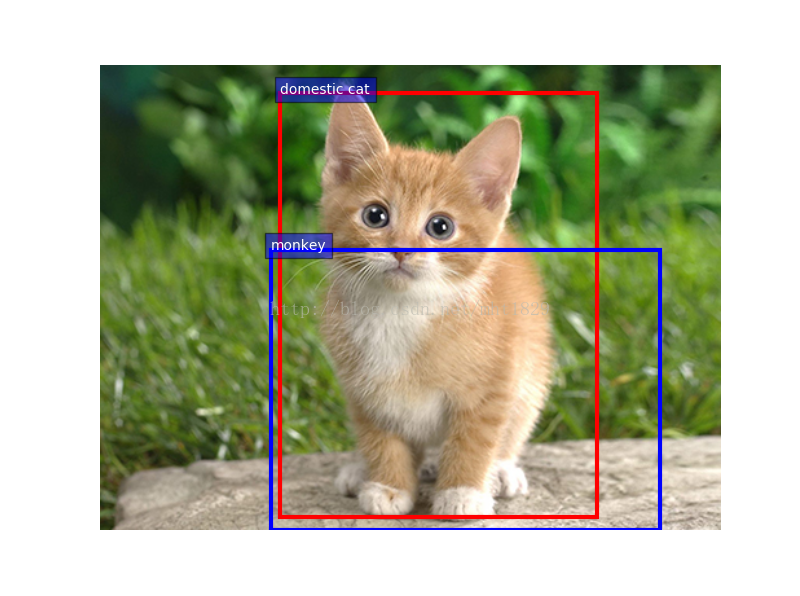
先上个我跑通后的图,我只试了一张图片。
第一步装caffe-windows,这个版本应该没什么要求,我用的是caffe提供Windows工具包(caffe-windows):https://github.com/BVLC/caffe/tree/windows ,具体配置可参考下面这篇博客,写得很详细。
http://blog.csdn.net/zb1165048017/article/details/51355143
最好同时能够配好python的接口,因为接下来会用到。所以在此之前电脑上最好已经装了python,如何让配置python的接口可参考我以前的博客。在运行过程中python会调用的matlab的函数,matlab也是必备的。本人使用的是Anaconda2+python2.7+matlab2014a+VS2013.

shlex.split(mc), stdout=open('null', 'w'), cwd=script_dirname)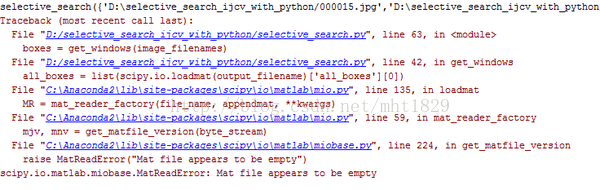
我们来看程序了:
# Execute command in MATLAB.
mc = "matlab -nojvm -r "try; {}; catch; exit; end; exit"".format(command)
pid = subprocess.Popen(
        shlex.split(mc), stdout=open('null', 'w'), cwd=script_dirname)
retcode = pid.wait() %此句在windows下没有效果,我们可以改为time.sleep(5)。5即让主程序暂停5s,也可以写其他数值,不过在此之前,应该到代码顶部加一句import time。
if retcode != 0:
    raise Exception("Matlab script did not exit successfully!")
这下应该没什么错了吧,我忘了,实在遇到的错误太多,记得没有那么清楚了,有问题可以再提。
第三步,来运行detect.py。怎么说呢,这个文件要改的东西太多了,毕竟原文件时在linux系统下运行的,我的技术又太渣,并不会改成windows版本,所以决定放弃,转用Ubuntu。然而我在Ubuntu上装matlab的时候无聊搜了搜知乎,发现有人已经改成windows版了。所以我又决定再试试。参考的知乎https://zhuanlan.zhihu.com/p/22287237。
把他的detect.py代码考过来,不过有很多错误,缩进格式就有错误,我还是上传一份我改过后的代码吧,
import numpy as np
import pandas as pd
import time
import matplotlib.pyplot as plt
import os

import caffe

CROP_MODES = ['list', 'selective_search']
COORD_COLS = ['ymin', 'xmin', 'ymax', 'xmax']


def detect(pretrained_model,model_def,mean_file,input_file,gpu=False):
    mean=None
    if mean_file:
        mean = np.load(mean_file)
    if mean.shape[1:] != (1, 1):
        mean = mean.mean(1).mean(1)
        channel_swap = [2,1,0]

    if gpu:
        caffe.set_mode_gpu()
        print("GPU mode")
    else:
        caffe.set_mode_cpu()
        ("CPU mode")

# Make detector.
    detector = caffe.Detector(model_def, pretrained_model, mean=mean,
    raw_scale=255.0,channel_swap=channel_swap,context_pad=16)

# Load input.
    t = time.time()
    print("Loading input...")
    if input_file.lower().endswith('txt'):
        with open(input_file) as f:
           inputs = [_.strip() for _ in f.readlines()]
    elif input_file.lower().endswith('csv'):
        inputs = pd.read_csv(input_file, sep=',', dtype={'filename': str})
        inputs.set_index('filename', inplace=True)
    else:
        raise Exception("Unknown input file type: not in txt or csv.")

# Detect.
    detections = detector.detect_selective_search(inputs)
    print("Processed {} windows in {:.3f} s.".format(len(detections),
                                                     time.time() - t))

# Collect into dataframe with labeled fields.
    df = pd.DataFrame(detections)
    df.set_index('filename', inplace=True)
    df[COORD_COLS] = pd.DataFrame(
        data=np.vstack(df['window']), index=df.index, columns=COORD_COLS)
    del(df['window'])
#此处我也使用了绝对路径
    with open('D:/caffeDev/caffe-windows/data/ilsvrc12/det_synset_words.txt', 'r') as f:
        labels_df = pd.DataFrame([{'synset_id': l.strip().split(' ')[0],
        'name': ' '.join(l.strip().split(' ')[1:]).split(',')[0]}
        for l in f.readlines()])

    for filename in inputs:
        spec_df=df.loc[os.path.abspath(filename)]
        predictions_df = pd.DataFrame(np.vstack(spec_df.prediction.values), columns=labels_df['name'])
        max_s=predictions_df.max(0)
        max_s.sort_values(ascending=False,inplace=True)
        print(max_s[:10])

        i = predictions_df[max_s.index[0]].argmax()
        j = predictions_df[max_s.index[1]].argmax()

        im = plt.imread(filename)
        currentAxis = plt.gca()

        det = spec_df.iloc[i]
        coords = (det['xmin'], det['ymin']), det['xmax'] - det['xmin'], det['ymax'] - det['ymin']
        currentAxis.add_patch(plt.Rectangle(*coords, fill=False, edgecolor='r', linewidth=3))
        currentAxis.text(det['xmin'], det['ymin'], max_s.index[0],
        bbox=dict(facecolor='blue', alpha=0.5),
        fontsize=10, color='white')

        det = spec_df.iloc[j]
        coords = (det['xmin'], det['ymin']), det['xmax'] - det['xmin'], det['ymax'] - det['ymin']
        currentAxis.add_patch(plt.Rectangle(*coords, fill=False, edgecolor='b', linewidth=3))
        currentAxis.text(det['xmin'], det['ymin'], max_s.index[1],
        bbox=dict(facecolor='blue', alpha=0.5),
        fontsize=10, color='white')

        plt.axis('off')
        plt.imshow(im)
        plt.show()


if __name__=='__main__':
    pretrained_model='D:/caffeDev/caffe-windows/models/bvlc_reference_rcnn_ilsvrc13/bvlc_reference_rcnn_ilsvrc13.caffemodel'
#为了避免错误,我使用的都是绝对路径。这里相对于原文件来说不同点就是原文件是在运行detect.py时在后面传相应的参数,而这里是直接定义了。
model_def='D:/caffeDev/caffe-windows/models/bvlc_reference_rcnn_ilsvrc13/deploy.prototxt'
mean_file='D:/caffeDev/caffe-windows/models/bvlc_reference_rcnn_ilsvrc13/ilsvrc_2012_mean.npy'
input_file='D:/caffeDev/caffe-windows/Build/x64/Release/pycaffe/det_input.txt'
detect(pretrained_model,model_def,mean_file,input_file)det_input.txt中只有一行图片的路径信息,如下图所示:
运行报错信息
ValueError: 'axis' entry 2 is out of bounds (-2, 2)

修改文件:~/caffe-master/python/caffe/detector.py
修改前:predictions = out[self.outputs[0]].squeeze(axis=(2, 3))
修改后:predictions = out[self.outputs[0]].squeeze(Traceback (most recent call last):
File "D:caffeDevcaffe-windowsBuildx64Releasepycaffedetect.py", line 98, in <module>
detect(pretrained_model,model_def,mean_file,input_file)
File "D:caffeDevcaffe-windowsBuildx64Releasepycaffedetect.py", line 56, in detect
with open('det_synset_words.txt', 'r') as f:
IOError: [Errno 2] No such file or directory: 'det_synset_words.txt'现在应该没什么错了,需要注意的是,如果这个文件不在CAFFE-ROOT/Python目录下,需要将其添加到PYTHONPATH路径中,不过我添加了PYTHONPATH路径,还是会报ImportError: No module named selective_search_ijcv_with_python错误。没办法又把这个包添加到D:caffeDevcaffe-windows下,同时也添加到了D:caffeDevcaffe-windowsBuildx64Releasepycaffe。另外我在D:caffeDevcaffe-windows或在D:caffeDevcaffe-windowsBuildx64Releasepy运行detect.py代码时,老是蹦ImportError: No module named numpy,我实在不知道是什么原因,最后直接打开Anaconda Prompt 下运行,运行时输入完整路径。如我输入的是C:Usersasus>python D:caffeDevcaffe-windowsBuildx64Releasepycaffedetect.py --raw_scale=255 --crop_mode=selective_search。
运行成功结果。我的运行时间那么长是因为前面的time.sleep设置了50s。停的比较久。小猫咪的图在前面就已经放了。
Processed 1673 windows in 261.537 s.
name
domestic cat             0.290301
monkey                  -0.364010
fox                     -0.499396
flower pot              -0.561736
horse                   -0.922417
strawberry              -0.923322
salt or pepper shaker   -0.925882
head cabbage            -0.955417
binder                  -0.970688
table                   -0.999348
dtype: float32如果觉得我的文章对您有用,请随意打赏。你的支持将鼓励我继续创作!