社区微信群开通啦,扫一扫抢先加入社区官方微信群

社区微信群
在学习google新出品的MotionLayout控件时,由于国内没有很好的学习资源(也可能是我没有找到),在Medium上看到这边比较好的文章,我就尝试着翻译过来,如果翻译的不好,希望大家见谅。第一次做翻译有些紧张:)。 文章的原有链接为:https://medium.com/google-developers/introduction-to-motionlayout-part-i-29208674b10d 是google官方开发人员写的,所有的代码源码都在github上可以找到,地址为:https://github.com/googlesamples/android-ConstraintLayoutExamples 。 我这里主要是记录一下自己学习的过程,重在成长。
第一篇主要是MotionLayout的介绍,代码不多,译文如下(有很多修饰性的语句,我直接删除了,可以翻墙的话推荐直接看原文):
MotionLayout是一个非常新的类,它来自ConstraintLayout 2.0库中,主要目的是为了帮助Android开发人员在应用中降低使用手势和组件动画的难度。[题外话:这和jetpack的初衷是一致的,都是为了更好、更快的开发app而生]。
Andoird framwork层已经给我提供了各种实现动画的方式:
MotionLayout,就像它的名字所陈述的一样,首先它是一个Layout,它可以为元素提供布局的功能。实际上它就是ConstraintLayout的子类,有强大并且丰富的布局功能。
MotionLayout的设计是为了连接布局过渡与复杂的手势处理。你可以把它想象成属性动画框架、过渡动画管理和CoordinatorLayout三种能力集于一身的框架。
混合了属性动画框架、TransitionManager的布局转换和CoordinatorLayout
它可以能够描述两个布局之间的过渡( 就像TransitionManager的功能一样),但是它又和TransitionManager不一样的地方在于,在转换的过程中,任何属性都能以动画的形式过渡(不仅仅是已有的属性,自定义属性也可以)。更屌的是,它本身就支持可见的转换,就像CoordinatorLayout一样(这种转换完全由触摸驱动,并且立即转换到任意点)。它支持触摸处理和关键帧(keyFrames),允许开发者非常容易的定制元素之间的过渡。
MotionLayout完全是声明式的
MotionLayout另一个不同点就是完全是声明式的,你完全可以用xml写一个复杂的转换(如果想用代码,当时也是非常可以的)
MotionLayout 工具
我们相信 使用这种声明式的说明 将会简化动画的创建,同时也为在Android studio中提供了一个可视化的工具。但是这个工具目前还不是特别稳定,估计会在稳定版或者beta版中与大家见面。

最后,MotionLayout作为ConstraintLayout 2.0的一部分,将会以support library的形式与大家见面。API支持最低为14,这就意味着至少支持99.8%的Android设备。
MotionLayout只能对其直属的子View提供各种变换功能,这一点相对于可以作用布局层级和Activity之间转换的TransitionManager来说,的确是一个劣势。
当你使用MotionLayout,我们预想的情景是这样的:当你想移动、缩放或者缩放页面上的UI元素,就像那些按钮、titlebar等等,那些需要交互的元素。
当用户需要与UI元素交互时,就可以使用MotionLayout
意识到这种Motion是很重要的,主要是有以下几个目的:
这类动画只需要处理预定义好的内容,用户没有或者不需要与这些内容直接交互。对于像视频、gif图片或者其他有限的方式,animated vector drawables或者一个lottie文件,MotionLayout不需要指定如果处理这些东西(当然MotionLayout可以包含这些东西在其中)
添加ConstraintLayout 2.0到gradle 文件中(写这篇文章的时候,还没有出beta版,目前来说还只有alpha版)
dependencies {
    implementation 'com.android.support.constraint:constraint-layout:2.0.0-alpha2'
}
MotionLayout是ConstraintLayout 的子类,所以你可以对待普通的Layout一样. 将ConstraintLayout 转换成MotionLayout,可以直接为:
<android.support.constraint.ConstraintLayout .../>
转为为:
<android.support.constraint.motion.MotionLayout .../>
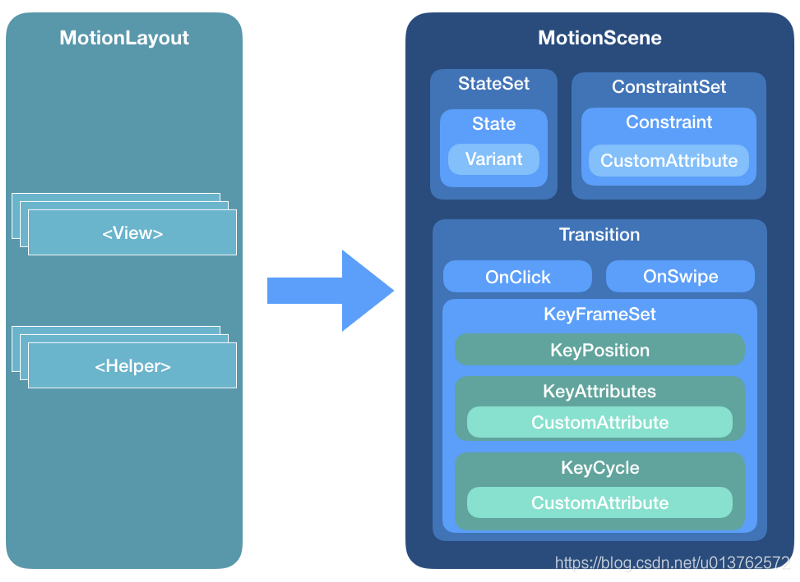
ConstraintLayout 与MotionLayout 最大的区别在于XML层级上面,实际上MotionLayout 并没有包含在布局文件中。
当然啦,MotionLayout非常有特色的将所有的信息保存在了一个独立的XML文件中,保存在XML文件中的信息优先级将会比layout文件中要高。
所以,这个布局文件仅仅只包含了View和它的属性,并没有包含他们的定位或者运动情况。
ConstraintSet是跟随ConstraintLayout 一起的,它封装了layout中的布局规则信息。你可以使用多个ConstraintSet,你可以决定使用哪些布局规则作用到你的layout上,此时并不需要你重新创建View,只需要改变它们的位置或者大小即可。
相比于TransitionManager,在ConstraintLayout 中 ConstraintSet提供了一个相对容易的方式来创建动画。
MotionLayout本质上就是基于以上想法的,在将来这些概念将会被扩展。
就像已经讲过的,与layouts布局相反,MotionLayout保存的规则就是存放到独立的XML文件中,MotionScene,存放在你的res/xml目录中。
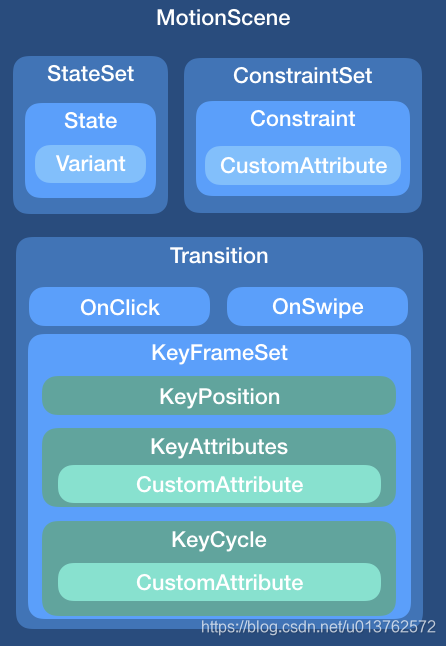
一个MotionScene可以包含指定动画的所需要的一切。
举个例子, 下面的例子就是一个view从屏幕的左方向移动到右方向,你可以使用手指移动:
我们需要创建两个ConstraintSets ,一个是开始位置的布局信息(上图的view在左侧时的布局),下一个就是第二个位置(就是上图view在最右侧的位置)。
开始布局:
我们命名为motion_01_cl_start.xml, 代码为:
<?xml version="1.0" encoding="utf-8"?>
<android.support.constraint.ConstraintLayout xmlns:android="http://schemas.android.com/apk/res/android"
    xmlns:tools="http://schemas.android.com/tools"
    xmlns:app="http://schemas.android.com/apk/res-auto"
    android:layout_width="match_parent"
    android:layout_height="match_parent">

    <View
        android:id="@+id/button"
        android:background="@color/colorAccent"
        android:layout_width="64dp"
        android:layout_height="64dp"
        android:layout_marginStart="8dp"
        android:text="Button"
        app:layout_constraintBottom_toBottomOf="parent"
        app:layout_constraintStart_toStartOf="parent"
        app:layout_constraintTop_toTopOf="parent" />

</android.support.constraint.ConstraintLayout>
结束布局:
我们命名为motion_01_cl_end.xml, 代码为:
<?xml version="1.0" encoding="utf-8"?>
<android.support.constraint.ConstraintLayout xmlns:android="http://schemas.android.com/apk/res/android"
    xmlns:tools="http://schemas.android.com/tools"
    xmlns:app="http://schemas.android.com/apk/res-auto"
    android:layout_width="match_parent"
    android:layout_height="match_parent">

    <View
        android:id="@+id/button"
        android:background="@color/colorAccent"
        android:layout_width="64dp"
        android:layout_height="64dp"
        android:layout_marginEnd="8dp"
        android:text="Button"
        app:layout_constraintBottom_toBottomOf="parent"
        app:layout_constraintEnd_toEndOf="parent"
        app:layout_constraintTop_toTopOf="parent" />

</android.support.constraint.ConstraintLayout>
在ConstraintLayout中,你需要为这两个layout初始化两个ConstraintSets,然后应用它们(如果使用TransitionManager,这种转换将会以动画的形式进行)。这里有一个问题就是,如果变换开始了,将不能打断,只能从开始到完成,中间没有停顿。当然,在转换的过程中,你不能告诉系统达到指定的点,意味着你不能通过用户的输入驱动转换。
但是MotionLayout解决了这些问题。这里将会告诉你MotionLayout怎么做相同的事,它甚至重用布局的方式来初始化两种状态。首先我们来为我们的组件创建一个MotionLayout文件:
<?xml version="1.0" encoding="utf-8"?>
<android.support.constraint.motion.MotionLayout xmlns:android="http://schemas.android.com/apk/res/android"
    xmlns:app="http://schemas.android.com/apk/res-auto"
    xmlns:tools="http://schemas.android.com/tools"
    android:id="@+id/motionLayout"
    android:layout_width="match_parent"
    android:layout_height="match_parent"
    app:layoutDescription="@xml/scene_01"
    tools:showPaths="true">

    <View
        android:id="@+id/button"
        android:layout_width="64dp"
        android:layout_height="64dp"
        android:background="@color/colorAccent"
        android:text="Button" />

</android.support.constraint.motion.MotionLayout>
请注意,这里有一个布局文件关联的MotionScene文件 --> scene_01, 它在res/xml/ 下:
<?xml version="1.0" encoding="utf-8"?>
<MotionScene
    xmlns:motion="http://schemas.android.com/apk/res-auto">

    <Transition
        motion:constraintSetStart="@layout/motion_01_cl_start"
        motion:constraintSetEnd="@layout/motion_01_cl_end"
        motion:duration="1000">

        <OnSwipe
            motion:touchAnchorId="@+id/button"
            motion:touchAnchorSide="right"
            motion:dragDirection="dragRight" />
    </Transition>

</MotionScene>
在scene_01文件中,指定了默认的转换(Transition节点),指明了开始和结束时的ConstraintSet,即为motion_01_cl_start和motion_01_cl_end,也就是上面已经写过的代码片段。
通过运行代码,你就可以实现上图手滑动滑块,从左到右的gif的动画。
在 scene_01.xml中,我们在Transition定义了一个OnSwipe handler,这个handler的功能就是让你通过您的手指驱动这个变换的进行。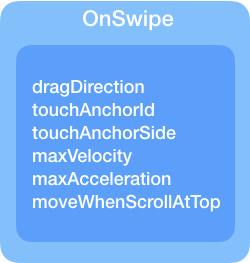
这里有些参数你需要设定:
touchAnchorId : 需要跟踪的对象(这里,我们使用@+id/button)
touchAnchorSide: 应该跟踪你手指的物体的侧面(right/left/top/bottom)
dragDirection: 我们拖动物体的方向(dragRight/dragLeft/dragUp/dragDown) 将会定义滑动的完成度(0-1)
第一个示例向你展示了使用MotionLayout是多么的快速,即使重用已经存在的layout布局(如果你使用ConstraintSets 来做一些基本的动画)。
MotionLayout也支持直接在MotionScene文件中描述ConstraintSets ,这将会带来以下几个好处:
在MotionScene 文件中,指定ConstraintSets元素的属性将会比layout布局的属性要多。除了了位置属性和边界属性,以下的属性将会被自动插入到MotionLayout中:
alpha
visibility
elevation
rotation, rotation[X/Y]
translation[X/Y/Z]
scaleX/Y
我们来使用插入属性来重新创建示例一,MotionLayout文件和示例一一致,只是layout关联文件发生了改变,变成了scene_02.xml :
<?xml version="1.0" encoding="utf-8"?>
<android.support.constraint.motion.MotionLayout
    xmlns:android="http://schemas.android.com/apk/res/android"
    xmlns:tools="http://schemas.android.com/tools"
    xmlns:app="http://schemas.android.com/apk/res-auto"
    android:id="@+id/motionLayout"
    app:layoutDescription="@xml/scene_02"
    android:layout_width="match_parent"
    android:layout_height="match_parent">

    <View
        android:id="@+id/button"
        android:background="@color/colorAccent"
        android:layout_width="64dp"
        android:layout_height="64dp"
        android:text="Button" />

</android.support.constraint.motion.MotionLayout>
这个scene_02中MotionScene场景是不一样的;Transition 定义是一样的,但是我们直接在文件中定义了start 和 end ConstraintSets 。和layout布局文件相比,我们最主要的区别是没有指定组件的类型,而是直接使用了Constraint 组件来替代:
<?xml version="1.0" encoding="utf-8"?>
<MotionScene xmlns:android="http://schemas.android.com/apk/res/android"
    xmlns:motion="http://schemas.android.com/apk/res-auto">

    <Transition
        motion:constraintSetStart="@+id/start"
        motion:constraintSetEnd="@+id/end"
        motion:duration="1000">
        <OnSwipe
            motion:touchAnchorId="@+id/button"
            motion:touchAnchorSide="right"
            motion:dragDirection="dragRight" />
    </Transition>

    <ConstraintSet android:id="@+id/start">
        <Constraint
            android:id="@+id/button"
            android:layout_width="64dp"
            android:layout_height="64dp"
            android:layout_marginStart="8dp"
            motion:layout_constraintBottom_toBottomOf="parent"
            motion:layout_constraintStart_toStartOf="parent"
            motion:layout_constraintTop_toTopOf="parent" />
    </ConstraintSet>

    <ConstraintSet android:id="@+id/end">
        <Constraint
            android:id="@+id/button"
            android:layout_width="64dp"
            android:layout_height="64dp"
            android:layout_marginEnd="8dp"
            motion:layout_constraintBottom_toBottomOf="parent"
            motion:layout_constraintEnd_toEndOf="parent"
            motion:layout_constraintTop_toTopOf="parent" />
    </ConstraintSet>

</MotionScene>
【其实运行代码,你会发现和示例一中场景一模一样】。
重要的是我们需要记住ConstraintSet是如何工作的,它将会替代所有被标记的组件(被标记id的组件)。
因此你在写ConstraintSet时,每一个UI组件都需要包含它所有的约束。基本上,这不是增量更新,每次应用到组件上的约束都会被清空,并重新应用你赋予的约束。 意思就是ConstraintSet的功能不是叠加的,上一个ConstraintSet和下一个ConstraintSet的功能是不相互影响的,后一个ConstraintSet被应用时,前一个ConstraintSet所有的约束都会被清空。
换句话说,如果你的布局中有非常多的组件,但是只有一个你想使用动画的组件,那么在MotionScene 文件中,只需要关联这个动画组件即可,其他的组件可以不管。
MotionLayout中可能有一些属性来帮助你开发:
app:layoutDescription=”reference” 指定你需要绑定的MotionScene XML 文件
app:applyMotionScene=”boolean” 是否启用MotionScene,默认是true
app:showPaths=”boolean” debug模式比较有用的模式,可以显示动画运动的路径
app:progress=”float” 指定转换的完成度 范围是0 - 1
app:currentState=”reference” 强制指定特定的ConstraintSet
这只是第一篇文件简单介绍MotionLayout的基本用法,所有的代码将会在
https://github.com/googlesamples/android-ConstraintLayoutExamples中找到。
如果觉得我的文章对您有用,请随意打赏。你的支持将鼓励我继续创作!
