社区微信群开通啦,扫一扫抢先加入社区官方微信群

社区微信群
目录
1.4.3 ESLint 插件:发布了一个名为 eslint-plugin-react-hooks 的 ESLint 插件来强制执行两条规则
CSS模块化优点:
所有样式都是local的,解决了命名冲突和全局污染问题
class名生成规则配置灵活,可以此来压缩class名
只需引用组件的JS就能搞定组件所有的JS和Css
依然是css,几乎零学习成本
引入CSS模块化:避免原因
1.全局污染
2.命名混乱
3.依赖管理不彻底
4.无法共享变量
5.代码压缩不彻底
CSS Modules模块化:框架添加配置项
运行npm run eject ,此时,项目中多了一个config文件,并且各个配置文件已经暴露出来了。(运行npm run eject之前,保证本地没有待提交到git的文件) 但是这种方法不可逆。
如果出错:This git repository has untracked files or uncommitted changes:
执行 git add .
git commit -am "Save before ejecting"
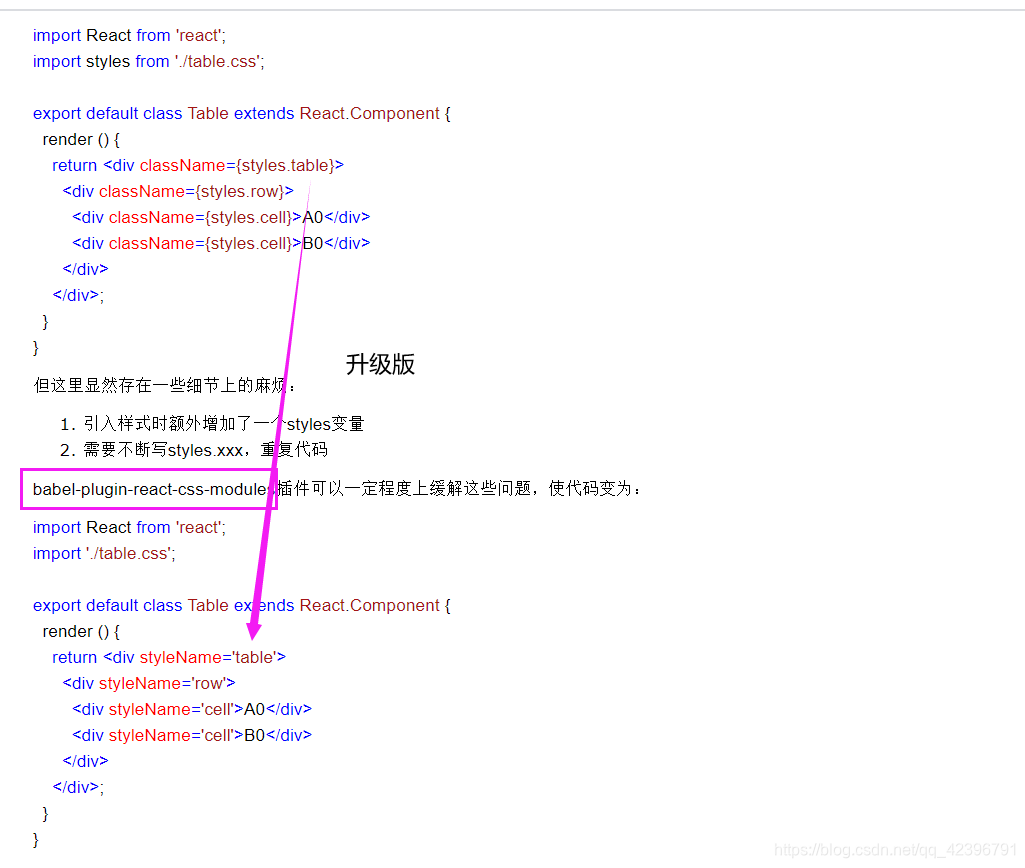
babel-plugin-react-html-attrs: https://github.com/insin/babel-plugin-react-html-attrs //此插件可以使用 classs不必className :无需配置
style-loader: https://github.com/webpack/style-loader
css-loader: https://github.com/webpack/css-loader
导入: var footerCss = require(" ../../footer.css");
使用:: <footer className={footerCss.miniFooter}>
:local(.norma){color:green;}//默认
:globa(.btn)(color:red;}
在终端安装less 和 less-loader。安装:npm install less less-loader --save-dev
使用npm run eject暴露config文件夹,点开项目文件夹,并依次找到 node_modules/react-scripts/config/webpack.config.js
import React from 'react';
import { Row, Col } from 'antd';

export default class header extends React.Component {
   render() {
      return (
         <header>
            <Row>
               <Col span={2}></Col>
               <Col span={4}>
                  <a href="/" class="logo">
                     <img src="images/logo.png" alt="logo" />
                     <span>ReactNews</span>
                  </a>
               </Col>
               <Col span={2}></Col>
            </Row>
         </header>
      )
   }
}Hook 是 React 16.8 的新增特性。它可以让你在不编写 class 的情况下使用 state 以及其他的 React 特性。
import React, { useState } from 'react';

function Example() {
  // 声明一个新的叫做 “count” 的 state 变量
  const [count, setCount] = useState(0);
  // 声明多个 state 变量
  const [age, setAge] = useState(42);
  const [fruit, setFruit] = useState('banana');
  const [todos, setTodos] = useState([{ text: '学习 Hook' }]);

  return (
    <div>
      <p>You clicked {count} times</p>
      {*设置count*}
      <button onClick={() => setCount(count + 1)}>
        Click me
      </button>
    </div>
  );
}
//等价的 class 示例
class Example extends React.Component {
  constructor(props) {
    super(props);
    this.state = {
      count: 0
    };
  }

  render() {
    return (
      <div>
        <p>You clicked {this.state.count} times</p>
        <button onClick={() => this.setState({ count: this.state.count + 1 })}>
          Click me
        </button>
      </div>
    );
  }
} Effect Hook 可以让你在函数组件中执行副作用操作,熟悉 React class 的生命周期函数,你可以把 useEffect Hook 看做 componentDidMount,componentDidUpdate 和 componentWillUnmount 这三个函数的组合
import React, { useState, useEffect } from 'react';

function Example() {
  const [count, setCount] = useState(0);

  // Similar to componentDidMount and componentDidUpdate:
  useEffect(() => {
    // Update the document title using the browser API
    document.title = `You clicked ${count} times`;
  });

  return (
    <div>
      <p>You clicked {count} times</p>
      <button onClick={() => setCount(count + 1)}>
        Click me
      </button>
    </div>
  );
}
//使用 class 的示例
class Example extends React.Component {
  constructor(props) {
    super(props);
    this.state = {
      count: 0
    };
  }

  componentDidMount() {
    document.title = `You clicked ${this.state.count} times`;
  }
  componentDidUpdate() {
    document.title = `You clicked ${this.state.count} times`;
  }

  render() {
    return (
      <div>
        <p>You clicked {this.state.count} times</p>
        <button onClick={() => this.setState({ count: this.state.count + 1 })}>
          Click me
        </button>
      </div>
    );
  }
}
在这个 class 中,我们需要在两个生命周期函数中编写重复的代码。与 componentDidMount 或 componentDidUpdate 不同,使用 useEffect 调度的 effect 不会阻塞浏览器更新屏幕,这让你的应用看起来响应更快。大多数情况下,effect 不需要同步地执行。在个别情况下(例如测量布局),有单独的 useLayoutEffect Hook 供你使用,其 API 与 useEffect 相同。
之前,我们研究了如何使用不需要清除的副作用,还有一些副作用是需要清除的。例如订阅外部数据源。这种情况下,清除工作是非常重要的,可以防止引起内存泄露!现在让我们来比较一下如何用 Class 和 Hook 来实现。
了解了 useEffect 可以在组件渲染后实现各种不同的副作用。有些副作用可能需要清除,所以需要返回一个函数:
useEffect(() => {
    function handleStatusChange(status) {
      setIsOnline(status.isOnline);
    }

    ChatAPI.subscribeToFriendStatus(props.friend.id, handleStatusChange);
    return () => {
      ChatAPI.unsubscribeFromFriendStatus(props.friend.id, handleStatusChange);
    };
  });
//其他的 effect 可能不必清除,所以不需要返回。
useEffect(() => {
  document.title = `You clicked ${count} times`;
});
effect Hook 使用同一个 API 来满足这两种情况。
另一方面:useEffect 会在每次渲染后都执行,默认情况下,它在第一次渲染之后和每次更新之后都会执行。(我们稍后会谈到如何控制它。)你可能会更容易接受 effect 发生在“渲染之后”这种概念,不用再去考虑“挂载”还是“更新”。React 保证了每次运行 effect 的同时,DOM 都已经更新完毕。
这是很常见的需求,所以它被内置到了 useEffect 的 Hook API 中。如果某些特定值在两次重渲染之间没有发生变化,你可以通知 React 跳过对 effect 的调用,只要传递数组作为 useEffect 的第二个可选参数即可:
useEffect(() => {
  document.title = `You clicked ${count} times`;
}, [count]); // 仅在 count 更改时更新
对于有清除操作的 effect 同样适用:
useEffect(() => {
  function handleStatusChange(status) {
    setIsOnline(status.isOnline);
  }

  ChatAPI.subscribeToFriendStatus(props.friend.id, handleStatusChange);
  return () => {
    ChatAPI.unsubscribeFromFriendStatus(props.friend.id, handleStatusChange);
  };
}, [props.friend.id]); // 仅在 props.friend.id 发生变化时,重新订阅
一般得useEffect调用函数会使用useCallback,且函数一般在前执行,或者工具类函数直接引入,对于调用得函数可以不根据上线顺序执行
import React, {useState, useEffect, useCallback} from 'react';
import {getC} from '../utils';
const [fa, setFa] = useState();

const setInt = useCallback((a) => {
    let b = getS(a);
    return b;
  }, []);

const getS = (a) => {//不需要在setInt前
    let s = a < 0 ? 1: 2;
    return s;
};

useEffect(() => {
    let
        a = setInt(5),//在前
        c = getC(7);//工具类
    setFa(a + c);
}, []);


//utils.js
export const getC = (a) =>{
  let c = a + 5;
  return c;
};eslint-plugin-react-hooks 的 ESLint 插件来强制执行两条规则1.只在最顶层使用 Hook
2.只在 React 函数中调用 Hook
npm install eslint-plugin-react-hooks --save-dev// 你的 ESLint 配置
{
"plugins": [
// ...
"react-hooks"
],
"rules": {
// ...
"react-hooks/rules-of-hooks": "error", // 检查 Hook 的规则
"react-hooks/exhaustive-deps": "warn" // 检查 effect 的依赖
}
}
说明:class 组件内部使用 Hook,但毫无疑问你可以在组件树里混合使用 class 组件和使用了 Hook 的函数组件。不论一个组件是 class 还是一个使用了 Hook 的函数,都只是这个组件的实现细节而已。长远来看,我们期望 Hook 能够成为人们编写 React 组件的主要方式。
资料:仅仅是参考记录,写作规范,无其他功能意义
import React from 'react';

import { Row, Col } from 'antd';
import { Tabs, Carousel } from 'antd';

import PCNewsBlock from './pc_news_block';
import PCNewsImageBlock from './pc_news_image_block';
import PCProducts from './pc_products';

import carousel1 from './../images/carousel_1.jpg';
import carousel2 from './../images/carousel_2.jpg';
import carousel3 from './../images/carousel_3.jpg';
import carousel4 from './../images/carousel_4.jpg';

const { TabPane } = Tabs;
export default class PCNewsContainer extends React.Component {
   render() {
      const settings = {
         dots: true,
         infinits: true,
         speed: 500,
         slidesToShow: 1,
         autoplay: true
      }
      return (
         <div>
            <Row>
               <Col span={2}></Col>
               <Col span={20} className="container">
                  <div className="wauto">
                     <div className="leftContainer">
                        <div className="carousel">
                           <Carousel {...settings}>
                              <div><img src={carousel1} alt="img" /></div>
                              <div><img src={carousel2} alt="img" /></div>
                              <div><img src={carousel3} alt="img" /></div>
                              <div><img src={carousel4} alt="img" /></div>
                           </Carousel>
                        </div>
                        <PCNewsImageBlock count={6} type="guoji" width="100%" cartTitle="国际头条" imageWidth="112px"></PCNewsImageBlock>
                     </div>
                     <Tabs className="rightContainer tabs_news">
                        <TabPane tab="新闻" key="1">
                           <PCNewsBlock count='22' type="top" width="100%" bordered="false"></PCNewsBlock>
                        </TabPane>
                        <TabPane tab="国际" key="2">
                           <PCNewsBlock count='22' type="nter" width="100%" bordered="false"></PCNewsBlock>
                        </TabPane>
                     </Tabs>
                     <Tabs className="rightContainer tabs_product">
                        <TabPane tab="ReactNews 产品" key="1">
                           <PCProducts />
                        </TabPane>
                     </Tabs>
                  </div>
                  <div className="wauto">
                     <PCNewsImageBlock count={8} type="guonei" width="100%" cartTitle="国内新闻" imageWidth="132px"></PCNewsImageBlock>

                     <PCNewsImageBlock count={16} type="yule" width="100%" cartTitle="娱乐新闻" imageWidth="132px"></PCNewsImageBlock>
                     <PCNewsImageBlock count={16} type="yule" width="100%" imageWidth="132px"></PCNewsImageBlock>
                  </div>
               </Col>
               <Col span={2}></Col>
            </Row>
         </div>
      )
   }
}
如果觉得我的文章对您有用,请随意打赏。你的支持将鼓励我继续创作!
