
node.js react
要求: (Requirements:)
- Basic knowledge of Javascript, React and Node.js Javascript,React和Node.js的基础知识
- Basic knowledge of how information moves from client to server 有关信息如何从客户端转移到服务器的基本知识
本文的目的 (The Purpose of This Article)
I’m trying to make other people’s coding journeys easier than mine by making tutorials of what I’ve learned. I recently had to integrate payments to monetize my website, so hope you can use what I learned!
我正在通过制作有关我所学知识的教程,使其他人的编码之旅比我的容易。 我最近不得不整合付款才能通过我的网站获利,因此希望您可以使用我学到的知识!
I learned how to code by building my financial education business. Check it out if you’re interested: www.snowballfinances.com.
我通过建立金融教育业务来学习如何编码。 如果您有兴趣,请查看: www.snowballfinances.com 。
Please send me an email at inaguirre96@gmail.com if you get stuck, or post in the comments below!
如果您遇到困难,请发送电子邮件至inaguirre96@gmail.com,或在下面的评论中发布!
您将学到什么 (What You’ll Learn)
- Use the Stripe client library in React to create an access token. 使用React中的Stripe客户端库创建访问令牌。
- Set up Stripe endpoint on a Node.js server to receive the token, process the payment, and send a response. 在Node.js服务器上设置Stripe端点,以接收令牌,处理付款并发送响应。
您需要什么 (What You’ll Need)
A Stripe account created at www.stripe.com. Write down your Stripe Public and Secret TEST Keys. You’ll have to get your account approved if you want to start selling online (deployment instructions included).
在www.stripe.com上创建的Stripe帐户。 写下您的Stripe公钥和秘密TEST密钥。 如果您要开始在线销售( 包括部署说明 ),则必须获得您的帐户批准。
Node.js: https://nodejs.org/en/download/
Node.js: https : //nodejs.org/en/download/
Create React App: https://reactjs.org/docs/create-a-new-react-app.html
创建React应用程序 : https : //reactjs.org/docs/create-a-new-react-app.html
Let’s get started!
让我们开始吧!
React设置 (React Setup)
Get your Stripe Public API key and follow the steps to set up your client-side application.
获取您的Stripe Public API密钥,并按照以下步骤设置客户端应用程序。
npx create-react-app name-of-your-app
npx create-react-app name-of-your-app
cd name-of-your-app
cd name-of-your-app
npm i @stripe/react-stripe-js @stripe/stripe-js axios
npm i @stripe/react-stripe-js @stripe/stripe-js axios
Great! You’ve installed all the dependencies you need to handle the token creation (Stripe calls the token an “id”).
大! 您已经安装了处理令牌创建所需的所有依赖项(Stripe将该令牌称为“ id ”)。
Now, let’s set up the folder structure. I’ve made it as simple as I could. You can create it by copying and pasting the following command, or by looking at the picture.
现在,让我们设置文件夹结构。 我已经尽可能地简化了。 您可以通过复制并粘贴以下命令或查看图片来创建它。
mkdir src/Stripe && touch src/Stripe/CheckoutForm.js && touch src/Stripe/StripeContainer.js
mkdir src/Stripe && touch src/Stripe/CheckoutForm.js && touch src/Stripe/StripeContainer.js

编码时间 (Coding Time)
We’ll set up up the Stripe Container as it’s own component so that you can use it wherever you want in your application. Code all the components before running the app.
我们将把Stripe Container设置为它自己的组件,以便您可以在应用程序中的任何位置使用它。 在运行应用程序之前,对所有组件进行编码。
App.js (App.js)
import React from "react";
import StripeContainer from "./Stripe/StripeContainer";


const App = () => {
  return (
    <div className="App">
      <StripeContainer />
    </div>
  );
};


export default App;
Inside the StripeContainer component, we’ll set up Stripe to wrap our CheckoutForm with the Elements component provided by Stripe. The Elements component provides the context to access Stripe methods within our CheckoutForm component.
在StripeContainer组件内部,我们将设置Stripe,以用Stripe提供的Elements组件包装CheckoutForm。 Elements组件提供了访问我们CheckoutForm组件内的Stripe方法的上下文 。
IMPORTANT: Replace PUBLIC_KEY (StripeContainer.js line 7) with your own Stripe public key. Use the TEST public keys in development.
重要说明:将PUBLIC_KEY(StripeContainer.js第7行)替换为您自己的Stripe公钥。 在开发中使用TEST公钥。
StripeContainer.js (StripeContainer.js)
import React from "react";
import { loadStripe } from "@stripe/stripe-js";
import { Elements } from "@stripe/react-stripe-js";


import { CheckoutForm } from "./CheckoutForm";


const PUBLIC_KEY = "YOUR_PUBLIC_TEST";


const stripeTestPromise = loadStripe(PUBLIC_KEY);


const Stripe = () => {
  return (
    <Elements stripe={stripeTestPromise}>
      <CheckoutForm />
    </Elements>
  );
};


export default Stripe;
Finally, we set up our CheckoutForm. On line 2, you can see we’re importing useStripe and useElements. These are made available by the Elements wrapper on our StripeContainer. Copy the following lines of code into the CheckoutForm component.
最后,我们设置了CheckoutForm。 在第2行,您可以看到我们正在导入useStripe和useElements。 这些可以通过我们的StripeContainer上的Elements包装器获得。 将以下代码行复制到CheckoutForm组件中。
CheckoutForm.js (CheckoutForm.js)
import React from "react";
import { CardElement, useStripe, useElements } from "@stripe/react-stripe-js";


export const CheckoutForm = () => {
  const stripe = useStripe();
  const elements = useElements();


  const handleSubmit = async (event) => {
    event.preventDefault();
    const { error, paymentMethod } = await stripe.createPaymentMethod({
      type: "card",
      card: elements.getElement(CardElement),
    });


    if (!error) {
      console.log("Stripe 23 | token generated!", paymentMethod);
      //send token to backend here
    } else {
      console.log(error.message);
    }
  };


  return (
    <form onSubmit={handleSubmit} style={{ maxWidth: 400 }}>
      <CardElement />
      <button>Pay</button>
    </form>
  );
};
If you run npm start and go to your browser, you should see the Stripe CardElement from our CheckoutForm.js file being rendered. Stripe handles the form in order to avoid any bugs, exploits, etc.
如果您运行npm start并转到浏览器,则应该看到渲染的CheckoutForm.js文件中的Stripe CardElement 。 Stripe处理表单以避免任何错误,漏洞利用等。
If you enter Stripe’s test card data ( I’ve filled it below) and hit pay, you should receive a successful response back with the token (id).
如果您输入Stripe的测试卡数据( 我在下面填写了数据)并点击了pay ,您应该会收到一个成功的响应,其中包含令牌( id )。
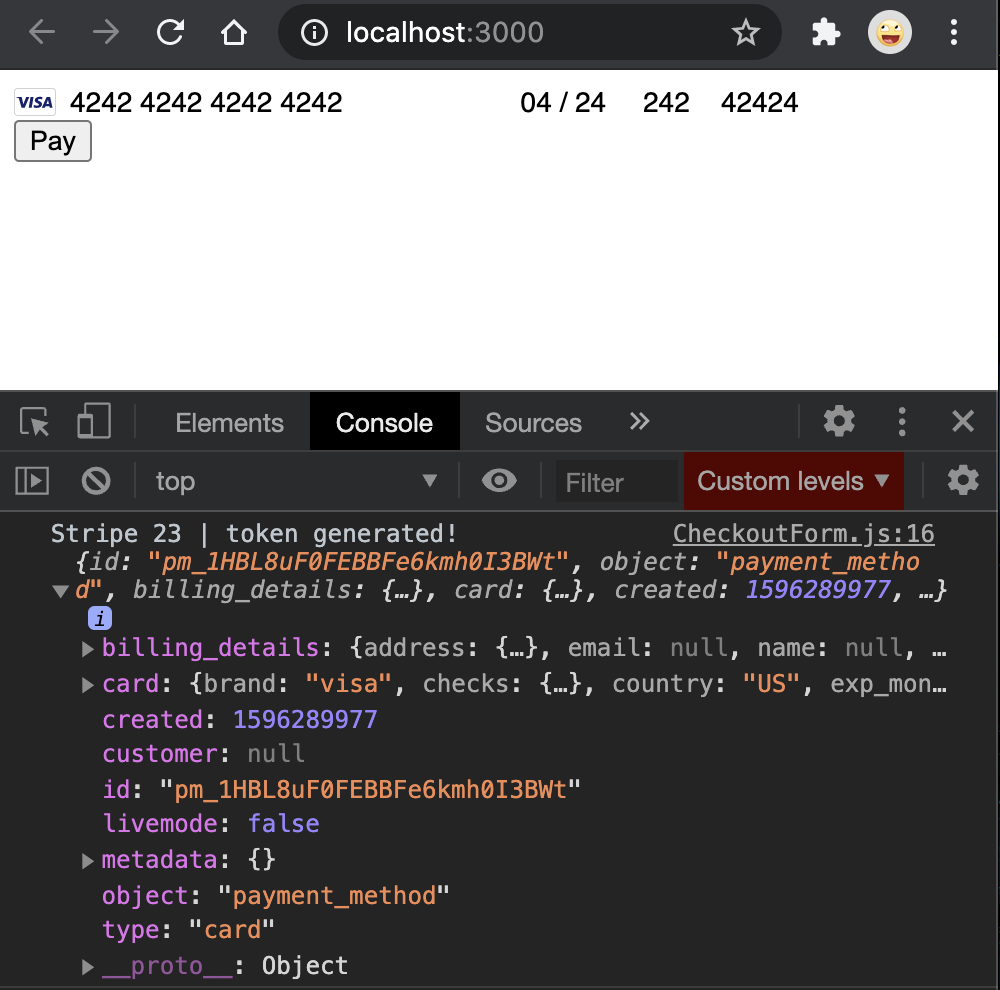
The id created (“pm_1HBL8uF0FEBBFe….”) is the token. You’re ready to create the server to process a payment with that token!
创建的ID(“ pm_1HBL8uF0FEBBFe…。”)是令牌。 您已准备好创建服务器以使用该令牌处理付款!
Node.js服务器 (Node.js Server)
Now we’ll send the token (id) from the client-side to our server and process the payment! This part is a bit trickier, but if you know how to use Node.js you should get it.
现在,我们将从客户端将令牌(id)发送到我们的服务器并处理付款! 这部分比较棘手,但是如果您知道如何使用Node.js,则应该获取它。
On a new project folder, input the following commands to create our server.
在新的项目文件夹上,输入以下命令以创建我们的服务器。
mkdir stripe-server
mkdir stripe-server
cd stripe-server && npm init -y
cd stripe-server && npm init -y
npm i stripe express cors dotenv body-parser
npm i stripe express cors dotenv body-parser
touch index.js .env
touch index.js .env
Copy the following code into index.js:
将以下代码复制到index.js :
const express = require("express");
const app = express();
require("dotenv").config();
const stripe = require("stripe")(process.env.STRIPE_SECRET_TEST);
const bodyParser = require("body-parser");
const cors = require("cors");


app.use(bodyParser.urlencoded({ extended: true }));
app.use(bodyParser.json());
app.use(cors());


app.post("/stripe/charge", cors(), async (req, res) => {
  console.log("stripe-routes.js 9 | route reached", req.body);
  let { amount, id } = req.body;
  console.log("stripe-routes.js 10 | amount and id", amount, id);
  try {
    const payment = await stripe.paymentIntents.create({
      amount: amount,
      currency: "USD",
      description: "Your Company Description",
      payment_method: id,
      confirm: true,
    });
    console.log("stripe-routes.js 19 | payment", payment);
    res.json({
      message: "Payment Successful",
      success: true,
    });
  } catch (error) {
    console.log("stripe-routes.js 17 | error", error);
    res.json({
      message: "Payment Failed",
      success: false,
    });
  }
});


app.listen(process.env.PORT || 8080, () => {
  console.log("Server started...");
});
Also, on your .env file, add your Stripe secret key from your Stripe dashboard.
另外,在您的.env文件上,从Stripe仪表板添加Stripe 密钥 。
.env file
.env file
STRIPE_SECRET_TEST=YOUR_STRIPE_SECRET
STRIPE_SECRET_TEST=YOUR_STRIPE_SECRET
We’ve created a /stripe/charge route to process a Stripe payment. If you look at the route, the stripe.paymentsIntent.create() function is expecting an id and amount. These should be sent from the client to specify the amount you’re charging and the id (or token, I’m using these terms interchangeably).
我们创建了/ stripe / charge路线来处理Stripe付款。 如果您查看路线,则stripe.paymentsIntent.create()函数期望使用id和amount 。 这些应该从客户端发送,以指定您要收取的金额和ID (或令牌,我可以互换使用这些术语)。
You can read more about paymentIntents in the Stripe docs:
您可以在Stripe文档中阅读有关payIntents的更多信息:
Let’s edit our React Client to send these parameters so that the charge is successful.
让我们编辑React Client以发送这些参数,以使收费成功。
Import axios on line 3.
在第3行上导入axios。
If you’re not getting an error from the Client on line 16, send a POST request to the server with the id and the amount you’re charging.
如果您没有从第16行的“客户端”中收到错误消息,请向服务器发送POST请求,其中包含ID和您要收取的金额。
import React from "react";
import { CardElement, useStripe, useElements } from "@stripe/react-stripe-js";
import axios from "axios";


export const CheckoutForm = () => {
  const stripe = useStripe();
  const elements = useElements();


  const handleSubmit = async (event) => {
    event.preventDefault();
    const { error, paymentMethod } = await stripe.createPaymentMethod({
      type: "card",
      card: elements.getElement(CardElement),
    });


    if (!error) {
      console.log("Stripe 23 | token generated!", paymentMethod);
      try {
        const { id } = paymentMethod;
        const response = await axios.post(
          "http://localhost:8080/stripe/charge",
          {
            amount: 999,
            id: id,
          }
        );


        console.log("Stripe 35 | data", response.data.success);
        if (response.data.success) {
          console.log("CheckoutForm.js 25 | payment successful!");
        }
      } catch (error) {
        console.log("CheckoutForm.js 28 | ", error);
      }
    } else {
      console.log(error.message);
    }
  };


  return (
    <form onSubmit={handleSubmit} style={{ maxWidth: 400 }}>
      <CardElement />
      <button>Pay</button>
    </form>
  );
};
Important note about amounts: Stripe handles amounts in minimum units (cents). So if you want to charge $1.00, the amount you send to Stripe is 100 cents. If you want to charge $20.00, your amount will be 2,000 (cents). In our case, we’re sending 999, the equivalent of $9.99. You can read more about this in their documentation.
有关金额的重要说明: Stripe以最小单位(美分)处理金额。 因此,如果您要收取1.00美元,您发送给Stripe的金额为100 美分 。 如果您要收费$ 20.00,则您的金额为2,000 (美分)。 在我们的案例中,我们将发送999 ,相当于9.99美元。 您可以在他们的文档中阅读有关此内容的更多信息。
付款 (Payment)
Run your server:
运行服务器:
node index.js
node index.js
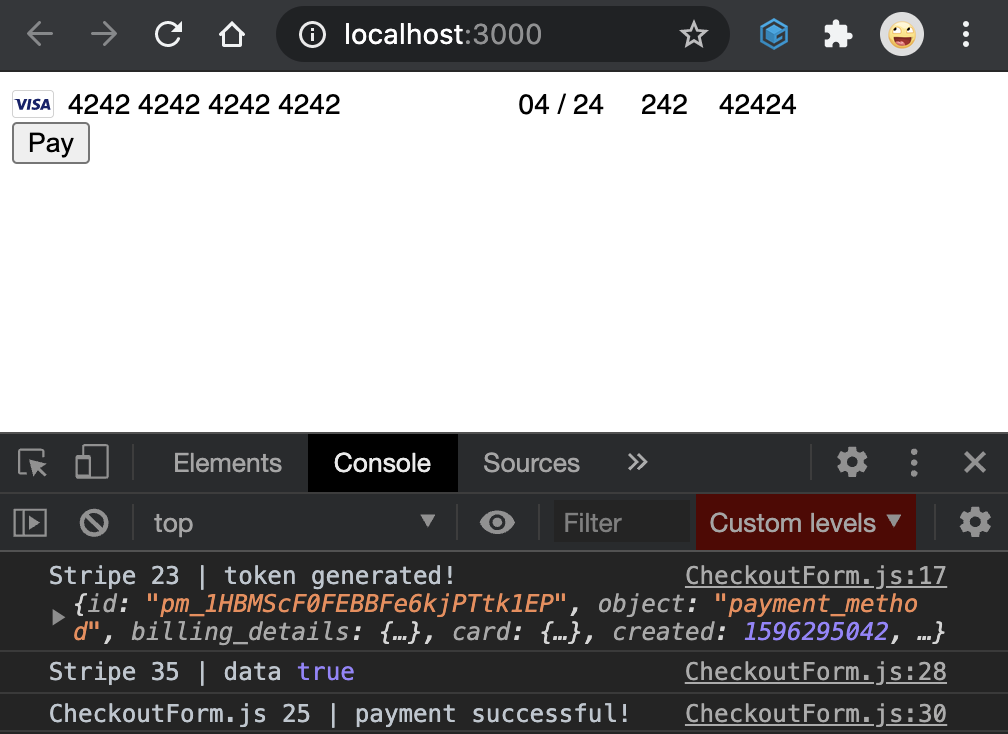
Go to your client, fill in the credentials, and hit Pay. You should be getting a payment successful response!
转到您的客户,填写凭据,然后点击“ 付款”。 您应该会收到付款成功的回应!
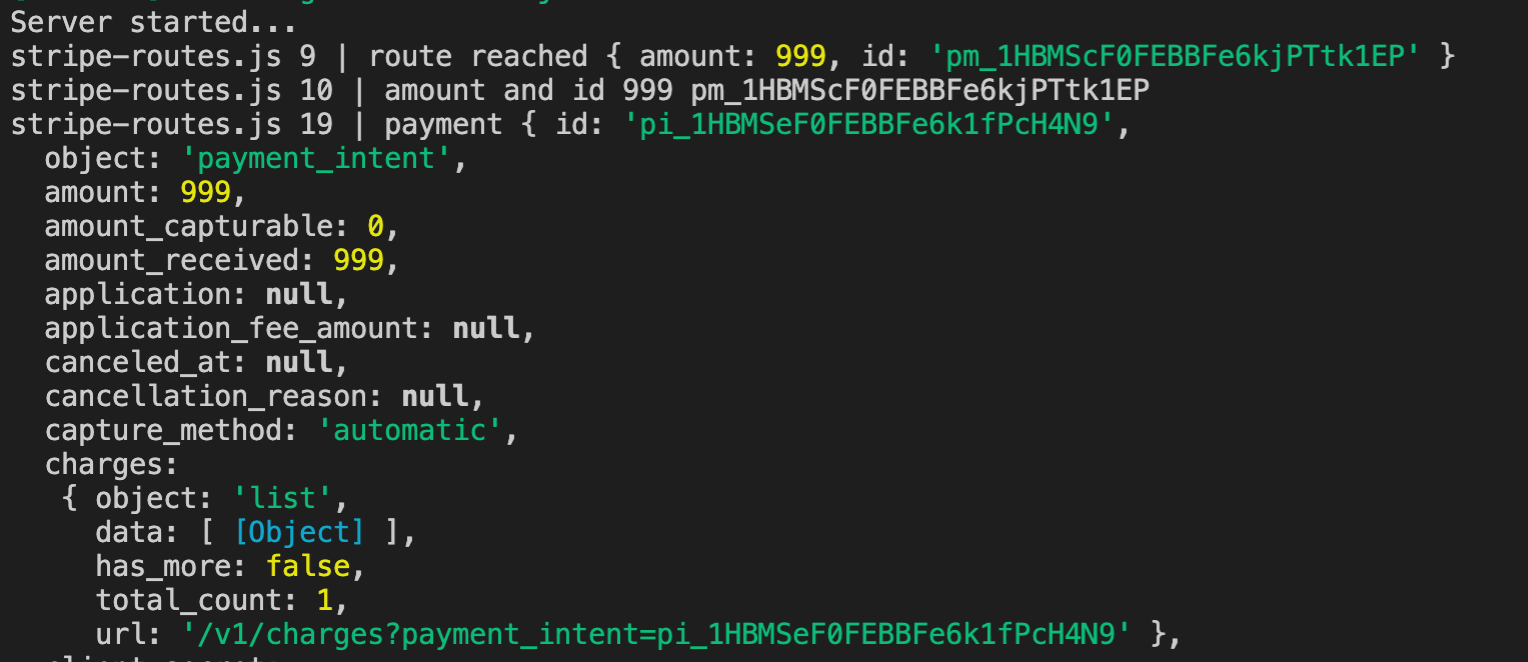
If you look at your server logs, you should be getting a response similar to this one:
如果查看服务器日志,则应该得到类似于以下内容的响应:
If you want to make sure the charge went through, go to your Stripe Dashboard. Toggle the button “Viewing Test Data” on the left side of the Dashboard. Now if you go to Payments, you should see the charge you created!
如果您想确定是否已扣款,请转到“ 条纹仪表板” 。 切换仪表板左侧的“查看测试数据”按钮。 现在,如果您转到“ 付款”,则应该看到您创建的费用!
部署方式 (Deployment)
If you want to deploy your application and have Stripe working, you’ll have to do the following:
如果要部署应用程序并使Stripe正常工作,则必须执行以下操作:
- Get your Stripe account approved. 批准您的Stripe帐户。
Client: StripeContainer.js line 7 change the public test key with the production public key Stripe gives you.
客户端: StripeContainer.js第7行使用Stripe给您的生产公用密钥更改公用测试密钥。
Server: .env file line 2, create a STRIPE_SECRET_PRODUCTION=your_production_key and add the secret production key Stripe gives you.
服务器: .env文件第2行,创建一个STRIPE_SECRET_PRODUCTION = your_production_key并添加Stripe给您的秘密生产密钥。
Server: index.js line 4, change the environment variable to STRIPE_SECRET_PRODUCTION.
服务器: index.js第4行,将环境变量更改为STRIPE_SECRET_PRODUCTION 。
Deploy server (I use Heroku, here’s their guide on how to deploy a Node server : https://devcenter.heroku.com/articles/deploying-nodejs).
部署服务器 (我使用Heroku,这是他们有关如何部署Node服务器的指南: https : //devcenter.heroku.com/articles/deploying-nodejs )。
Client: CheckoutForm.js line 23, change the endpoint from http://localhost:8080/stripe/charge to http://yourherokuserverendpoint.com/stripe/charge.
客户端: CheckoutForm.js第23行,将端点从http:// localhost:8080 / stripe / charge更改为http://yourherokuserverendpoint.com/stripe/charge 。
And you should be good to go!
而且您应该很好走!
恭喜你! (Congratulations!)
You’ve successfully added Stripe payments to your application. Read the documentation to see all the different types of payments and information you can ask from users, or even add subscriptions!
您已成功将Stripe付款添加到您的应用程序。 阅读文档以查看所有不同类型的付款和您可以向用户询问的信息,甚至可以添加订阅!
And as always, happy coding!
和往常一样,祝您编程愉快!
翻译自: https://medium.com/better-programming/stripe-api-tutorial-with-react-and-node-js-1c8f2020a825
node.js react
