社区微信群开通啦,扫一扫抢先加入社区官方微信群

社区微信群
话说Android开源系统拥有着App不计其数,百家争鸣,都想在这“大争之世”寻得系统存活的一席之地。然则系统资源有限,如若都割据为王,再强劲的CPU也会忙不过来,再庞大的内存终会消耗殆尽,再大容量的电池续航终会昙花一现。
面对芸芸众生,无尽变数,系统以不变应万变,一招绝杀神技forceStop腾空出世,此处以adb指令的方式为例来说说其内部机理:
am force-stop pkgName
am force-stop --user 2 pkgName //只杀用户userId=2的相关信息
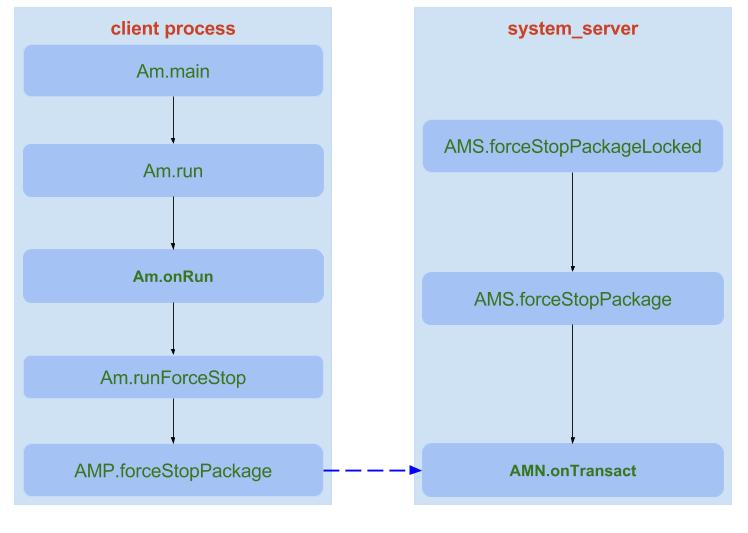
force-stop命令杀掉所有用户空间下的包名pkgName相关的信息,也可以通过--user来指定用户Id。 当执行上述am指令时,则会触发调用Am.java的main()方法,接下来从main方法开始说起。
[-> Am.java]
public static void main(String[] args) {
     (new Am()).run(args); //【见小节1.3】
}
[-> Am.java]
public void run(String[] args) {
    ...
    mArgs = args;
    mNextArg = 0;
    mCurArgData = null;
    onRun(); //【见小节1.4】
    ...
}
[-> Am.java]
public void onRun() throws Exception {
    //获取的是Binder proxy对象AMP
    mAm = ActivityManagerNative.getDefault();
    String op = nextArgRequired();

    if (op.equals("start")) {
        ...
    } else if (op.equals("force-stop")) {
        runForceStop(); //【见小节1.5】
    }
    ...
}
[-> Am.java]
private void runForceStop() throws Exception {
    int userId = UserHandle.USER_ALL;

    String opt;
    // 当指定用户时,则解析相应userId
    while ((opt=nextOption()) != null) {
        if (opt.equals("--user")) {
            userId = parseUserArg(nextArgRequired());
        }
    }
    //【见小节1.6】
    mAm.forceStopPackage(nextArgRequired(), userId);
}
当不指定userId时,则默认为UserHandle.USER_ALL。
[-> ActivityManagerNative.java ::AMP]
public void forceStopPackage(String packageName, int userId) throws RemoteException {
     Parcel data = Parcel.obtain();
     Parcel reply = Parcel.obtain();
     data.writeInterfaceToken(IActivityManager.descriptor);
     data.writeString(packageName);
     data.writeInt(userId);
     //【见小节1.7】
     mRemote.transact(FORCE_STOP_PACKAGE_TRANSACTION, data, reply, 0);
     reply.readException();
     data.recycle();
     reply.recycle();
 }
[-> ActivityManagerNative.java]
public boolean onTransact(int code, Parcel data, Parcel reply, int flags)
        throws RemoteException {
    switch (code) {
      case FORCE_STOP_PACKAGE_TRANSACTION: {
           data.enforceInterface(IActivityManager.descriptor);
           String packageName = data.readString();
           int userId = data.readInt();
           //【见小节2.1】
           forceStopPackage(packageName, userId);
           reply.writeNoException();
           return true;
      }
      ...
    }
}
AMP.forceStopPackage来运行在执行adb时所创建的进程,经过Binder Driver后,进入system_server进程的一个binder线程来执行AMN.forceStopPackage,从这开始的操作(包括当前操作)便都运行在system_server系统进程。
进程绝杀技force-stop,并非任意app可直接调用, 否则App间可以相互停止对方,则岂非天下大乱。该方法的存在便是供系统差遣。一般地,点击home弹出的清理用户最近使用app采取的策略便是force-stop.
至于force-stop的触发方式,除了adb的方式,还可通过获取ActivityManager再调用其方法forceStopPackage(),不过这是@hide隐藏方法,同样是需要具有FORCE_STOP_PACKAGES权限。虽然第三方普通app不能直接调用,但对于深入理解Android,还是很有必要知道系统是如何彻底清理进程的过程。接下来,进入AMS来深入探查force-stop的内部机理。
[-> ActivityManagerService.java]
public void forceStopPackage(final String packageName, int userId) {
    if (checkCallingPermission(android.Manifest.permission.FORCE_STOP_PACKAGES)
                    != PackageManager.PERMISSION_GRANTED) {
        //需要权限permission.FORCE_STOP_PACKAGES
        throw new SecurityException();
    }
    final int callingPid = Binder.getCallingPid();
    userId = handleIncomingUser(callingPid, Binder.getCallingUid(),
                    userId, true, ALLOW_FULL_ONLY, "forceStopPackage", null);
    long callingId = Binder.clearCallingIdentity();
    try {
        IPackageManager pm = AppGlobals.getPackageManager();
        synchronized(this) {
            int[] users = userId == UserHandle.USER_ALL
                            ? getUsersLocked() : new int[] { userId };
            for (int user : users) {
                    int pkgUid = -1;
                    //根据包名和userId来查询相应的uid
                    pkgUid = pm.getPackageUid(packageName, user);
                    //设置包的状态为stopped
                    pm.setPackageStoppedState(packageName, true, user);

                    if (isUserRunningLocked(user, false)) {
                            //【见流程2.2】
                            forceStopPackageLocked(packageName, pkgUid, "from pid " + callingPid);
                    }
            }
        }
    } finally {
            Binder.restoreCallingIdentity(callingId);
    }
}
这里有一个过程非常重要,那就是setPackageStoppedState()将包的状态设置为stopped,那么所有广播都无法接收,除非带有标记FLAG_INCLUDE_STOPPED_PACKAGES的广播,系统默认的广播几乎都是不带有该标志,也就意味着被force-stop的应用是无法通过建立手机网络状态或者亮灭的广播来拉起进程。
当使用force stop方式来结束进程时, reason一般都是”from pid “ + callingPid. 当然也有另外,那就是AMS.clearApplicationUserData方法调用forceStopPackageLocked的reason为”clear data”.
private void forceStopPackageLocked(final String packageName, int uid, String reason) {
    //[见流程2.3]
    forceStopPackageLocked(packageName, UserHandle.getAppId(uid), false,
                false, true, false, false, UserHandle.getUserId(uid), reason);

    Intent intent = new Intent(Intent.ACTION_PACKAGE_RESTARTED,
                Uri.fromParts("package", packageName, null));
    //系统启动完毕后,则mProcessesReady=true
    if (!mProcessesReady) {
            intent.addFlags(Intent.FLAG_RECEIVER_REGISTERED_ONLY
                        | Intent.FLAG_RECEIVER_FOREGROUND);
    }
    intent.putExtra(Intent.EXTRA_UID, uid);
    intent.putExtra(Intent.EXTRA_USER_HANDLE, UserHandle.getUserId(uid));
    //发送广播用于停止alarm以及通知 【见小节8.1】
    broadcastIntentLocked(null, null, intent,
                    null, null, 0, null, null, null, AppOpsManager.OP_NONE,
                    null, false, false, MY_PID, Process.SYSTEM_UID, UserHandle.getUserId(uid));
}
清理跟该包名相关的进程和四大组件之外,还会发送广播ACTION_PACKAGE_RESTARTED,用于清理已注册的alarm,notification信息。
//callerWillRestart = false, doit = true;
private final boolean forceStopPackageLocked(String packageName, int appId,
         boolean callerWillRestart, boolean purgeCache, boolean doit,
         boolean evenPersistent, boolean uninstalling, int userId, String reason) {
     int i;

     if (appId < 0 && packageName != null) {
         // 重新获取正确的appId
         appId = UserHandle.getAppId(
                 AppGlobals.getPackageManager().getPackageUid(packageName, 0));
     }

     // doit =true能进入该分支
     if (doit) {
         final ArrayMap<String, SparseArray<Long>> pmap = mProcessCrashTimes.getMap();
         for (int ip = pmap.size() - 1; ip >= 0; ip--) {
             SparseArray<Long> ba = pmap.valueAt(ip);
             for (i = ba.size() - 1; i >= 0; i--) {
                 boolean remove = false;
                 final int entUid = ba.keyAt(i);
                 if (packageName != null) {
                     if (userId == UserHandle.USER_ALL) {
                         if (UserHandle.getAppId(entUid) == appId) {
                             remove = true;
                         }
                     } else {
                         if (entUid == UserHandle.getUid(userId, appId)) {
                             remove = true;
                         }
                     }
                 } else if (UserHandle.getUserId(entUid) == userId) {
                     remove = true;
                 }
                 if (remove) {
                     ba.removeAt(i);
                 }
             }
             if (ba.size() == 0) {
                 pmap.removeAt(ip);
             }
         }
     }

     //清理Process [见流程3.1]
     boolean didSomething = killPackageProcessesLocked(packageName, appId, userId,
             -100, callerWillRestart, true, doit, evenPersistent,
             packageName == null ? ("stop user " + userId) : ("stop " + packageName));

     //清理Activity [见流程4.1]
     if (mStackSupervisor.finishDisabledPackageActivitiesLocked(
             packageName, null, doit, evenPersistent, userId)) {
         ...
         didSomething = true;
     }

     // 结束该包中的Service [见流程5.1]
     if (mServices.bringDownDisabledPackageServicesLocked(
             packageName, null, userId, evenPersistent, true, doit)) {
         ...
         didSomething = true;
     }

     if (packageName == null) {
         //当包名为空, 则移除当前用户的所有sticky broadcasts
         mStickyBroadcasts.remove(userId);
     }

     //收集providers [见流程6.1]
     ArrayList<ContentProviderRecord> providers = new ArrayList<>();
     if (mProviderMap.collectPackageProvidersLocked(packageName, null, doit, evenPersistent,
             userId, providers)) {
          ...
         didSomething = true;
     }
     for (i = providers.size() - 1; i >= 0; i--) {
          //清理providers [见流程6.2]
         removeDyingProviderLocked(null, providers.get(i), true);
     }

     //移除已获取的跟该package/user相关的临时权限
     removeUriPermissionsForPackageLocked(packageName, userId, false);

     if (doit) {
         // 清理Broadcast [见流程7.1]
         for (i = mBroadcastQueues.length - 1; i >= 0; i--) {
             didSomething |= mBroadcastQueues[i].cleanupDisabledPackageReceiversLocked(
                     packageName, null, userId, doit);
         }
     }

     if (packageName == null || uninstalling) {
         ... //包名为空的情况
     }

     if (doit) {
         if (purgeCache && packageName != null) {
            ... //不进入该分支
         }
         if (mBooted) {
             //恢复栈顶的activity
             mStackSupervisor.resumeTopActivitiesLocked();
             mStackSupervisor.scheduleIdleLocked();
         }
     }

     return didSomething;
 }
对于didSomething只指当方法中所有行为,则返回true.比如killPackageProcessesLocked(),只要杀过一个进程则代表didSomething为true.
该方法的主要功能:
接下来,从这5个角度来分别说说force-stop的执行过程.
//callerWillRestart = false, allowRestart = true, doit = true;
private final boolean killPackageProcessesLocked(String packageName, int appId,
        int userId, int minOomAdj, boolean callerWillRestart, boolean allowRestart,
        boolean doit, boolean evenPersistent, String reason) {
    ArrayList<ProcessRecord> procs = new ArrayList<>();

    //遍历当前所有运行中的进程
    final int NP = mProcessNames.getMap().size();
    for (int ip=0; ip<NP; ip++) {
        SparseArray<ProcessRecord> apps = mProcessNames.getMap().valueAt(ip);
        final int NA = apps.size();
        for (int ia=0; ia<NA; ia++) {
            ProcessRecord app = apps.valueAt(ia);
            if (app.persistent && !evenPersistent) {
                continue; //不杀persistent进程
            }
            if (app.removed) {
                //已标记removed的进程,便是需要被杀的进程,加入procs队列
                if (doit) {
                    procs.add(app);
                }
                continue;
            }

            if (app.setAdj < minOomAdj) {
                continue; //不杀adj低于预期的进程
            }

            if (packageName == null) {
                ...
            //已指定包名的情况
            } else {
                //pkgDeps: 该进程所依赖的包名
                final boolean isDep = app.pkgDeps != null
                        && app.pkgDeps.contains(packageName);
                if (!isDep && UserHandle.getAppId(app.uid) != appId) {
                    continue;
                }
                if (userId != UserHandle.USER_ALL && app.userId != userId) {
                    continue;
                }
                //pkgList: 运行在该进程的所有包名;
                if (!app.pkgList.containsKey(packageName) && !isDep) {
                    continue;
                }
            }

            //通过前面所有条件,则意味着该进程需要被杀, 添加到procs队列
            app.removed = true;
            procs.add(app);
        }
    }

    int N = procs.size();
    for (int i=0; i<N; i++) {
        // [见流程3.2]
        removeProcessLocked(procs.get(i), callerWillRestart, allowRestart, reason);
    }
    updateOomAdjLocked();
    return N > 0;
}
一般地force-stop会指定包名,该方法会遍历当前所有运行中的进程mProcessNames,以下条件同时都不满足的进程,则会成为被杀的目标进程:(也就是说满足以下任一条件都可以免死)
通俗地来说就是:
除此之外,以下情况则必然会成为被杀进程:
remove=true的进程,则会被杀;pkgDeps中包含该packageName,则会被杀;pkgList中包含该packageName,且该进程与包名所指定的AppId相等则会被杀; 进程的pkgList是在启动组件或者创建进程的过程向该队列添加的,代表的是该应用下有组件运行在该进程。那么pkgDeps是指该进程所依赖的包名,调用ClassLoader的过程添加。
//callerWillRestart = false, allowRestart = true
private final boolean removeProcessLocked(ProcessRecord app,
         boolean callerWillRestart, boolean allowRestart, String reason) {
     final String name = app.processName;
     final int uid = app.uid;
     //从mProcessNames移除该进程
     removeProcessNameLocked(name, uid);
     if (mHeavyWeightProcess == app) {
        ...
     }
     boolean needRestart = false;
     if (app.pid > 0 && app.pid != MY_PID) {
         int pid = app.pid;
         synchronized (mPidsSelfLocked) {
             mPidsSelfLocked.remove(pid);
             mHandler.removeMessages(PROC_START_TIMEOUT_MSG, app);
         }

         if (app.isolated) {
             mBatteryStatsService.removeIsolatedUid(app.uid, app.info.uid);
         }
         boolean willRestart = false;
         if (app.persistent && !app.isolated) {
             if (!callerWillRestart) {
                 willRestart = true; //用于标记persistent进程则需重启进程
             } else {
                 needRestart = true; //用于返回值,作用不大
             }
         }
         //杀掉该进程
         app.kill(reason, true);
         //清理该进程相关的信息
         handleAppDiedLocked(app, willRestart, allowRestart);

         //对于persistent进程,则需要重新启动该进程
         if (willRestart) {
             removeLruProcessLocked(app);
             addAppLocked(app.info, false, null /* ABI override */);
         }
     } else {
         mRemovedProcesses.add(app);
     }

     return needRestart;
 }
该方法的主要功能:
[-> ActivityStackSupervisor.java]
boolean finishDisabledPackageActivitiesLocked(String packageName, Set<String> filterByClasses,
        boolean doit, boolean evenPersistent, int userId) {
    boolean didSomething = false;
    for (int displayNdx = mActivityDisplays.size() - 1; displayNdx >= 0; --displayNdx) {
        final ArrayList<ActivityStack> stacks = mActivityDisplays.valueAt(displayNdx).mStacks;
        final int numStacks = stacks.size();
        for (int stackNdx = 0; stackNdx < numStacks; ++stackNdx) {
            final ActivityStack stack = stacks.get(stackNdx);
            // [见流程4.2]
            if (stack.finishDisabledPackageActivitiesLocked(
                    packageName, filterByClasses, doit, evenPersistent, userId)) {
                didSomething = true;
            }
        }
    }
    return didSomething;
}
[-> ActivityStack.java]
// doit = true;
boolean finishDisabledPackageActivitiesLocked(String packageName, Set<String> filterByClasses,
boolean doit, boolean evenPersistent, int userId) {
boolean didSomething = false;
TaskRecord lastTask = null;
ComponentName homeActivity = null;
for (int taskNdx = mTaskHistory.size() - 1; taskNdx >= 0; --taskNdx) {
final ArrayList<ActivityRecord> activities = mTaskHistory.get(taskNdx).mActivities;
int numActivities = activities.size();
for (int activityNdx = 0; activityNdx < numActivities; ++activityNdx) {
ActivityRecord r = activities.get(activityNdx);
final boolean sameComponent =
(r.packageName.equals(packageName) && (filterByClasses == null
|| filterByClasses.contains(r.realActivity.getClassName())))
|| (packageName == null && r.userId == userId);
if ((userId == UserHandle.USER_ALL || r.userId == userId)
&& (sameComponent || r.task == lastTask)
&& (r.app == null || evenPersistent || !r.app.persistent)) {
...
if (r.isHomeActivity()) {
if (homeActivity != null && homeActivity.equals(r.realActivity)) {
continue; //不结束home activity
} else {
homeActivity = r.realActivity;
}
}
didSomething = true;
if (sameComponent) {
if (r.app != null) {
r.app.removed = true;
}
r.app =
版权声明:本文来源CSDN,感谢博主原创文章,遵循 CC 4.0 by-sa 版权协议,转载请附上原文出处链接和本声明。
原文链接:https://blog.csdn.net/bat1992/article/details/52944824
站方申明:本站部分内容来自社区用户分享,若涉及侵权,请联系站方删除。
如果觉得我的文章对您有用,请随意打赏。你的支持将鼓励我继续创作!
