社区微信群开通啦,扫一扫抢先加入社区官方微信群

社区微信群
优质文章,及时送达
前言
OAuth(开放授权)是一个开放标准,允许用户授权第三方网站访问他们存储在另外的服务提供者上的信息,而不需要将用户名和密码提供给第三方网站或分享他们数据的所有内容。网上有很多关于OAuth协议的讲解,这里就不在详细解释OAuth相关的概念了,请读者自行查阅相关资料,否则本文接下来的内容可能会很难理解。 Spring-Security对OAuth2.0的支持 截止到本文撰写的日期为止,Spring已经提供了对OAuth提供的支持( spring-security-oauth:https://github.com/spring-projects/spring-security-oauth ),但是该工程已经被废弃了,因为Spring-Security工程提供了最新的OAuth2.0支持。如果你的项目中使用了过期的Spring-Security-OAuth,请参考《 OAuth 2.0迁移指南:https://github.com/spring-projects/spring-security/wiki/OAuth-2.0-Migration-Guide》 , 本文将对OAuth2.0中的客户端模式进行原理分析,结合Spring官方指南中提供了一个简单的基于spring-boot与oauth2.0集成第三方应用登录的案例( spring-boot-oauth2:https://spring.io/guides/tutorials/spring-boot-oauth2/ ),一步一步分析其内部实现的原理。 公众号同样发布过近百篇 Spring Boot 相关的实战文章,关注微信公众号 Java后端,回复 666 下载这本技术栈手册。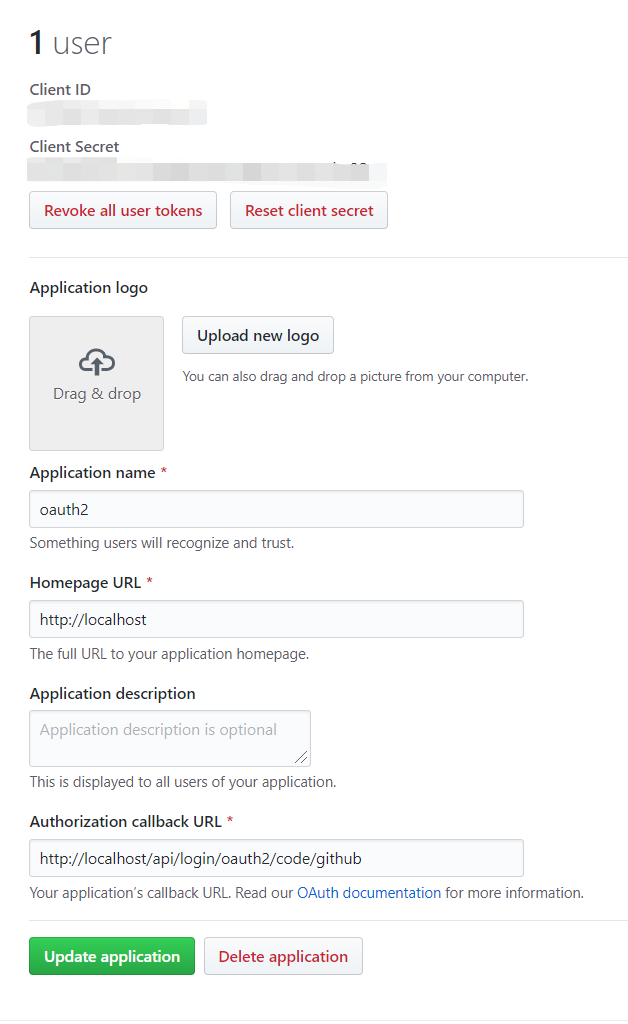 这个应用相当于我们自己的应用(客户端),被注册在Github(授权服务器)中了,如果我们应用中的用户有github账号的话,则可以基于oauth2来登录我们的系统,替代原始的用户名密码方式。在官方指南的例子中,使用spring-security和oauth2进行社交登陆只需要在你的pom文件中加入以下几个依赖即可:
<dependency><groupId>org.springframework.bootgroupId><artifactId>spring-boot-starter-oauth2-clientartifactId>dependency><dependency><groupId>org.springframework.bootgroupId><artifactId>spring-boot-starter-securityartifactId>dependency><dependency><groupId>org.springframework.bootgroupId><artifactId>spring-boot-starter-webartifactId>dependency>spring:security:oauth2:client:registration:github:clientId: github-client-idclientSecret: github-client-secret@SpringBootApplication@RestController
public class SocialApplication extends WebSecurityConfigurerAdapter {@Override
protected void configure(HttpSecurity http) throws Exception {http.authorizeRequests(a -> a
.antMatchers("/", "/error", "/webjars/**").permitAll()
.anyRequest().authenticated()
).exceptionHandling(e -> e
.authenticationEntryPoint(new HttpStatusEntryPoint(HttpStatus.UNAUTHORIZED))
).oauth2Login();
}
}logging:
level:
org.springframework.security: debugOAuth2AuthorizationRequestRedirectFilter
OAuth2LoginAuthenticationFilterpublic class OAuth2AuthorizationRequestRedirectFilter extends OncePerRequestFilter {
......省略部分代码@Overrideprotected void doFilterInternal(HttpServletRequest request, HttpServletResponse response, FilterChain filterChain)throws ServletException, IOException {try {
OAuth2AuthorizationRequest authorizationRequest = this.authorizationRequestResolver.resolve(request);if (authorizationRequest != null) {this.sendRedirectForAuthorization(request, response, authorizationRequest);return;
}
} catch (Exception failed) {this.unsuccessfulRedirectForAuthorization(request, response, failed);return;
}
......省略部分代码
}@Overridepublic OAuth2AuthorizationRequest resolve(HttpServletRequest request) {String registrationId = this.resolveRegistrationId(request);String redirectUriAction = getAction(request, "login");return resolve(request, registrationId, redirectUriAction);
}private OAuth2AuthorizationRequest resolve(HttpServletRequest request, String registrationId, String redirectUriAction) {if (registrationId == null) {return null;
}
ClientRegistration clientRegistration = this.clientRegistrationRepository.findByRegistrationId(registrationId);if (clientRegistration == null) {throw new IllegalArgumentException("Invalid Client Registration with Id: " + registrationId);
}
Map<String, Object> attributes = new HashMap<>();
attributes.put(OAuth2ParameterNames.REGISTRATION_ID, clientRegistration.getRegistrationId());
OAuth2AuthorizationRequest.Builder builder;if (AuthorizationGrantType.AUTHORIZATION_CODE.equals(clientRegistration.getAuthorizationGrantType())) {
builder = OAuth2AuthorizationRequest.authorizationCode();
Map<String, Object> additionalParameters = new HashMap<>();if (!CollectionUtils.isEmpty(clientRegistration.getScopes()) &&
clientRegistration.getScopes().contains(OidcScopes.OPENID)) {
addNonceParameters(attributes, additionalParameters);
}if (ClientAuthenticationMethod.NONE.equals(clientRegistration.getClientAuthenticationMethod())) {
addPkceParameters(attributes, additionalParameters);
}
builder.additionalParameters(additionalParameters);
} else if (AuthorizationGrantType.IMPLICIT.equals(clientRegistration.getAuthorizationGrantType())) {
builder = OAuth2AuthorizationRequest.implicit();
} else {throw new IllegalArgumentException("Invalid Authorization Grant Type (" +
clientRegistration.getAuthorizationGrantType().getValue() +") for Client Registration with Id: " + clientRegistration.getRegistrationId());
}String redirectUriStr = expandRedirectUri(request, clientRegistration, redirectUriAction);
OAuth2AuthorizationRequest authorizationRequest = builder
.clientId(clientRegistration.getClientId())
.authorizationUri(clientRegistration.getProviderDetails().getAuthorizationUri())
.redirectUri(redirectUriStr)
.scopes(clientRegistration.getScopes())
.state(this.stateGenerator.generateKey())
.attributes(attributes)
.build();return authorizationRequest;
}private void sendRedirectForAuthorization(HttpServletRequest request, HttpServletResponse response,
OAuth2AuthorizationRequest authorizationRequest) throws IOException {if (AuthorizationGrantType.AUTHORIZATION_CODE.equals(authorizationRequest.getGrantType())) {this.authorizationRequestRepository.saveAuthorizationRequest(authorizationRequest, request, response);
}this.authorizationRedirectStrategy.sendRedirect(request, response, authorizationRequest.getAuthorizationRequestUri());
}public void sendRedirect(HttpServletRequest request, HttpServletResponse response,String url) throws IOException {String redirectUrl = calculateRedirectUrl(request.getContextPath(), url);
redirectUrl = response.encodeRedirectURL(redirectUrl);if (logger.isDebugEnabled()) {
logger.debug("Redirecting to '" + redirectUrl + "'");
}
response.sendRedirect(redirectUrl);
}public class OAuth2LoginAuthenticationFilter extends AbstractAuthenticationProcessingFilter {@Overridepublic Authentication attemptAuthentication(HttpServletRequest request, HttpServletResponse response)
throws AuthenticationException {
MultiValueMap<String, String> params = OAuth2AuthorizationResponseUtils.toMultiMap(request.getParameterMap());if (!OAuth2AuthorizationResponseUtils.isAuthorizationResponse(params)) {
OAuth2Error oauth2Error = new OAuth2Error(OAuth2ErrorCodes.INVALID_REQUEST);throw new OAuth2AuthenticationException(oauth2Error, oauth2Error.toString());
}
OAuth2AuthorizationRequest authorizationRequest =this.authorizationRequestRepository.removeAuthorizationRequest(request, response);if (authorizationRequest == null) {
OAuth2Error oauth2Error = new OAuth2Error(AUTHORIZATION_REQUEST_NOT_FOUND_ERROR_CODE);throw new OAuth2AuthenticationException(oauth2Error, oauth2Error.toString());
}String registrationId = authorizationRequest.getAttribute(OAuth2ParameterNames.REGISTRATION_ID);
ClientRegistration clientRegistration = this.clientRegistrationRepository.findByRegistrationId(registrationId);if (clientRegistration == null) {
OAuth2Error oauth2Error = new OAuth2Error(CLIENT_REGISTRATION_NOT_FOUND_ERROR_CODE,"Client Registration not found with Id: " + registrationId, null);throw new OAuth2AuthenticationException(oauth2Error, oauth2Error.toString());
}String redirectUri = UriComponentsBuilder.fromHttpUrl(UrlUtils.buildFullRequestUrl(request))
.replaceQuery(null)
.build()
.toUriString();
OAuth2AuthorizationResponse authorizationResponse = OAuth2AuthorizationResponseUtils.convert(params, redirectUri);Object authenticationDetails = this.authenticationDetailsSource.buildDetails(request);
OAuth2LoginAuthenticationToken authenticationRequest = new OAuth2LoginAuthenticationToken(
clientRegistration, new OAuth2AuthorizationExchange(authorizationRequest, authorizationResponse));
authenticationRequest.setDetails(authenticationDetails);
OAuth2LoginAuthenticationToken authenticationResult =
(OAuth2LoginAuthenticationToken) this.getAuthenticationManager().authenticate(authenticationRequest);
OAuth2AuthenticationToken oauth2Authentication = new OAuth2AuthenticationToken(
authenticationResult.getPrincipal(),
authenticationResult.getAuthorities(),
authenticationResult.getClientRegistration().getRegistrationId());
oauth2Authentication.setDetails(authenticationDetails);
OAuth2AuthorizedClient authorizedClient = new OAuth2AuthorizedClient(
authenticationResult.getClientRegistration(),
oauth2Authentication.getName(),
authenticationResult.getAccessToken(),
authenticationResult.getRefreshToken());this.authorizedClientRepository.saveAuthorizedClient(authorizedClient, oauth2Authentication, request, response);return oauth2Authentication;
}
}public class OAuth2LoginAuthenticationProvider implements AuthenticationProvider {
...省略部分代码@Overridepublic Authentication authenticate(Authentication authentication) throws AuthenticationException {
OAuth2LoginAuthenticationToken authorizationCodeAuthentication =
(OAuth2LoginAuthenticationToken) authentication;if (authorizationCodeAuthentication.getAuthorizationExchange()
.getAuthorizationRequest().getScopes().contains("openid")) {return null;
}
OAuth2AccessTokenResponse accessTokenResponse;try {
OAuth2AuthorizationExchangeValidator.validate(
authorizationCodeAuthentication.getAuthorizationExchange());
accessTokenResponse = this.accessTokenResponseClient.getTokenResponse(new OAuth2AuthorizationCodeGrantRequest(
authorizationCodeAuthentication.getClientRegistration(),
authorizationCodeAuthentication.getAuthorizationExchange()));
} catch (OAuth2AuthorizationException ex) {
OAuth2Error oauth2Error = ex.getError();throw new OAuth2AuthenticationException(oauth2Error, oauth2Error.toString());
}
OAuth2AccessToken accessToken = accessTokenResponse.getAccessToken();
Map additionalParameters = accessTokenResponse.getAdditionalParameters();
OAuth2User oauth2User = this.userService.loadUser(new OAuth2UserRequest(
authorizationCodeAuthentication.getClientRegistration(), accessToken, additionalParameters));
Collection extends GrantedAuthority> mappedAuthorities =this.authoritiesMapper.mapAuthorities(oauth2User.getAuthorities());
OAuth2LoginAuthenticationToken authenticationResult = new OAuth2LoginAuthenticationToken(
authorizationCodeAuthentication.getClientRegistration(),
authorizationCodeAuthentication.getAuthorizationExchange(),
oauth2User,
mappedAuthorities,
accessToken,
accessTokenResponse.getRefreshToken());
authenticationResult.setDetails(authorizationCodeAuthentication.getDetails());return authenticationResult;
}
...省略部分代码
}OAuth2ClientAutoConfiguration
OAuth2ClientRegistrationRepositoryConfiguration
OAuth2WebSecurityConfiguration@Configuration(proxyBeanMethods = false)
@EnableConfigurationProperties(OAuth2ClientProperties.class)
@Conditional(ClientsConfiguredCondition.class)class OAuth2ClientRegistrationRepositoryConfiguration {
@Bean
@ConditionalOnMissingBean(ClientRegistrationRepository.class)
InMemoryClientRegistrationRepository clientRegistrationRepository(OAuth2ClientProperties properties) {
List registrations = new ArrayList<>(
OAuth2ClientPropertiesRegistrationAdapter.getClientRegistrations(properties).values());return new InMemoryClientRegistrationRepository(registrations);
}
}public enum CommonOAuth2Provider {
GOOGLE {@Overridepublic Builder getBuilder(String registrationId) {
ClientRegistration.Builder builder = getBuilder(registrationId,
ClientAuthenticationMethod.BASIC, DEFAULT_REDIRECT_URL);
builder.scope("openid", "profile", "email");
builder.authorizationUri("https://accounts.google.com/o/oauth2/v2/auth");
builder.tokenUri("https://www.googleapis.com/oauth2/v4/token");
builder.jwkSetUri("https://www.googleapis.com/oauth2/v3/certs");
builder.userInfoUri("https://www.googleapis.com/oauth2/v3/userinfo");
builder.userNameAttributeName(IdTokenClaimNames.SUB);
builder.clientName("Google");return builder;
}
},
GITHUB {@Overridepublic Builder getBuilder(String registrationId) {
ClientRegistration.Builder builder = getBuilder(registrationId,
ClientAuthenticationMethod.BASIC, DEFAULT_REDIRECT_URL);
builder.scope("read:user");
builder.authorizationUri("https://github.com/login/oauth/authorize");
builder.tokenUri("https://github.com/login/oauth/access_token");
builder.userInfoUri("https://api.github.com/user");
builder.userNameAttributeName("id");
builder.clientName("GitHub");return builder;
}
},
FACEBOOK {@Overridepublic Builder getBuilder(String registrationId) {
ClientRegistration.Builder builder = getBuilder(registrationId,
ClientAuthenticationMethod.POST, DEFAULT_REDIRECT_URL);
builder.scope("public_profile", "email");
builder.authorizationUri("https://www.facebook.com/v2.8/dialog/oauth");
builder.tokenUri("https://graph.facebook.com/v2.8/oauth/access_token");
builder.userInfoUri("https://graph.facebook.com/me?fields=id,name,email");
builder.userNameAttributeName("id");
builder.clientName("Facebook");return builder;
}
},
OKTA {@Overridepublic Builder getBuilder(String registrationId) {
ClientRegistration.Builder builder = getBuilder(registrationId,
ClientAuthenticationMethod.BASIC, DEFAULT_REDIRECT_URL);
builder.scope("openid", "profile", "email");
builder.userNameAttributeName(IdTokenClaimNames.SUB);
builder.clientName("Okta");return builder;
}
};private static final String DEFAULT_REDIRECT_URL = "{baseUrl}/{action}/oauth2/code/{registrationId}";protected final ClientRegistration.Builder getBuilder(String registrationId,
ClientAuthenticationMethod method, String redirectUri) {
ClientRegistration.Builder builder = ClientRegistration.withRegistrationId(registrationId);
builder.clientAuthenticationMethod(method);
builder.authorizationGrantType(AuthorizationGrantType.AUTHORIZATION_CODE);
builder.redirectUriTemplate(redirectUri);return builder;
}public abstract ClientRegistration.Builder getBuilder(String registrationId);
}@Configuration(proxyBeanMethods = false)@ConditionalOnBean(ClientRegistrationRepository.class)
class OAuth2WebSecurityConfiguration {@Bean@ConditionalOnMissingBean
OAuth2AuthorizedClientService authorizedClientService(ClientRegistrationRepository clientRegistrationRepository) {return new InMemoryOAuth2AuthorizedClientService(clientRegistrationRepository);
}
@Bean
@ConditionalOnMissingBeanOAuth2AuthorizedClientRepository authorizedClientRepository(OAuth2AuthorizedClientService authorizedClientService) {return new AuthenticatedPrincipalOAuth2AuthorizedClientRepository(authorizedClientService);
}
@Configuration(proxyBeanMethods = false)
@ConditionalOnMissingBean(WebSecurityConfigurerAdapter.class)static class OAuth2WebSecurityConfigurerAdapter extends WebSecurityConfigurerAdapter {@Override
protected void configure(HttpSecurity http) throws Exception {http.authorizeRequests((requests) -> requests.anyRequest().authenticated());http.oauth2Login(Customizer.withDefaults());http.oauth2Client();
}
}
}- END -
最近整理一份面试资料《Java技术栈学习手册》,覆盖了Java技术、面试题精选、Spring全家桶、Nginx、SSM、微服务、数据库、数据结构、架构等等。获取方式:点“ 在看,关注公众号 Java后端 并回复 777 领取,更多内容陆续奉上。推荐阅读 1. 15000 字 30 图讲解 AQS2. 如何设计订单系统?不妨看看这篇文章3. 用命令行管理你的 GitHub 项目,不必再开网页4. 怎么去掉 IDEA 中 XML 显示的屎黄色5. 程序员需知的 58 个网站

喜欢文章,点个在看 
如果觉得我的文章对您有用,请随意打赏。你的支持将鼓励我继续创作!
