社区微信群开通啦,扫一扫抢先加入社区官方微信群

社区微信群
在 Mac 的 Visual Studio Code 上装 Golang 的开发环境,在安装 go 的插件是,会自动更新依赖的库文件,由于各种原因,导致安装过程中,总是遇到插件安装失败的情况。
go 1.10 下载地址:
https://studygolang.com/dl
查看 Go 的环境变量设置的命令
go envGOARCH="amd64"
GOBIN=""
GOEXE=""
GOHOSTARCH="amd64"
GOHOSTOS="darwin"
GOOS="darwin"
GOPATH=""
GORACE=""
GOROOT="/usr/local/go"
GOTOOLDIR="/usr/local/go/pkg/tool/darwin_amd64"
GO15VENDOREXPERIMENT=""
CC="clang"
GOGCCFLAGS="-fPIC -m64 -pthread -fno-caret-diagnostics -Qunused-arguments -fmessage-length=0 -fno-common"
CXX="clang++"
CGO_ENABLED="1"需要设置的环境变量包括:GOPATH和PATH,GOROOT变量默认已经设置好。
在bash中设置:
vim .bash_profile在 .bash_profile 设置
export GOPATH="/Users/username/go"
export PATH="/Users/username/go/bin:$PATH"
使修改立刻生效:
source .bash_profile查看 Go 的环境变量
GOARCH="amd64"
GOBIN=""
GOEXE=""
GOHOSTARCH="amd64"
GOHOSTOS="darwin"
GOOS="darwin"
GOPATH="/Users/username/go"
GORACE=""
GOROOT="/usr/local/go"
GOTOOLDIR="/usr/local/go/pkg/tool/darwin_amd64"
GO15VENDOREXPERIMENT=""
CC="clang"
GOGCCFLAGS="-fPIC -m64 -pthread -fno-caret-diagnostics -Qunused-arguments -fmessage-length=0 -fno-common"
CXX="clang++"
CGO_ENABLED="1"打开Visual Studio Code,找到菜单File->Preferences->User Settings,
{
    "go.autocompleteUnimportedPackages": true,
    "files.autoSave": "onFocusChange",
    "go.buildOnSave": "package",
    "go.lintOnSave": "package",
    "go.vetOnSave": "package",
    "go.buildFlags": [],
    "go.lintFlags": [],
    "go.vetFlags": [],
    "go.useCodeSnippetsOnFunctionSuggest": false,
    "go.formatTool": "goreturns",
    "go.gopath": "/Users/username/go",
    "go.goroot": "/usr/local/go",
}本文的重点来了,由于小编在前面配置好了路径,在我们创建go的文件的时候,Visual Studio Code 会在顶部提示是否安装相应的插件,如下图:
点击 Install all ,在 Visual Studio Code 下面的终端会出现 Installing tools 字样,如下图:
但在小编的安装的过程中,总是遇到失败的情况:
Installing github.com/nsf/gocode SUCCEEDED
Installing github.com/uudashr/gopkgs/cmd/gopkgs SUCCEEDED
Installing github.com/ramya-rao-a/go-outline FAILED
Installing github.com/acroca/go-symbols FAILED
Installing golang.org/x/tools/cmd/guru FAILED
Installing golang.org/x/tools/cmd/gorename FAILED
Installing github.com/fatih/gomodifytags SUCCEEDED
Installing github.com/haya14busa/goplay/cmd/goplay SUCCEEDED
Installing github.com/josharian/impl FAILED
Installing github.com/rogpeppe/godef SUCCEEDED
Installing sourcegraph.com/sqs/goreturns FAILED
Installing github.com/golang/lint/golint FAILED
Installing github.com/cweill/gotests/... FAILED
Installing github.com/derekparker/delve/cmd/dlv SUCCEEDED
此时,我们需要在我们之前设置好的 GOPATH 的目录下的 src 文件夹里创建一个新的文件夹 golang.org,在 golang.org 文件夹里创建 x 的文件夹,在 bash 中切换目录:
cd $GOPATH/src/golang.org/x/下载插件包:
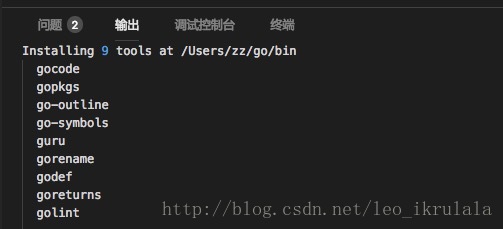
git clone https://github.com/golang/tools.git tools执行完成后,有多一个 tools 的文件夹,打开 Visual Studio Code,重复上面步骤,点击 Install all ,此时我们会在刚刚的位置看到 插件 安装成功的提示,如下:
Installing 9 tools at /Users/username/go/bin
  gocode
  gopkgs
  go-outline
  go-symbols
  guru
  gorename
  godef
  goreturns
  golint

Installing github.com/nsf/gocode SUCCEEDED
Installing github.com/uudashr/gopkgs/cmd/gopkgs SUCCEEDED
Installing github.com/ramya-rao-a/go-outline SUCCEEDED
Installing github.com/acroca/go-symbols SUCCEEDED
Installing golang.org/x/tools/cmd/guru SUCCEEDED
Installing golang.org/x/tools/cmd/gorename SUCCEEDED
Installing github.com/rogpeppe/godef SUCCEEDED
Installing sourcegraph.com/sqs/goreturns SUCCEEDED
Installing github.com/golang/lint/golint SUCCEEDED在 Visual Studio Code 中,我们新建后缀 .go 文件,因小编是 Mac 用户,所以小编的调试快捷键 fn + F5,点击调试,小编的 Visual Studio Code 报错,如下图:
这个错误,相信很多人都会遇到哦~ 但复制粘贴去百度,答案繁杂众多,此时我们需要更详细的信息,打开 launch.json 配置:
{
    // 使用 IntelliSense 了解相关属性。
    // 悬停以查看现有属性的描述。
    // 欲了解更多信息,请访问: https://go.microsoft.com/fwlink/?linkid=830387
    "version": "0.2.0",
    "configurations": [

        {
            "name": "Launch",
            "type": "go",
            "request": "launch",
            "mode": "debug",
            "remotePath": "",
            "port": 2345,
            "host": "127.0.0.1",
            "program": "${fileDirname}",
            "env": {},
            "args": [],
            "showLog": true,
            "trace": "verbose"
        }
    ]
}
配置之后,再次点击调试,我们会在 Visual Studio Code 的调试控制台看到如下信息:
Verbose logs are written to:
/var/folders/c5/d39vvdjj6s54c78t65t3fym40000gp/T/vscode-go-debug.txt
14:58:49, 2018-3-7
InitializeRequest
InitializeResponse
Using GOPATH: /Users/username/go
Couldnt find dlv at /Users/username/go, /Users/username/go or /Users/username/go/bin:/Library/Frameworks/Python.framework/Versions/3.6/bin:/usr/local/Cellar/python3/3.6.2/bin:/usr/local/Cellar/python/2.7.14/bin:/Users/username/.rvm/gems/ruby-2.2.4/bin:/Users/username/.rvm/gems/ruby-2.2.4@global/bin:/Users/username/.rvm/rubies/ruby-2.2.4/bin:/usr/local/bin:/usr/bin:/bin:/usr/sbin:/sbin:/opt/X11/bin:/usr/local/go/bin:/Users/username/.rvm/bin
ContinueResponse
DisconnectRequest
看调试控制台的信息,我们会发现 Couldnt find dlv at /Users/username/go 的提示语句,意思是说 Visual Studio Code 在我们设置的 GOPATH 中没有找到 dlv 这个插件,so… 我们需要在我们的 GOPATH 的目录下下载安装一个 dlv 的插件:
首先我们要确定的 Mac 装了 xcode-select,没有则运行:
xcode-select --install现在我们可以 Install delve:
go get -u github.com/derekparker/delve/cmd/dlv或者,我们可以 clone 到本地,运行:
make installmakefile将负责自动创建和安装自签名证书。
安装完成后,我们再次调试代码,会在调试控制台中看到我们的正常信息啦,小编的调试代码如下:
package main

import "fmt"

func main() {
    fmt.Println("Hello,World")
}
在我们的调试控制台中,会看到如下信息:
InitializeResponse
Using GOPATH: /Users/username/go
Running: /Users/username/go/bin/dlv debug --headless=true --listen=127.0.0.1:2345 --log=true --
2018/03/07 15:05:25 server.go:73: Using API v1
2018/03/07 15:05:25 debugger.go:98: launching process with args: [/Users/username/Documents/goworkplace/debug]
API server listening at: 127.0.0.1:2345
InitializeEvent
ConfigurationDoneRequest
ContinueRequest
ContinueResponse
ThreadsRequest
2018/03/07 15:05:25 debugger.go:497: continuing
Hello,World
continue state {"Threads":null,"NextInProgress":false,"exited":true,"exitStatus":0,"When":""}
TerminatedEvent
DisconnectRequest
其实这里面的打印信息有我们在上面步骤中 的 launch.json 文件里 “trace”: “verbose” 的配置打印出来的,在调试中不要这些信息的,可以把这个配置去掉……
Colorization 代码着彩色
Completion Lists 代码自动完成(使用gocode)
Snippets 代码片段
Quick Info 快速提示信息(使用godef)
Goto Definition 跳转到定义(使用godef)
Find References 搜索参考引用(使用go-find-references)
File outline 文件大纲(使用go-outline)
Workspace symbol search 工作区符号搜索(使用 go-symbols)
Rename 重命名(使用gorename)
Build-on-save 保存构建(使用go build或go test)
Format 代码格式化(使用goreturns或goimports或gofmt)
Add Imports 自动完成导入未导入的 packages(使用 gopkgs)
Linter 静态分析检查(使用 golint 或 gometalinter)
Debugging 调试代码(使用delve)
ErrorChecking 检查代码中未检查的错误(使用 errcheck)
VarChecking 查找未调用的全局变量和常量(使用 varcheck)
UnusedCode 查找未调用的代码(使用 deadcode)
小编在这篇文章中,主要在两个地方遇到安装的问题,Visual Studio Code Installing tools 遇到 FAILED 的情况,需要我们去配置其 GOPATH 、用户设置 和 安装 /src/golang.org/x/tools 。其二,在小编在调试的过程中,Visual Studio Code 出现了 ensure it is in your “GOPATH…” 的错误提示。但由于这个错误提示并没有给我们描述更详细的情况,需要我们在我们的 launch.json 配置 “trace”: “verbose” ,以便于我们确定更准确的错误内容,如小编因没有下载 dlv 这个插件导致的。最好谢谢大家能看到最后,哈哈……
如果觉得我的文章对您有用,请随意打赏。你的支持将鼓励我继续创作!