社区微信群开通啦,扫一扫抢先加入社区官方微信群

社区微信群
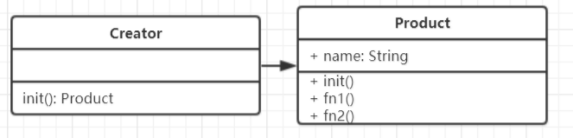
class CarFactory {
  constructor(name) {
    this.name = name
  }
  productBus() {
    console.log(this.name, '生产公交车')
  }
  productCar() {
    console.log(this.name, '生产小汽车')
  }
}

class Creator {
  constructor(name) {
    return new CarFactory(name)
  }
}

// 测试
let p = new Creator('汽车工厂')
p.productBus()
p.productCar()
应用场景:
class jQuery {
  constructor(selector) {
    // ...code...
    this.selector = selector
  }
  html(data) {

  }
}
window.$ = function (selector) {
  return new jQuery(selector)
}
class Vnode(tag, attrs, chilren) {
  // ...code...
}

React.createElement = function (tag, attrs, chilren) {
  return new Vnode(tag, attrs, chilren)
}
Vue.component('async-example', function (resolve, reject) {
  setTimeout(() => {
    resolve({
      template: '<div>i am async</div>'
    })
  }, 1000);
})
符合单一职能原则,没有体现开放闭合原则
常用于登录框和购物车
class SinglonObject {
  login() {
    console.log('登录')
  }
}

SinglonObject.getInstance = (() => {
  let instance
  return () => {
    if (!instance) {
      instance = new SinglonObject()
    }
    return instance
  }
})()

// 测试
let login1 = SinglonObject.getInstance()
let login2 = SinglonObject.getInstance()
login1.login();
login2.login()
console.log(login1 === login2)
应用场景
if (window.jQuery != null) {
  return window.jQuery
} else {
  // 初始化
}
class LoginDialog {
  constructor() {
    this.state = 'hide'
  }
  show() {
    if (this.state == "show") {
      console.log("登录框已显示");
      return
    }
    this.state = 'show'
    console.log('显示登录框')
  }
  hide() {
    if (this.state == 'hide') {
      console.log('登录框已隐藏')
      return
    }
    this.state = 'hide'
    console.log('隐藏登录框')
  }
}

LoginDialog.getInstance = (() => {
  let instance
  return () => {
    if (!instance) {
      instance = new LoginDialog()
    }
    return instance
  }
})()

// 测试
let login1 = LoginDialog.getInstance();
let login2 = LoginDialog.getInstance()

login1.show()
login2.show()

console.log(login2 == login1);
符合开放闭合原则
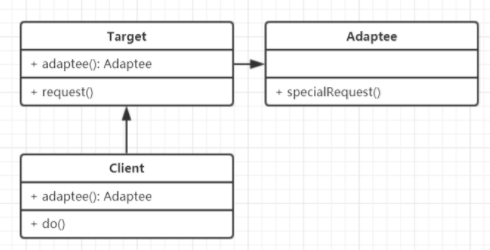
通过适配器将旧接口和使用者分离
装饰器的区别:原来的接口不能用,装饰器原来的功能还能用
class Adaptee {
  specialRequest() {
    return '德国插头'
  }
}

class Target {
  constructor() {
    this.adaptee = new Adaptee()
  }
  requet() {
    return `${this.adaptee.specialRequest()}-->中国插头`
  }
}

let target = new Target()
let res = target.requet()
console.log(res)
使用场景
ajax({
  url: '',
  type: '',
  dataType: '',
  data: {
    id: '123'
  }
})
.done(() => {})

let $ = {
  ajax(opts) {
    return ajax(opts)
  }
}

// 以前代码中的 $.ajax 就指向我们自定义 ajax,删除 Query 也不会报错
$.ajax()
new Vue({
  el: '#app',
  data: {
    hello: 'hello'
  },
  computed() {
    reserveHello() {
      return this.hello.split('').reserve().join('')
    }
  }
})
class Cricle {
  draw() {
    console.log('画一个圆')
  }
}

class Decorator {
  constructor(cricle) {
    this.cricle = cricle
  }
  draw() {
    this.cricle.draw()
    this.setRedBorder(this.cricle)
  }
  setRedBorder(cricle) {
    console.log('给圆设置红色边框')
  }
}

let cricel = new Cricle()
cricel.draw()
let dec = new Decorator(cricel)
dec.draw()
应用场景
function testDec(isDec) {
  return target => {
    target.isDec = isDec
  }
}

@testDec(true)
class Demo {}

console.log(Demo.isDec)
function Mixins(...list) {
  return (target) => {
    Object.assign(target.prototype, ...list)
  }
}
const Foo = {
  foo() {
    console.log('foo')
  }
}
@Mixins(Foo)
class Myclass {}

let obj = new Myclass()
obj.foo()
/**
* @desc 只读
* arg1 {Class} target Person
* arg2 {string} name getName
* arg2 {Object} descriptor 属描述对象,共四个值
*/
function readonly(target, name, descriptor) {
  // varlue: '',
  // enumerable: true,
  // configurable: false,
  // writable: true
  descriptor.writable = false
  return descriptor
}
class Person {
  constructor() {
    this.first = 'a'
    this.last = 'b'
  }
  @readonly
  getName() {
    return `a: ${this.first}, b: ${this.last}`
  }
}
let people = new Person()
console.log(people.getName())
// people.getName = 'iwen' 修改会报错
import { deprecate } from "core-decorators";

class Person {
  @deprecate('即将废弃', {url: 'www.baidu.com'})
  getName() {
    return 'iwen'
  }
}

let p = new Person()
console.log(p.getName())
function log(target, name, descriptor) {
  let oldValue = descriptor.value
  descriptor.value = function () {
    console.log(`${name} args: `, arguments)
    return oldValue.apply(this, arguments)
  }
}

class MyMath {
  @log
  add(a, b) {
    return a + b
  }
  getName() {
    return 'iwen'
  }
}
let math = new MyMath()
let result = math.add(3, 4)
console.log(result)
客户端无法直接访问主机,但是可以通过代理访问,比如科学上网和访问公司内网
class RealImg {
  constructor(fileName) {
    this.fileName = fileName
    this.loadFromDisk()
  }
  loadFromDisk() {
    console.log('加载', this.fileName)
  }
  display() {
    console.log('显示', this.fileName)
  }
}

class ProxyImg {
  constructor(fileName) {
    this.realImg = new RealImg(fileName)
  }
  display() {
    this.realImg.display()
  }
}

let proxyImg = new ProxyImg('1.png')
proxyImg.display()
应用场景:
$('button').click(function () {
  setTimeout($.proxy(function () {
    console.log(this)
  }, this), 1000)
})
const star = {
  name: '张xx',
  age: 18,
  phone: 'star 16666666666'
}

const agent = new Proxy(star, {
  get(target, key, val) {
    if (key == 'phone') {
      return 'agent 15888888888'
    }
    if (key == 'price') {
      return 120000
    }
    return target[key]
  },
  set(target, key, val) {
    if (key == 'customPrice') {
      if (val < 100000) {
        console.log('价格太低')
      } else {
        target[key] = val
        return
      }
    }
  }
})

console.log(agent.phone)
console.log(agent.price)
console.log(agent.name)
agent.customPrice = 1200
nodejs 一行行读取数据
const readline = require('readline');
const fs = require('fs');
let rl = readline.createInterface({
  input: fs.createReadStream('./a.txt')
})
let lineNum = 0
rl.on('line', (line) => {
  lineNum++
})
rl.on('close', () => {
  console.log(lineNum)
})
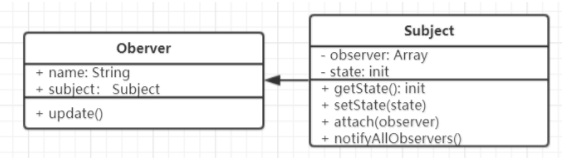
应用场景: 页面事件绑定,promise 中的 then,node 中 event, vue 中的生命周期
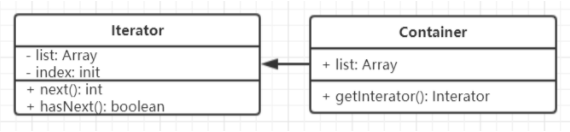
class Iterator {
  constructor(container) {
    this.list = container.list
    this.index = 0
  }
  next() {
    if (this.hasNext()) {
      return this.list[this.index++]
    }
  }
  hasNext() {
    if (this.index >= this.list.length) {
      return false
    }
    return true
  }
}

class Container {
  constructor(list) {
    this.list = list
  }
  getIterator() {
    return new Iterator(this)
  }
}

let container = new Container([5, 6, 7, 8, 9])
let iterator = container.getIterator()
while (iterator.hasNext()) {
  console.log(iterator.next())
}
自己实现 for of
function each(data) {
  let iterator = data[Symbol.iterator]()
  let item = {done: false}
  while (!item.done) {
    item = iterator.next()
    if (!item.done) {
      console.log(item.value)
    }
  }
}
each([5, 6, 7, 8, 9])
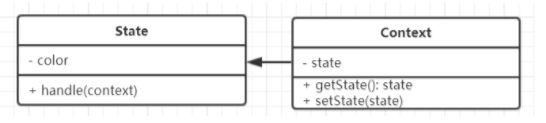
class State {
  constructor(color) {
    this.color = color
  }
  handle(context) {
    console.log(`turn to ${this.color} light`)
    context.setState(this)
  }
}

class Context {
  constructor() {
    this.state = null
  }
  getState() {
    return this.state
  }
  setState(state){
    this.state = state
  }
}

let context = new Context()
let red = new State('红灯')
let green = new State('绿灯')
let yellow = new State('黄灯')

red.handle(context)
console.log(context.getState())
green.handle(context)
console.log(context.getState())
yellow.handle(context)
console.log(context.getState())
应用场景:
利用状态机进行收藏和取消收藏
import StateMachine from "javascript-state-machine";
import $ from 'zepto2'
let fsm = new StateMachine({
  init: '收藏',
  transitions: [{
    name: 'doStore',
    from: '收藏',
    to: '取消收藏'
  }, {
    name: 'deleteStore',
    from: '取消收藏',
    to: '收藏'
  }],
  methods: {
    onDoStore() {
      console.log('收藏成功')
      updateText()
    },
    onDeleteStore() {
      console.log('取消收藏')
      updateText()
    }
  }
})
$('button').on('click', function () {
  if (fsm.is('收藏')) {
    fsm.doStore()
  } else {
    fsm.deleteStore()
  }
});
updateText()

function updateText() {
  $('button').text(fsm.state)
}
class Soldier {
  exec() {
    console.log('执行')
  }
}

class Trumpeter {
  constructor(soldier) {
    this.soldier = soldier
  }
  cmd() {
    console.log('执行命令')
    this.soldier.exec()
  }
}

class General {
  constructor(trumpeter) {
    this.trumpeter = trumpeter
  }
  invoke() {
    console.log('开始')
    this.trumpeter.cmd()
  }
}

let soldier = new Soldier() // 士兵
let trumpeter = new Trumpeter(soldier) // 号手
let general = new General(trumpeter) // 将军
general.invoke()
class Action {
  constructor(name) {
    this.name = name
    this.nextAction = null
  }
  setNextAction(action) {
    this.nextAction = action
  }
  handle() {
    console.log(`${this.name} 审批`)
    if (this.nextAction != null) {
      this.nextAction.handle()
    }
  }
}

let a1 = new Action('组长')
let a2 = new Action('经理')
let a3 = new Action('总监')
a1.setNextAction(a2)
a2.setNextAction(a3)
a1.handle()
处理大量的if else 或者switch case
class User {
  constructor(type) {
    this.type = type
  }
  buy() {
    if (this.type == 'ordinary') {
      console.log('普通用户购买')
    } else if (this.type == 'member') {
      console.log('会员用户购买')
    } else if (this.type == 'vip') {
      console.log('vip用户购买')
    }
  }
}
// test
let u1 = new User('ordinary')
u1.buy()
let u2 = new User('member')
u2.buy()
let u3 = new User('vip')
u3.buy()

// 使用策略模式重构
class OrdinaryUser {
  buy() {
    console.log('普通用户购买')
  }
}
class MemberUser {
  buy() {
    console.log('会员用户购买')
  }
}
class VipUser {
  buy() {
    console.log('vip用户购买')
  }
}

// 测试
let u4 = new OrdinaryUser()
u4.buy()
let u5 = new MemberUser()
u5.buy()
let u6 = new VipUser()
u6.buy()
class Color {
  constructor(name) {
    this.name = name
  }
}

class Shape {
  constructor(name, color) {
    this.name = name
    this.color = color
  }
  draw() {
    console.log(`画${this.color.name}的${this.name} `)
  }
}

// 测试
let red = new Color('red')
let green = new Color('green')
let shape = new Shape('圆', red)
shape.draw()
const prototype = {
  sayName() {
    return `${this.first} ${this.last}`
  },
  say() {
    return 'hello'
  }
}

// 测试
// 基于原型创建x
let x = Object.create(prototype)
x.first = 'a'
x.last = 'b'
console.log(x.sayName())
console.log(x.say())
// 基于原型创建y
let y = Object.create(prototype)
y.first = 'c'
y.last = 'd'
console.log(y.sayName())
console.log(y.say())
参考: https://blog.csdn.net/qq_33988065/article/details/84771323
如果觉得我的文章对您有用,请随意打赏。你的支持将鼓励我继续创作!