社区微信群开通啦,扫一扫抢先加入社区官方微信群

社区微信群
单例模式,是为了确保在整个软件体统中,某个类对象只有一个实例,并且该类通常会提供一个对外获取该实例的public方法(静态方法)。
比如日志、数据库连接池等对象,通常需要且只需要一个实例对象,这就会使用单例模式。
下面依次来说明一下:
通常,我们创建一个对象的方式就是new,但是,当我们考虑只创建一个实例的时候,就应该禁止外部来通过new的方式进行创建。同时,由于无法使用new,你应该考虑提供一个获取单例对象的方式给别人。
1.将构造器私有化(防止外部new,但是对反射还是有局限)
2.类的内部创建对象
3.对外提供一个获取实例静态的public方法
public class Singleton1 {
    public static void main(String[] args) {
        HungrySingleton hungrySingleton = HungrySingleton.getInstance();
        HungrySingleton hungrySingleton1 = HungrySingleton.getInstance();
        System.out.println(hungrySingleton == hungrySingleton1);
    }
}

class HungrySingleton {
    //1.私有化构造器
    private HungrySingleton() {
    }

     // 2.类内部创建对象,因为步骤3是static的,
    // 所以实例对象是static的
    private final static HungrySingleton instance = new HungrySingleton();

    //3.对外提供一个获取对象的方法,
    // 因为调用方式的目的就是为了获取对象,
    // 所以该方法应该是static的。
    public static HungrySingleton getInstance() {
        return instance;
    }
}
运行程序显示,我们的确只创建了一个对象实例。
优点:代码实现比较简单,在类加载的时候就完成了实例化,同时,该方式能够避免线程安全问题。
缺点:在类装载的时候就完成实例化,没有达到Lazy Loading的效果。如果从始至终从未使用过这个实例,则会造成内存的浪费。
这种方式基于classloder机制避免了多线程的同步问题,不过, instance在类装载时就实例化,在单例模式中大多数都是调用getInstance方法, 但是导致类装载的原因有很多种, 因此不能确定有其他的方式(或者其他的静态方法)导致类装载,这时候初始化instance就没有达到lazy loading的效果。
总结:这种单例模式可以使用,但是可能造成内存的浪费。
该方式和第一种区别不大,只是将创建实例放在了静态代码块中。
由于无法使用new,你应该考虑提供一个获取单例对象的方式给别人。
1.将构造器私有化(防止外部new,但是对反射还是有局限)
2.类的内部创建对象(通过静态代码块)
3.对外提供一个获取实例静态的public方法
public class Singleton2 {
    public static void main(String[] args) {
        HungrySingleton hungrySingleton = HungrySingleton.getInstance();
        HungrySingleton hungrySingleton1 = HungrySingleton.getInstance();
        System.out.println(hungrySingleton == hungrySingleton1);
    }
}

class HungrySingleton {
    //1.私有化构造器
    private HungrySingleton() {
    }

    // 2.类内部创建对象,因为步骤3是static的,
    // 所以实例对象是static的
    private final static HungrySingleton instance;

    static {
        instance = new HungrySingleton();
    }

    //3.对外提供一个获取对象的方法,
    // 因为调用方式的目的就是为了获取对象,
    // 所以该方法应该是static的。
    public static HungrySingleton getInstance() {
        return instance;
    }
}该方式只是将对象的创建放在静态代码块中,其优点和缺点与第一种方式完全一样。
总结:这种单例模式可以使用,但是可能造成内存的浪费。(同第一种)
该方式的主要思想就是为了改善饿汉式的缺点,通过懒加载(在使用的时候再去加载),达到节约内存的目的。
由于无法使用new,你应该考虑提供一个获取单例对象的方式给别人。
1.将构造器私有化(防止外部new,但是对反射还是有局限)
2.类的内部创建对象,懒加载,在使用的时候才去加载
3.对外提供一个获取实例静态的public方法
public class Singleton3 {
    public static void main(String[] args) {
        TestThread testThread = new TestThread();
        Thread thread = new Thread(testThread);
        Thread thread1 = new Thread(testThread);
        thread.start();
        thread1.start();
    }
}

class LazySingleton {
    //1.私有化构造器
    private LazySingleton() {}

    //2.类的内部声明对象
    private volatile static LazySingleton instance;

    //3.对外提供获取对象的方法
    public static LazySingleton getInstance() {
        //判断类是否被初始化
        if (instance == null) {
            //第一次使用的时候,创建对象
            instance = new LazySingleton();
        }
        return instance;
    }
}

class TestThread implements Runnable {

    @Override
    public void run() {
        System.out.println("线程" + Thread.currentThread().getName() + "开始执行");
        try {
            //为了演示多线程情况
            Thread.sleep(100);
        } catch (InterruptedException e) {
            e.printStackTrace();
        }
        LazySingleton instance = LazySingleton.getInstance();
        System.out.println("线程" + Thread.currentThread().getName() + "初始化对象" + instance.hashCode());
    }
}
执行程序后,发现了问题:
//运行结果:
线程Thread-0开始执行
线程Thread-1开始执行
线程Thread-1初始化对象1391273746
线程Thread-0初始化对象547686109优点:起到了懒加载的作用,但是只能在单线程情况下使用。
缺点:多线程下不安全,如果一个线程进入到if语句中阻滞(还未开始创建对象),另一线程进入并通过了if判断,则会创建多个实例,这一点就违背了单例的目的。
结论:实际情况下,不要使用这种方式。
同上一中方式一样,但是为了解决多线程安全问题,使用同步方法。
public class Singleton4 {
    public static void main(String[] args) {
        TestThread testThread = new TestThread();
        Thread thread = new Thread(testThread);
        Thread thread1 = new Thread(testThread);
        thread.start();
        thread1.start();
    }
}

class LazySingleton {
    //1.私有化构造器
    private LazySingleton() {}

    //2.类的内部声明对象
    private volatile static LazySingleton instance;

    //3.对外提供获取对象的方法
    public synchronized static LazySingleton getInstance() {
        //判断类是否被初始化
        if (instance == null) {
            //第一次使用的时候,创建对象
            instance = new LazySingleton();
        }
        return instance;
    }
}

class TestThread implements Runnable {

    @Override
    public void run() {
        System.out.println("线程" + Thread.currentThread().getName() + "开始执行");
        try {
            //为了演示多线程情况
            Thread.sleep(100);
        } catch (InterruptedException e) {
            e.printStackTrace();
        }
        LazySingleton instance = LazySingleton.getInstance();
        System.out.println("线程" + Thread.currentThread().getName() + "初始化对象" + instance.hashCode());
    }
}
运行结果如下所示:
线程Thread-1开始执行
线程Thread-0开始执行
线程Thread-0初始化对象681022576
线程Thread-1初始化对象681022576优点:起到了懒加载的效果,同时,解决了线程安全问题。
缺点:效率低下,每次想要获取对象的时候,去执行getInstance()都是通过同步方法。而且,初始化对象后,再次使用的时候,应该直接return这个对象。
总结:可以在多线程条件下使用,但是效率低下,不推荐。
同样是为了解决多线程安全问题,不过采用的是同步代码块。首先,最先想到的是:
public class Singleton5 {
    public static void main(String[] args) {
        TestThread testThread = new TestThread();
        Thread thread = new Thread(testThread);
        Thread thread1 = new Thread(testThread);
        thread.start();
        thread1.start();
    }
}

//对getInstance()的方法体整体加同步代码块
class LazySingleton {
    //1.私有化构造器
    private LazySingleton() {}

    //2.类的内部声明对象
    private volatile static LazySingleton instance;

    //3.对外提供获取对象的方法
    public static LazySingleton getInstance() {
        //同步代码块
        synchronized (LazySingleton.class) {
            //判断类是否被初始化
            if (instance == null) {
                //第一次使用的时候,创建对象
                instance = new LazySingleton();
            }
        }
        return instance;
    }
}

class TestThread implements Runnable {

    @Override
    public void run() {
        System.out.println("线程" + Thread.currentThread().getName() + "开始执行");
        try {
            //为了演示多线程情况
            Thread.sleep(100);
        } catch (InterruptedException e) {
            e.printStackTrace();
        }
        LazySingleton instance = LazySingleton.getInstance();
//     LazySingleton1 instance = LazySingleton1.getInstance();
        System.out.println("线程" + Thread.currentThread().getName() + "初始化对象" + instance.hashCode());
    }
}
运行的结果:
线程Thread-0开始执行
线程Thread-1开始执行
线程Thread-1初始化对象1419349448
线程Thread-0初始化对象1419349448
这种方式的优缺点和同步方法一样,能够实现多线程安全,但是效率低下。那么,能不能提高一下效率呢?我们发现,每次调用getInstance()的时候,都要进入同步代码块,但是,一旦对象初始化后,第二次使用的时候,应该能够直接获取这个对象才对。
按照这个思路,对代码进行更改(为了说明这个,新建一个类LazySingleton1):
//为了提高效率,通过if判断,初始化之前进入同步锁
class LazySingleton1 {
    //1.私有化构造器
    private LazySingleton1() {}

    //2.类的内部声明对象
    private volatile static LazySingleton1 instance;

    //3.对外提供获取对象的方法
    public static LazySingleton1 getInstance() {
        //判断类是否被初始化
        if (instance == null) {
            //第一次使用的时候,创建对象
            synchronized (LazySingleton1.class) {
                instance = new LazySingleton1();
            }
        }
        return instance;
    }
将类TestClass的run()方法进行更改,获取的实例改为LazySingleton1类型。代码看上去没有问题,那么运行效果如何呢:
//运行结果:
线程Thread-1开始执行
线程Thread-0开始执行
线程Thread-1初始化对象1368942806
线程Thread-0初始化对象1187311731
那么,我们发现,打脸了,多线程情况下,创建了两个对象,并未达到单例的目的。
针对懒汉式的多线程问题,我们可谓是操碎了心:同步方法可以解决问题,但是效率太低了;同步代码块则根本不能保证多线程安全。如何能做到“鱼和熊掌兼得”呢?既然同步代码块的效率较好,那么我们就针对这个方式进行改良:双重检查机制,即在getInstance()内进行两次检查,第一次通过if判断后,初始化对象之前,进行同步并再次进行判断。这样做的目的:既能解决线程安全问题,同时避免第二次使用对象的时候还要执行同步的代码。
public class Singleton6 {
    public static void main(String[] args) {
        TestThread testThread = new TestThread();
        Thread thread = new Thread(testThread);
        Thread thread1 = new Thread(testThread);
        thread.start();
        thread1.start();
    }
}

class LazyDoubleCheckSingleton {
    //1.私有化构造器
    private LazyDoubleCheckSingleton() {}

    //2.类的内部声明对象
    private volatile static LazyDoubleCheckSingleton instance;

    //3.对外提供获取对象的方法
    public static LazyDoubleCheckSingleton getInstance() {
        //判断类是否被初始化
        if (instance == null) {
            //第一次使用,通过if判断
            //加锁
            synchronized (LazyDoubleCheckSingleton.class) {
                //拿到锁后,初始化对象之前,再次进行判断
                if (instance == null) {
                    instance = new LazyDoubleCheckSingleton();
                }
            }
        }
        return instance;
    }
}

class TestThread implements Runnable {

    @Override
    public void run() {
        System.out.println("线程" + Thread.currentThread().getName() + "开始执行");
        try {
            //为了演示多线程情况
            Thread.sleep(100);
        } catch (InterruptedException e) {
            e.printStackTrace();
        }
        LazyDoubleCheckSingleton instance = LazyDoubleCheckSingleton.getInstance();
        System.out.println("线程" + Thread.currentThread().getName() + "初始化对象" + instance.hashCode());
    }
}
运行结果如下所示:
//运行结果:
线程Thread-0开始执行
线程Thread-1开始执行
线程Thread-1初始化对象996963733
线程Thread-0初始化对象996963733优点:
为了实现多线程情况下安全,除了手工加锁,还有别的方式。现在,我们采用静态内部类的方式。这种方式利用了JVM加载类的机制来保证只初始化一个对象。
思路同样是私有化构造器,对外提供静态的公开方法;不同之处是,类的创建交给静态内部类来时实现。
public class Singleton7 {
    public static void main(String[] args) {
        TestThread testThread = new TestThread();
        Thread thread = new Thread(testThread);
        Thread thread1 = new Thread(testThread);
        thread.start();
        thread1.start();
    }
}

class StaticInnerSingleton {
    // 1.构造器私有化
    private StaticInnerSingleton() {}

    // 2.通过静态内部类来初始化对象
    private static class InnerClass {
        private static final StaticInnerSingleton INSTANCE = new StaticInnerSingleton();
    }

    // 3.对外提供获取对象的方法
    public static StaticInnerSingleton getInstance() {
        return InnerClass.INSTANCE;
    }
}


class TestThread implements Runnable {

    @Override
    public void run() {
        System.out.println("线程" + Thread.currentThread().getName() + "开始执行");
        try {
            //为了演示多线程情况
            Thread.sleep(100);
        } catch (InterruptedException e) {
            e.printStackTrace();
        }
        StaticInnerSingleton instance = StaticInnerSingleton.getInstance();
        System.out.println("线程" + Thread.currentThread().getName() + "初始化对象" + instance.hashCode());
    }
}
运行结果:
线程Thread-0开始执行
线程Thread-1开始执行
线程Thread-0初始化对象1326533480
线程Thread-1初始化对象1326533480
OK,我们发现,这种方式达到了预期的效果。
优点:
在静态内部类的方式中,我们借用了JVM的类加载机制来实现了功能,同样,还可以借用Java的枚举来实现单例模式。
public class Singleton8 {
    public static void main(String[] args) {
        TestThread testThread = new TestThread();
        Thread thread = new Thread(testThread);
        Thread thread1 = new Thread(testThread);
        thread.start();
        thread1.start();
    }
}

enum EnumSingleton {
    INSTANCE;

    public void sayHi() {
        System.out.println("Hi, " + INSTANCE);
    }
}

class TestThread implements Runnable {

    @Override
    public void run() {
        System.out.println("线程" + Thread.currentThread().getName() + "开始执行");
        try {
            //为了演示多线程情况
            Thread.sleep(100);
        } catch (InterruptedException e) {
            e.printStackTrace();
        }
        EnumSingleton instance = EnumSingleton.INSTANCE;
        System.out.println("线程" + Thread.currentThread().getName() + "初始化对象" + instance.hashCode());
    }
}
运行结果如下:
线程Thread-0开始执行
线程Thread-1开始执行
线程Thread-1初始化对象1134798663
线程Thread-0初始化对象1134798663优点:
我们可以先初始化单例对象,通过容器来管理,然后在使用的时候从容器中获取对象。
class ContainSingleton {
    private ContainSingleton() {}

    private static Map<String, Object> singletonMap = new HashMap<>();

    public static Object getInstance(String key) {
        return singletonMap.get(key);
    }

    public void putInstance(String key, Object instance) {
        if (StringUtils.isNotEmpty(key) && instance != null) {
            if (!singletonMap.containsKey(key)) {
                singletonMap.put(key,instance);
            }
        }
    }
}这种单例模式是有一定的安全隐患的,如果你多个线程去创建实例,并且key相同,是有可能创建多个实例的。这种形式,建议在使用的时候,先去使用一个线程初始化数据后再使用。
思路也前面的几种形式一样,无非就是用线程池来创建对象而已。
class ThreadLocalSingleton {
    //私有化构造器
    private ThreadLocalSingleton() {}

    //类的内部创建单例对象
    private static final ThreadLocal<ThreadLocalSingleton> instanceThreadLocal =
            new ThreadLocal<ThreadLocalSingleton>() {
                @Override
                protected ThreadLocalSingleton initialValue() {
                    return new ThreadLocalSingleton();
                }
            };
    // 获取对象的方法
    public static ThreadLocalSingleton getInstance() {
        return instanceThreadLocal.get();
    }
}
但是,这种形式的单例模式是要带引号的。为什么这么说呢?写一个代码测试一下吧:
class TestClass implements Runnable {
    @Override
    public void run() {
        System.out.println("线程" + Thread.currentThread().getName() + "开始执行");
        try {
            //为了演示多线程情况
            Thread.sleep(100);
        } catch (InterruptedException e) {
            e.printStackTrace();
        }
        ThreadLocalSingleton instance = ThreadLocalSingleton.getInstance();
        System.out.println("线程" + Thread.currentThread().getName() + "初始化对象" + instance);
    }
}

public class Singleton10 {
    public static void main(String[] args) {
        TestClass testClass = new TestClass();
        Thread t1 = new Thread(testClass);
        Thread t2 = new Thread(testClass);
        t1.start();
        t2.start();

        System.out.println(ThreadLocalSingleton.getInstance());
        System.out.println(ThreadLocalSingleton.getInstance());
        System.out.println(ThreadLocalSingleton.getInstance());
        System.out.println(ThreadLocalSingleton.getInstance());
    }
}
OK , 我们发现了,多线程下创建了不同的对象,但是,对于同一线程,你多次获取的对象始终是同一个。
这种形式的单例模式,和之前的懒汉式加锁的形式不一样,加同步锁的思路是牺牲时间(效率)来实现;这种形式是保证同一线程中的单例,
属于牺牲空间来实现。
在上面的枚举类的总结中,我们提高枚举方式能够避免反序列化对象的时候重新建立新的对象(反序列化漏洞),那么什么是反序列化漏洞呢?Java对象进行反序列化的时候会通过反射机制来创建实例,反射机制的存在使得我们可以越过Java本身的静态检查和类型约束,在运行期直接访问和修改目标对象的属性和状态。这里理解的不是很准确,有错误的话请指出。
public class Test {
    public static void main(String[] args) throws IOException, ClassNotFoundException {
//        HungrySingleton instance = HungrySingleton.getInstance();
//        //序列化
//        ObjectOutputStream oos = new ObjectOutputStream(new FileOutputStream("serializable_singleton"));
//        oos.writeObject(instance);
//
//        //反序列化
//        ObjectInputStream ois = new ObjectInputStream(new FileInputStream("serializable_singleton"));
//        HungrySingleton newInstance = (HungrySingleton) ois.readObject();

        LazyDoubleCheckSingleton instance = LazyDoubleCheckSingleton.getInstance();
        //序列化
        ObjectOutputStream oos = new ObjectOutputStream(new FileOutputStream("serializable_singleton"));
        oos.writeObject(instance);

        //反序列化
        ObjectInputStream ois = new ObjectInputStream(new FileInputStream("serializable_singleton"));
        LazyDoubleCheckSingleton newInstance = (LazyDoubleCheckSingleton) ois.readObject();

        System.out.println(instance);
        System.out.println(newInstance);
        System.out.println(instance == newInstance);
    }

}
class HungrySingleton implements Serializable {


    private static final long serialVersionUID = -4913346286867374832L;

    //1.私有化构造器
    private HungrySingleton() {
    }

    // 2.类内部创建对象,因为步骤3是static的,
    // 所以实例对象是static的
    private final static HungrySingleton instance;

    static {
        instance = new HungrySingleton();
    }

    //3.对外提供一个获取对象的方法,
    // 因为调用方式的目的就是为了获取对象,
    // 所以该方法应该是static的。
    public static HungrySingleton getInstance() {
        return instance;
    }

    //解决单例模式的反序列化漏洞
  //    public Object readResolve() {
//        return instance;
//    }
}

class LazyDoubleCheckSingleton implements Serializable {
    private static final long serialVersionUID = -8459475238793042042L;

    //1.私有化构造器
    private LazyDoubleCheckSingleton() {}

    //2.类的内部声明对象
    private volatile static LazyDoubleCheckSingleton instance;

    //3.对外提供获取对象的方法
    public static LazyDoubleCheckSingleton getInstance() {
        //判断类是否被初始化
        if (instance == null) {
            //第一次使用,通过if判断
            //加锁
            synchronized (LazyDoubleCheckSingleton.class) {
                //拿到锁后,初始化对象之前,再次进行判断
                if (instance == null) {
                    instance = new LazyDoubleCheckSingleton();
                }
            }
        }
        return instance;
    }

//    public Object readResolve() {
//        return instance;
//    }
}
这里,我们分别提供了懒汉式和饿汉式(双重检查)来验证这个现象。运行后会报错,实现Serializable接口后能够正常运行,结果如下:
com.bm.desginpattern.pattern.creational.singleton.serialization.LazyDoubleCheckSingleton@7f31245a
com.bm.desginpattern.pattern.creational.singleton.serialization.LazyDoubleCheckSingleton@6d03e736
false创建了两个对象,没有实现多线程安全。首先说明一下解决方案,然后再讲解一下原理。我们发现饿汉式还是懒汉式都新增了一个方法readResolve(),将注释取消后,再次运行的结果如下:
com.bm.desginpattern.pattern.creational.singleton.serialization.LazyDoubleCheckSingleton@7f31245a
com.bm.desginpattern.pattern.creational.singleton.serialization.LazyDoubleCheckSingleton@7f31245a
true
奇迹出现了,只是增加一个方法,情况完全不同了。那么背后的原理是什么呢?我们通过debug来讲解:
1.在23行打一个断点,进入并进入该方法:
2.我们发现,该方法首先是进行一些判断,然后执行readObject0()方法,进入该方法查看:
//该方法完成代码
 private Object readObject0(boolean unshared) throws IOException {
        boolean oldMode = bin.getBlockDataMode();
        if (oldMode) {
            int remain = bin.currentBlockRemaining();
            if (remain > 0) {
                throw new OptionalDataException(remain);
            } else if (defaultDataEnd) {
                /*
                 * Fix for 4360508: stream is currently at the end of a field
                 * value block written via default serialization; since there
                 * is no terminating TC_ENDBLOCKDATA tag, simulate
                 * end-of-custom-data behavior explicitly.
                 */
                throw new OptionalDataException(true);
            }
            bin.setBlockDataMode(false);
        }

        byte tc;
        while ((tc = bin.peekByte()) == TC_RESET) {
            bin.readByte();
            handleReset();
        }

        depth++;
        totalObjectRefs++;
        try {
            switch (tc) {
                case TC_NULL:
                    return readNull();

                case TC_REFERENCE:
                    return readHandle(unshared);

                case TC_CLASS:
                    return readClass(unshared);

                case TC_CLASSDESC:
                case TC_PROXYCLASSDESC:
                    return readClassDesc(unshared);

                case TC_STRING:
                case TC_LONGSTRING:
                    return checkResolve(readString(unshared));

                case TC_ARRAY:
                    return checkResolve(readArray(unshared));

                case TC_ENUM:
                    return checkResolve(readEnum(unshared));

                case TC_OBJECT:
                    return checkResolve(readOrdinaryObject(unshared));

                case TC_EXCEPTION:
                    IOException ex = readFatalException();
                    throw new WriteAbortedException("writing aborted", ex);

                case TC_BLOCKDATA:
                case TC_BLOCKDATALONG:
                    if (oldMode) {
                        bin.setBlockDataMode(true);
                        bin.peek();             // force header read
                        throw new OptionalDataException(
                            bin.currentBlockRemaining());
                    } else {
                        throw new StreamCorruptedException(
                            "unexpected block data");
                    }

                case TC_ENDBLOCKDATA:
                    if (oldMode) {
                        throw new OptionalDataException(true);
                    } else {
                        throw new StreamCorruptedException(
                            "unexpected end of block data");
                    }

                default:
                    throw new StreamCorruptedException(
                        String.format("invalid type code: %02X", tc));
            }
        } finally {
            depth--;
            bin.setBlockDataMode(oldMode);
        }
    }
我们发现,该方法还是对传入的对象进行一些判断,在这里,我们匹配到TC_OBJECT,执行对应的方法。
3.进入该方法:
4.进一步查看:
我们看到一个名为resolveEx的属性,说明很接近了。
5.继续往下调试:

我们发现,这三个条件都满足,因为我们在LazyDoubleCheckSingleton类中定义了readResolve()方法。
6.if判断通过,进入到下一个方法:
7.在该方法中,我们发现经过一些条件判断后,通过反射方式来调用我们在类LazyDoubleCheckSingleton中新定义的方法readResolve():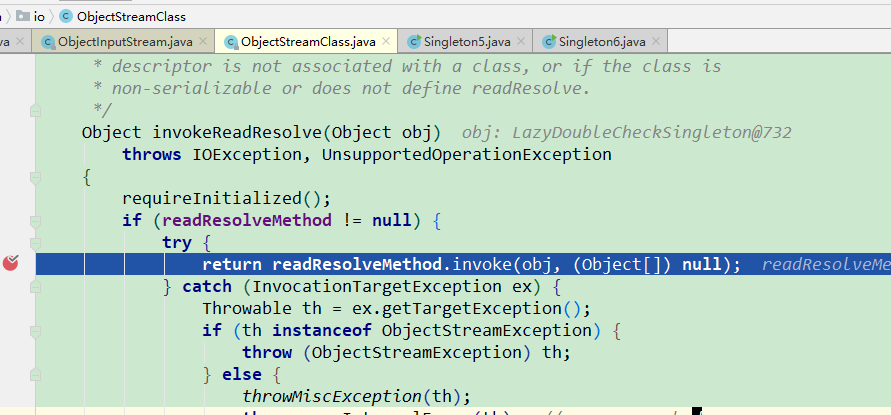
除了反序列化漏洞,单例模式还有反射漏洞。下面介绍一下:
通过反射,能够破坏单例模式,进而生成多个对象。
class HungrySingleton {
    private HungrySingleton() {}

    private final static HungrySingleton instance = new HungrySingleton();

    public static HungrySingleton getInstance() {
        return instance;
    }
}

  public static void main(String[] args) throws Exception {
        //测试,饿汉式
        Constructor<HungrySingleton> constructor = HungrySingleton.class
                .getDeclaredConstructor();
        constructor.setAccessible(true);
        HungrySingleton instance = HungrySingleton.getInstance();
        HungrySingleton newInstance = constructor.newInstance();
        System.out.println(instance);
        System.out.println(newInstance);
        System.out.println(instance == newInstance);
    }
运行一下,就能发现,生成了两个实例,破坏了单例模式。同样的情况,也会发生在静态内部类、懒汉式中。
 private HungrySingleton() {
        if (instance != null) {
            throw new RuntimeException("禁止反射机制生成实例");
        }
    }
静态内部类同理。
 private HungrySingleton() {
        if (instance != null) {
            throw new RuntimeException("单例构造器禁止反射机制调用");
        }
    }
但是,当你先执行getInstance()方法来生成实例的时候,问题能够解决,可以当你先通过反射来生成对象的时候,就出问题了:
这时,你的运行结果就如下图所示:
怎么办?有人说,新增一个变量,在构造器中根据变量的值该判断,但是,这种方式其实没啥用。因为同样可以通过反射机制该修改属性值。
在这里,再一次想起神奇的枚举类,既能防止反序列化漏洞,又能防止反射漏洞,推荐大家使用。
例如Runtime类,使用的就是单例模式的饿汉式(Runtime类在lang包中,在JVM运行的时候就被加载)来实现:
还有Desktop类,使用的就是单例模式的容器模式结合同步锁来实现的:
Spring单例Bean与单例模式的区别:它们关联的环境不一样,单例模式是指在一个JVM进程中仅有一个实例,而Spring单例是指一个Spring Bean容器(ApplicationContext)中仅有一个实例。

当你配置一个bean为单例的时候(默认就是singleton),在获取对象的时候,spring会读取判断为true,然后如果这个对象已经创建好则直接返回,否则就调用方法getEarlySingletonInstance()来创建对象(其源码为第二张图片)。
如果觉得我的文章对您有用,请随意打赏。你的支持将鼓励我继续创作!
