社区微信群开通啦,扫一扫抢先加入社区官方微信群

社区微信群
一、搭建环境与下载
gatling是基于scala环境,但是scala是基于java的,需要二种环境,
1.java环境
地址:https://www.runoob.com/java/java-environment-setup.html
2.scala环境
地址:https://www.scala-lang.org/download/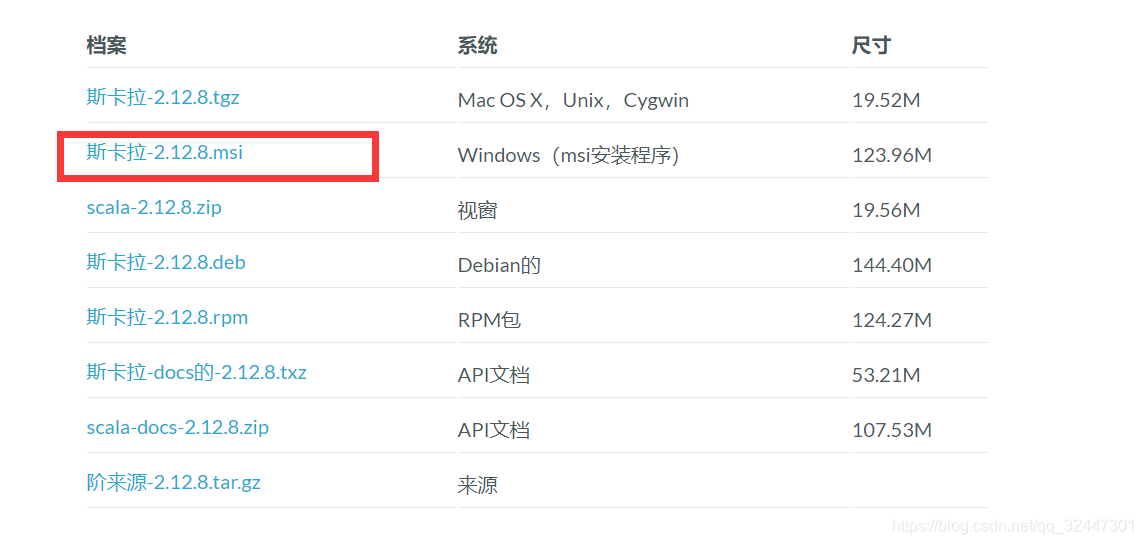
直接下载安装,不需要配置环境变量。验证scala -version
3.下载gatling
地址:https://gatling.io/download/ 文档:https://gatling.io/documentation/
入门:https://gatling.io/docs/current/quickstart/
-gatling-charts-highcharts-bundle-3.0.3-bundle
---- bin 执行程序
---- ---- gatling.bat  windows 环境运行
---- ---- gatling.sh liunx 环境运行
---- ---- recorder.bat  windows 环境运行
---- ---- recorder.sh  liunx 环境运行
---- conf 配置信息
---- lib 依赖包
---- user-files 用户文件
---- ---- bodies 用来存放请求的body数据
---- ---- data 数据目录,csv参数文件存放在这里
---- ---- simulations 测试脚本
#####Run:
> ```bash
> #Linux/Unix执行脚本
> >$GATLING_HOME/bin/gatling.sh
> #Windows执行脚本
> >%GATLING_HOME%bingatling.bat
使用bat脚本运行下是此画面。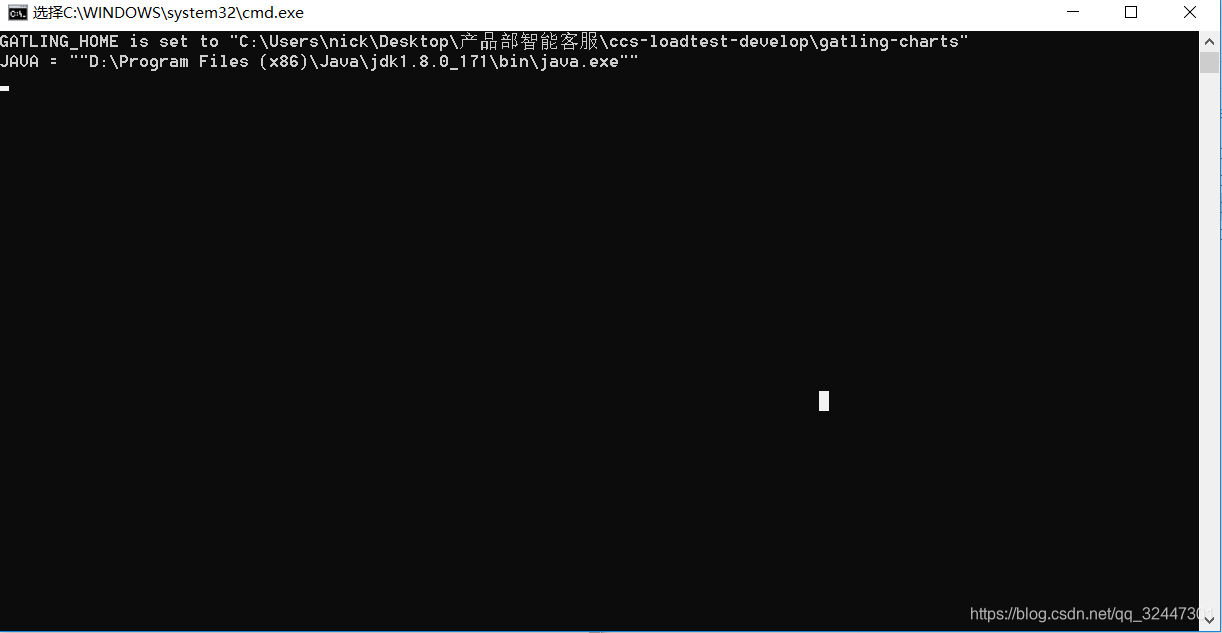

二、springboot与gatling结合进行压测
1.需要在IDEA安装scala插件
2.安装scala SDK 由于步骤一 我们已经安装完毕,不需要安装,只需要重新配置。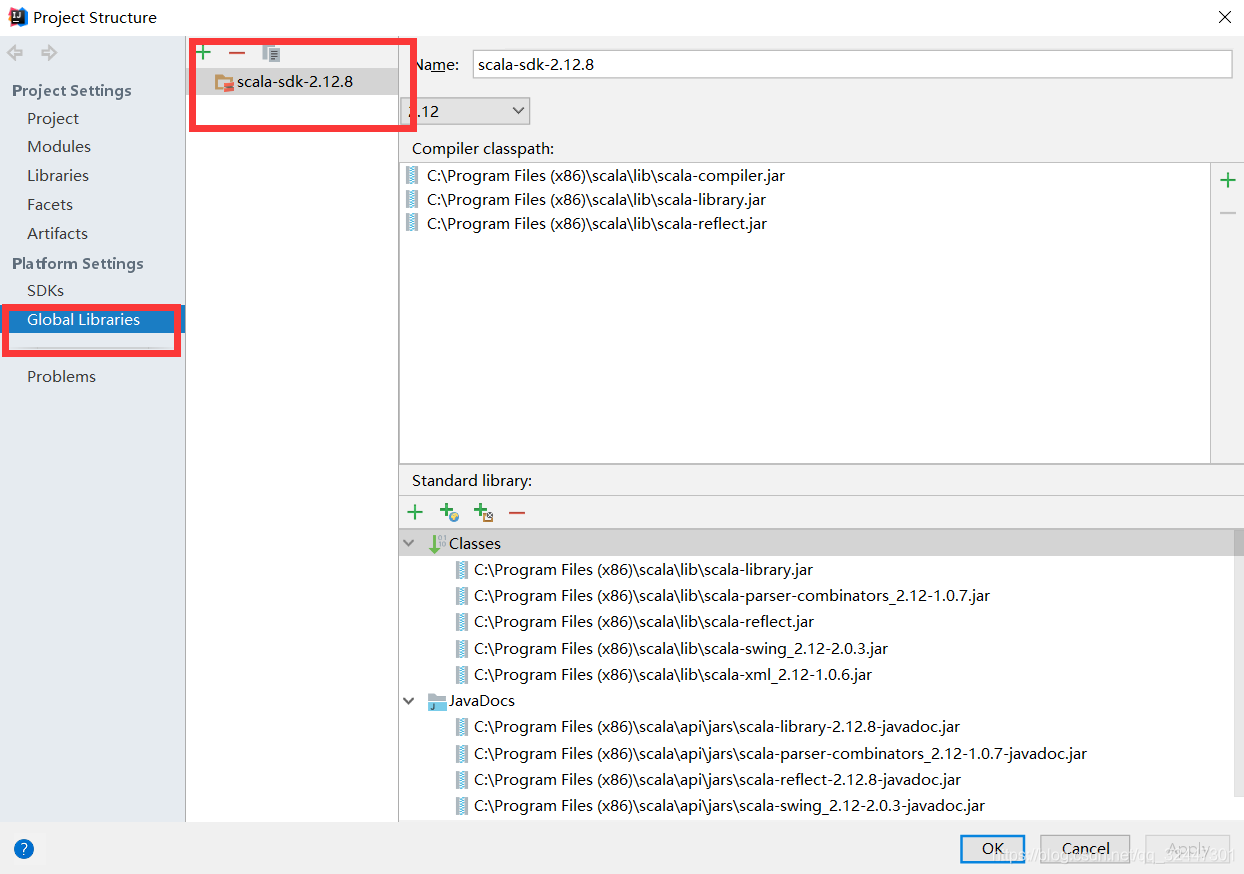
3.环境搭建
pom.xml
<?xml version="1.0" encoding="UTF-8"?>
<project xmlns="http://maven.apache.org/POM/4.0.0"
         xmlns:xsi="http://www.w3.org/2001/XMLSchema-instance"
         xsi:schemaLocation="http://maven.apache.org/POM/4.0.0 http://maven.apache.org/xsd/maven-4.0.0.xsd">
    <modelVersion>4.0.0</modelVersion>

    <groupId>com.anoyi</groupId>
    <artifactId>gatling-test</artifactId>
    <version>1.0-SNAPSHOT</version>

    <parent>
        <groupId>org.springframework.boot</groupId>
        <artifactId>spring-boot-starter-parent</artifactId>
        <version>1.5.9.RELEASE</version>
    </parent>

    <properties>
        <lombok.version>1.16.18</lombok.version>
        <mariadb-client.version>2.1.2</mariadb-client.version>
        <hikariCP.version>2.7.1</hikariCP.version>
        <postgresql.version>42.1.4</postgresql.version>
        <gatling-plugin.version>2.2.4</gatling-plugin.version>
    </properties>

    <dependencies>
        <!-- web 依赖 -->
        <dependency>
            <groupId>org.springframework.boot</groupId>
            <artifactId>spring-boot-starter-web</artifactId>
            <exclusions>
                <exclusion>
                    <groupId>org.springframework.boot</groupId>
                    <artifactId>spring-boot-starter-tomcat</artifactId>
                </exclusion>
            </exclusions>
        </dependency>

        <!-- 容器 undertow -->
        <dependency>
            <groupId>org.springframework.boot</groupId>
            <artifactId>spring-boot-starter-undertow</artifactId>
        </dependency>

        <!-- 移除 Tomcat 连接池,使用 HikariCP  -->
        <dependency>
            <groupId>org.springframework.boot</groupId>
            <artifactId>spring-boot-starter-data-jpa</artifactId>
            <exclusions>
                <exclusion>
                    <groupId>org.apache.tomcat</groupId>
                    <artifactId>tomcat-jdbc</artifactId>
                </exclusion>
            </exclusions>
        </dependency>

        <!-- 移除 tomcat-jdbc, Spring Boot 将会自动使用 HikariCP -->
        <dependency>
            <groupId>com.zaxxer</groupId>
            <artifactId>HikariCP</artifactId>
            <version>${hikariCP.version}</version>
        </dependency>

        <!-- 简化 lombok -->
        <dependency>
            <groupId>org.projectlombok</groupId>
            <artifactId>lombok</artifactId>
            <version>${lombok.version}</version>
        </dependency>

        <!-- 数据库驱动 postgresql -->
        <dependency>
            <groupId>org.postgresql</groupId>
            <artifactId>postgresql</artifactId>
            <version>${postgresql.version}</version>
        </dependency>

        <!-- 性能测试 Gatling -->
        <dependency>
            <groupId>io.gatling.highcharts</groupId>
            <artifactId>gatling-charts-highcharts</artifactId>
            <version>2.3.0</version>
        </dependency>

    </dependencies>

    <build>
        <plugins>
            <plugin>
                <groupId>io.gatling</groupId>
                <artifactId>gatling-maven-plugin</artifactId>
                <version>${gatling-plugin.version}</version>
                <configuration>
                    <!-- 测试脚本 -->
                    <simulationClass>com.anoyi.test.ApiGatlingSimulationTest</simulationClass>
                    <!-- 结果输出地址 -->
                    <resultsFolder>/Users/admin/code/gatling</resultsFolder>
                </configuration>
            </plugin>
        </plugins>
    </build>

</project>
4.编写测试脚本
每一个 Gatling 测试都要继承 Simulation 类,在里面你可以使用Gatling Scala DSL 来声明一个场景列表。这里的目标是运行 30 个客户端,同时发送 1000 次请求
项目目录结构: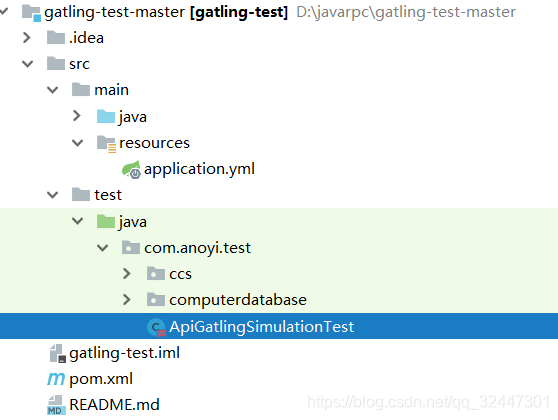
package com.anoyi.test

import io.gatling.core.scenario.Simulation
import io.gatling.core.Predef._
import io.gatling.http.Predef._
import scala.concurrent.duration.FiniteDuration
import scala.concurrent.duration.Duration
import java.util.concurrent.TimeUnit

class ApiGatlingSimulationTest extends Simulation {

  val scn = scenario("AddAndFindPersons").repeat(1000, "n") {
    exec(
      http("AddPerson-API")
        .post("http://localhost:8080/persons")
        .header("Content-Type", "application/json")
        .body(StringBody("""{"firstName":"John${n}","lastName":"Smith${n}","birthDate":"1980-01-01", "address": {"country":"pl","city":"Warsaw","street":"Test${n}","postalCode":"02-200","houseNo":${n}}}"""))
        .check(status.is(200))
    ).pause(Duration.apply(5, TimeUnit.MILLISECONDS))
  }.repeat(1000, "n") {
    exec(
      http("GetPerson-API")
        .get("http://localhost:8080/persons/${n}")
        .check(status.is(200))
    )
  }
 setUp(scn.inject(atOnceUsers(30))).maxDuration(FiniteDuration.apply(10, "minutes"))

}
如果觉得我的文章对您有用,请随意打赏。你的支持将鼓励我继续创作!
