社区微信群开通啦,扫一扫抢先加入社区官方微信群

社区微信群
nginx介绍
Nginx是一款轻量级的Web 服务器/反向代理服务器及电子邮件(IMAP/POP3)代理服务器,并在一个BSD-like 协议下发行。其特点是占有内存少,并发能力强
Nginx作为负载均衡服务器:Nginx 既可以在内部直接支持 Rails 和 PHP 程序对外进行服务,也可以支持作为 HTTP代理服务器对外进行服务。Nginx采用C进行编写,不论是系统资源开销还是CPU使用效率都比 Perlbal 要好很多。处理静态文件,索引文件以及自动索引;打开文件描述符缓冲。无缓存的反向代理加速,简单的负载均衡和容错。FastCGI,简单的负载均衡和容错。模块化的结构。包括 gzipping, byte ranges, chunked responses,以及 SSI-filter 等 filter。如果由 FastCG或其它代理服务器处理单页中存在的多个 SSI,则这项处理可以并行运行,而不需要相互等待。
模块依赖性
gzip模块需要 zlib 库
rewrite模块需要 pcre 库
ssl 功能需要openssl库
# 在第三方下载nginx-1.14.0.tar.gz,解压
[root@server4 mnt]# tar zxf nginx-1.14.0.tar.gz
[root@server4 mnt]# ls
nginx-1.14.0 nginx-1.14.0.tar.gz
[root@server4 mnt]# cd nginx-1.14.0
[root@server4 nginx-1.14.0]# ls
auto CHANGES.ru configure html man src
CHANGES conf contrib LICENSE README
[root@server4 nginx-1.14.0]# cd src/
[root@server4 src]# ls
core event http mail misc os stream
[root@server4 src]# cd core/
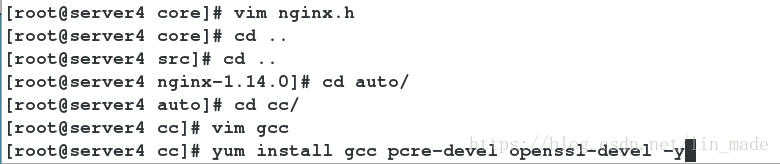
[root@server4 core]# vim nginx.h
第14行的nginx版本删掉,防黑客攻击
[root@server4 core]# cd ..
[root@server4 src]# cd ..
[root@server4 nginx-1.14.0]# cd auto/
[root@server4 auto]# cd cc/
[root@server4 cc]# vim gcc
注释掉172行CFLAGS="$CFLAGS -g"
# 安装依赖性软件
[root@server4 nginx-1.14.0]# yum install gcc -y
[root@server4 nginx-1.14.0]# yum install pcre-devel -y
[root@server4 nginx-1.14.0]# yum install openssl-devel -y
# 源码编译三部曲
[root@server4 nginx-1.14.0]# ./configure --prefix=/usr/local/nginx --with-http_ssl_module --with-http_stub_status_module --with-threads --with-file-aio
[root@server4 nginx-1.14.0]# make
[root@server4 nginx-1.14.0]# make install
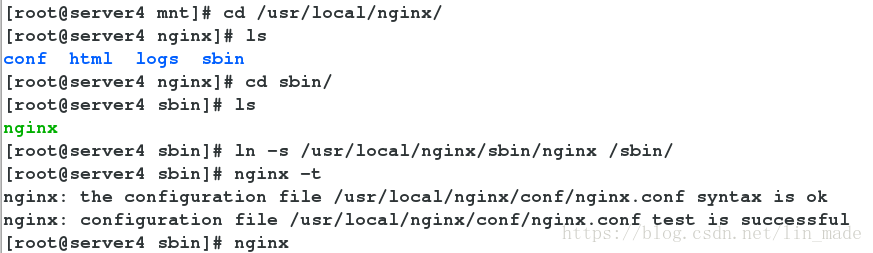
# 做软连接
[root@server4 sbin]# ln -s /usr/local/nginx/sbin/nginx /sbin/
[root@server4 sbin]# nginx -t
# 启动nginx
[root@server4 sbin]# nginx
# 默认发布目录/usr/local/nginx/html/
/mnt/nginx-1.14.0/src/core/nginx.h 更改的内容
/mnt/nginx-1.14.0/auto/cc/gcc 更改的内容:
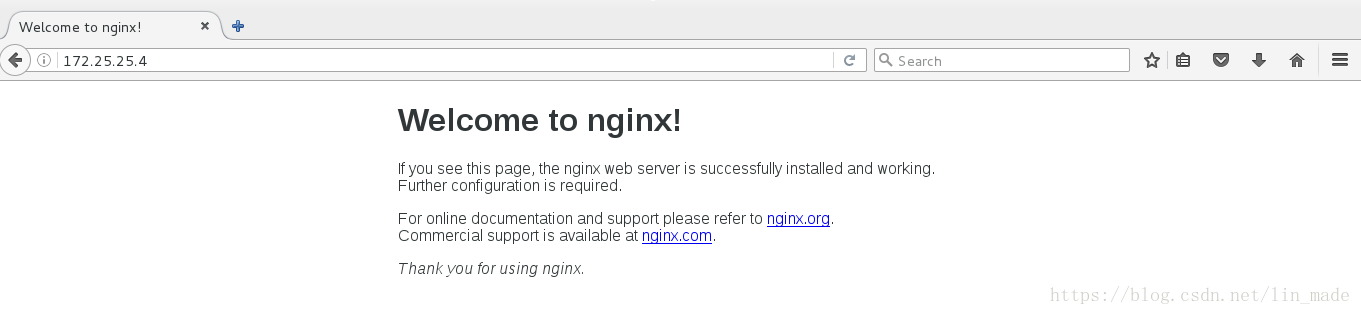
在网页访问172.25.25.4
1)负载均衡配置
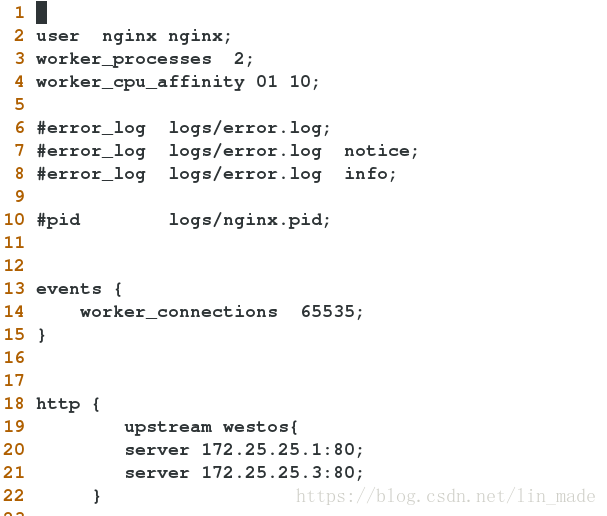
# 主配置文件:/usr/local/nginx/conf/nginx.conf
[root@server4 sbin]# vim /usr/local/nginx/conf/nginx.conf
user nginx nginx;
# nginx 多核绑定
worker_processes 2;
worker_cpu_affinity 01 10;
events {
worker_connections 65535;
}
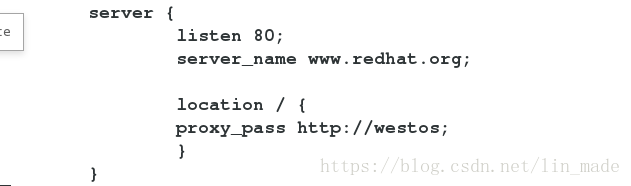
# 后端服务器
http {
upstream westos{
server 172.25.25.1:80;
server 172.25.25.3:80;
}
server {
listen 80;
server_name www.redhat.org;
location / {
proxy_pass http://westos;
}
}
[root@server4 conf]# useradd -M -d /usr/local/nginx/ nginx #创建用户
[root@server4 conf]# nginx -s reload #重新加载
[root@server4 conf]# vim /etc/security/limits.conf
nginx - nofile 65536
开启两个后端服务器的httpd
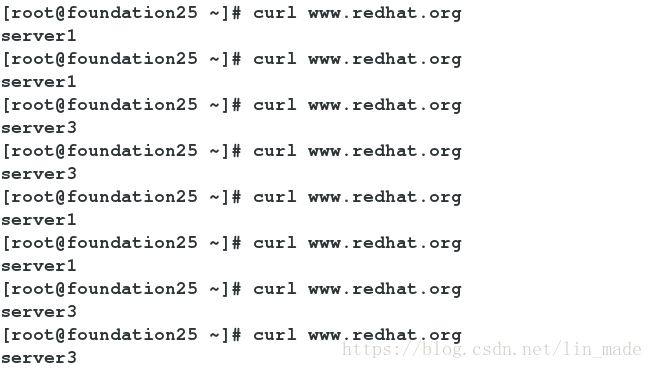
真机测试:
[root@foundation25 ~]# curl www.redhat.org
/usr/local/nginx/conf/nginx.conf更改的内容
开启后端服务器的httpd
/etc/hosts 做本地解析
物理主机测试:
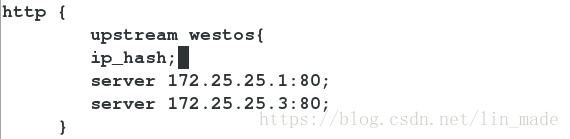
2)hash算法:
[root@server4 sbin]# vim /usr/local/nginx/conf/nginx.conf
http {
        upstream westos{
        ip_hash;
        server 172.25.25.1:80;
        server 172.25.25.3:80;
     }
/usr/local/nginx/conf/nginx.conf更改的内容
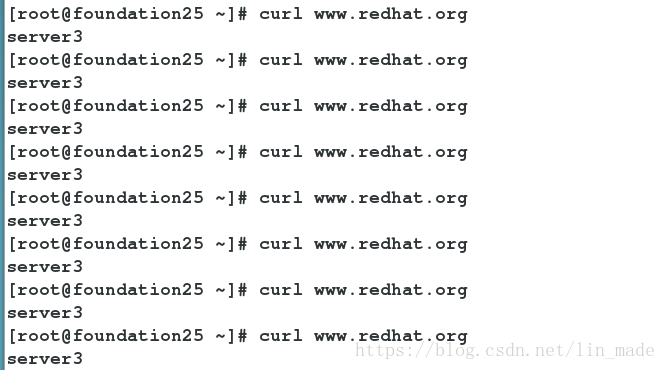
物理主机测试
3)weight权重,默认为1
[root@server4 sbin]# vim /usr/local/nginx/conf/nginx.conf
http {
        upstream westos{
        server 172.25.25.1:80 weight=2;
        server 172.25.25.3:80;
     }
物理主机测试:
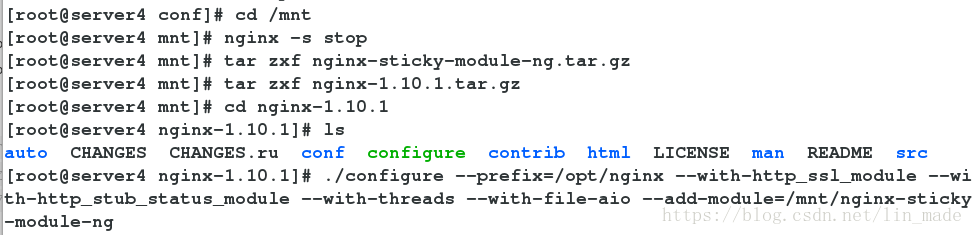
需要用到nginx-1.10.1.tar.gz版本
# 关闭服务
[root@server4 conf]# nginx -s stop
# 在第三方下载nginx-sticky-module-ng.tar.gz nginx-1.10.1.tar.gz,解压
[root@server4 mnt]# tar zxf nginx-sticky-module-ng.tar.gz
[root@server4 mnt]# tar zxf nginx-1.10.1.tar.gz
[root@server4 mnt]# cd nginx-1.10.1
[root@server4 nginx-1.10.1]# ls
auto CHANGES.ru configure html man src
CHANGES conf contrib LICENSE README
# 源码编译三部曲
[root@server4 nginx-1.10.1]# ./configure --prefix=/opt/nginx --with-http_ssl_module --with-http_stub_status_module --with-threads --with-file-aio --add-module=/mnt/nginx-sticky-module-ng
[root@server4 nginx-1.10.1]# make
[root@server4 nginx-1.10.1]# make install
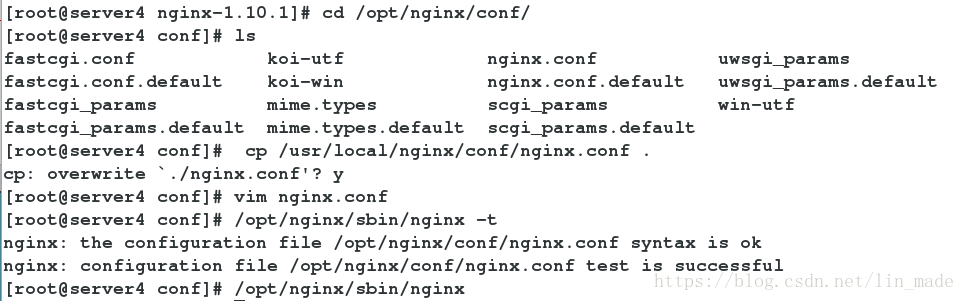
[root@server4 conf]# cd /opt/nginx/conf/
[root@server4 conf]# cp /usr/local/nginx/conf/nginx.conf .
# 更改主配置文件
[root@server4 conf]# vim nginx.conf
http {
upstream westos{
sticky;
server 172.25.25.1:80;
server 172.25.25.3:80;
}
[root@server4 conf]# /opt/nginx/sbin/nginx -t
# 启动服务
[root@server4 conf]# /opt/nginx/sbin/nginx如果觉得我的文章对您有用,请随意打赏。你的支持将鼓励我继续创作!