社区微信群开通啦,扫一扫抢先加入社区官方微信群

社区微信群
2018年已经成为过去,还记得在2018年新年写过一篇【Shell编程】打响2018第一炮-shell编程之for循环语句,那在此时此刻,也是写一篇关于编程方面,不过要比18年的稍微高级点。 So,mark一下,也希望对您有所帮助。
进入正题,在双十一想必大家都逛过淘宝and京东,比如我们需要买一部手机或电脑,但是我们需要点开手机或者电脑页面看需要购买的商品价格,型号,评论,等等信息。 你没有听错,本章目的获取京东商城手机&电脑的数据,包括价格,评论,型号等信息。
爬虫:一段自动抓取互联网信息的程序,从互联网上抓取对于我们有价值的信息。
下面用一个图来解释一下调度器是如何协调工作的: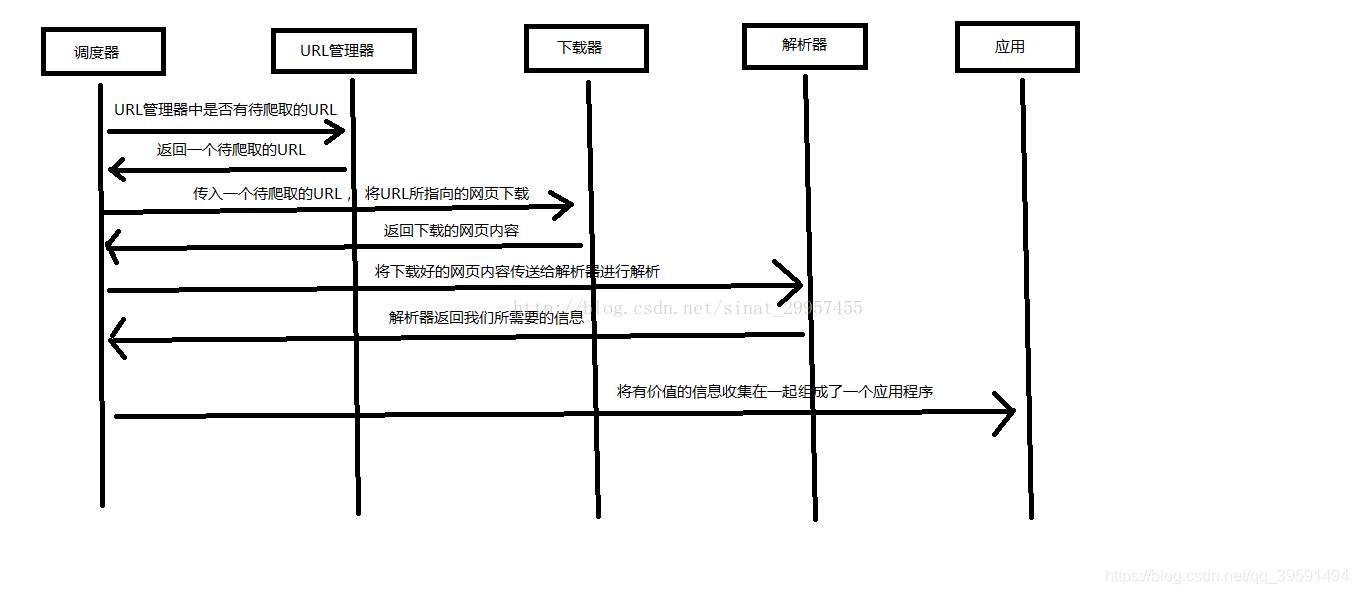
以上内容来自:http://www.runoob.com/w3cnote/python-spider-intro.html
训练自己爬虫的技巧,从简单的网页开始,掌握多种技能(语言,html,css,js等等),在训练的过程中积累经验,逐渐可以爬取任意类型的网站。
本章为爬虫入门,所以我们只需要安装几个Python库即可,如下:
requests | pip install requestsbs4 | pip install bs4lxml | pip install lxmlrequests 已安装requests 最新版让我们从一些简单的示例开始吧。
我们每天访问百度,其实就是一次请求,这个requests作用其实就是使用代码模拟我们人类给网站发送了一次请求。 首先我们需要导入requests库 如下:
In [2]: import requests # 导入requests库
导入之后我们就可以使用requests库中的方法了,例如我们需要获取我csdn某一篇文章。
r = requests.get('https://blog.csdn.net/qq_39591494/article/details/85331388')
现在,我们有一个名字为:r的Response响应对象,也就是我们访问网站,网站肯定会给我们数据。一些参数如下:
In [4]: r.status_code # 查看访问状态码 200为ok 是成功的
Out[4]: 200
In [5]: r.headers # 查看响应头部
Out[5]:
{'Server': 'openresty',
'Date': 'Tue, 01 Jan 2019 06:52:56 GMT',
'Content-Type': 'text/html; charset=UTF-8',
'Transfer-Encoding': 'chunked',
'Connection': 'keep-alive',
'Keep-Alive': 'timeout=20',
'Set-Cookie': 'uuid_tt_dd=10_7631126010-1546325576025-268248; Expires=Thu, 01 Jan 2025 00:00:00 GMT; Path=/; Domain=.csdn.net;, dc_session_id=10_1546325576025.334557; Expires=Thu, 01 Jan 2025 00:00:00 GMT; Path=/; Domain=.csdn.net;',
'Vary': 'Accept-Encoding',
'Content-Encoding': 'gzip', 'Strict-Transport-Security': 'max-age= 31536000'}

r.request.headers # 请求头
Out[6]: {'User-Agent': 'python-requests/2.20.0',
'Accept-Encoding': 'gzip, deflate',
'Accept': '*/*',
'Connection': 'keep-alive'}
Requests简便的API意味着所有HTTP请求类型都是显而易见的。例如,你可以这样发送一个HTTP POST请求:
r = requests.post("http://httpbin.org/post")
漂亮,对吧?那么其他HTTP请求类型:PUT, DELETE, HEAD以及OPTIONS又是如何的呢?都是一样的简单:
In [11]: r = requests.put("http://httpbin.org/put")
In [12]: r = requests.delete("http://httpbin.org/delete")
n [13]:  r = requests.head("http://httpbin.org/get")
In [14]: r = requests.options("http://httpbin.org/get")
在这里http://httpbin.org/只是一个测试网站
若网站响应的内容为json格式那么requests中也有一个内置的JSON解码器,助你处理JSON数据:
In [21]: r = requests.get('http://httpbin.org/json')

In [22]: r.status_code
Out[22]: 200

In [23]: r.json()
Out[23]:
{'slideshow': {'author': 'Yours Truly',
  'date': 'date of publication',
  'slides': [{'title': 'Wake up to WonderWidgets!', 'type': 'all'},
   {'items': ['Why <em>WonderWidgets</em> are great',
     'Who <em>buys</em> WonderWidgets'],
    'title': 'Overview',
    'type': 'all'}],
  'title': 'Sample Slide Show'}}
如何查看返回源码?
In [25]: r = requests.get('http://httpbin.org/')

In [26]: r.status_code
Out[26]: 200

In [27]: r.text
更多requests内容请参考:http://docs.python-requests.org/zh_CN/latest/#
简单来说,Beautiful Soup 是python的一个库,最主要的功能是从网页抓取数据。官方解释如下:
Beautiful Soup提供一些简单的、python式的函数用来处理导航、搜索、修改分析树等功能。它是一个工具箱,通过解析文档为用户提供需要抓取的数据,因为简单,所以不需要多少代码就可以写出一个完整的应用程序Beautiful Soup自动将输入文档转换为Unicode编码,输出文档转换为utf-8编码。你不需要考虑编码方式,除非文档没有指定一个编码方式,这时,Beautiful Soup就不能自动识别编码方式了。然后,你仅仅需要说明一下原始编码方式就可以了Beautiful Soup已成为和lxml、html6lib一样出色的python解释器,为用户灵活地提供不同的解析策略或强劲的速度。 Beautiful Soup 3 目前已经停止开发,推荐在现在的项目中使用Beautiful Soup 4,不过它已经被移植到BS4了,也就是说导入时我们需要 import bs4 。所以这里我们用的版本是 Beautiful Soup 4.3.2 (简称BS4)。
bs4 已安装bs4 最新版下表列出了主要的解析器,以及它们的优缺点:
| 解析器 | 使用方法 | 优势 | 劣势 |
|---|---|---|---|
| Python标准库 | BeautifulSoup(markup, “html.parser”) | Python的内置标准库,执行速度适中,文档容错能力强 | Python 2.7.3 or 3.2.2)前 的版本中文档容错能力差 |
| lxml HTML 解析器 | BeautifulSoup(markup, “lxml”) | 速度快、文档容错能力强 | 需要安装C语言库 |
| lxml XML 解析器 | BeautifulSoup(markup, “xml”)、BeautifulSoup(markup, [“lxml”, “xml”]) | 速度快、唯一支持XML的解析器 | 需要安装C语言库 |
| html5lib | BeautifulSoup(markup, “html5lib”) | 最好的容错性、以浏览器的方式解析文档、生成HTML5格式的文档 | 速度慢、不依赖外部扩展 |
以下内容通过soup对象调用
| 方法/属性 | 含义 | 示例 |
|---|---|---|
| prettify() | 漂亮的格式化打印内容 | soup.prettify() |
| text | 返回标签里面的字符串 | soup.text |
| tag | html 文档中的标签名 | soup.head、soup.title、soup.p等 |
| find() | 返回第一个找到的对象 | soup.find(‘a’) |
| find_all() | 返回所有找到的对象 | soup.find_all(‘a’) |
| get() | 根据soup里面对象的属性取到数据,类似字典。 | for link soup.find_all(‘a’): —> print(‘link.get(‘href’)’) |
本章内容重点学习find & find_all即可, 案例代码
html_doc = """
<html><head><title>The Dormouse's story</title></head>

<p class="title"><b>The Dormouse's story</b></p>

<p class="story">Once upon a time there were three little sisters; and their names were
<a href="http://example.com/elsie" class="sister" id="link1">Elsie</a>,
<a href="http://example.com/lacie" class="sister" id="link2">Lacie</a> and
<a href="http://example.com/tillie" class="sister" id="link3">Tillie</a>;
and they lived at the bottom of a well.</p>

<p class="story">...</p>
"""
查找所有关于title标签
#!/usr/bin/env python
# -*- coding:utf-8 -*-
from bs4 import BeautifulSoup
soup = BeautifulSoup(html_doc, 'lxml')
title = soup.find_all('title')
print(title)
>>> [<title>The Dormouse's story</title>]
查找所有的p标签
#!/usr/bin/env python
# -*- coding:utf-8 -*-
from bs4 import BeautifulSoup
soup = BeautifulSoup(html_doc, 'lxml')
p = soup.find_all('p')
print(p)
>>>
[<p class="title"><b>The Dormouse's story</b></p>, <p class="story">Once upon a time there were three little sisters; and their names were
<a class="sister" href="http://example.com/elsie" id="link1">Elsie</a>,
<a class="sister" href="http://example.com/lacie" id="link2">Lacie</a> and
<a class="sister" href="http://example.com/tillie" id="link3">Tillie</a>;
and they lived at the bottom of a well.</p>, <p class="story">...</p>]
查找p标签中的title
#!/usr/bin/env python
# -*- coding:utf-8 -*-

from bs4 import BeautifulSoup
soup = BeautifulSoup(html_doc, 'lxml')
p = soup.find_all('p', 'title')
print(p)
>>> [<p class="title"><b>The Dormouse's story</b></p>]
查找a标签
#!/usr/bin/env python
# -*- coding:utf-8 -*-
from bs4 import BeautifulSoup
soup = BeautifulSoup(html_doc, 'lxml')
a = soup.find_all('a')
print(a)
>>>
[<a class="sister" href="http://example.com/elsie" id="link1">Elsie</a>,
<a class="sister" href="http://example.com/lacie" id="link2">Lacie</a>,
<a class="sister" href="http://example.com/tillie" id="link3">Tillie</a>]
查找id="link2"标签
#!/usr/bin/env python
# -*- coding:utf-8 -*-
from bs4 import BeautifulSoup
soup = BeautifulSoup(html_doc, 'lxml')
link = soup.find_all(id="link2")
print(link)
>>> [<a class="sister" href="http://example.com/lacie" id="link2">Lacie</a>]
查找所包含id属性的tag
#!/usr/bin/env python
# -*- coding:utf-8 -*-
from bs4 import BeautifulSoup
soup = BeautifulSoup(html_doc, 'lxml')
link = soup.find_all(id=True)
print(link)
>>>
[<a class="sister" href="http://example.com/elsie" id="link1">Elsie</a>,
<a class="sister" href="http://example.com/lacie" id="link2">Lacie</a>,
<a class="sister" href="http://example.com/tillie" id="link3">Tillie</a>]
使用多个指定名字的参数可以同时过滤tag的多个属性:
#!/usr/bin/env python
# -*- coding:utf-8 -*-
import re
from bs4 import BeautifulSoup
soup = BeautifulSoup(html_doc, 'lxml')
link = soup.find_all(href=re.compile("lacie"), id="link2")
print(link)
>>> [<a class="sister" href="http://example.com/lacie" id="link2">Lacie</a>]
按CSS搜索
按照CSS类名搜索tag的功能非常实用,但标识CSS类名的关键字class在Python中是保留字,使用 class 做参数会导致语法错误.从Beautiful Soup的4.1.1版本开始,可以通过class_ 参数搜索有指定CSS类名的tag。
#!/usr/bin/env python
# -*- coding:utf-8 -*-
import re
from bs4 import BeautifulSoup
soup = BeautifulSoup(html_doc, 'lxml')
CLS = soup.find('a', class_ = "sister")
print(CLS)
>>> <a class="sister" href="http://example.com/elsie" id="link1">Elsie</a>
#!/usr/bin/env python
# -*- coding:utf-8 -*-
import re
from bs4 import BeautifulSoup
soup = BeautifulSoup(html_doc, 'lxml')
CLS = soup.find_all('a', class_ = "sister")
print(CLS)
>>>
[<a class="sister" href="http://example.com/elsie" id="link1">Elsie</a>,
<a class="sister" href="http://example.com/lacie" id="link2">Lacie</a>,
<a class="sister" href="http://example.com/tillie" id="link3">Tillie</a>]
结合正则查找
#!/usr/bin/env python
# -*- coding:utf-8 -*-
import re
from bs4 import BeautifulSoup
soup = BeautifulSoup(html_doc, 'lxml')
CLS = soup.find(class_ = re.compile("ti"))
print(CLS)
>>> <p class="title"><b>The Dormouse's story</b></p>
完全匹配 class 的值时,如果CSS类名的顺序与实际不符,将搜索不到结果:
#!/usr/bin/env python
# -*- coding:utf-8 -*-
import re
from bs4 import BeautifulSoup
soup = BeautifulSoup(html_doc, 'lxml')
CLS = soup.find('p', attrs={'class':'title'})
print(CLS)
>>> <p class="title"><b>The Dormouse's story</b></p>
更多关于Beautiful Soup内容:https://www.crummy.com/software/BeautifulSoup/bs4/doc.zh/
经过以上的铺垫,现在正式开始写代码,我们需要获取京东的电脑数据,首先我们需要打开京东网站去搜索电脑如下: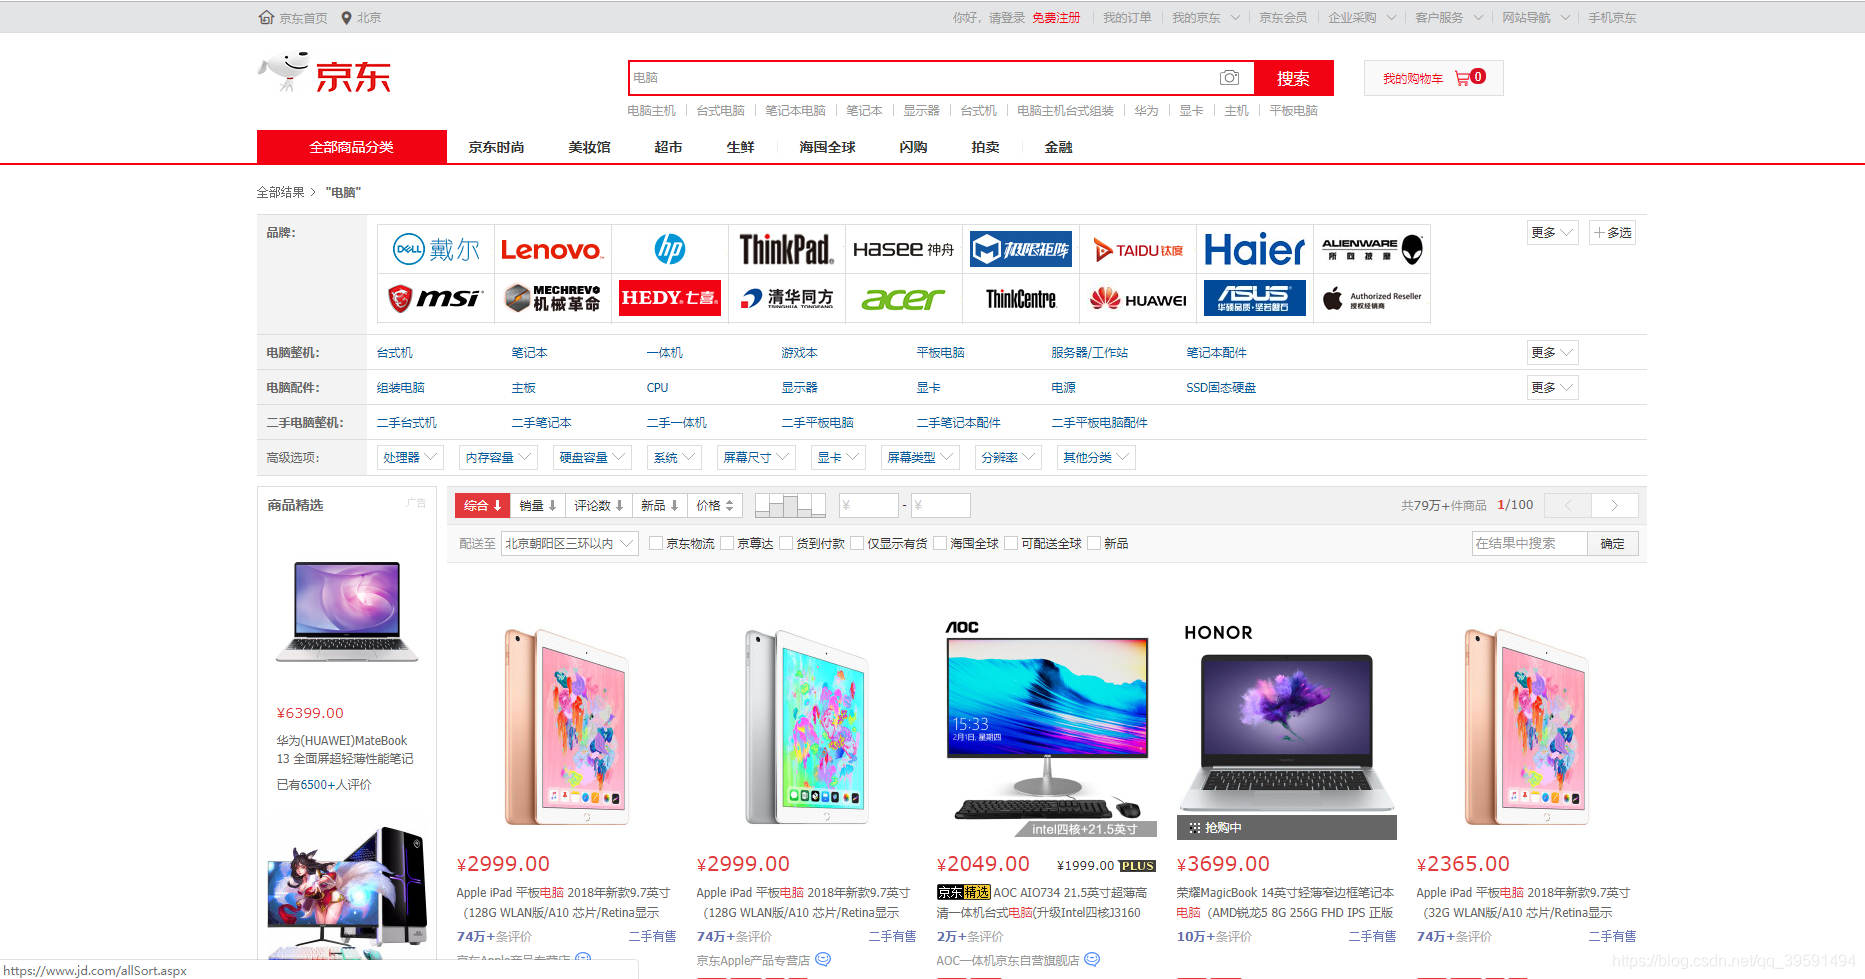


我们目的是需要取京东这一个页面上所有的电脑数据,包括价格,评论,名称等数据,那么在取所有数据之前我们第一步应该需要取第一台电脑的数据,如下: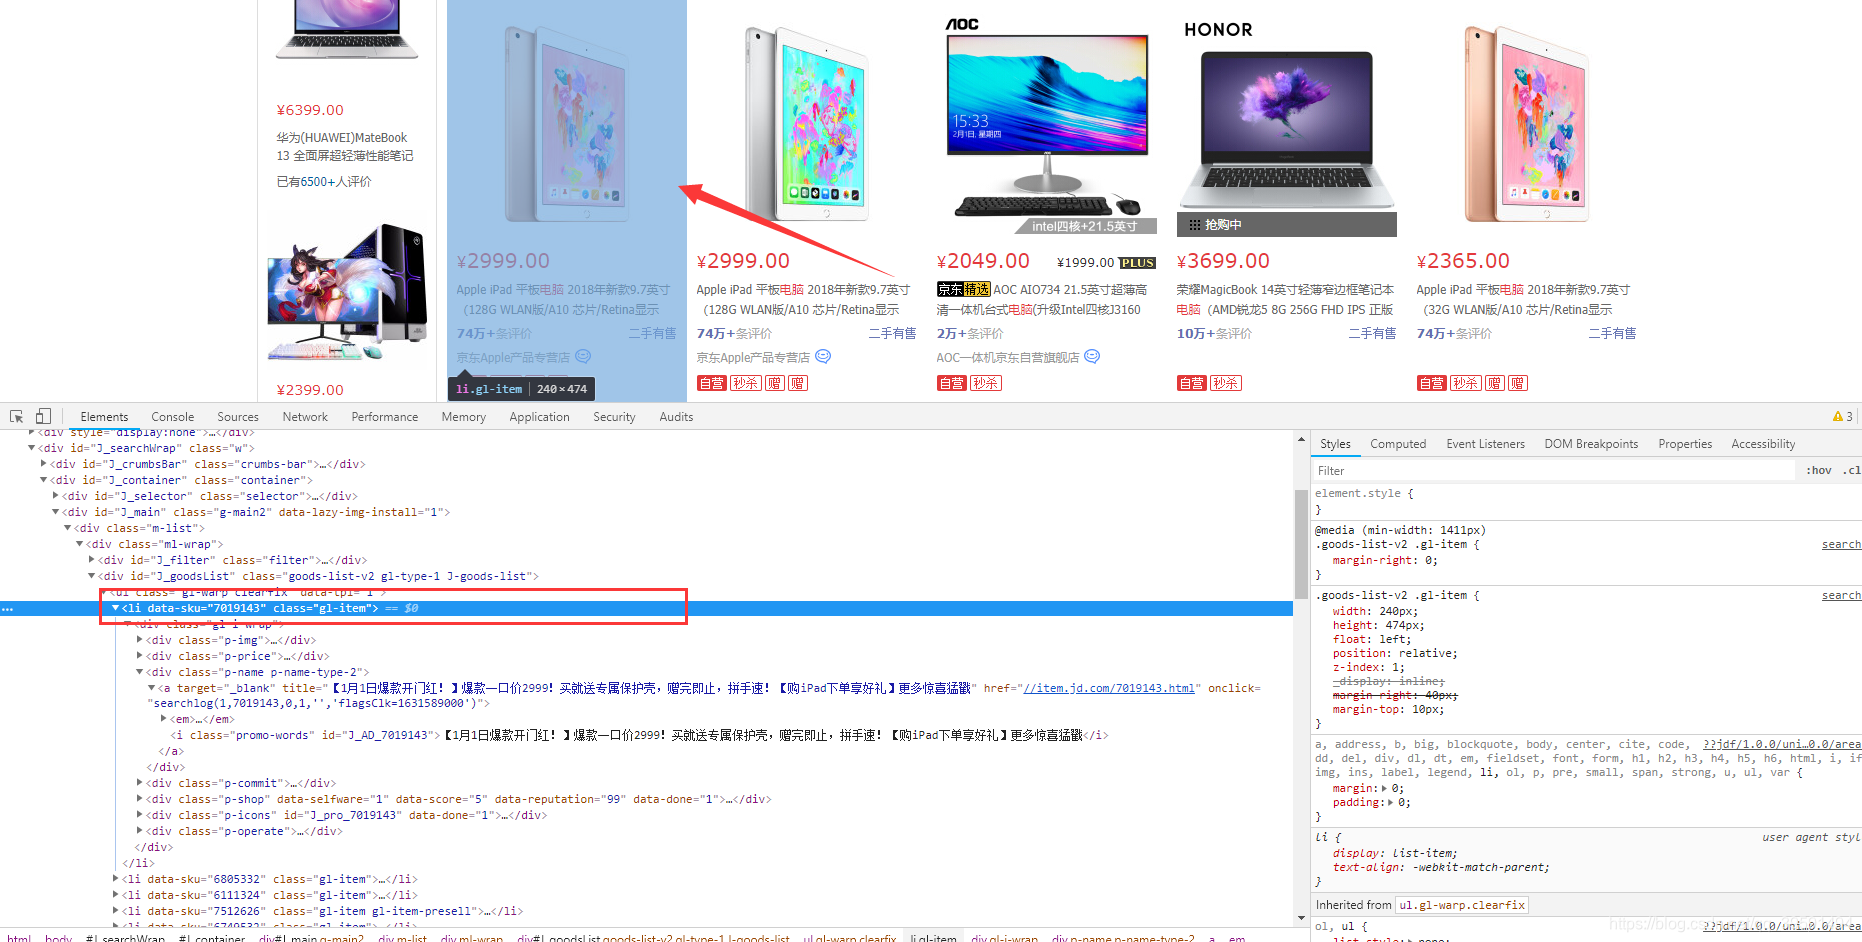
当我们选中Li标签时,页面会将水印指定到第一台电脑上,如果我们选择第二个Li标签呢? 如下: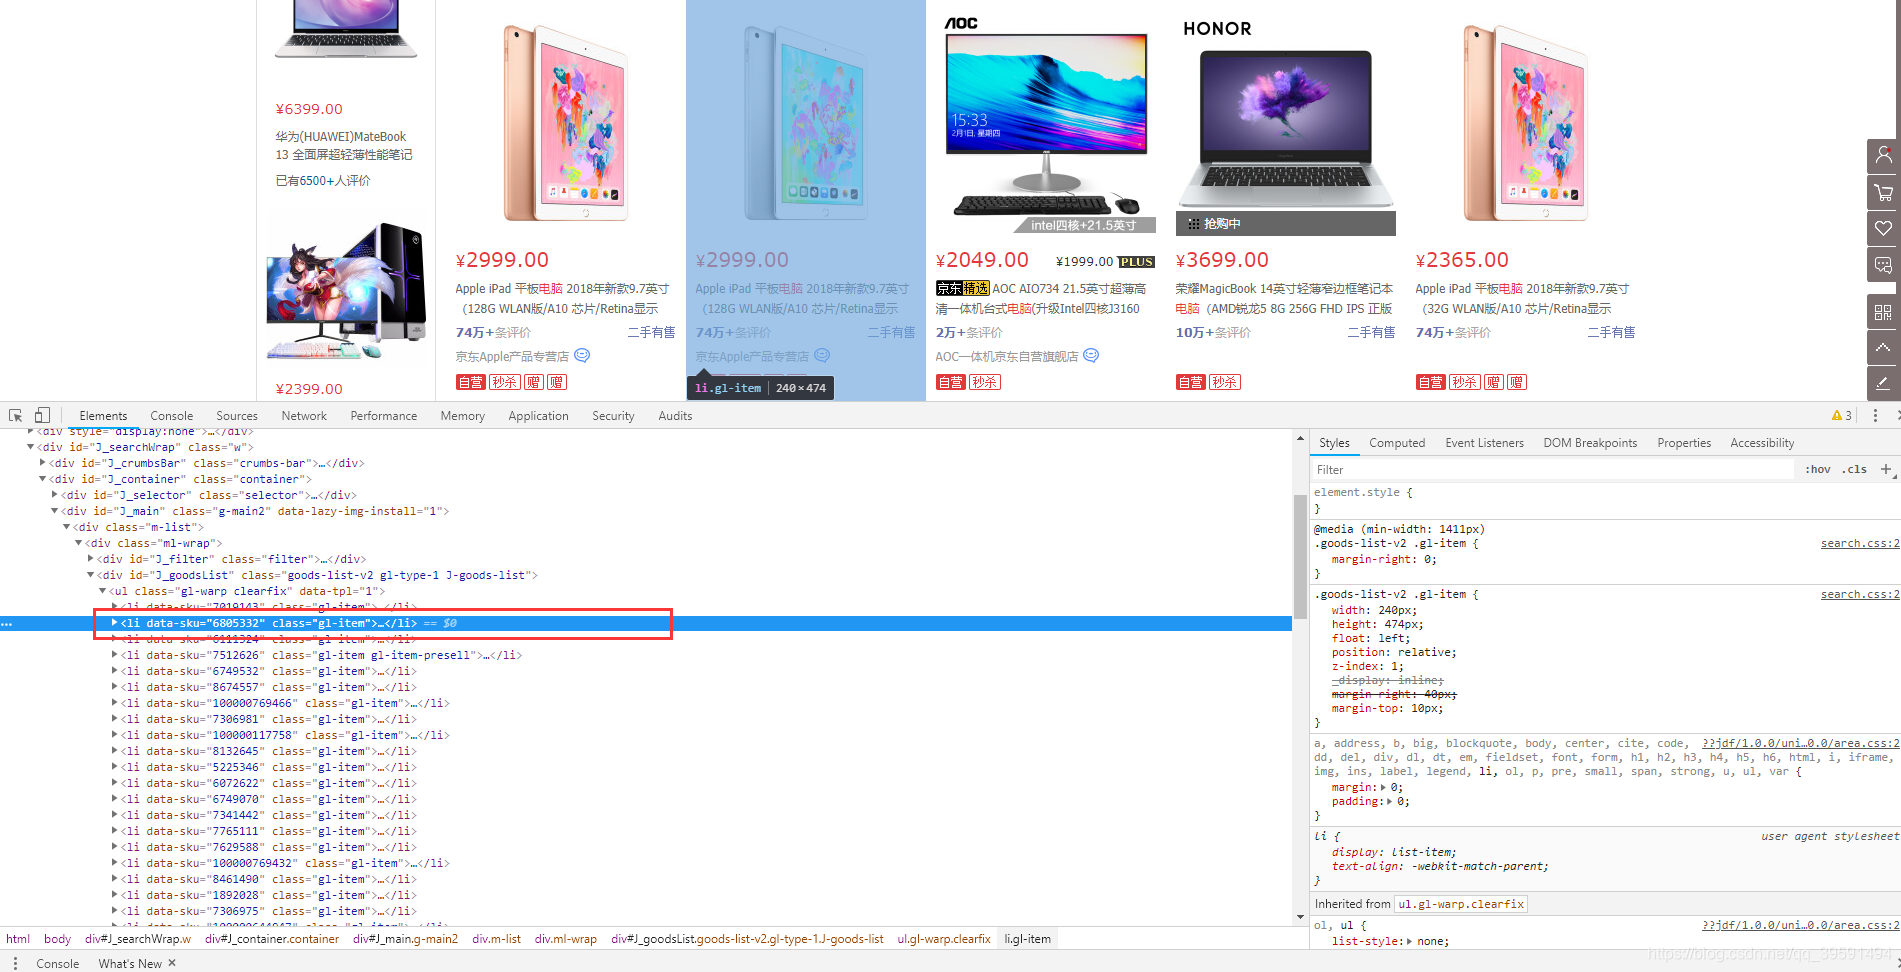
因此可以得出,在目前此页面中每一台电脑的数据都在< li data-sku >标签中。将< li data-sku >代码拷贝。选中< Li data-sku=“6805332”>—>右键—>Copy—>Copy elemrent. 内容如下:
<li data-sku="6805332" class="gl-item">
	<div class="gl-i-wrap">
					<div class="p-img">
						<a target="_blank" title="【1月1日爆款开门红!】爆款一口价2999!买就送专属保护壳,赠完即止,拼手速!【购iPad下单享好礼】更多惊喜猛戳" href="//item.jd.com/6805332.html" onclick="searchlog(1,6805332,1,2,'','flagsClk=1631589000')">
							<img width="220" height="220" class="" data-img="1" source-data-lazy-img="" data-lazy-img="done" src="//img12.360buyimg.com/n7/jfs/t16759/298/1134242689/85617/2b4ccc02/5abb0fd5Nd40c72e1.jpg">
</a>						<div data-lease="" data-catid="2694" data-venid="1000000127" data-presale="" data-done="1"></div>
					</div>
					<div class="p-price">
<strong class="J_6805332" data-done="1"><em>¥</em><i>2999.00</i></strong>					</div>
					<div class="p-name p-name-type-2">
						<a target="_blank" title="【1月1日爆款开门红!】爆款一口价2999!买就送专属保护壳,赠完即止,拼手速!【购iPad下单享好礼】更多惊喜猛戳" href="//item.jd.com/6805332.html" onclick="searchlog(1,6805332,1,1,'','flagsClk=1631589000')">
							<em>Apple
如果觉得我的文章对您有用,请随意打赏。你的支持将鼓励我继续创作!
