社区微信群开通啦,扫一扫抢先加入社区官方微信群

社区微信群
不可否认,这次我标题党了,如果想了解底层还是得多找一些资料,但是从蒙蔽状态到 ‘ 奥,原来是这样 ’ 看这一篇就够了,也是我自己的学习过程。工作中经常用到但是一般都不用自己动手配,本着由浅入深的原则看了看之前做的笔记,不求甚解,知其然知其所以然,巴拉巴拉的。
杂记
网上nginx安装的博客一堆,也包括很多转发坟贴,版本号要注意!!!,避免出现因为版本导致的问题。
所以建议 在安装之前 去对应的官网查询版本号
nginx安装依赖3个包,以及是否有make和gcc工具
安装make
yum -y install gcc automake autoconf libtool make
安装gcc
yum install gcc gcc-c++
安装PCRE库(正则表达式库)
ftp://ftp.csx.cam.ac.uk/pub/software/programming/pcre/ 下载最新的 PCRE 源码包,使用下面命令下载编译和安装 PCRE 包:(本文参照下载文件版本:若想下载最新版本请打开上面网址。本文选择pcre-8.39.tar.gz)
cd /usr/local/src
wget ftp://ftp.csx.cam.ac.uk/pub/software/programming/pcre/pcre-8.39.tar.gz
tar -zxvf pcre-8.39.tar.gz
cd pcre-8.39
./configure
make
make install
安装zlib库
http://zlib.net/zlib-1.2.11.tar.gz 下载最新的 zlib 源码包,使用下面命令下载编译和安装 zlib包:(本文参照下载文件版本:若想下载最新版本请打开上面网址。本文选择zlib-1.2.11.tar.gz )
cd /usr/local/src

wget http://zlib.net/zlib-1.2.11.tar.gz
tar -zxvf zlib-1.2.11.tar.gz
cd zlib-1.2.11
./configure
make
make install
安装openssl (某些vps默认没装ssl)
cd /usr/local/src
wget https://www.openssl.org/source/openssl-1.0.1t.tar.gz
tar -zxvf openssl-1.0.1t.tar.gz
安装nginx
本文采用版本为1.9.9,了解最新版本请去 http://nginx.org/
cd /usr/local/src
wget http://nginx.org/download/nginx-1.9.9.tar.gz
tar -zxvf nginx-1.9.9.tar.gz
cd nginx-1.9.9
./configure --prefix /usr/local/src
make
make install
–prefix 表示指定nginx安装到的目录,默认安装在 /usr/local/nginx 下
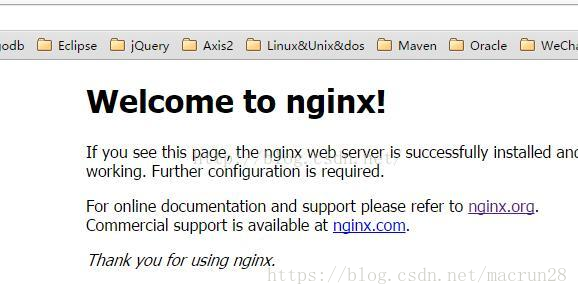
完成以上步骤启动nginx(到 /nginx/sbin/ 目录下 ./nginx 即可),访问ip,即可出现以下页面
2.安装可能遇到的问题
报错:./nginx: error while loading shared libraries: libpcre.so.1: cannot open shared object file: No such file or directory
这是由于lib里包版本不对导致的,解决方法是,删掉 ./lib 或者 ./lib64 中的 libpcre.so.1 ,然后根据系统是32位还是64位,执行下方命令
查询linux是32位还是64位
[root@host lib]#  getconf LONG_BIT
32
如果是32位系统
[root@host lib]# ln -s /usr/local/lib/libpcre.so.1 /lib
如果是64位系统
[root@host lib]# ln -s /usr/local/lib/libpcre.so.1 /lib64
然后在启动nginx就OK了
nginx的目录很简单明了,基础的为4个:
sbin 启动目录
conf 配置信息目录
html 浏览器访问到的静态页面
logs 默认的日志打印目录
启动nginx
//进到sbin目录 执行下方命令,默认使用/conf/nginx.conf文件
[root@host sbin]# ./nginx
//指定conf文件
[root@host sbin]# ./nginx -c /usr/local/nginx/conf/nginx.conf
//nginx 测试配置文件是否正确  返回如下表示成功
[root@host sbin]# ./nginx -t
nginx: the configuration file /usr/local/nginx/conf/nginx.conf syntax is ok
nginx: configuration file /usr/local/nginx/conf/nginx.conf test is successful
重启nginx
1.先停止,后启动
2.进到sbin目录 执行下方命令,
[root@host sbin]# ./nginx -s reload
一般执行这个操作前  会  ./nginx -t   test一下
停止nginx
1.使用nginx命令停止
[root@host sbin]# ./nginx -s quit   完整有序的停止nginx
[root@host sbin]# ./nginx -s stop   快速停止nginx

2.查询进程,杀死进程
[root@host sbin]# ps -ef | grep nginx
root     27768     1  0 02:57 ?        00:00:00 nginx: master process ./nginx
nobody   27769 27768  0 02:57 ?        00:00:00 nginx: worker process
root     27771 27656  0 02:57 pts/0    00:00:00 grep nginx
[root@host sbin]# kill -QUIT 主进程号     :从容停止Nginx
[root@host sbin]# kill -TERM 主进程号     :快速停止Nginx
[root@host sbin]# kill -9 主进程号        :强制停止Nginx
[root@host sbin]# pkill -9 nginx     	 :强制停止Nginx
nginx.conf文件主要分为3块
main 全局模块 写在最外部
events 用events括号包裹
http http块中包含http全局块和多个server块,每个server块中包含server全局块和多个location块,采用就近原则生效
以下是官方最简单的配置模板
user nobody nobody;    #所有用户具有启停权限  不做限制
worker_processes  1;   # 如果设置为数字,启动以后就具有多少个worker process
pid logs/nginx.pid;   #pid日志打印目录   默认存放在logs/nginx.pid
error_log  /var/log/nginx/error.log warn;   #定义nginx错误日志打印目录,以及等级
events {
	epoll;             #一般不配置,事件驱动模型
    worker_connections  1024;  #允许每一个WP同事开启的最大连接数。此值不能大于操作系统支持的打开							  #的最大文件句柄数.
}

http {
    include       mime.types;
    default_type  application/octet-stream;  #默认为 text/plain
    sendfile        on;
    keepalive_timeout  65;   #设置用户会话连接的保持时间,即超时时间

    server {
        listen       80;    #监听80端口
        server_name  localhost;   #访问过来的网站域名

        location / {
            root   html;       #访问的html的存放路径
            index  index.html index.htm;   #主页为html/index.html
        }

        error_page   500 502 503 504  /50x.html;
        location = /50x.html {
            root   html;
        }
    }
}
以上为基本配置,可以增加server块满足更多场景,但是生产环境的用法还是有区别的。
接下来为了能了解到整个流程,进行以下的实验
添加如下server块
 server {
        listen       80;
        server_name  www.zeerdaye.com;

        location / {
            root   html/zeerdaye;     #这样访问域名,打开的静态网页就
            						#是/usr/local/nginx/html/zeerdaye/index
            index  index.html index.htm;
        }

        error_page   500 502 503 504  /50x.html;
        location = /50x.html {
            root   html;
        }
    }
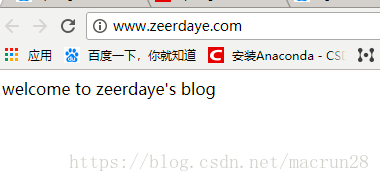
在/usr/local/nginx/html 下
mkdir zeerdaye
cd zeerdaye
vim index.html   #随便写点东西  我写的 welcome to zeerdaye's blog
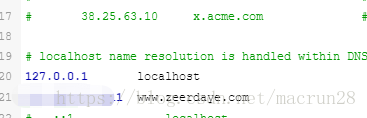
修改本地host
配置ip,域名
输入网址即可访问到
生产场景,为了便于管理,会将server分开存放,再 include到 nginx.conf 文件中。
下面举一个负载均衡的例子:
nginx.conf 配置如下:
   worker_processes  1;
   events {
       worker_connections  1024;
   }

   http {
       include       mime.types;
       default_type  application/octet-stream;
       sendfile        on;
       keepalive_timeout  65;

       include /usr/local/nginx/conf/conf.d/*.conf;  #新建conf.d目录
  }
conf.d 下包含多个配置server的conf文件,和一个配置upstream的conf文件
upstream.conf 配置如下
   upstream demoserver{
       ip_hash;      #自定义负载均衡规则  默认轮训
                     #ip_hash 根据ip的hash值判断;
                     #url_hash 根据url的hash值判断
                     #fair 根据响应时间判断
                     #在端口号后添加 weight = 1(权重自定义) 来开启权重的配置规则
       server 127.0.0.1:8081;
       server 127.0.0.1:8082;
   }
www.demo.conf 的配置如下
   server {
            listen 80;
            server_name www.demo.com;

            location /{
                proxy_pass http://demoserver;   #这里的demoserver需要和upstream一致
                                                #实际就是做一下转发,所以请求头的内容会因为转发
                                                #发生改变,所以最好自己定义一下
                proxy_set_header Host $host;
                proxy_set_header real_IP $remote_addr;  #真正请求来源的ip  java取的时候
                                                        #getHeader("real_IP")即可
            }
  }
这样,访问www.demo.com的时候,就会根据ip的hash值,判断访问8081还是8082的服务了。
生产环境 如果一个服务器有多个服务,配置多个server即可。
最后 写一些可以扩展的配置,有兴趣可以查一下:rewrite实现转发,gzip实现压缩,expire实现浏览器缓存。
Nginx 禁止ip访问
https://blog.csdn.net/xiaocao12/article/details/52304097
线上配置实例
https://blog.csdn.net/netdxy/article/details/79423444
conf配置
https://blog.csdn.net/u010209217/article/details/77854929
最后,有各种想法,加我好友即可,以后会维护公众号的。
如果觉得我的文章对您有用,请随意打赏。你的支持将鼓励我继续创作!