社区微信群开通啦,扫一扫抢先加入社区官方微信群

社区微信群
前言
这次要完成的案例是一个分组列表,相信很多小伙伴在学习js的时候就已经做过类似的练习了,而这次我们要用React来完成开发,而用React开发最重要的就是组件化的思想了。
什么是组件化?
在生活中,我们所接触到的手机、电脑等各电子产品都是由许多个零件组装拼接而成,就算是车辆、房子这样比较巨型、又比较复杂的东西也是由很多个基本的零件组装而成。同理,React开发中通过将各个功能、模块组装成一个组件,再将各个组件组装成一个项目。
组件化有什么作用?
如果自己的手机屏幕摔破了,我相信许多人的反应是去换一个新的屏幕而不是换一台手机。同样,对于一个由各个组件组装起来的项目,后期对于项目的更新、维护都极为方便。如果你要更新某个区域,那你只需要到相应的组件进行更改即可。同时,后期改bug也会方便许多,组件化允许开发者能更快地精准定位到bug的位置。
首先看一下成品是个什么样子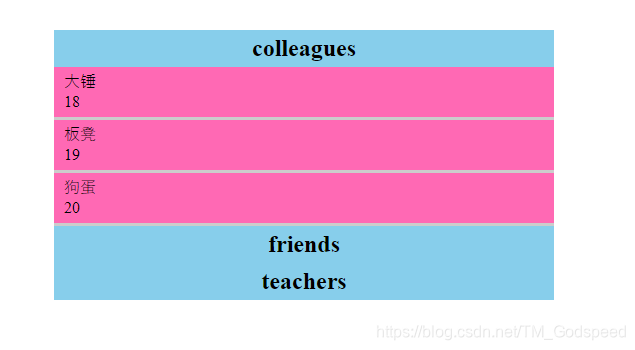
在这个案例中,点击一个分组会自动合并其他分组,点击自己则合并自己,初始展开第一分组
PS:在本案例中没有使用脚手架,而是手动运用了babel;本案例重点是为了理解React的开发思想而不是搭建一个企业级项目。
材料
自制模拟后台传输过来的json数据
const dataList = {
    "colleagues":[
        {
            name: "大锤"
            , age: 18
            , id: Math.random()
        }
        ,{
            name: "板凳"
            , age: 19
            , id: Math.random()
        }
        ,{
            name: "狗蛋"
            , age: 20
            , id: Math.random()
        }
    ]
    ,"friends":[
        {
            name: "kris"
            , age: 18
            , id: Math.random()
        }
        ,{
            name: "kara"
            , age: 18
            , id: Math.random()
        }
        ,{
            name: "Catherine"
            , age: 18
            , id: Math.random()
        }
    ]
    ,"teachers":[
        {
            name: "T1"
            , age: 18
            , id: Math.random()
        }
        ,{
            name: "T2"
            , age: 18
            , id: Math.random()
        }
        ,{
            name: "T3"
            , age: 18
            , id: Math.random()
        }
        ,{
            name: "T4"
            , age: 18
            , id: Math.random()
        }
    ]
}

export default dataList
组件
App Group
总体结构
<div id="app"></div>

<!-- 引入必要的依赖 -->
<script type="text/javascript" src="node_modules/babel-standalone/babel.min.js"></script>
<script type="text/javascript" src="node_modules/react/umd/react.development.js"></script>
<script type="text/javascript" src="node_modules/react-dom/umd/react-dom.development.js"></script>

<!-- 引入模拟后台发送过来的数据 -->
<script type="module">
        import dataList from './data.js'
        window.data = dataList
</script>

<!-- 正文 -->
<script type="text/babel">
	class Group extends React.Component{
		...
	}

	class App extends React.Component{
		...
	}

	ReactDOM.render(
		<App />
		,document.querySelector("#app")
	)
</script>
App组件作用
App组件具体代码
class App extends React.Component{
    state = {
        onOff : [true, false, false]
    }

    handleChange = (Index)=>{
        const onOff = this.state.onOff.map((item, index)=>{
            if(index === Index) return true
            return false
        })

        this.setState({
            onOff
        })
        // console.log(this.state.onOff);
    }

    render() {
        return (
            <div>
                {
                    // console.log(Object.keys(data))
                    Object.keys(data).map((item, index)=>{
                        return(
                            <Group
                                key={index}
                                data_item={item}
                                data_show={this.state.onOff[index]}
                                data_index = {index}
                                change = {this.handleChange}
                          	/>
                        )
                    })
                }
            </div>
        );
    }
}
Group组件作用
Group组件具体代码
class Group extends React.Component{
    constructor(){
        super(...arguments)
        // console.log(this.props);

        this.state = {
            data : this.props.data_item
            ,ifShow : this.props.data_show
            ,_index : this.props.data_index
        }
    }

    // 父组件更新时本组件也跟着更新
    shouldComponentUpdate(nextProps, nextState) {
        // console.log(nextProps, nextState);
        // 这里的组件更新和handleClick函数中的更新不一样,这里针对的是除被点击组的其他组,而handleClick中的更新是针对被点击组本身的
        if(this.state.ifShow !== nextProps.data_show){
            this.setState({
                ifShow: nextProps.data_show
            })
        }

        if(this.state.ifShow !== nextState.ifShow){
            this.toggleList(nextState.ifShow)
        }

        return true
    }

    // 组件完成渲染时实现第一次数据渲染
    componentDidMount() {
        this.toggleList(this.state.ifShow)
    }

    // 根据父组件传过来的值决定是否展开
    toggleList = (ifShow)=>{
        const ele = this._list
        ifShow ?
            (ele.style.height = ele.scrollHeight + "px")
     	   :(ele.style.height = 0)
    }

    // 根据点击组来改变当前组状态,并通过父组件传过来的函数来改变父组件的状态
    handleClick = (index)=>{
        const ifShow = !this.state.ifShow
        this.setState({
            ifShow
        })

		// 这个函数执行后会使父组件状态更新,从而触发本组件的shouldComponentUpdate函数
        this.props.change(this.state._index)
    }

    render(){
        return(
            <div className="group">

                <h2
                    onClick={()=>{
                        	this.handleClick(this.state._index)
                   		 }}
                   		 >
                    {
                        this.state.data
                    }
                </h2>

                <div
                    className="list"
                    ref={list=>this._list=list}
                    >

                    {/*
						当然这里的ul是可以单独分离成一个组件的,想学得更扎实的小伙伴可以自己尝试一下
					*/}
                    <ul>
                        {
                            data[this.state.data].map((item, index)=>{
                                return(
                                    <li key={index}>
                                        <p>{item.name}</p>
                                        <p>{item.age}</p>
                                    </li>
                                )
                            })
                        }
                    </ul>

                </div>

            </div>
        )
    }
}
CSS样式
#app{
    width: 500px;
    margin: 100px auto;
}

.group{
    background-color: #ccc;
}

h2{
    padding: 5px;
    margin: 0;
    text-align: center;
    background-color: skyblue;
    cursor: pointer;
    user-select: none;
}

ul{
    padding: 0;
    margin: 0;
    list-style: none;
}

li{
    padding: 5px;
    margin-bottom: 3px;
    background-color: hotpink;
}

li:hover{
    transform: translateX(2px);
}

li p{
    padding: 5px;
    margin: 0;
    line-height: 10px;
    cursor: pointer;
}

.list{
    height: 0;
    overflow: hidden;
    transition: 0.5s;
}
最后补充一下
用React开发时一定要清楚各层级间的关系,同时灵活运用生命周期函数,不清楚的地方多console.log
希望这篇文章会对你有帮助
Wish you godspeed!
如果觉得我的文章对您有用,请随意打赏。你的支持将鼓励我继续创作!
