社区微信群开通啦,扫一扫抢先加入社区官方微信群

社区微信群
SpringBoot的诞生,极大的简化了Spring框架的使用过程,提升了开发效率,可以把它理解为一个整合包,使用了SpringBoot,就可以不用自己去进行繁琐的配置,通过几个简单的注解,就可以构建一个基于REST的服务。同时,SpringBoot的快速构建部署的特性,为当下大热的微服务落地提供了极大的便利,可以说是构建微服务的理想框架。
归纳来说SpringBoot的特性有如下几点:
- 自动配置
- 内置tomcat、jetty、undertow 三大web容器
- 将Web应用打成jar包启动
那么SpringBoot是怎样做到上述三个特性的呢?是我接下来的研究方向,本篇主要研究的是后两个特点,如何内嵌了Web容易,将应用打成jar包,怎么还能像Web程序一样运行。
本文是笔者患难与共的好兄弟Dewey Ding及笔者Debug了若干天的成果,谨以此篇留作纪念。
在SpringBoot中,一个Web应用从启动到接收请求,我粗略将它分为四步:
这一部分的学习真可谓一波三折,每次Debug SpringApplication的run方法,都会迷失在茫茫的源码之中,看书和博客也都是云里雾里,所以这次决定换一种学法,先从宏观上了解都要做什么,至于具体细节,等到需要的时候再去分析。比如今天要了解的是和Tomcat启动相关的部分,那么就先只了解这个模块。
关于SpringBoot和Tomcat是如何合作的,在实际Debug之前,我们先抛出如下几个问题:
SpringBoot有main()方法,可以直接打成jar包运行;SpringMVC没有main方法,所以无法自己启动,要依赖Tomcat,Tomcat本质是个容器,所以Tomcat中一定有main方法或者线程的start()方法来启动Spring程序
/WEB-INF是Web应用需要的,SpringMVC配置了这个,是为了Tomcat读取,从而启动Web容器
项目要部署到webapp目录下,才能被Tomcat运行
那么问题来了,SpringBoot没有做这些配置,是怎么做到内置Tomcat容器,并让Tomcat启动的呢?
我们先来看Tomcat的启动时在SpringBoot启动的哪一步?这里只列举比较关键的几步:
SpringApplication的run方法
org.springframework.boot.SpringApplication#run(java.lang.String...)
刷新IOC容器(Bean的实例化)
 org.springframework.boot.SpringApplication#refreshContext()
 org.springframework.boot.web.servlet.context.ServletWebServerApplicationContext#onRefresh()
创建WebServer
在org.springframework.boot.web.servlet.context.ServletWebServerApplicationContext#onRefresh调用了createWebServer
org.springframework.boot.web.servlet.context.ServletWebServerApplicationContext#createWebServer()
private void createWebServer() {
		WebServer webServer = this.webServer;
		ServletContext servletContext = getServletContext();
		if (webServer == null && servletContext == null) {
            // 重点:这时初始化了dispatcherServlet
			ServletWebServerFactory factory = getWebServerFactory();
			// 创建
			this.webServer = factory.getWebServer(getSelfInitializer());
		}
		else if (servletContext != null) {
			try {
			   // 启动
				getSelfInitializer().onStartup(servletContext);
			}
			catch (ServletException ex) {
				throw new ApplicationContextException("Cannot initialize servlet context", ex);
			}
		}
	initPropertySources();
	}
这里就是Tomcat的创建和启动过程了,关于下面这两行代码中,蕴含着我们尚未去发现的秘密,后面会继续分析(蕴含着的秘密真的坑苦了我们,竟然与它擦肩而过,然后绕了一大圈才回来,泪奔中~~):
this.webServer = factory.getWebServer(getSelfInitializer());
······
getSelfInitializer().onStartup(servletContext);
在这里创建了Tomcat,Connector,Host,Engine并且设置一些属性,关于Tomcat的具体内容,由于内容比较多,就不在此篇详细展开,后续会专门研究。这里我们发现,在Tomcat启动的时候,servletClass还没有获取到dispatcherServlet,而在第一次收到请求时,servletClass就变成了dispatcherServlet,这里就对我们形成了一定误导,以为是第一次收到请求时Tomcat才加载了默认的wrapper,后来才发现出现了偏差,经历了无数次断点后,才回到正确的路上。
这里不得不提到,一个最开始被我们忽略,后来才发现是个重要的地方:getSelfInitializer() 。关于SpringBoot是如何把“/”和“dispatcherServlet”的关联给到Tomcat这件事,就蕴含在下面这段代码之中:
//注意 selfInitialize
private org.springframework.boot.web.servlet.ServletContextInitializer getSelfInitializer() {
		return this::selfInitialize;
	}

//注意 getServletContextInitializerBeans()
private void selfInitialize(ServletContext servletContext) throws ServletException {
		prepareWebApplicationContext(servletContext);
		registerApplicationScope(servletContext);
		WebApplicationContextUtils.registerEnvironmentBeans(getBeanFactory(), servletContext);
		for (ServletContextInitializer beans : getServletContextInitializerBeans()) {
			beans.onStartup(servletContext);
		}
}

//注意 ServletContextInitializerBeans()
protected Collection<ServletContextInitializer> getServletContextInitializerBeans() {
		return new ServletContextInitializerBeans(getBeanFactory());
}

// 注意 this.initializers 和 addServletContextInitializerBeans
public ServletContextInitializerBeans(ListableBeanFactory beanFactory,
			Class<? extends ServletContextInitializer>... initializerTypes) {
		this.initializers = new LinkedMultiValueMap<>();
		this.initializerTypes = (initializerTypes.length != 0) ? Arrays.asList(initializerTypes)
				: Collections.singletonList(ServletContextInitializer.class);
		addServletContextInitializerBeans(beanFactory);
		addAdaptableBeans(beanFactory);
		List<ServletContextInitializer> sortedInitializers = this.initializers.values().stream()
				.flatMap((value) -> value.stream().sorted(AnnotationAwareOrderComparator.INSTANCE))
				.collect(Collectors.toList());
		this.sortedList = Collections.unmodifiableList(sortedInitializers);
		logMappings(this.initializers);
	}
让我们来看两张对比图:
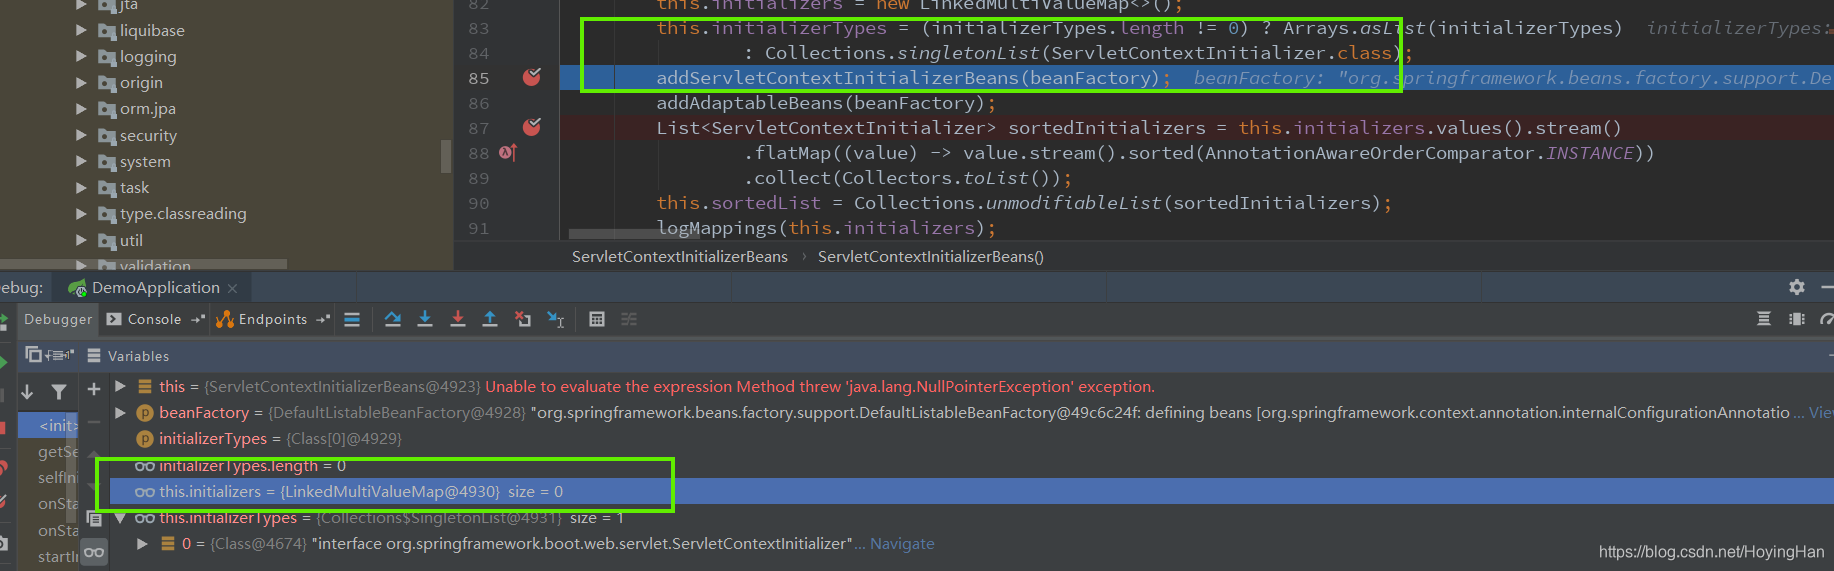

通过上面两个Debug的断点图,我们可以看到,在执行了addServletContextInitializerBeans(beanFactory)和addAdaptableBeans(beanFactory)方法之后,this.initializers的赋值发生了变化,两个Servlet,四个Filter都被赋到里面,至于这两个方法中的处理逻辑,此时已经心累到不想去看,暂记jira。
接下来的onStartup()方法,调用了接口org.springframework.boot.web.servlet.ServletContextInitializeronStartup()方法。
这里有下面几点需要注意:
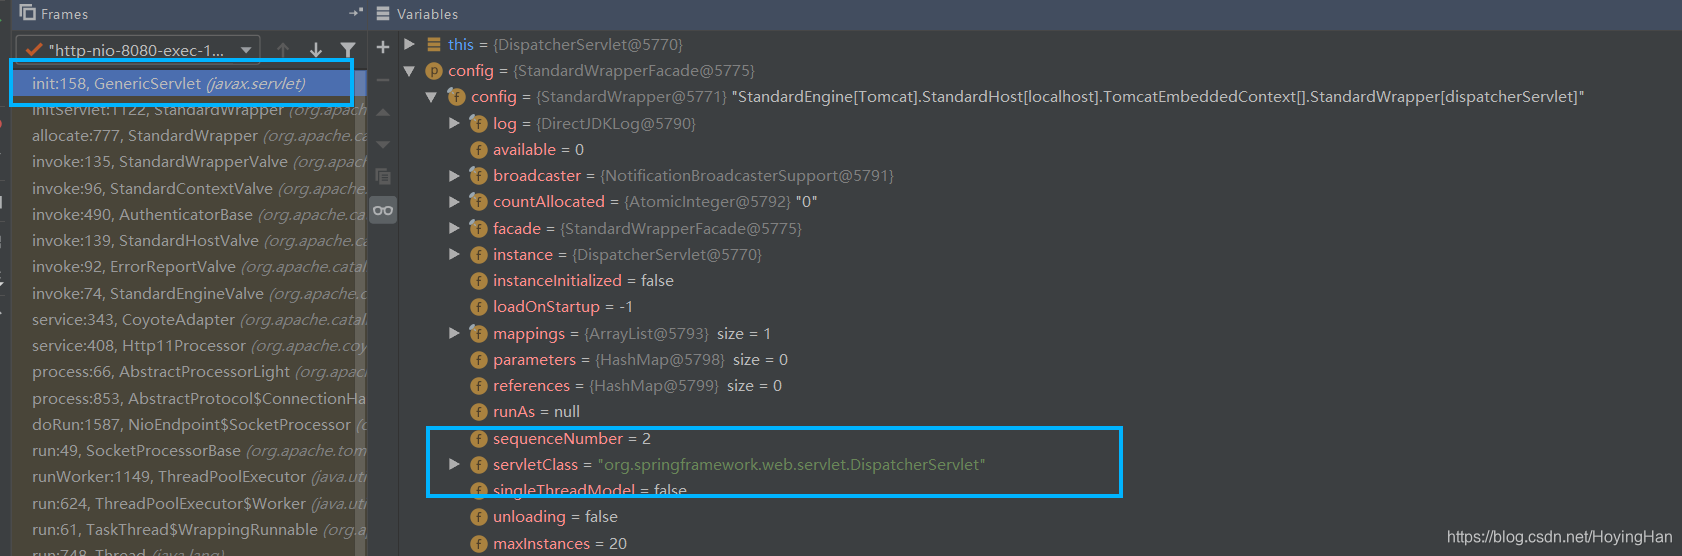
初始化DispatcherServlet,是在第一次发起Web请求的时候(AbstractAnnotationConfigDispatcherServletInitializer)
具体调用过程如下:
javax.servlet.GenericServlet#init(javax.servlet.ServletConfig)
GenericServlet实现了Servlet接口
这个方法启动SpringBoot时会调用一次,初始化dispatcherServlet时还会调用一次,不过两次的config中的servletClass不一样,第二次是dispatcherServlet

org.springframework.web.servlet.HttpServletBean#init
org.springframework.web.servlet.FrameworkServlet#initServletBean
这时会打印“Initializing Servlet ‘dispatcherServlet’”日志,
org.springframework.web.servlet.FrameworkServlet#initWebApplicationContext
protected WebApplicationContext initWebApplicationContext() {
		WebApplicationContext rootContext =
				WebApplicationContextUtils.getWebApplicationContext(getServletContext());
		WebApplicationContext wac = null;

		if (this.webApplicationContext != null) {
			// A context instance was injected at construction time -> use it
			wac = this.webApplicationContext;
			if (wac instanceof ConfigurableWebApplicationContext) {
				ConfigurableWebApplicationContext cwac = (ConfigurableWebApplicationContext) wac;
				if (!cwac.isActive()) {
					// The context has not yet been refreshed -> provide services such as
					// setting the parent context, setting the application context id, etc
					if (cwac.getParent() == null) {
						// The context instance was injected without an explicit parent -> set
						// the root application context (if any; may be null) as the parent
						cwac.setParent(rootContext);
					}
					configureAndRefreshWebApplicationContext(cwac);
				}
			}
		}
		if (wac == null) {
			// No context instance was injected at construction time -> see if one
			// has been registered in the servlet context. If one exists, it is assumed
			// that the parent context (if any) has already been set and that the
			// user has performed any initialization such as setting the context id
			wac = findWebApplicationContext();
		}
		if (wac == null) {
			// No context instance is defined for this servlet -> create a local one
			wac = createWebApplicationContext(rootContext);
		}

		if (!this.refreshEventReceived) {
			// Either the context is not a ConfigurableApplicationContext with refresh
			// support or the context injected at construction time had already been
			// refreshed -> trigger initial onRefresh manually here.
			synchronized (this.onRefreshMonitor) {
                //重要的刷新上下文操作
				onRefresh(wac);
			}
		}

		if (this.publishContext) {
			// Publish the context as a servlet context attribute.
			String attrName = getServletContextAttributeName();
			getServletContext().setAttribute(attrName, wac);
		}

		return wac;
	}
获取根上下文(这时根上下文已经在SpringBoot启动时初始化好了)
然后把根上下文给webApplicationContext
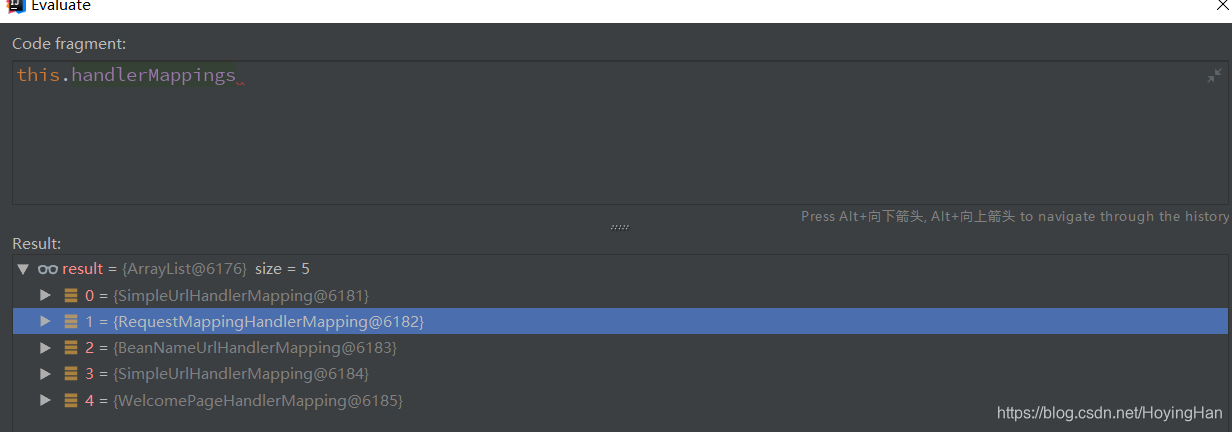
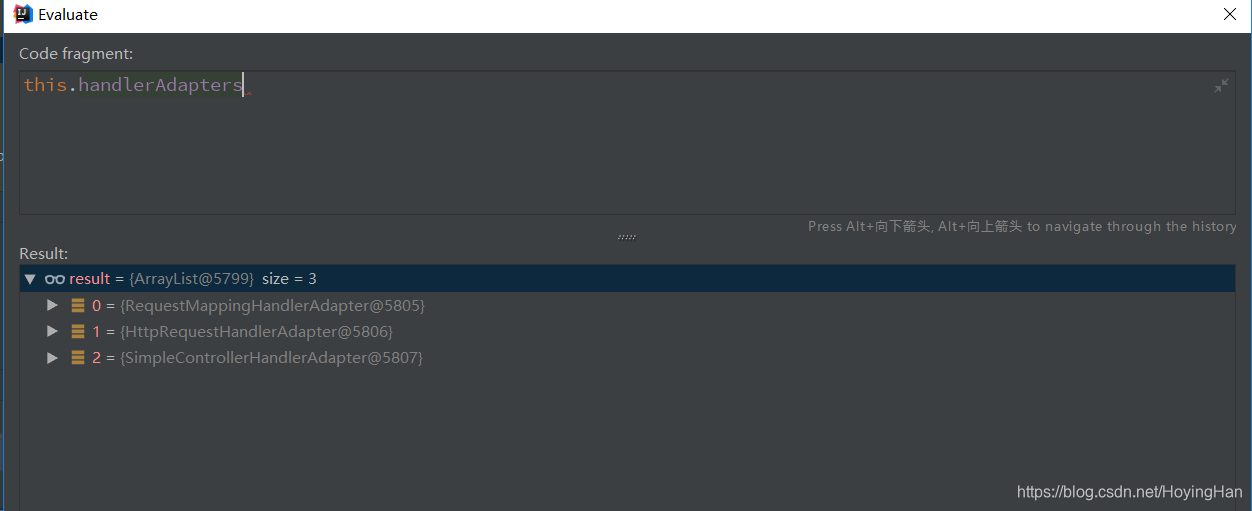
org.springframework.web.servlet.DispatcherServlet#onRefresh - 这时就要刷新子上下文了,刷新上下文要刷新HandlerMapping,HandlerAdapter这些
	protected void initStrategies(ApplicationContext context) {
		initMultipartResolver(context);
		initLocaleResolver(context);
		initThemeResolver(context);
		initHandlerMappings(context);
		initHandlerAdapters(context);
		initHandlerExceptionResolvers(context);
		initRequestToViewNameTranslator(context);
		initViewResolvers(context);
		initFlashMapManager(context);
	}
这里记录几个重要的时间点:
![[外链图片转存失败(img-kNuDQeVd-1565153451706)(D:CodeMarkdownPhotosRepositoryResArticlePicSpringBoot刷新前的mapping.png)]](https://img-blog.csdnimg.cn/20190807125805855.png?x-oss-process=image/watermark,type_ZmFuZ3poZW5naGVpdGk,shadow_10,text_aHR0cHM6Ly9ibG9nLmNzZG4ubmV0L0hveWluZ0hhbg==,size_16,color_FFFFFF,t_70)
关于SpringMVC、SpringBoot与Tomcat合作中,启动方式不同点的总结如下
SpringMVC
Springboot
在启动过程中,SpringBoot会将DispatcherServlet给到Tomcat的Service的defaultWrapper中(如何给到的后面会说明)
Tomcat启动时,就会把“/”路径和DispatcherServlet匹配
当第一次发起Web请求时,初始化DispatcherServlet,包括HandlerMapping,HandlerAdapter
如果觉得我的文章对您有用,请随意打赏。你的支持将鼓励我继续创作!
