社区微信群开通啦,扫一扫抢先加入社区官方微信群

社区微信群
代码托管平台很多,这里只介绍如何使用git在本地建立仓库并同步到远程服务器github。
使用代码托管平台托管代码的好处之一就是解决不同电脑办公的问题。通过代码托管平台,我们可以随时随地在不同的电脑上对代码进行修改,更新。
Git的使用教程很多,可以直接看这本书Pro Git ,这篇文章看这本书的笔记。
配置Git的时候需要github的账号。
window下打开命令行查看
git --version
在Windows下安装git:
Mac os上如果装了XCode的话,git应该是已经装了的,同样使用git --version查看版本。high sierra 或者更高版本的mac os可能会报错:xcrun: error
xcrun: error: invalid active developer path (/Library/Developer/CommandLineTools),
missing xcrun at: /Library/Developer/CommandLineTools/usr/bin/xcrun
解决办法:
xcode-select --install
问题解决后使用git --version命令能够看到git的版本。
如果没有或者想安装最新版的git,可以参考下面的博客。
在Mac os下安装git:
$ git config --global user.name "你的用户名"
$ git config --global user.email 你github的邮箱
更多可阅读这里。
有两种取得 Git 项目仓库的方法。 一种是从一个服务器克隆一个现有的 Git 仓库; 另一种是在现有项目或目录下导入所有文件到 Git 中,这里只介绍第二种,第一种在弄懂了第二种后就直接可以使用。
我使用的Pycharm,在Pycharm中建立一个项目名为hello_github的project。在这个现有的目录中初始化仓库:
$ git init
Initialized empty Git repository in /Users/siucaan/PycharmProjects/hello_world/.git/
该命令将创建一个名为 .git 的子目录,这个子目录含有你初始化的 Git 仓库中所有的必须文件。
要实现对初始化 Git 仓库来进行版本控制的话,你应该开始跟踪这些文件并提交。 可通过 git add 命令来实现对指定文件的跟踪,使用该命令将其放入暂存区,然后执行 git commit 提交。
在当前工作目录添加一个README文件, README中添加一句话: This is a Test project!
$echo > README
$vi README
使用git add对指定文件的跟踪,使用该命令将其放入暂存区, 再使用git status检查当前文件状态
$ git add hello_world.py
$ git add README
想撤销错误添加到暂存区里的文件,可以输入以下命令:
$ git rm --cache 文件名
更多操作参考Git删除暂存区或版本库中的文件
每次对文件做了修改之后,使用git status检查当前文件状态
工作目录下的只有两种文件:已跟踪或未跟踪
工作目录下的文件有三个状态:未修改,已修改,已放入暂存区
$ git status
On branch master

No commits yet

Changes to be committed:
  (use "git rm --cached <file>..." to unstage)

	new file:   README
	new file:   hello_world.py

Untracked files:
  (use "git add <file>..." to include in what will be committed)

	.idea/
对于不需要跟踪的文件,需要创建一个名为 .gitignore 的文件,列出要忽略的文件模式。 比如我这里使用的是Python,先在工作目录下创建一个名为 .gitignore 的文件, 然后编辑.gitignore::
$ echo > .gitignore
$ vi .gitignore
$ git add .gitignore
$ git status
On branch master

No commits yet

Changes to be committed:
  (use "git rm --cached <file>..." to unstage)

	new file:   .gitignore
	new file:   README
	new file:   hello_world.py

Untracked files:
  (use "git add <file>..." to include in what will be committed)

	.idea/
输入以下要忽略的文件模式. 针对数十种项目及语言的 .gitignore 文件列表,在 https://github.com/github/gitignore 找到, 针对不同编辑环境,有一些不必要追踪的文件,比如Pycharm中的可以参考 https://github.com/github/gitignore/blob/master/Global/JetBrains.gitignore
下面我把两者放到了一起:
# Byte-compiled / optimized / DLL files
__pycache__/
*.py[cod]
*$py.class

# C extensions
*.so

# Distribution / packaging
.Python
build/
develop-eggs/
dist/
downloads/
eggs/
.eggs/
lib/
lib64/
parts/
sdist/
var/
wheels/
*.egg-info/
.installed.cfg
*.egg
MANIFEST

# PyInstaller
#  Usually these files are written by a python script from a template
#  before PyInstaller builds the exe, so as to inject date/other infos into it.
*.manifest
*.spec

# Installer logs
pip-log.txt
pip-delete-this-directory.txt

# Unit test / coverage reports
htmlcov/
.tox/
.nox/
.coverage
.coverage.*
.cache
nosetests.xml
coverage.xml
*.cover
.hypothesis/
.pytest_cache/

# Translations
*.mo
*.pot

# Django stuff:
*.log
local_settings.py
db.sqlite3

# Flask stuff:
instance/
.webassets-cache

# Scrapy stuff:
.scrapy

# Sphinx documentation
docs/_build/

# PyBuilder
target/

# Jupyter Notebook
.ipynb_checkpoints

# IPython
profile_default/
ipython_config.py

# pyenv
.python-version

# celery beat schedule file
celerybeat-schedule

# SageMath parsed files
*.sage.py

# Environments
.env
.venv
env/
venv/
ENV/
env.bak/
venv.bak/

# Spyder project settings
.spyderproject
.spyproject

# Rope project settings
.ropeproject

# mkdocs documentation
/site

# mypy
.mypy_cache/
.dmypy.json
dmypy.json

# Pyre type checker
.pyre/
# Covers JetBrains IDEs: IntelliJ, RubyMine, PhpStorm, AppCode, PyCharm, CLion, Android Studio and WebStorm
# Reference: https://intellij-support.jetbrains.com/hc/en-us/articles/206544839

# User-specific stuff
.idea/**/workspace.xml
.idea/**/tasks.xml
.idea/**/usage.statistics.xml
.idea/**/dictionaries
.idea/**/shelf

# Generated files
.idea/**/contentModel.xml

# Sensitive or high-churn files
.idea/**/dataSources/
.idea/**/dataSources.ids
.idea/**/dataSources.local.xml
.idea/**/sqlDataSources.xml
.idea/**/dynamic.xml
.idea/**/uiDesigner.xml
.idea/**/dbnavigator.xml

# Gradle
.idea/**/gradle.xml
.idea/**/libraries

# Gradle and Maven with auto-import
# When using Gradle or Maven with auto-import, you should exclude module files,
# since they will be recreated, and may cause churn.  Uncomment if using
# auto-import.
# .idea/modules.xml
# .idea/*.iml
# .idea/modules

# CMake
cmake-build-*/

# Mongo Explorer plugin
.idea/**/mongoSettings.xml

# File-based project format
*.iws

# IntelliJ
out/

# mpeltonen/sbt-idea plugin
.idea_modules/

# JIRA plugin
atlassian-ide-plugin.xml

# Cursive Clojure plugin
.idea/replstate.xml

# Crashlytics plugin (for Android Studio and IntelliJ)
com_crashlytics_export_strings.xml
crashlytics.properties
crashlytics-build.properties
fabric.properties

# Editor-based Rest Client
.idea/httpRequests

# Android studio 3.1+ serialized cache file
.idea/caches/build_file_checksums.ser
使用git diff查看已暂存和未暂存具体修改了什么地方
不加参数直接输入 git diff:比较的是工作目录中当前文件和暂存区域快照之间的差异, 也就是修改之后还没有暂存起来的变化内容。
我在README中添加了一句话:Use ‘git diff’ to see the difference!
查看其状态,未放到暂存区
$ vi README
$ git status
On branch master
Changes to be committed:
  (use "git reset HEAD <file>..." to unstage)

	new file:   .gitignore
	new file:   README
	new file:   hello_github.py

Changes not staged for commit:
  (use "git add <file>..." to update what will be committed)
  (use "git checkout -- <file>..." to discard changes in working directory)

	modified:   README

Untracked files:
  (use "git add <file>..." to include in what will be committed)

	.idea/
查看不同
$ git diff
diff --git a/README b/README
index 461a328..b04018c 100644
--- a/README
+++ b/README
@@ -1 +1,2 @@
 This is a Test project!
+Use 'git diff' to see the difference!
使用git diff --staged或者git diff --cached查看已暂存的文件做了哪些修改。
$ git diff --cached
# 这里会列出你做过的所有文件,以及每个文件做了哪些修改
# 我在README, .gitignore都做了修改,添加的内容太多,不贴出来了。
查看不同命令总结:
git diff # 比较当前文件和暂存区文件差异 git diff
git diff # 比较两次提交之间的差异
git diff … # 在两个分支之间比较
git diff --staged # 比较暂存区和版本库差异
git diff --cached # 比较暂存区和版本库差异
git diff --stat # 仅仅比较统计信息
git summit
这种方式会启动文本编辑器以便输入本次提交的说明。
# Please enter the commit message for your changes. Lines starting
# with '#' will be ignored, and an empty message aborts the commit.
#
# On branch master
# Changes to be committed:
#       new file:   .gitignore
#       new file:   README
#       new file:   hello_github.py
#
# Untracked files:
#       .idea/
#
~
~
~
~
~
~
~
~
~
~
"~/PycharmProjects/hello_world/.git/COMMIT_EDITMSG" 13L, 292C
在 commit 命令后添加 -m 选项,将提交信息与命令放在同一行, 比如这里添加说明:‘initial project version’
$ git commit -m 'initial project version'
[master (root-commit) f8ccf5d] initial project version
 3 files changed, 183 insertions(+)
 create mode 100644 .gitignore
 create mode 100644 README
 create mode 100644 hello_world.py
git br -r # 查看远程分支
git br <new_branch> # 创建新的分支
git br -v # 查看各个分支最后提交信息
git br --merged # 查看已经被合并到当前分支的分支
git br --no-merged # 查看尚未被合并到当前分支的分支
git co # 切换到某个分支
git co -b <new_branch> # 创建新的分支,并且切换过去
git co -b <new_branch> # 基于branch创建新的new_branch
git co $id # 把某次历史提交记录checkout出来,但无分支信息,切换到其他分支会自动删除
git co $id -b <new_branch> # 把某次历史提交记录checkout出来,创建成一个分支
git br -d # 删除某个分支
git br -D # 强制删除某个分支 (未被合并的分支被删除的时候需要强制)
git help # 显示command的help
git show # 显示某次提交的内容 git show KaTeX parse error: Expected 'EOF', got '#' at position 21: …t co -- <file> #̲ 抛弃工作区修改
git co…id> # 恢复某次提交的状态,恢复动作本身也创建次提交对象
git revert HEAD # 恢复最后一次提交的状态
这里不讲怎么搭建Git服务器,而是使用第三方github托管,有兴趣搭建自己Git服务器的可以看看前文提到的书。在github上创建一个空的repository完成后会有这些提示: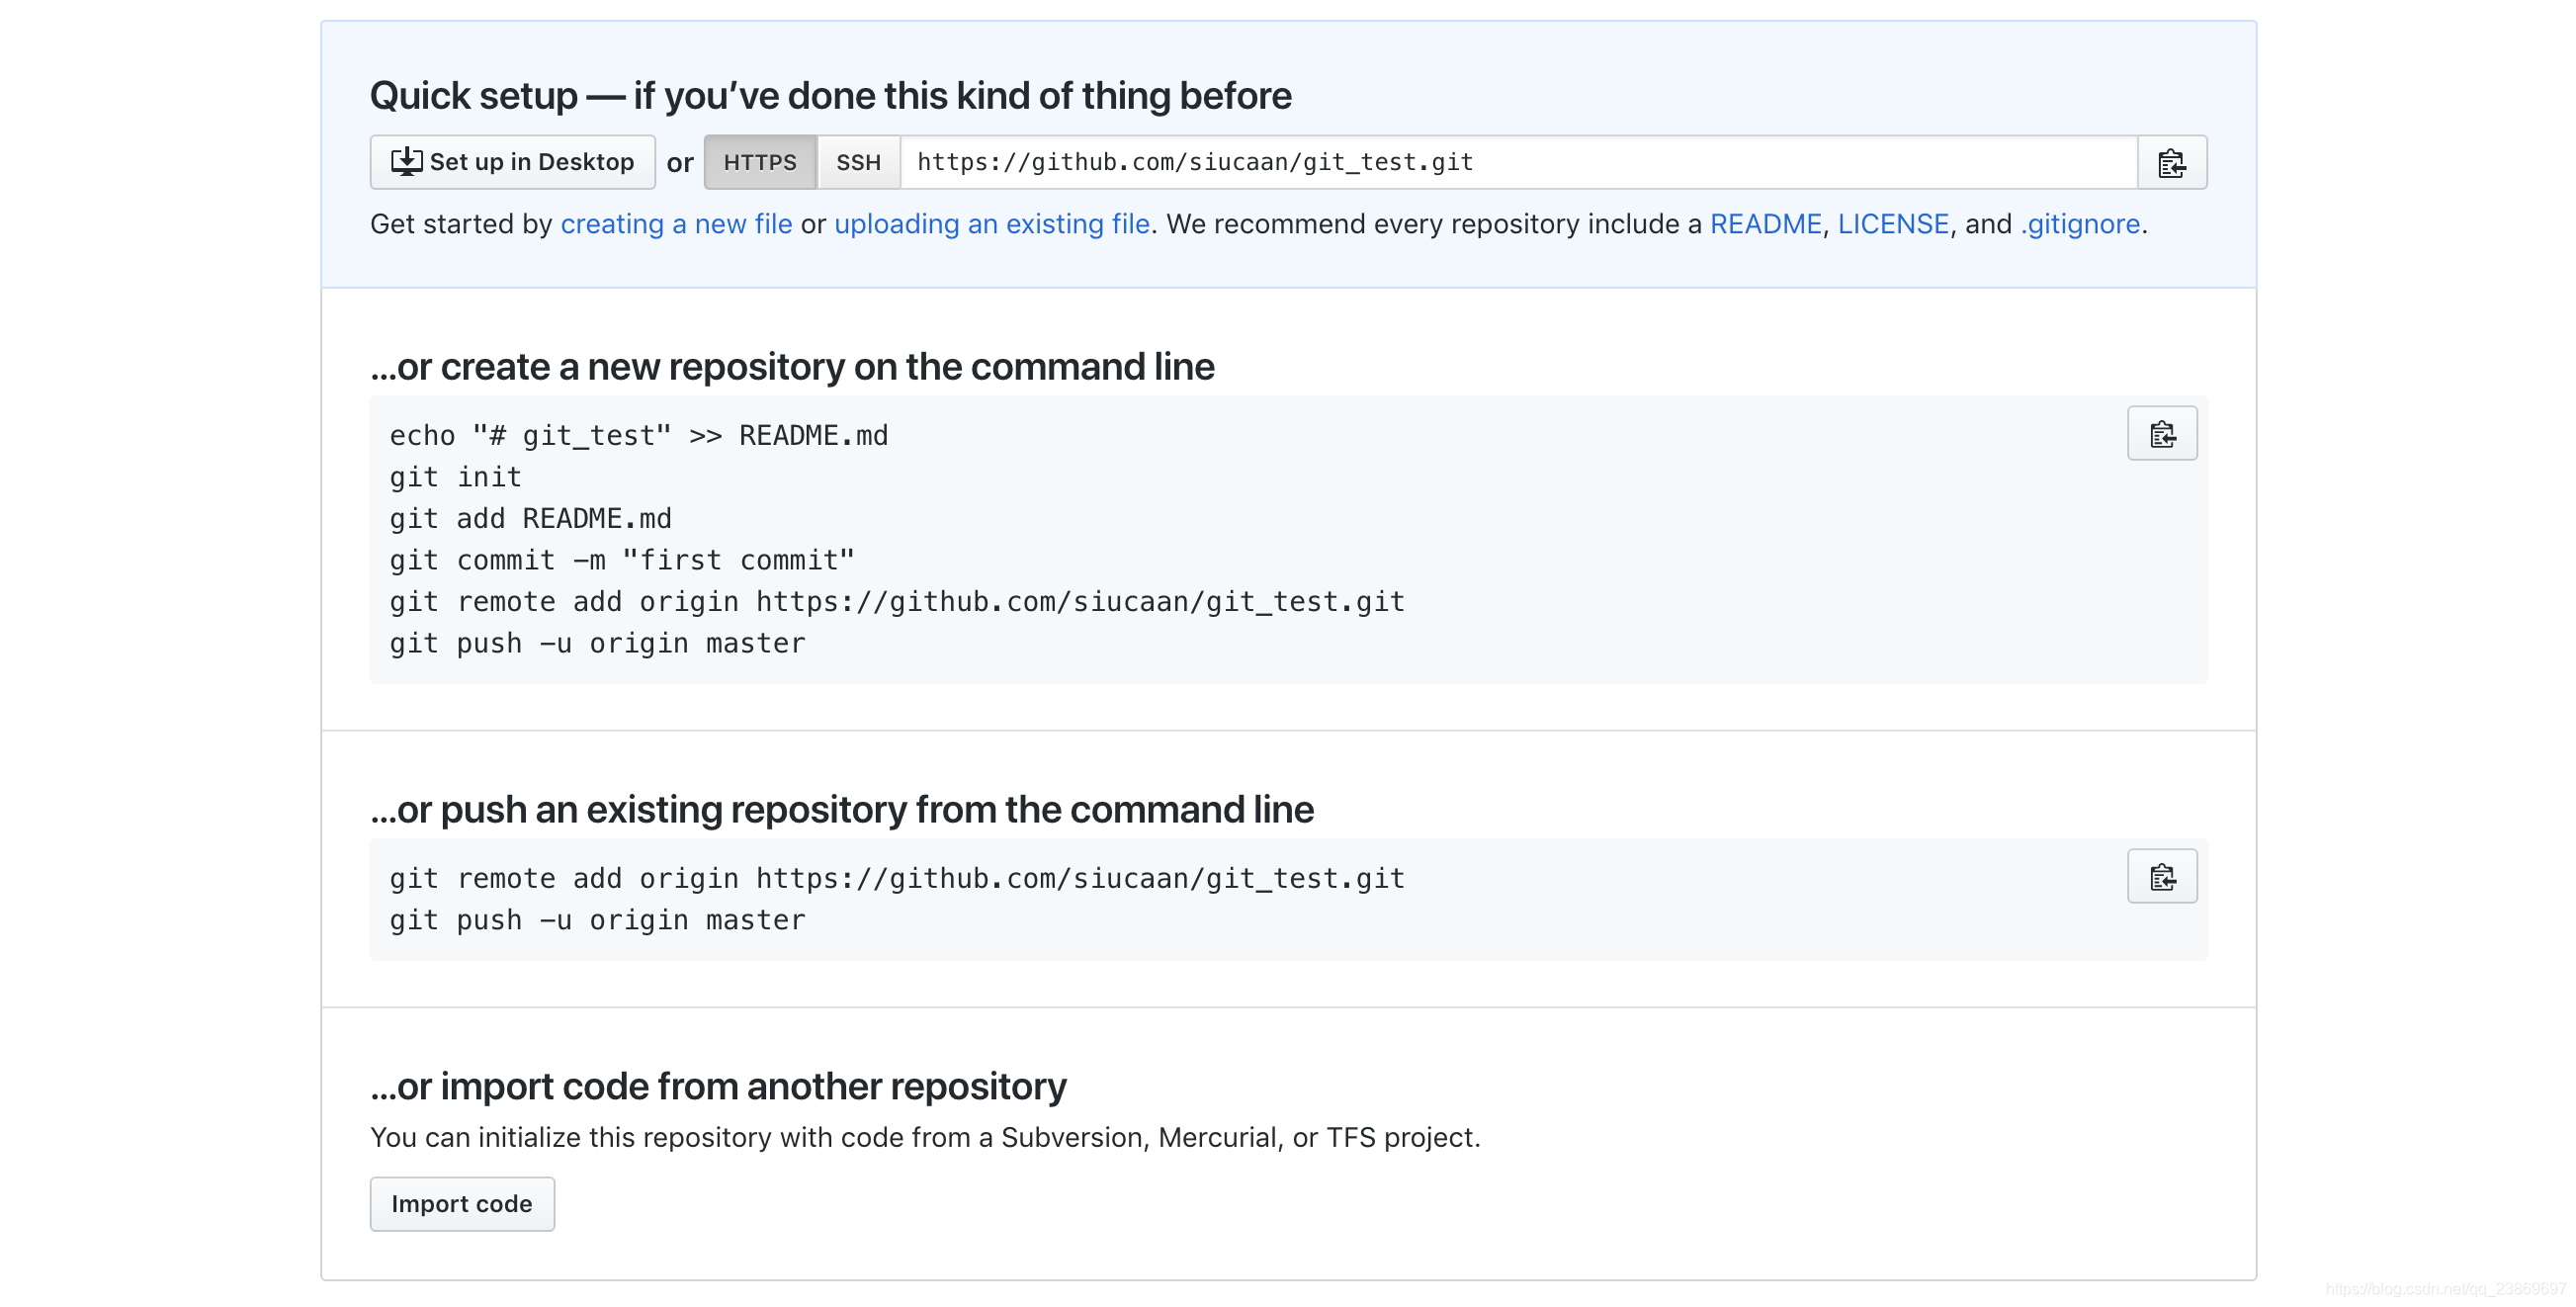
因为我上面已经创建了一个本地的仓库,所以我直接push一个本地存在的仓库。按照提示在命令行输入:
$ git remote add origin https://github.com/siucaan/git_test.git
$ git push -u origin master
Enumerating objects: 7, done.
Counting objects: 100% (7/7), done.
Delta compression using up to 8 threads
Compressing objects: 100% (5/5), done.
Writing objects: 100% (7/7), 1.85 KiB | 1.85 MiB/s, done.
Total 7 (delta 1), reused 0 (delta 0)
remote: Resolving deltas: 100% (1/1), done.
remote:
remote: Create a pull request for 'master' on GitHub by visiting:
remote:      https://github.com/siucaan/git_test/pull/new/master
remote:
To https://github.com/siucaan/git_test.git
 * [new branch]      master -> master
Branch 'master' set up to track remote branch 'master' from 'origin'.
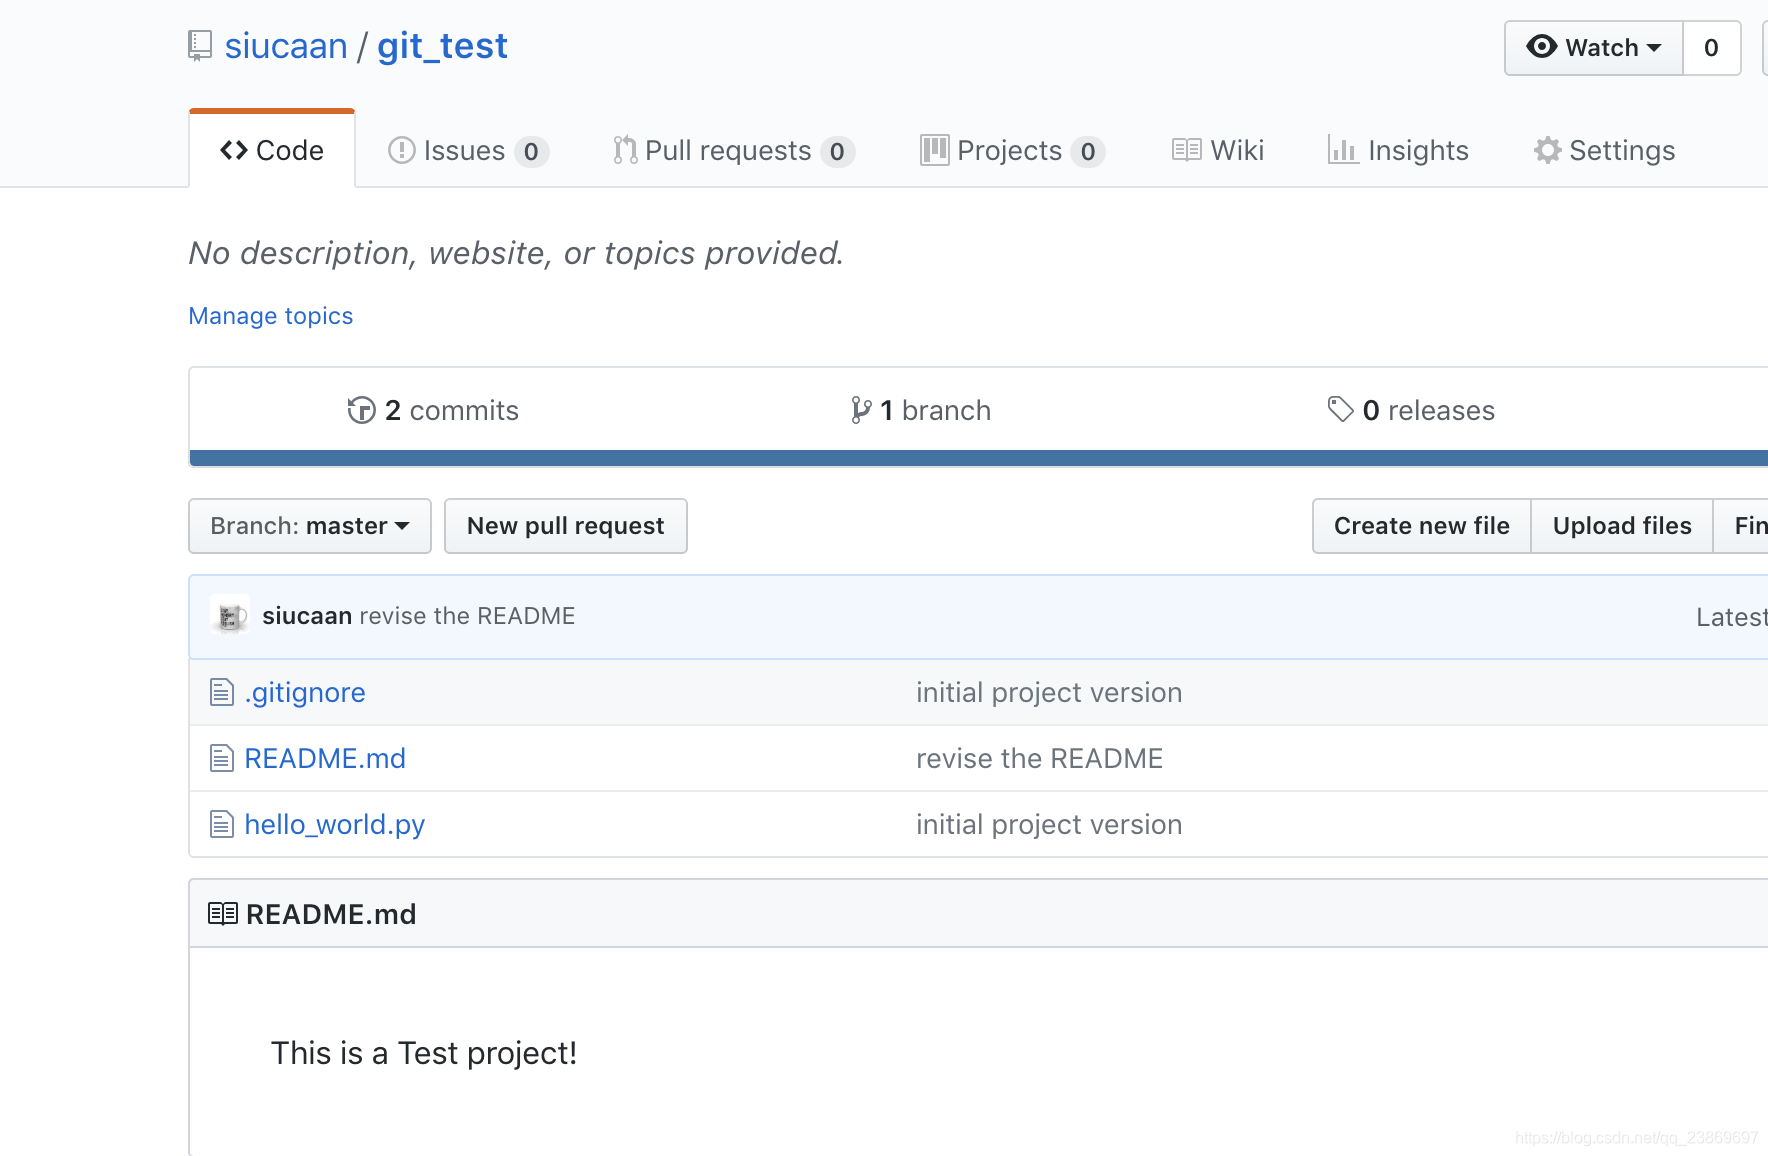
此时,已经将本地的仓库同步到了github远程仓库,之前建立的本地仓库的文件已经上传到了github。
修改的步骤想前面所说:先做修改,然后git add添加将其放入暂存区,再使用 git commit完成本地仓库。(克隆现有的仓库到本地时直接就建立了一个完整的本地仓库,所以要修改本地仓库并将其推送到远程仓库操作是一样的。建议先fork到自己的账号下,然后使用git clone自己账户下的到本地,这样你做的修改只在自己的分支上。如果不使用pull request,你分支的修改不会对其他分支产生影响。)
使用命令推送到远程仓库:git push [remote-name] [branch-name]
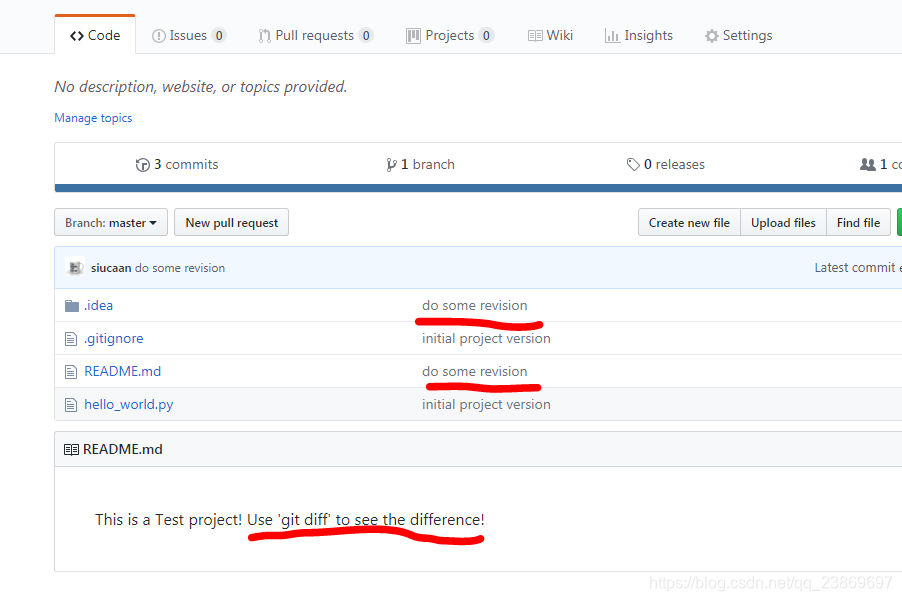
之前展示git diff时添加的一句话没有commit,我还错误地把.idea给add了并commit. 使用git reset是可以对提交的东西修改或者放弃的,我没有尝试。
$ git add .
$ git commit -m 'do some revision'
$ git push
git log git log # 查看该文件每次提交记录
git log -p # 查看每次详细修改内容的diff
git log -p -2 # 查看最近两次详细修改内容的diff
git log --stat #查看提交统计信息
Git远程分支管理
git clone --bare robbin_site robbin_site.git # 用带版本的项目创建纯版本仓库
scp -r my_project.git git@ git.csdn.net:~ # 将纯仓库上传到服务器上
mkdir robbin_site.git && cd robbin_site.git && git --bare init # 在服务器创建纯仓库
git remote add origin git@ github.com:robbin/robbin_site.git # 设置远程仓库地址
git push -u origin master # 客户端首次提交
git push -u origin develop # 首次将本地develop分支提交到远程develop分支,并且track
git remote set-head origin master # 设置远程仓库的HEAD指向master分支
git pull # 抓取远程仓库所有分支更新并合并到本地
git pull --no-ff # 抓取远程仓库所有分支更新并合并到本地,不要快进合并
git fetch origin # 抓取远程仓库更新
git merge origin/master # 将远程主分支合并到本地当前分支
git co --track origin/branch # 跟踪某个远程分支创建相应的本地分支
git co -b <local_branch> origin/<remote_branch> # 基于远程分支创建本地分支,功能同上
git push origin master # 将本地主分支推到远程主分支
git push -u origin master # 将本地主分支推到远程(如无远程主分支则创建,用于初始化远程仓库)
git push origin <local_branch> # 创建远程分支, origin是远程仓库名
git push origin <local_branch>:<remote_branch> # 创建远程分支
git push origin :<remote_branch> #先删除本地分支(git br -d ),然后再push删除远程分支
git remote -v # 查看远程服务器地址和仓库名称
git remote show origin # 查看远程服务器仓库状态
git remote add origin git@ github:robbin/robbin_site.git # 添加远程仓库地址
git remote set-url origin git@ github.com:robbin/robbin_site.git # 设置远程仓库地址(用于修改远程仓库地址)
git remote rm # 删除远程仓库
啃了老半天链接1的书,才发现链接2给了很好的精华版,手把手教怎么使用github托管。学东西就是重复造轮T_T 鱼块。
如果觉得我的文章对您有用,请随意打赏。你的支持将鼓励我继续创作!
