社区微信群开通啦,扫一扫抢先加入社区官方微信群

社区微信群
Java Caching定义了5个核心接口,分别是CachingProvider、CacheManager、Cache、Entry和Expiry。

<!-- jsr107缓存 -->
<dependency>
    <groupId>javax.cache</groupId>
    <artifactId>cache-api</artifactId>
</dependency>
Spring从3.1开始定义了org.springframework.cache.Cache和org.springframework.cache.CacheManager接口来统一不同的缓存技术;并支持使用JCache(JSR-107)注解简化我们开发;
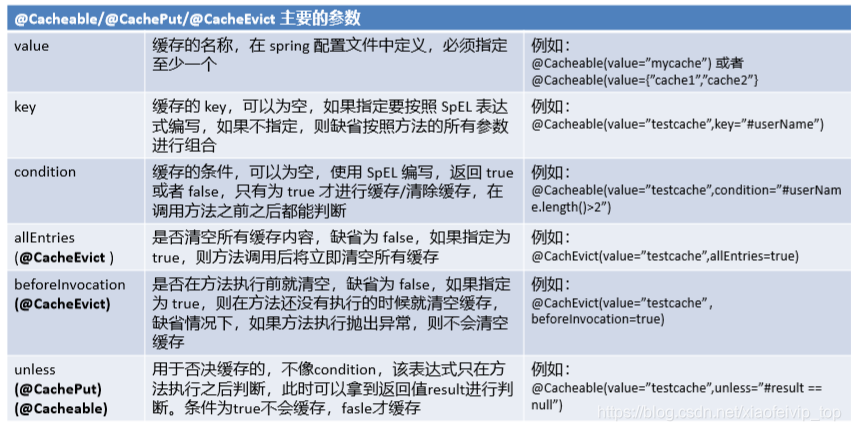
| Cache | 缓存接口,定义缓存操作。实现有:RedisCache、EhCacheCache、ConcurrentMapCache等 |
|---|---|
| CacheManager | 缓存管理器,管理各种缓存(Cache)组件 |
| @Cacheable | 主要针对方法配置,能够根据方法的请求参数对其结果进行缓存 |
| @CacheEvict | 清空缓存 |
| @CachePut | 保证方法被调用,又希望结果被缓存。 |
| @EnableCaching | 开启基于注解的缓存 |
| keyGenerator | 缓存数据时key生成策略 |
| serialize | 缓存数据时value序列化策略 |
1、首先需要在主启动类上面加上:@EnableCaching
2、在Servie方法上面添加: @Cacheable
# 修改端口号
server.port=80

# 数据库配置
spring.datasource.url=jdbc:mysql://127.0.0.1:3306/mp?serverTimezone=UTC
spring.datasource.username=root
spring.datasource.password=root
spring.datasource.driver-class-name=com.mysql.cj.jdbc.Driver

# 开启驼峰命名规则

mybatis-plus.configuration.map-underscore-to-camel-case=true

# 打印sql
logging.level.top.xf.springbootcache.mapper=debug

# debug=true
/**
* 将方法的运行结果进行缓存,以后需要相同的数据就会直接从缓存中获取
* <p>
* <p>
* 几个属性:
* cacheNames/value: 指定缓存的名称
* key: 缓存数据使用的key
* condition: 指定符合条件的情况才进行缓存 condition = "#a0 > 0 and ...." (a0 代表第一个参数)
* unless:否定缓存 当unless指定条件为true则不缓存跟condition相反
* sync: 是否使用异步模式
* <p>
* 运行流程:
* 1、方法运行前,先去查Cache(缓存组件),按照cacheNames指定名字获取;
* 如果没有Cache获取缓存是自动创建出来;
* 2、去Cache查找缓存的内容,使用一个key,默认就是方法的参数;
* 3、没有查询到缓存就调用目标方法;
* 4、将目标方法返回的结果放进缓存中;
*/
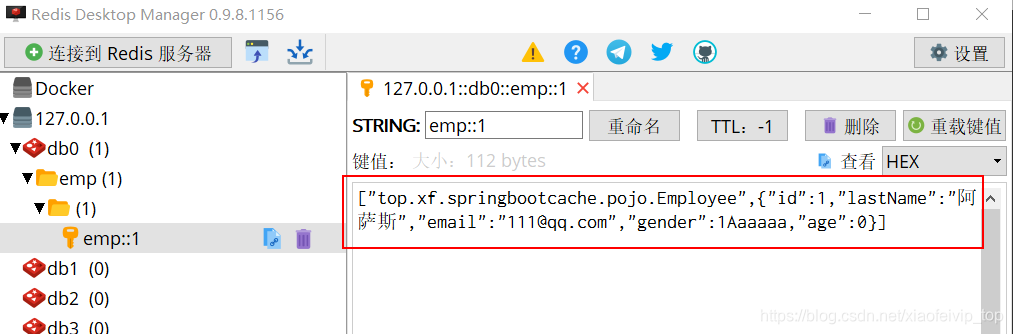
@Cacheable(value = "emp",cacheNames = "emp")
public Employee getEmp(Integer id) {
System.err.println("查询" + id + "号员工");
return employeeMapper.selectEmpById(id);
}
第一次查询: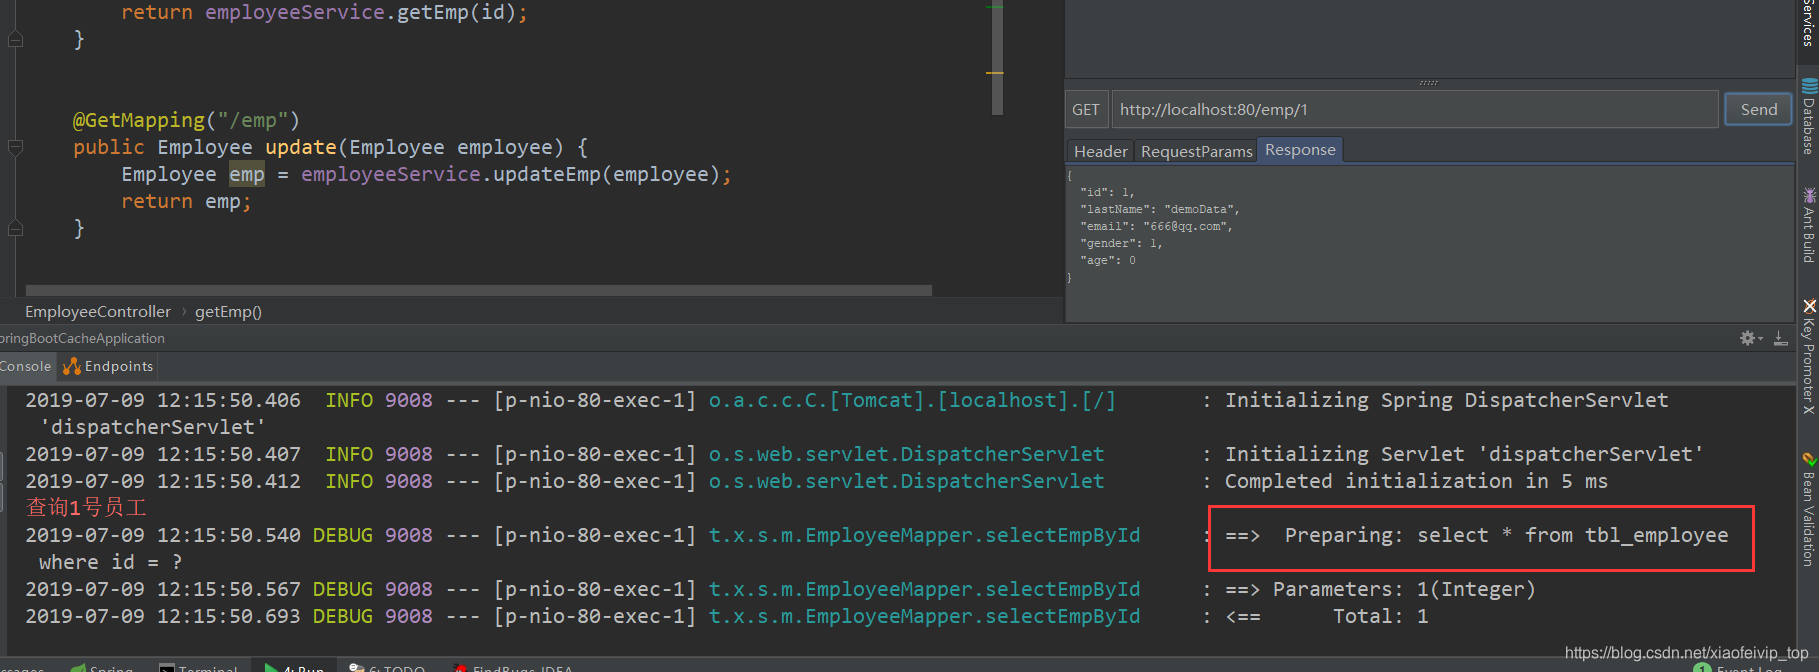
第二次查询: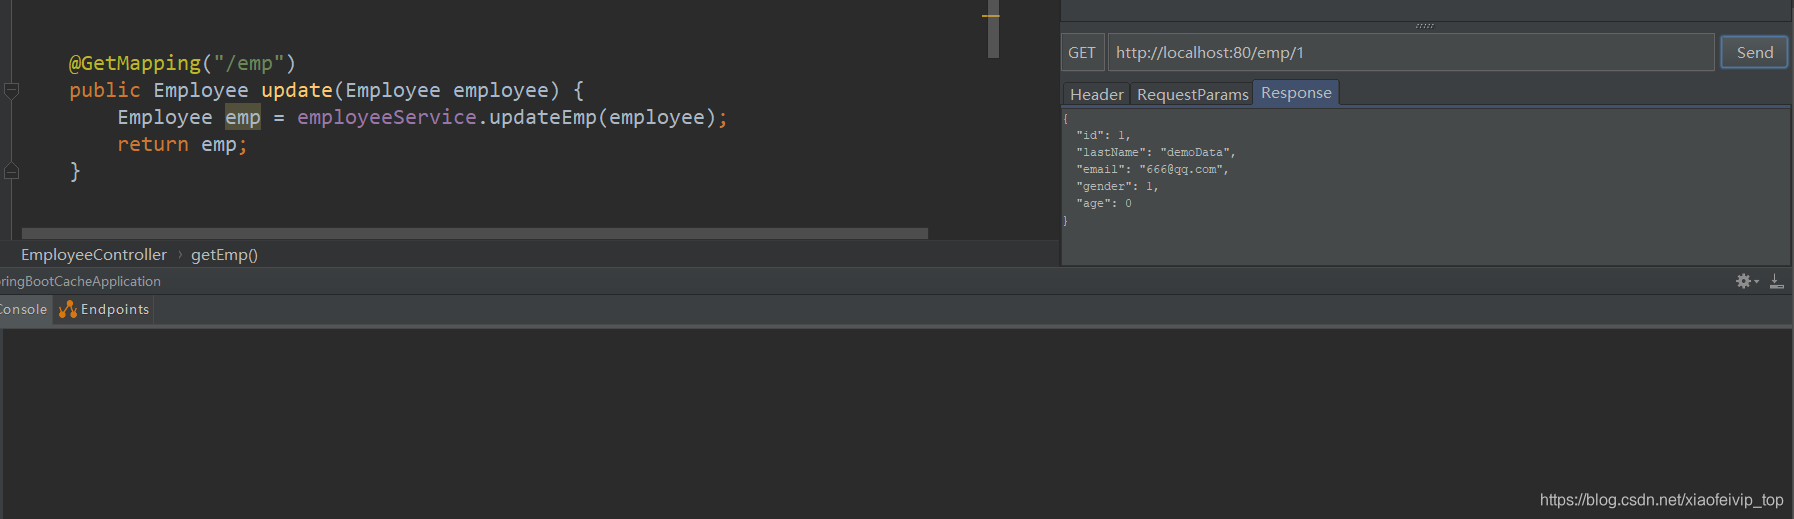
 /**
     * @CachePut: 即调用方法,有更新缓存数据;
     *
     * 运行实际:
     * 1.先调用目标方法
     * 2.将目标方法结果缓存起来
     * key = "#employee.id"
     * key = "#result.id" 拿返回值的ID
     */

    @CachePut(value = "emp", key = "#result.id")
    public Employee updateEmp(Employee employee) {
        System.err.println("更新员工信息");
        employee.setId(13);
        employee.setAge(0);
        employee.setEmail("111@qq.com");
        employee.setGender(1);
        employeeMapper.updateEmp(employee);
        return employee;
    }
第一步先查询: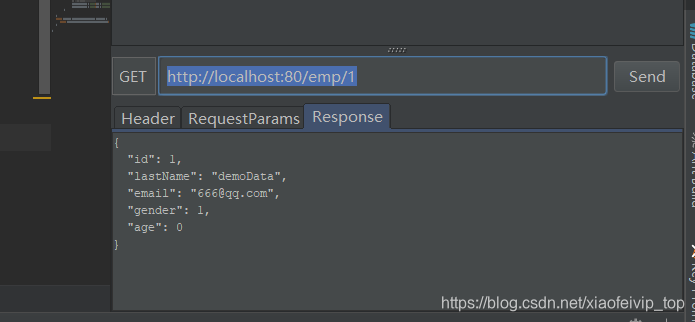
第二步更新Id=1的员工: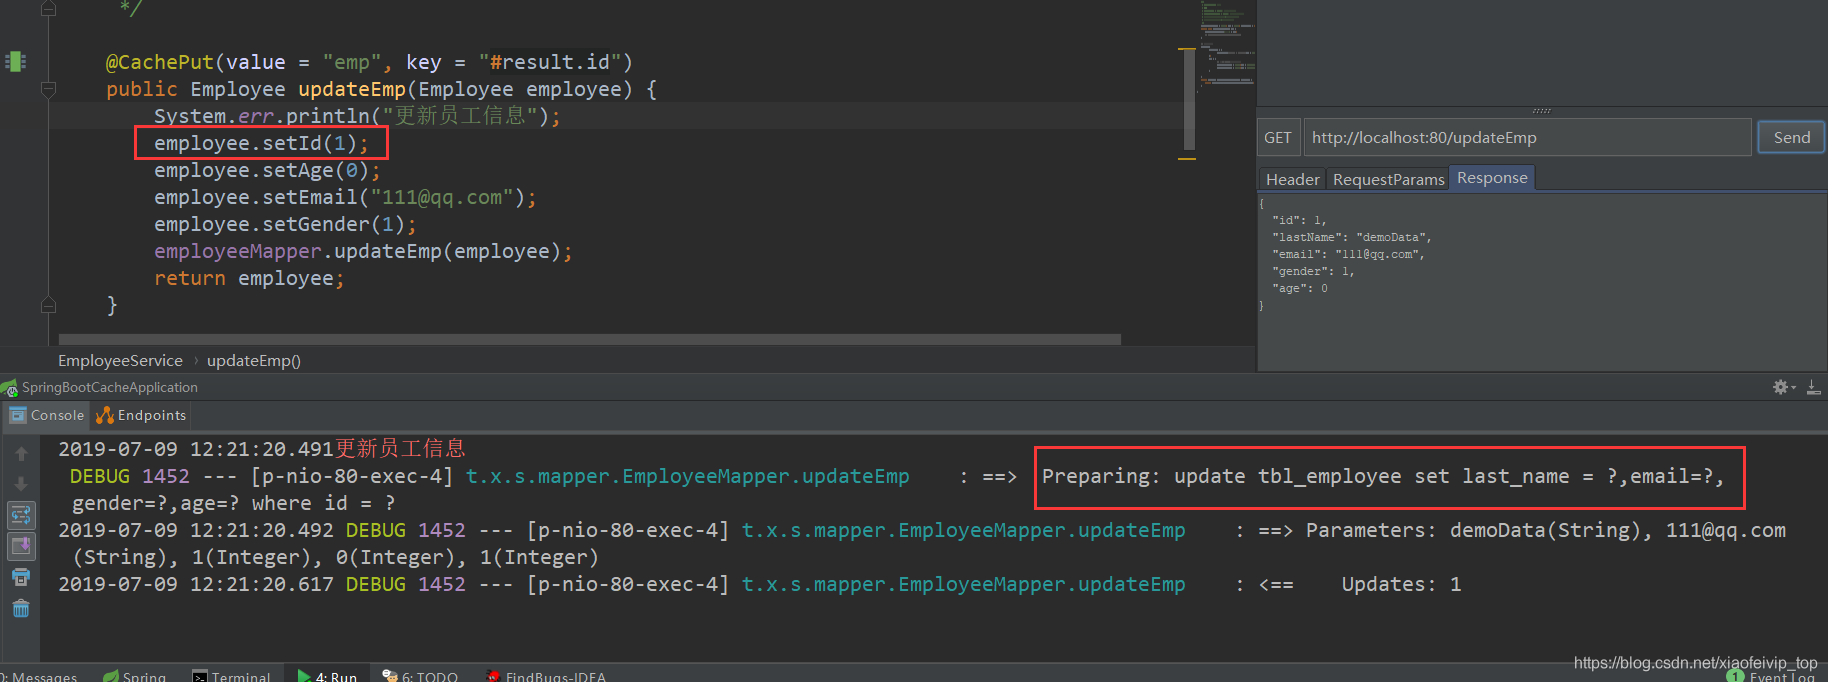
第二步查询id=1的员工: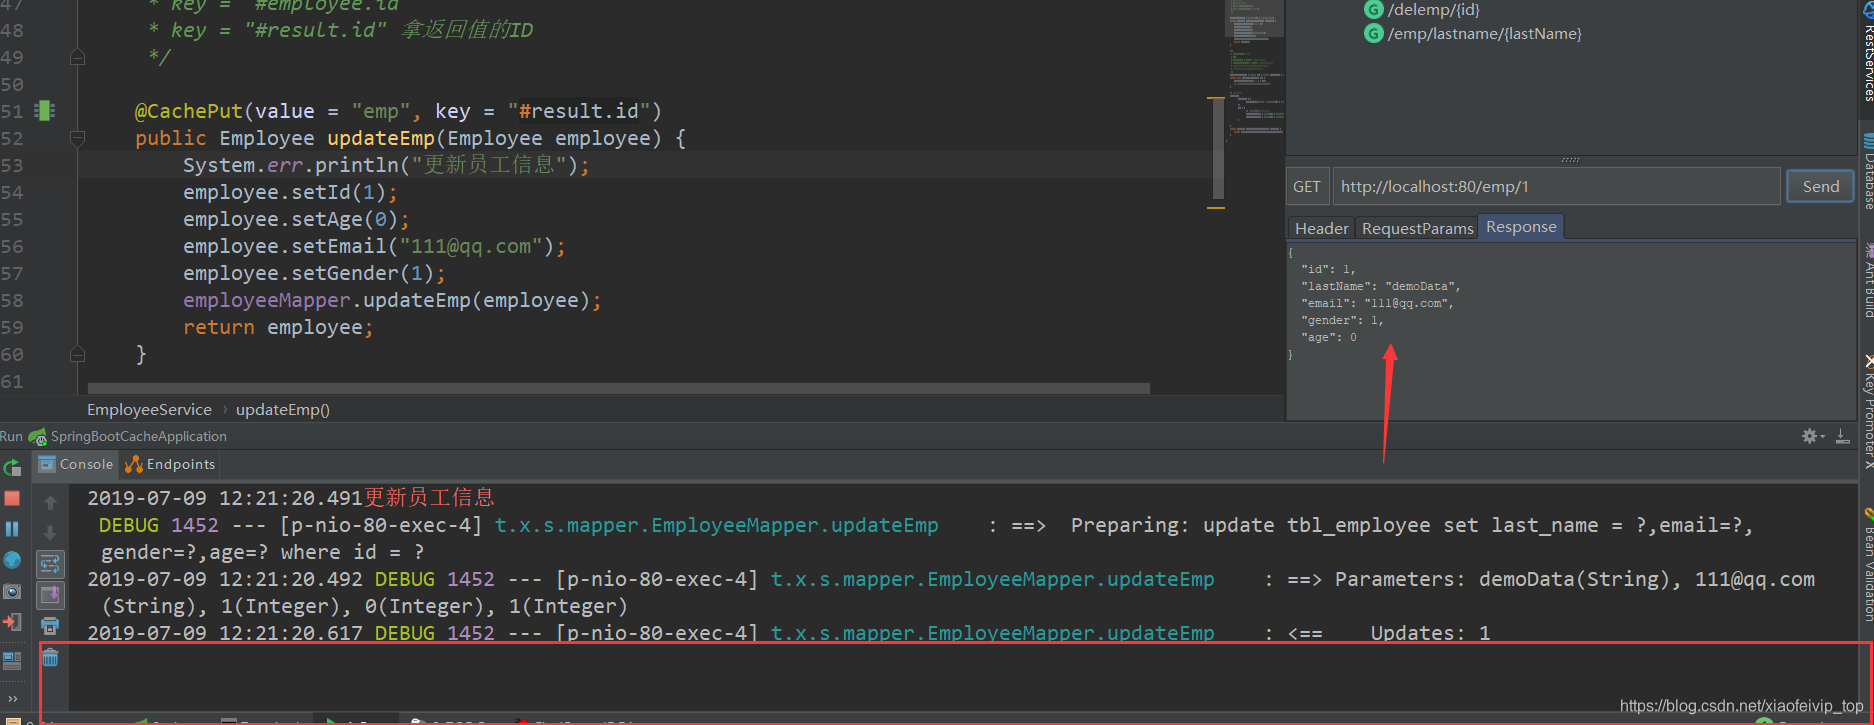
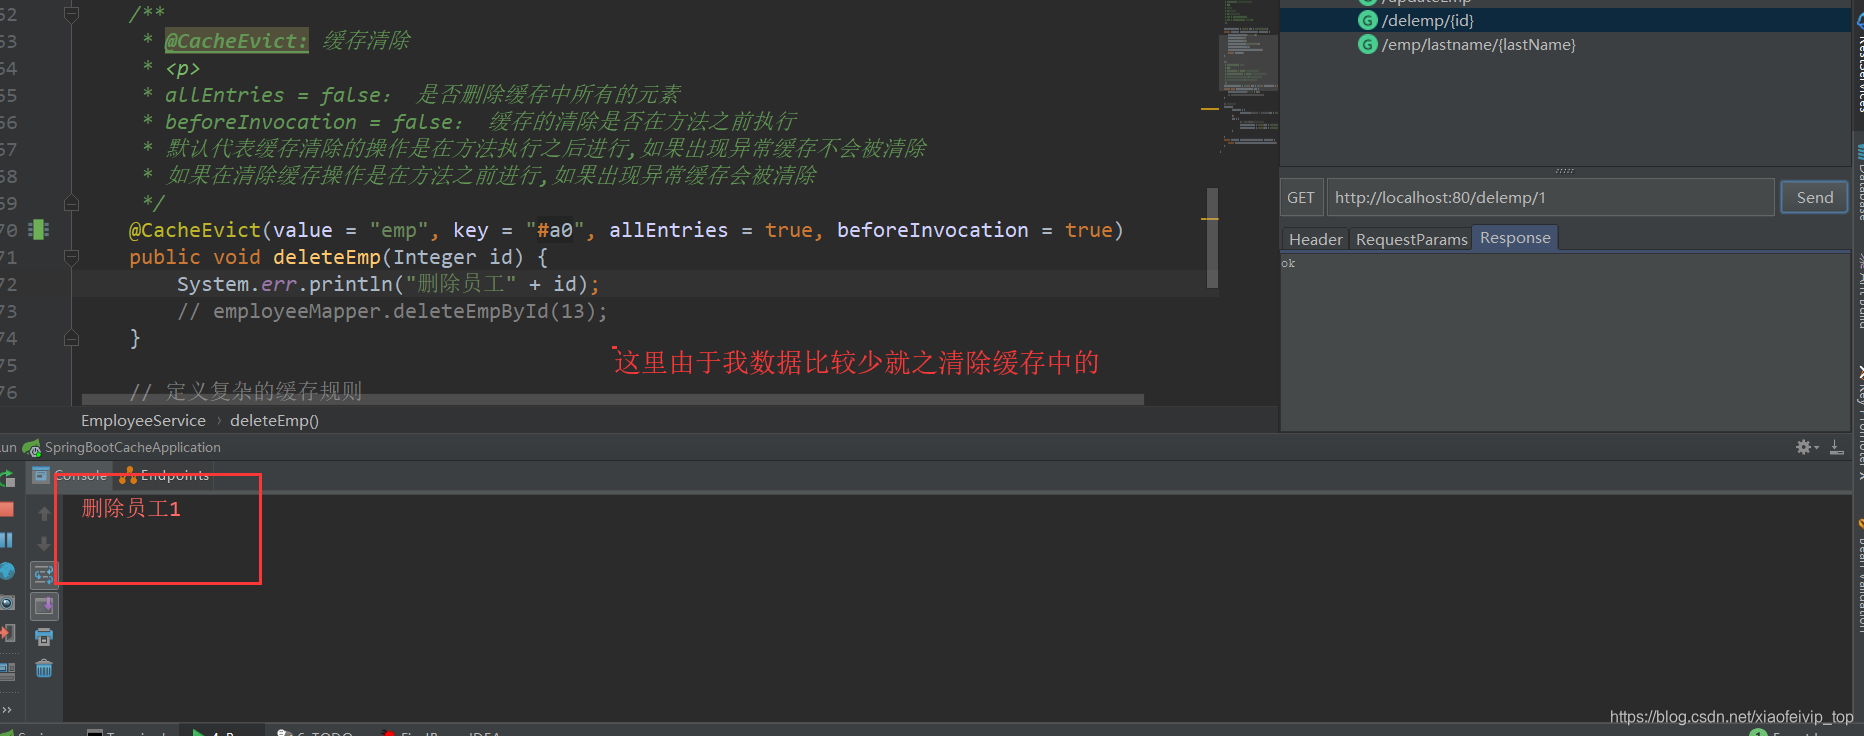
/**
     * @CacheEvict: 缓存清除
     *
     * allEntries = false: 是否删除缓存中所有的元素
     * beforeInvocation = false: 缓存的清除是否在方法之前执行
     * 默认代表缓存清除的操作是在方法执行之后进行,如果出现异常缓存不会被清除
     * 如果在清除缓存操作是在方法之前进行,如果出现异常缓存会被清除
     */
    @CacheEvict(value = "emp", key = "#a0", allEntries = true, beforeInvocation = true)
    public void deleteEmp(Integer id) {
        System.err.println("删除员工" + id);
    }
第一步查询id=1的员工: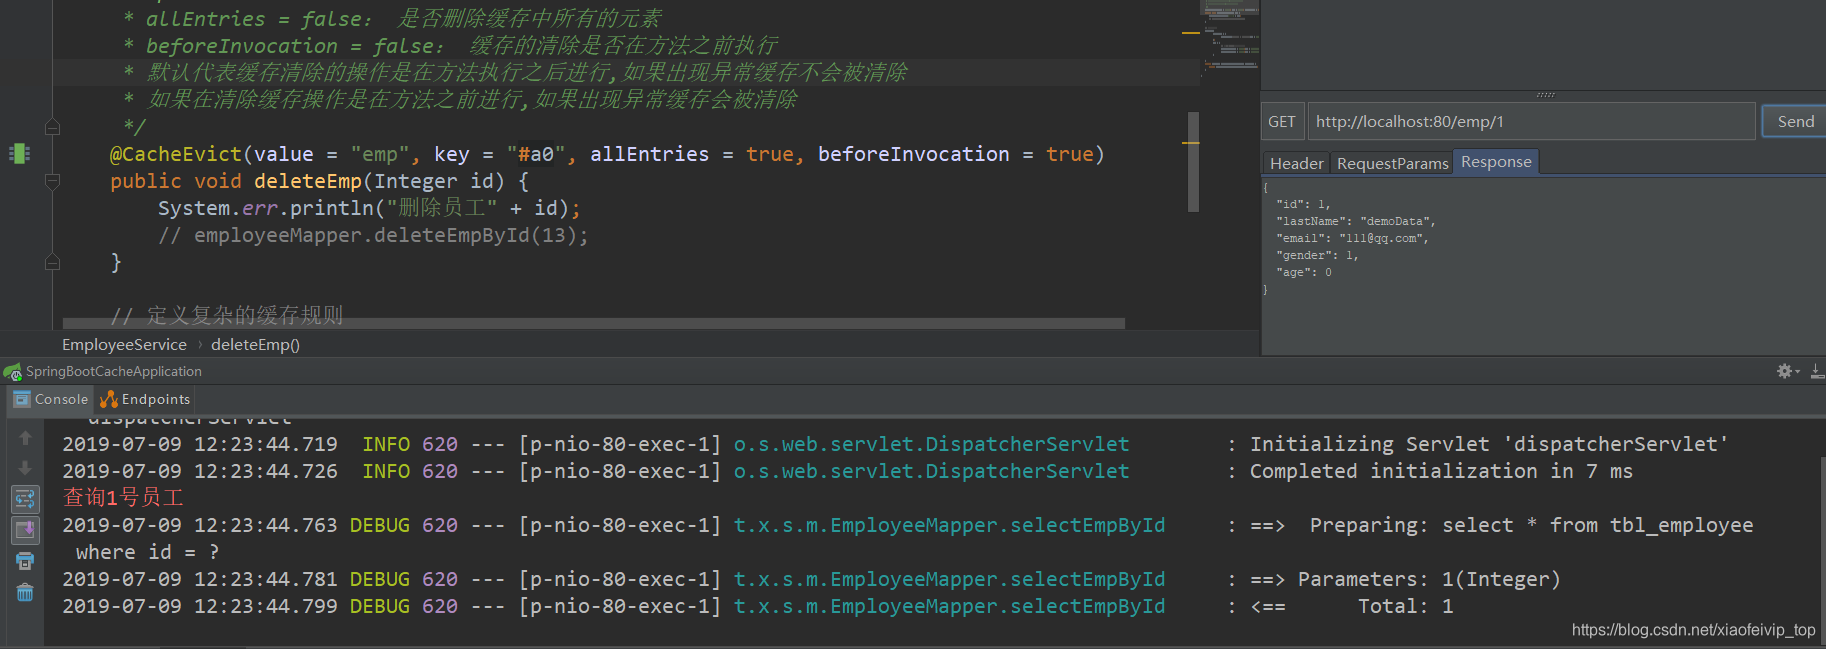
第二步清空控制台在查询id=1的员工: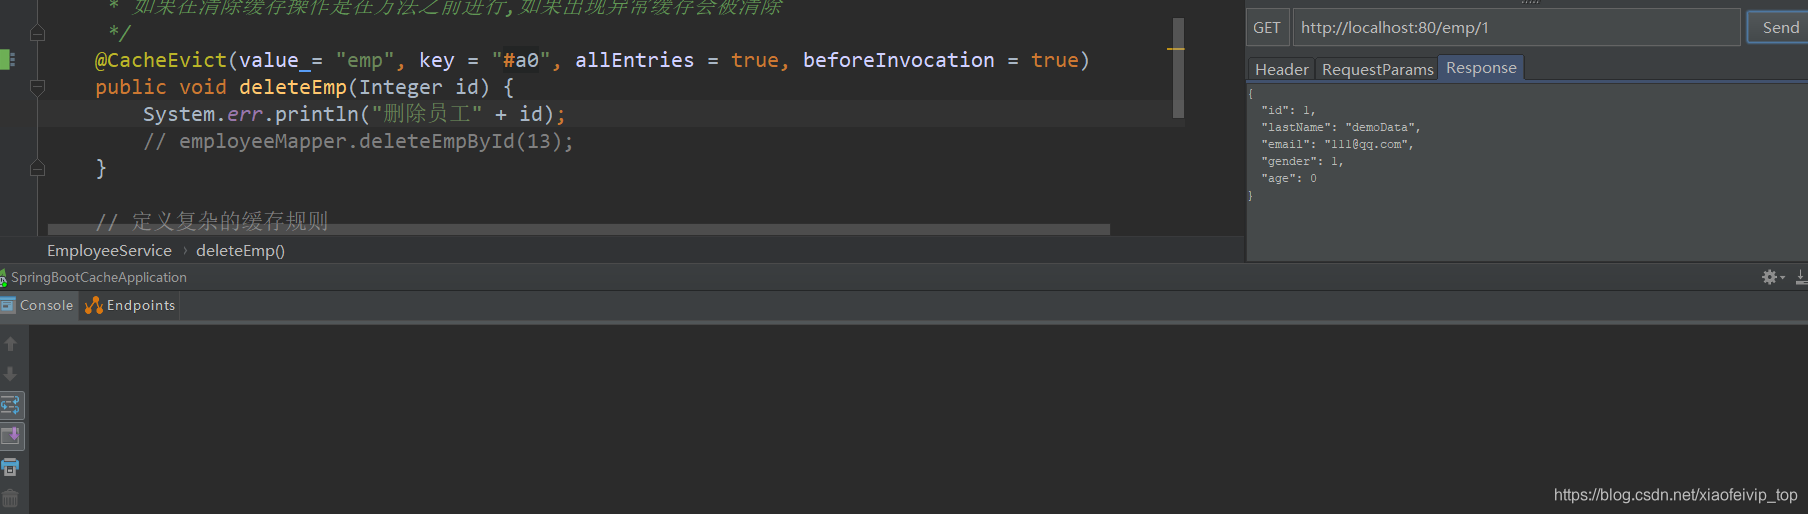
第三步删除id=1的员工:
第四步再次查询id=1的员工: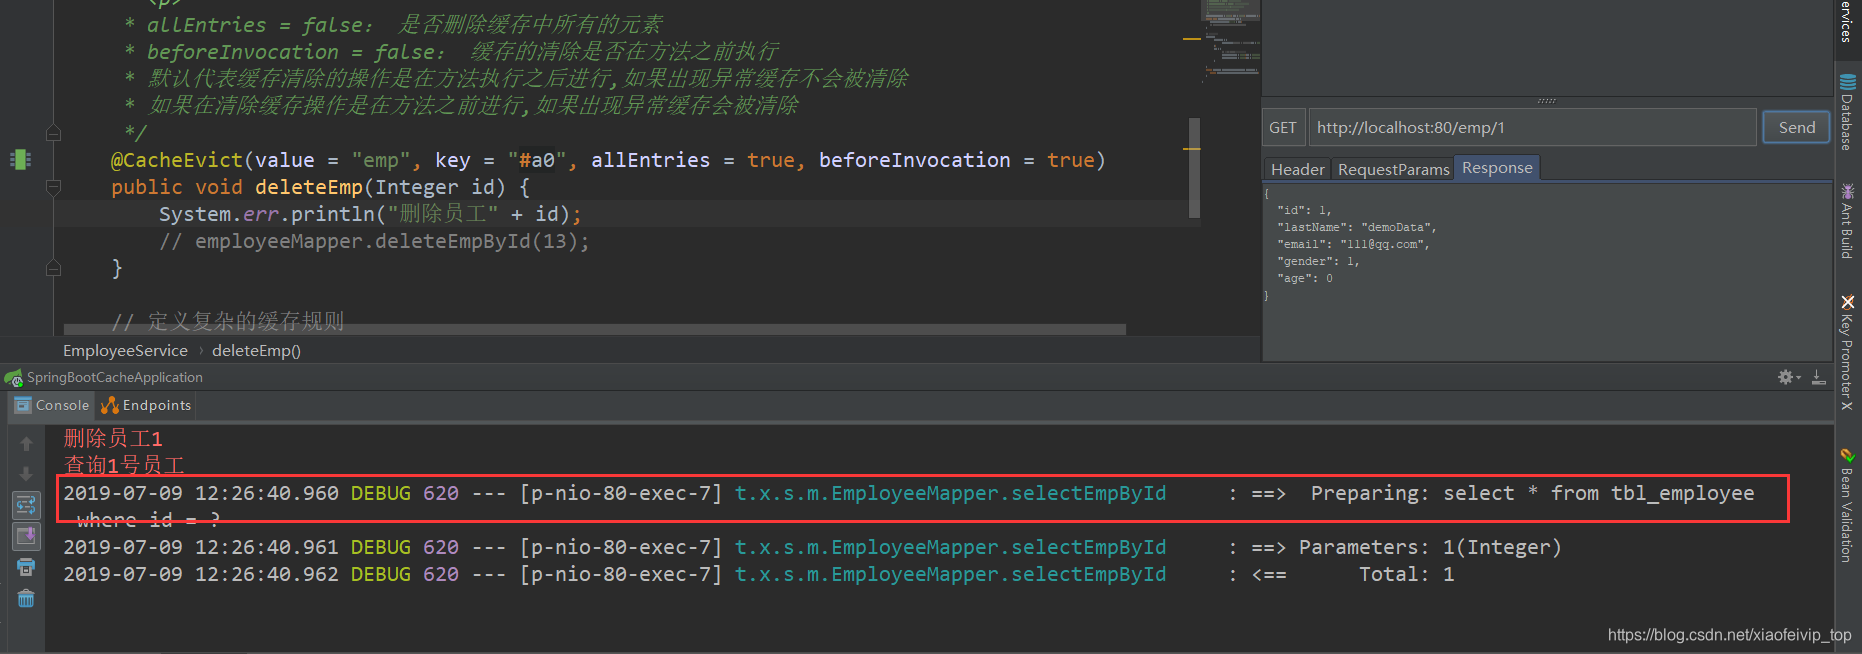
// 定义复杂的缓存规则
    @Caching(
            cacheable = {
                    @Cacheable(/*value = "emp",*/key = "#lastName")
            },
            put = {
                    // 利用ID和email查询就会直接查询缓存了
                    @CachePut(value = "emp",key = "#result.id"),
                    @CachePut(value = "emp",key = "#result.email")
            }

    )
    public Employee getEmpByLastName(String lastName) {
        return employeeMapper.getEmpByLastName(lastName);
    }
第一步重启服务器根据名称查询员工: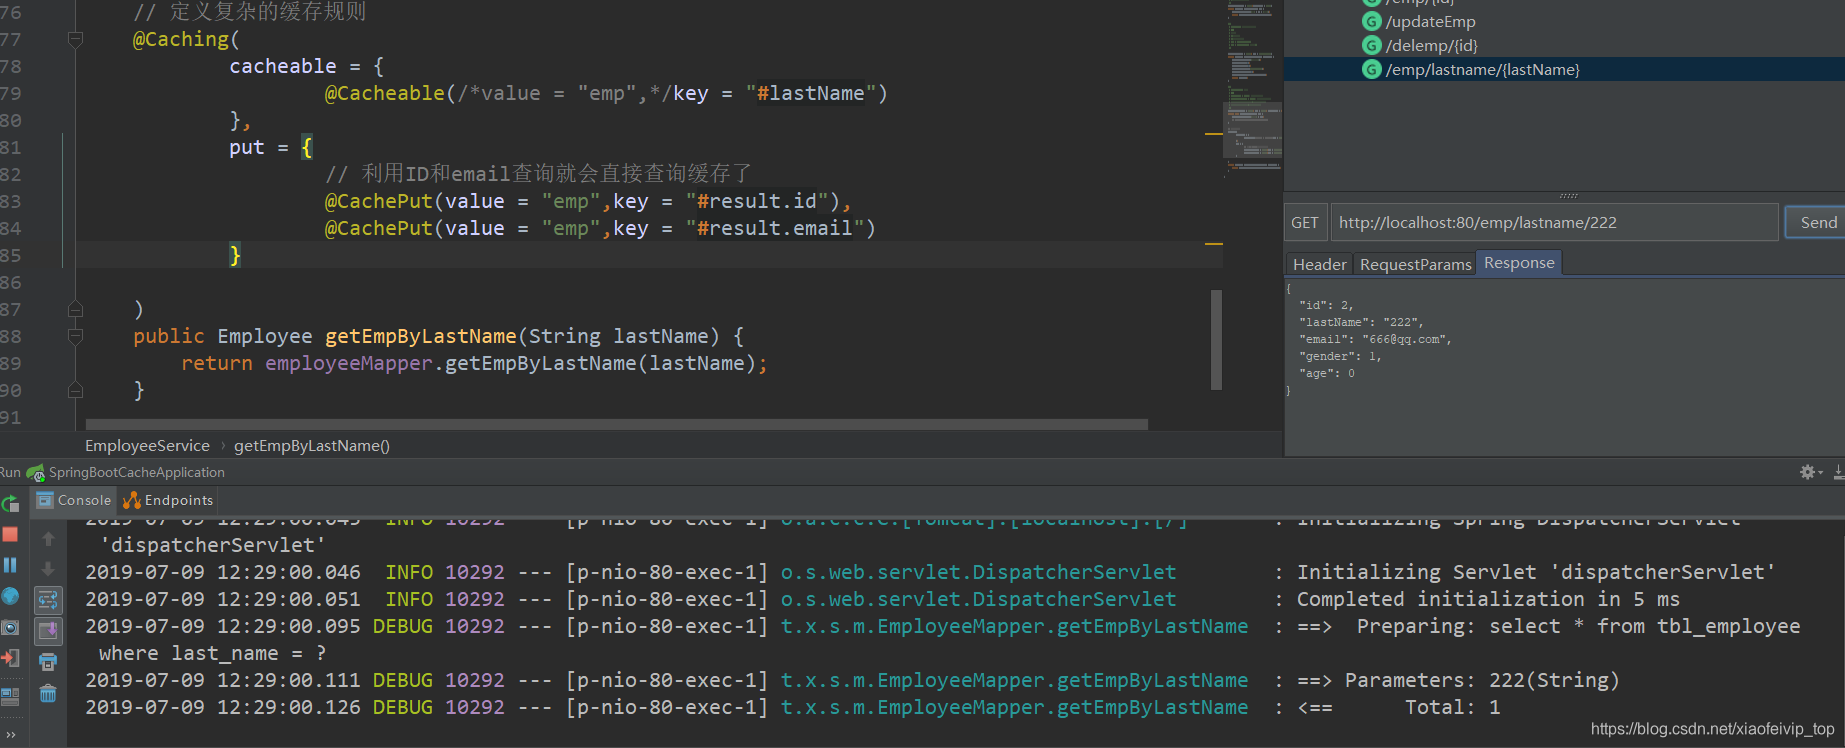
第二步直接根据id查询员工: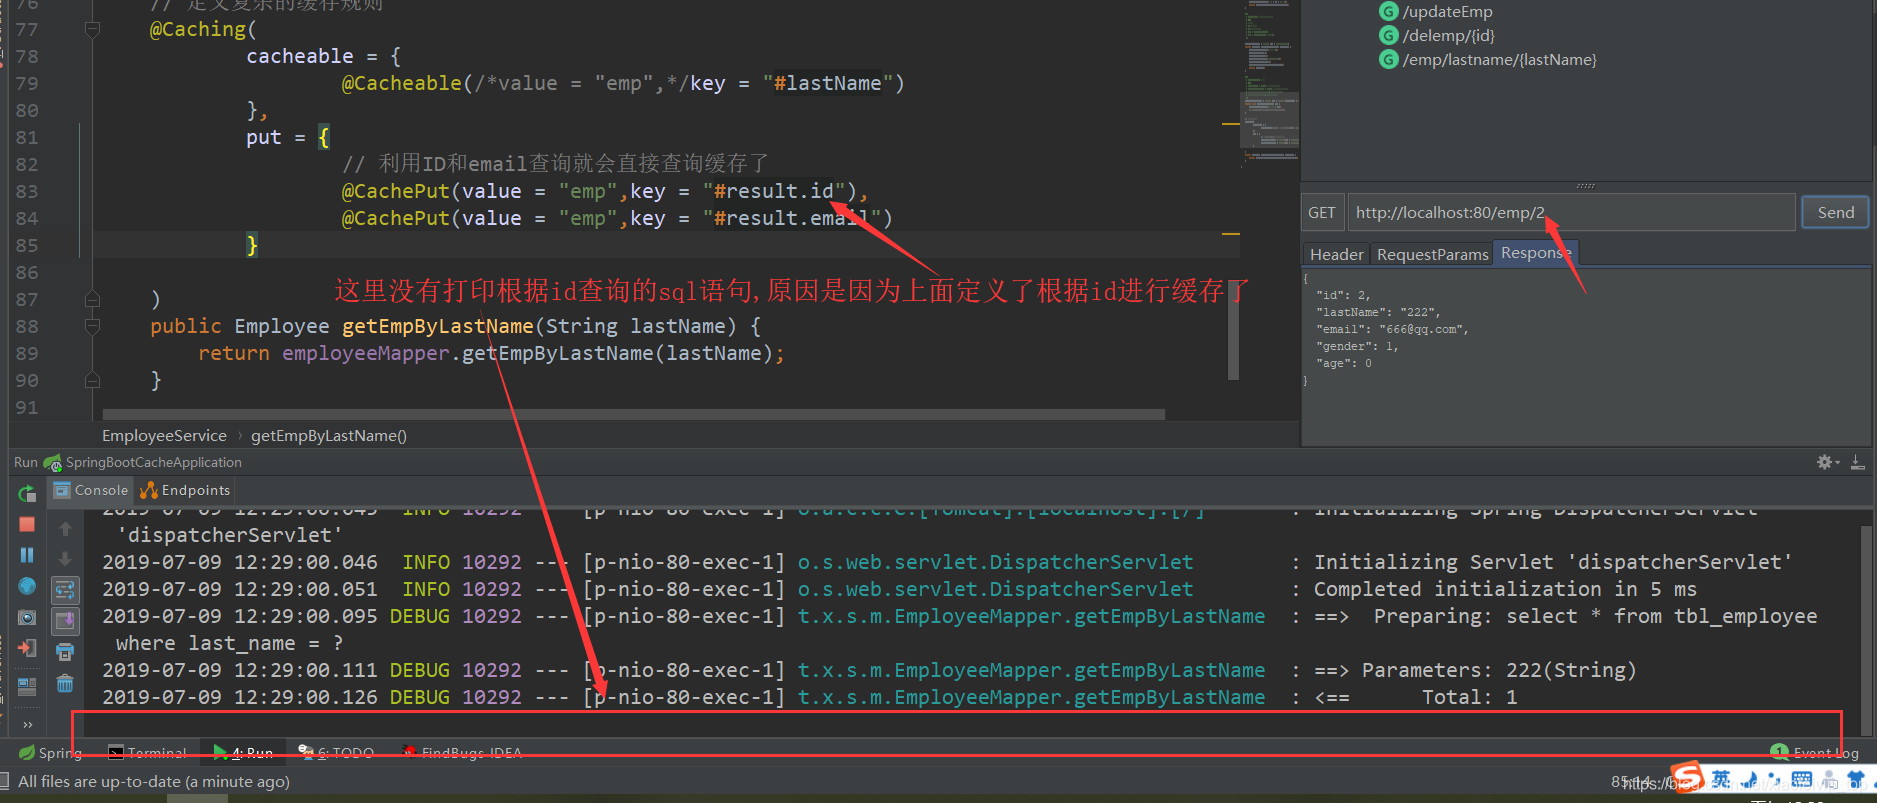
<dependency>
	<groupId>org.springframework.boot</groupId>
	<artifactId>spring-boot-starter-data-redis</artifactId>
</dependency>
# redis配置
spring.redis.host=127.0.0.1
import com.fasterxml.jackson.annotation.JsonAutoDetect;
import com.fasterxml.jackson.annotation.PropertyAccessor;
import com.fasterxml.jackson.databind.ObjectMapper;
import org.springframework.context.annotation.Bean;
import org.springframework.context.annotation.Configuration;
import org.springframework.data.redis.cache.RedisCacheConfiguration;
import org.springframework.data.redis.cache.RedisCacheManager;
import org.springframework.data.redis.connection.RedisConnectionFactory;
import org.springframework.data.redis.serializer.Jackson2JsonRedisSerializer;

import org.springframework.data.redis.serializer.RedisSerializationContext;
import org.springframework.data.redis.serializer.RedisSerializer;
import org.springframework.data.redis.serializer.StringRedisSerializer;

/**
 * Redis配置json序列化
 * @author xiaofei
 */
@Configuration
public class MyRedisConfig {


    @Bean
    public RedisCacheManager myCacheManager(RedisConnectionFactory redisConnectionFactory){
        RedisSerializer<String> redisSerializer = new StringRedisSerializer();
        //.entryTtl(Duration.ofHours(1)); // 设置缓存有效期一小时
        Jackson2JsonRedisSerializer jackson2JsonRedisSerializer = new Jackson2JsonRedisSerializer(Object.class);

        ObjectMapper om = new ObjectMapper();
        om.setVisibility(PropertyAccessor.ALL, JsonAutoDetect.Visibility.ANY);
        om.enableDefaultTyping(ObjectMapper.DefaultTyping.NON_FINAL);
        jackson2JsonRedisSerializer.setObjectMapper(om);

        // 配置序列化(解决乱码的问题)
        RedisCacheConfiguration config = RedisCacheConfiguration.defaultCacheConfig()
                .serializeKeysWith(RedisSerializationContext.SerializationPair.fromSerializer(redisSerializer))
                .serializeValuesWith(RedisSerializationContext.SerializationPair.fromSerializer(jackson2JsonRedisSerializer))
                .disableCachingNullValues();

        RedisCacheManager cacheManager = RedisCacheManager.builder(redisConnectionFactory)
                .cacheDefaults(config)
                .build();
        return cacheManager;
    }
}
QQ群:470765097
如果觉得我的文章对您有用,请随意打赏。你的支持将鼓励我继续创作!
