社区微信群开通啦,扫一扫抢先加入社区官方微信群

社区微信群
它使用 “习惯优于配置” (项目中存在大量的配置,此外还内置一个习惯性的配置,让你无须)的理念让你的项目快速运行起来。
它并不是什么新的框架,而是默认配置了很多框架的使用方式,就像 Maven 整合了所有的 jar 包一样,Spring Boot 整合了所有框架
回顾我们之前的 SSM 项目,搭建过程还是比较繁琐的,需要:
1)配置 web.xml,加载 spring 和 spring mvc
2)配置数据库连接、配置日志文件
3)配置家在配置文件的读取,开启注解
4)配置mapper文件
…..
而使用 Spring Boot 来开发项目则只需要引入几个jar包,和非常少的配置就可以搭建起来一个 Web 项目,对于分模块进行开发的项目来说,简直就是天降福音…
重点:简单、快速、方便地搭建项目;对主流开发框架的无配置集成;极大提高了开发、部署效率。
redis是一个key-value存储系统。和Memcached类似,它支持存储的value类型相对更多,包括string(字符串)、list(链表)、set(集合)、zset(sorted set –有序集合)和hash(哈希类型)。这些数据类型都支持push/pop、add/remove及取交集并集和差集及更丰富的操作,而且这些操作都是原子性的。在此基础上,redis支持各种不同方式的排序。与memcached一样,为了保证效率,数据都是缓存在内存中。区别的是redis会周期性的把更新的数据写入磁盘或者把修改操作写入追加的记录文件,并且在此基础上实现了master-slave(主从)同步。
通用Mapper就是可以随意的按照自己的需要选择通用方法,还可以很方便的开发自己的通用方法。
极其方便的使用MyBatis单表的增删改查。
支持单表操作,不支持通用的多表联合查询。
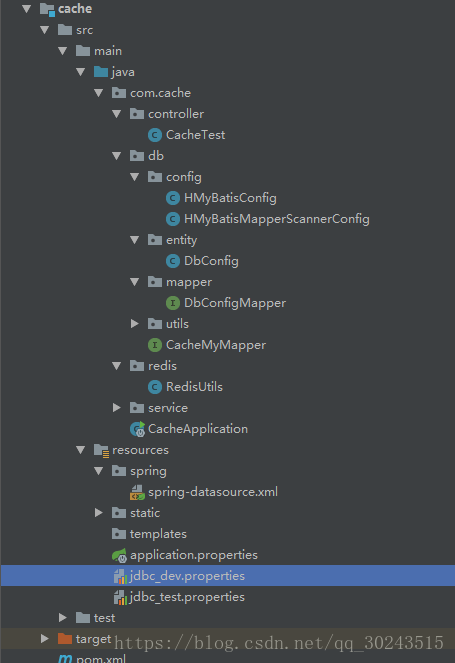
好了,介绍完了上述基本的一些东西开始进行Spring boot项目的搭建
    //这是在声明这是一个springboot的子项目,类似maven多模块时,子项目的pom.xml也会有节点,
    //下面引入的jar包就不再一一做介绍,完事儿,项目源码我会放在GitHub上,需要的可以自行查看
    <parent>
        <groupId>org.springframework.boot</groupId>
        <artifactId>spring-boot-starter-parent</artifactId>
        <version>2.0.3.RELEASE</version>
        <relativePath/>
    </parent>

    <dependency>
        <groupId>org.springframework.boot</groupId>
        <artifactId>spring-boot-starter-data-redis</artifactId>
    </dependency>

    <dependency>
        <groupId>org.springframework.boot</groupId>
        <artifactId>spring-boot-starter-web</artifactId>
    </dependency>

    <dependency>
        <groupId>com.alibaba</groupId>
        <artifactId>druid</artifactId>
        <version>1.0.18</version>
    </dependency>
    <dependency>
        <groupId>mysql</groupId>
        <artifactId>mysql-connector-java</artifactId>
    </dependency>
    <dependency>
        <groupId>org.springframework</groupId>
        <artifactId>spring-jdbc</artifactId>
    </dependency>
     <!--Mybatis -->
    <dependency>
        <groupId>org.mybatis</groupId>
        <artifactId>mybatis</artifactId>
        <version>${mybatis.version}</version>
    </dependency>
    <dependency>
        <groupId>org.mybatis</groupId>
        <artifactId>mybatis-spring</artifactId>
        <version>${mybatis.spring.version}</version>
    </dependency>
    <!-- Mybatis Generator -->
    <dependency>
        <groupId>org.mybatis.generator</groupId>
        <artifactId>mybatis-generator-core</artifactId>
        <version>${mybatis.generator.version}</version>
        <scope>compile</scope>
        <optional>true</optional>
    </dependency>

    <!--分页插件 -->
    <dependency>
        <groupId>com.github.pagehelper</groupId>
        <artifactId>pagehelper</artifactId>
        <version>${pagehelper.version}</version>
     </dependency>

     <!--通用Mapper -->
     <dependency>
        <groupId>tk.mybatis</groupId>
        <artifactId>mapper</artifactId>
        <version>${mapper.version}</version>
     </dependency>

     <dependency>
        <groupId>com.alibaba</groupId>
        <artifactId>fastjson</artifactId>
        <version>1.2.12</version>
     </dependency>

     <build>
        <plugins>
            <plugin>
                <groupId>org.springframework.boot</groupId>
                <artifactId>spring-boot-maven-plugin</artifactId>
            </plugin>
        </plugins>
</build># 指定端口号
server.port=8082
# 指定访问路径,如果没有配置,则相当于项目在tomcat中webapp的ROOT文件夹下,可以直接访问
server.servlet.context-path=/cache
# 指定redis的连接的信息
spring.redis.database=5
spring.redis.host=192.168.31.62
spring.redis.password=
spring.redis.port=6379
spring.redis.jedis.pool.max-active=8
spring.redis.jedis.pool.max-idle=8
spring.redis.jedis.pool.max-wait=2ms
spring.redis.jedis.pool.min-idle=3
spring.profiles.active=dev //用于多环境配置,加载datasource的xml文件使用<?xml version="1.0" encoding="UTF-8"?>
<beans xmlns="http://www.springframework.org/schema/beans"
xmlns:xsi="http://www.w3.org/2001/XMLSchema-instance" xmlns:context="http://www.springframework.org/schema/context"
xmlns:mybatis-spring="http://mybatis.org/schema/mybatis-spring"
xmlns:tx="http://www.springframework.org/schema/tx"
xsi:schemaLocation="http://www.springframework.org/schema/beans http://www.springframework.org/schema/beans/spring-beans.xsd
http://www.springframework.org/schema/context http://www.springframework.org/schema/context/spring-context.xsd
http://mybatis.org/schema/mybatis-spring http://mybatis.org/schema/mybatis-spring.xsd
http://www.springframework.org/schema/tx http://www.springframework.org/schema/tx/spring-tx.xsd">
<context:property-placeholder location="classpath:jdbc_${spring.profiles.active}.properties" ignore-unresolvable="true"/>
<bean name="parentDataSource" class="com.alibaba.druid.pool.DruidDataSource" destroy-method="close" scope="prototype">
<property name="username" value="${jdbc_username0}" />
<property name="password" value="${jdbc_password0}" />
<!-- <property name="driverClass" value="${jdbc_driver0}" /> -->
<!-- 初始化连接大小 -->
<property name="initialSize" value="5" />
<!-- 连接池最大使用连接数量 -->
<property name="maxActive" value="20" />
<!-- 连接池最小空闲 -->
<property name="minIdle" value="5" />
<!-- 获取连接最大等待时间 -->
<property name="maxWait" value="60000" />
<property name="validationQuery" value="${validationQuery}" />
<property name="testOnBorrow" value="false" />
<property name="testOnReturn" value="false" />
<property name="testWhileIdle" value="true" />
<!-- 配置间隔多久才进行一次检测,检测需要关闭的空闲连接,单位是毫秒 -->
<property name="timeBetweenEvictionRunsMillis" value="60000" />
<!-- 配置一个连接在池中最小生存的时间,单位是毫秒 -->
<property name="minEvictableIdleTimeMillis" value="25200000" />
<!-- 打开removeAbandoned功能 -->
<property name="removeAbandoned" value="true" />
<!-- 1800秒,也就是30分钟 -->
<property name="removeAbandonedTimeout" value="1800" />
<!-- 关闭abanded连接时输出错误日志 -->
<property name="logAbandoned" value="true" />
<property name="filters" value="stat" />
</bean>
<bean name="db_product" parent="parentDataSource" primary="true" scope="singleton">
<property name="url" value="${jdbc_url0}" />
</bean>
</beans>
jdbc_driver0   = com.mysql.jdbc.Driver
jdbc_url0      = jdbc:mysql://localhost:3306/dbservice?useUnicode=true&characterEncoding=UTF-8&allowMultiQueries=true&useSSL=false
jdbc_username0 = root
jdbc_password0 = 123456

validationQuery=SELECT 1

user_0         = t_user_0
user_1         = t_user_1
user_2 = t_user_2因为我这里写的是多环境,这个文件是什么时候加载的呢,就是我们在加载spring-datasource.xml时,里面的<context:property-placeholder location="classpath:jdbc_${spring.profiles.active}.properties" ignore-unresolvable="true"/>这段代码所起的作用,一会我们会在其中类中使用@ImportResource注解进行导入,先写在这里:@ImportResource("classpath:/spring/spring-datasource.xml")因为我这里写的是多环境,这个文件是什么时候加载的呢,就是我们在加载spring-datasource.xml时,里面的<context:property-placeholder location="classpath:jdbc_${spring.profiles.active}.properties" ignore-unresolvable="true"/>这段代码所起的作用,一会我们会在其中类中使用@ImportResource注解进行加载,先写在这里:@ImportResource("classpath:/spring/spring-datasource.xml")
/**
 * MyBatis基础配置
 */
@Configuration
@EnableTransactionManagement
public class HMyBatisConfig implements TransactionManagementConfigurer {

    @Resource(name="db_product")
    @Lazy
    DataSource dataSource;

    @Bean(name = "productSessionFactory")
    public SqlSessionFactory productSessionFactoryBean() {
        SqlSessionFactoryBean bean = new SqlSessionFactoryBean();
        bean.setDataSource(dataSource);
        bean.setTypeAliasesPackage("com.cache.db.entity");

        //分页插件
        PageHelper pageHelper = new PageHelper();
        Properties properties = new Properties();
        properties.setProperty("reasonable", "true");
        properties.setProperty("supportMethodsArguments", "true");
        properties.setProperty("returnPageInfo", "check");
        properties.setProperty("params", "count=countSql");
        pageHelper.setProperties(properties);

        //添加插件
        bean.setPlugins(new Interceptor[]{pageHelper});

        //添加XML目录
        ResourcePatternResolver resolver = new PathMatchingResourcePatternResolver();
        try {
            //注意根据自己的目录结构修改下面Xml的路径,通用Mapper是不需要xml文件的,当然写了也是没问题,也是可以使用的
            bean.setMapperLocations(resolver.getResources("classpath:com/cache/db/mapper/*.xml"));
            return bean.getObject();
        } catch (Exception e) {
            e.printStackTrace();
            throw new RuntimeException(e);
        }
    }

    @Bean
    @Override
    public PlatformTransactionManager annotationDrivenTransactionManager() {
        //这里的DataSourceTransactionManager类是由spring-jdbc提供的,所以需要导入jdbc的依赖
        return new DataSourceTransactionManager(dataSource);
    }
}@Configuration
//TODO 注意,由于MapperScannerConfigurer执行的比较早,所以必须有下面的注解
@AutoConfigureAfter(HMyBatisConfig.class)
public class HMyBatisMapperScannerConfig {
@Bean
public MapperScannerConfigurer accountMapperScannerConfigurer() {
MapperScannerConfigurer mapperScannerConfigurer = new MapperScannerConfigurer();
mapperScannerConfigurer.setSqlSessionFactoryBeanName("productSessionFactory");
mapperScannerConfigurer.setBasePackage("com.cache.db.mapper");
Properties properties = new Properties();
properties.setProperty("mappers", "com.cache.db.CacheMyMapper");
properties.setProperty("notEmpty", "false");
properties.setProperty("IDENTITY", "MYSQL");
mapperScannerConfigurer.setProperties(properties);
return mapperScannerConfigurer;
}
}public interface CacheMyMapper<T> extends Mapper<T>, MySqlMapper<T> {
//没错,就是这么少
}@Table(name = "db_config") //根数据库中的表名相同
public class DbConfig {
@Id //ID的表示
private Integer dbId;
private String dbPlatId;
private String dbPasswd;
private Date crtTime;
...省略Getter,Setter
}public interface DbConfigMapper extends CacheMyMapper<DbConfig> {
}
这里的代码只贴出来一部分,内容有点多,可以去GitHub上下载
基本内容就是封装了 redis,对于各种数据类型存储的支持
@Component
public class RedisUtils {
    private static final Logger log = LoggerFactory.getLogger(RedisUtils.class);

    @Autowired
    RedisTemplate redisTemplate;

    public void remove(String key) {
        redisTemplate.delete(key);
    }

    public void setObject(String key, Object value, long expire) {
        ValueOperations<Serializable, Object> ops = redisTemplate.opsForValue();
        ops.set(key, JsonUtils.toString(value));
        expire(key, expire);
    }

    public void setObject(String key, Object value) {
        setObject(key, value, 0);
    }

    public <T extends Object> T getObject(String key, Class<T> c, long expire) {
        ValueOperations<Serializable, Object> ops = redisTemplate.opsForValue();
        Object o = ops.get(key);
        if(o == null){
            return null;
        }
        expire(key, expire);
        return  JsonUtils.toObject(o.toString(), c);
    }

}
@Service
public class DbConfigService {
    //构建数据时的随机数据
    private static String buildContent = "AaBbCcDdEeFfGg" +
            "n" +
            "HhIiJjKkLlMmNn" +
            "n" +
            "OoPpQqRrSsTtn" +
            "n" +
            "UuVvWwXxYyZz!@#$%^&*";
    //构建数据是掺杂的数字
    private static Integer[] buildNumber = new Integer[]{1,2,3,4,5,6,7,8,9};
    //指定redis中的key,这里是直接存的List集合
    private static String db_config_list = "db_config_list";

    @Autowired
    DbConfigMapper dbConfigMapper;
    @Autowired
    RedisUtils redisUtils;

    /**
     * 直接查询数据库
     */
    public List<DbConfig> getDBList() {
        return dbConfigMapper.selectAll();
    }

    /**
     * 从redis中查询
     */
    public List<DbConfig> getRedisList() {
        return redisUtils.getList(db_config_list, DbConfig.class);
    }

    /**
     * 添加到reids
     */
    public void addRedis() {
        List<DbConfig> dbConfigs = dbConfigMapper.selectAll();
        redisUtils.addList(db_config_list, dbConfigs);
    }

    /**
     * 批量创建数据
     */
    public void BuildData() {
        dbConfigMapper.insertList(batchCreateData());
    }

    private List<DbConfig> batchCreateData() {
        List<DbConfig> configList = new ArrayList<>();
        for(int i = 0; i < 1000000; i++) {
            DbConfig config = new DbConfig();
            config.setDbPlatId(buildString());
            config.setDbPasswd(buildString());
            config.setCrtTime(new Date());
            configList.add(config);
        }
        return configList;
    }

    private String buildString() {
        StringBuffer sb = new StringBuffer();
        for(int i =0; i <= 10; i++) {
            int next = (int)(Math.random()*64);
            if(next == buildContent.length()) {
                next = next - 2;
            }
            sb.append(buildContent.substring(next, next + 1));
        }
        for(int i =0; i<= 5; i++) {
            int next = (int)(Math.random()*9);
            if(next == buildNumber.length) {
                next = next -1;
            }
            sb.append(buildNumber[next]);
        }
        return sb.toString();
    }

}@RestController
public class CacheTest {
@Autowired
DbConfigService configService;
//从数据库中获取数据
@RequestMapping("getDbList")
public JSONObject getList() {
Long startTime = System.currentTimeMillis();
List<DbConfig> configs = configService.getDBList();
Long endTime = System.currentTimeMillis();
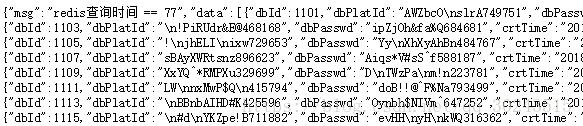
return resultData(configs, "数据库查询时间 == " + (endTime - startTime));
}
//构建数据(就是造假数据)
@RequestMapping("buildData")
public String buildData() {
Long startTime = System.currentTimeMillis();
configService.BuildData();
Long endTime = System.currentTimeMillis();
return "构建数据花费时间 == " + (endTime - startTime);
}
//添加的reids缓存中
@RequestMapping("addRedis")
public void addRedis(){
configService.addRedis();
}
//从缓存中获取数据
@RequestMapping("getRedisList")
public JSONObject getRedisList() {
Long startTime = System.currentTimeMillis();
List<DbConfig> configs = configService.getRedisList();
Long endTime = System.currentTimeMillis();
return resultData(configs, "数据库查询时间 == " + (endTime - startTime));
}
//封装返回
private JSONObject resultData(List<DbConfig> configs, String msg) {
JSONObject obj = new JSONObject();
obj.put("msg", msg);
obj.put("data", configs);
return obj;
}
}
@SpringBootApplication
@ImportResource("classpath:/spring/spring-datasource.xml")  //加载链接池配置文件
public class CacheApplication {

    public static void main(String[] args) {
        SpringApplication.run(CacheApplication.class, args);
    }

}
如果觉得我的文章对您有用,请随意打赏。你的支持将鼓励我继续创作!