社区微信群开通啦,扫一扫抢先加入社区官方微信群

社区微信群

https://wenku.baidu.com/view/8ff2ce94591b6bd97f192279168884868762b8e7
https://wenku.baidu.com/view/24cfee1ce43a580216fc700abb68a98270feac21
本博文不会长篇大论的讨论生命周期的概念,而是从各种plugin的实际功能和应用出发,来讨论maven的实际应用,说得通透一点,生命周期(lifecycle)可以理解成由各种plugin按照一定的顺序执行来完成java项目清理、编译、打包、测试、布署等整个项目的流程的一个过程。
生命周期(lifecycle)由各个阶段组成,每个阶段由maven的插件plugin来执行完成。生命周期(lifecycle)主要包括clean、resources、complie、install、package、testResources、testCompile等,其中带test开头的都是用业编译测试代码或运行单元测试用例的。
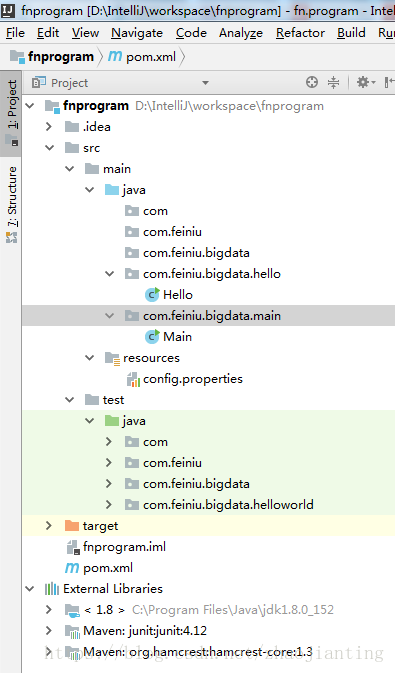
一般构建项目时执行的最常用的命领是mvn clean install,如果是IDE就是点对应的按纽其实还是调的mvn命令,除非你使用的IDE内嵌的maven(不推荐使用内嵌的maven)。下周通过一个具体的实例来详细了解执行mvn clean install这条命令背后,maven为我们做了哪些事情。我们有一个工程,工程结构如下图所示,这个工程非常简单,只有两个类,Hello类和对应的测试类HelloWorldTest,
Hello类和对应的测试类HelloWorldTest,代码如下
package com.feiniu.bigdata.helloworld;

import com.feiniu.bigdata.hello.Hello;
import com.feiniu.bigdata.main.Main;
import junit.framework.TestCase;
import org.junit.Test;

public class HelloWorldTest {

    @Test
    public void testSayHello(){
        Hello hello = new Hello();
        String result = hello.sayHello();
        TestCase.assertEquals("Hello world",result);
    }
}
package com.feiniu.bigdata.hello;

public class Hello {
    public String sayHello() {
        return "Hello world";
    }
    public static void main(String[] args) {
        System.out.println(new Hello().sayHello());
    }
}
pom文件也很简单如下所示:
<?xml version="1.0" encoding="UTF-8"?>
<project xmlns="http://maven.apache.org/POM/4.0.0"
         xmlns:xsi="http://www.w3.org/2001/XMLSchema-instance"
         xsi:schemaLocation="http://maven.apache.org/POM/4.0.0 http://maven.apache.org/xsd/maven-4.0.0.xsd">
    <modelVersion>4.0.0</modelVersion>

    <groupId>com.feiniu.bigdata</groupId>
    <artifactId>fn.program</artifactId>
    <version>1.0-SNAPSHOT</version>
    <packaging>jar</packaging>
    <name>fn program</name>
    <description>This is a program to tesc new function of jdk8</description>

    <build>
        <plugins>
            <plugin>
                <groupId>org.apache.maven.plugins</groupId>
                <artifactId>maven-compiler-plugin</artifactId>
                <version>3.3</version>
                <configuration>
                    <source>1.8</source>
                    <target>1.8</target>
                </configuration>
            </plugin>
        </plugins>
    </build>

    <dependencies>
        <!-- https://mvnrepository.com/artifact/junit/junit -->
        <!-- test只对test代码有效,主代码引用会报错,compile对主代码和测试代码都有效 -->
        <dependency>
            <groupId>junit</groupId>
            <artifactId>junit</artifactId>
            <version>4.12</version>
            <scope>test</scope>
        </dependency>

    </dependencies>
</project>
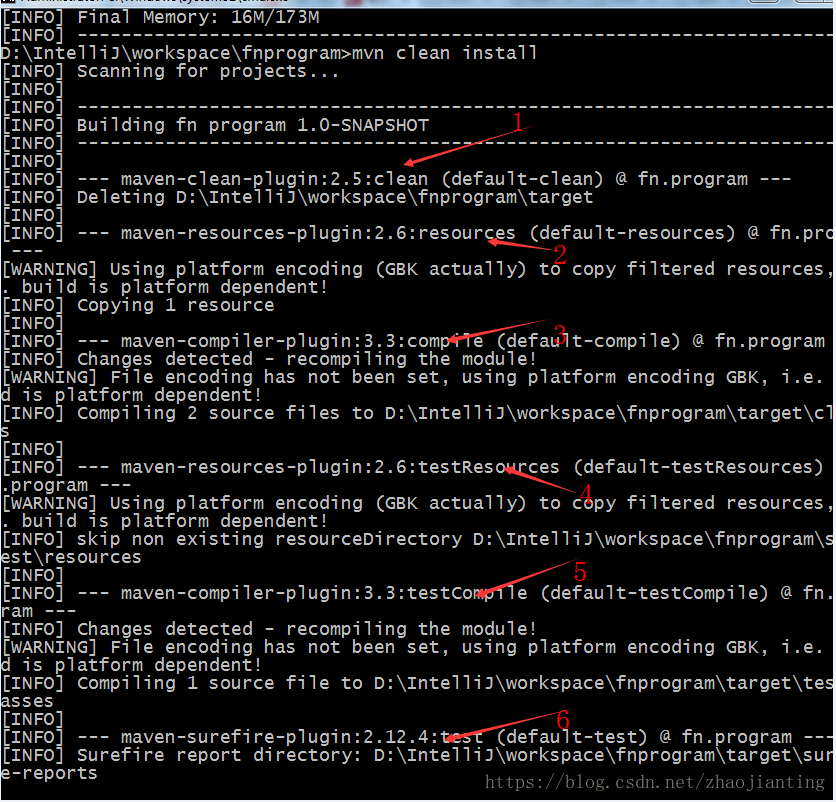
到项目根目录下执行mvn clean install 对应的输出如下图所示
由上图可知,各个插件的执行顺序一般是:1:clean、2:resources、3:compile、4:testResources、5:testCompile、6:test、7:jar、8:install。在图中标记的地方每一行都是由冒号分隔的,前半部分是对应的插件,后半部分是插件的执行目标也就是插件执行产生的结果。现在我们来看下上面的pom文件,我们如配置了maven-compiler-plugin这个插件,其它的插件没有配置,但最后项目构建成功,说明maven内置的各种插件,如果pom中没有配置就调用默认的内置插件,如果pom中配置了就调用配置的插件。到此我们理解maven的构建过程或者有更多的人称是打包,就是由各种插件按照一定的顺序执行来完成项目的编译,单元测试、打包、布署的完成。各种插件的执行过程也就构成的maven的生命周期(lifecycle)。生命周期(lifecycle)各个阶段并不是独立的,可以单独执行如mvn clean,也可以一起执行如mvn clean install。而且有的mvn命令其是包括多个阶段的,如mvn compile其是包括了resources和compile两个阶段。下面分别来分析各个阶段需要的插件和输出的结果
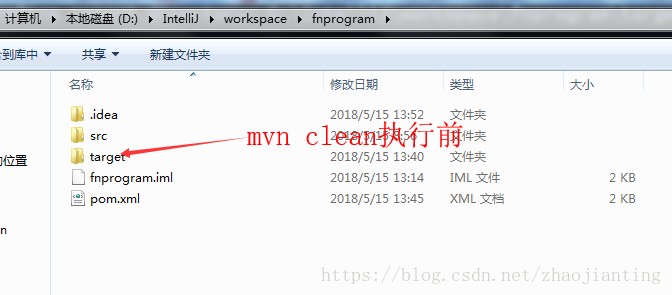
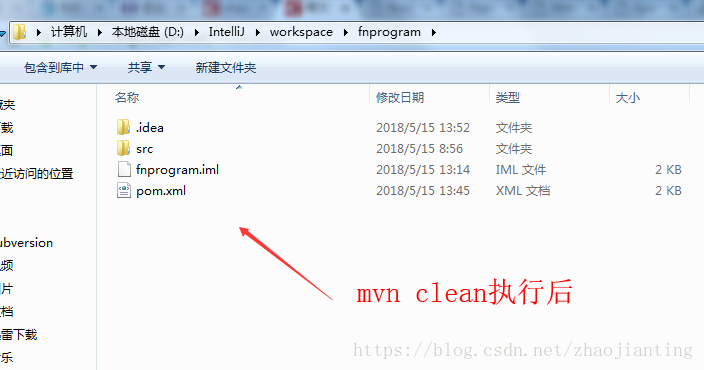
clean阶段是独立的一个阶段,功能就是清除工程目前下的target目录,对应的插件是 maven-clean-plugin:2.5,2.5是版本号,可以使用maven内置的插件,当然也可以自己在pom中配置,配置方式和上面所说的maven-compiler-plugin配置方式一样。下面看下mvn执行前后工程目录下的输出对比
resource插件的功能就是把项目需要的配置文件拷贝到指定的目当,默认是拷贝srcmainresources目录下的件到classes目录下,当然可以自己来配置源目录和输出目录。resources插件一般不单独执行,complie插件执行时会先调用resources插件。配置示例如下:
      <plugin>
         <groupId>org.apache.maven.plugins</groupId>
         <artifactId>maven-resources-plugin</artifactId>
         <version>2.6</version>
         <executions>
           <execution>
              <id>copy-resources</id>
              <!-- 在default生命周期的 validate阶段就执行resources插件的copy-resources目标 -->
              <phase>validate</phase>
              <goals>
                <goal>copy-resources</goal>
              </goals>
              <configuration>
              <!-- 指定resources插件处理资源文件到哪个目录下 -->
                 <outputDirectory>${project.build.outputDirectory}</outputDirectory>
                  <!-- 也可以用下面这样的方式(指定相对url的方式指定outputDirectory) <outputDirectory>target/classes</outputDirectory> -->
                  <!-- 待处理的资源定义 -->
                  <resources>
                     <resource>
                        <!-- 指定resources插件处理哪个目录下的资源文件 -->
                        <directory>src/main/${deploy.env}/applicationContext.xml</directory>
                        <!-- 指定不需要处理的资源 <excludes> <exclude>WEB-INF/*.*</exclude> </excludes> -->
                        <!-- 是否对待处理的资源开启过滤模式 (resources插件的copy-resources目标也有资源过滤的功能,这里配置的
                        这个功能的效果跟<build><resources><resource>下配置的资源过滤是一样的,只不过可能执行的阶段不一样, 这里执行的阶段是插件指定的validate阶段,<build><resources><resource>下的配置将是在resources插件的resources目标执行时起作用(在process-resources阶段)) -->
                        <filtering>false</filtering>
                     </resource>
                  </resources>
              </configuration>
              <inherited></inherited>
           </execution>
         </executions>

         </plugin>
compile插件执行时先调用resouces插件,功能就是把srcmainjava源码编译成字节码生成class文件,并把编译好的class文件输出到targetclasses目录下。下面看执行结果:
单元测试所用的compile和resources插件和主代码是相同的,但执行的目标不行,目标estCompile和testResources是把srctestjava下的代码编译成字节码输出到targettest-classes,同时把srctestresources下的配置文件拷贝到targettest-classes。看下面的输出:
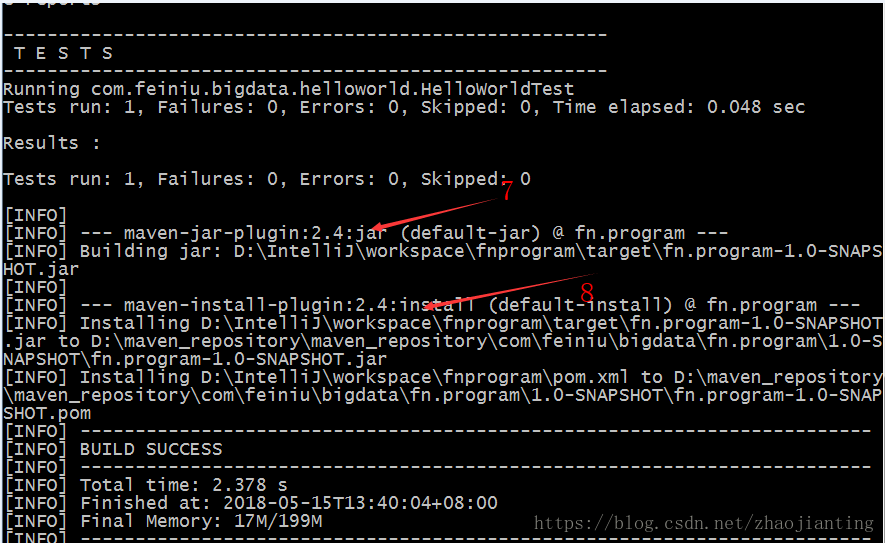
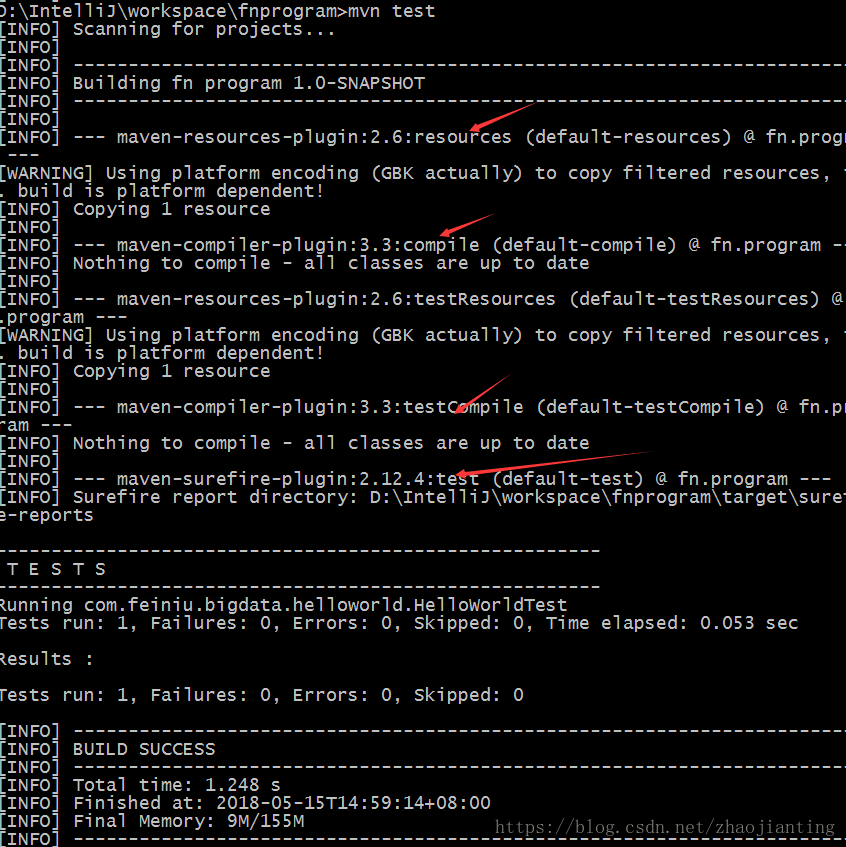
插件maven-surefire-plugin:2.12.4是执行单元测试类的,在本例中就是运行HelloWorldTest.testSayHello()方法,如果单测试不通行,构建会失败,在编译正式的项目时可以使用mvn -Dmaven.test.skip=true 来跳过测试类的编译和运行过程。mvn test可以单独执行,但是这个命令其实是包括了resources、compile、testResources、testCompile、test这几个阶段,如下图所示:
这个插件是把class文件、配置文件打成一个jar(war或其它格式)包。依赖包是不在jar里面的,需要建立lib目录,且jar和lib目录在同级目录。常用的打包插件有maven-jar-plugin、maven-assembly-plugin、maven-shade-plugin三种,下面分别介绍下各自己pom配置和使用特点。
maven-jar-plugin
可执行jar与依赖包是分开,需建立lib目录里来存放需要的j依赖包,且需要jar和lib目录在同级目录
             <plugin>
                 <groupId>org.apache.maven.plugins</groupId>
                 <artifactId>maven-jar-plugin</artifactId>
                 <version>2.6</version>
                 <configuration>
                    <archive>
                         <manifest>
                             <addClasspath>true</addClasspath>
                             <classpathPrefix>lib/</classpathPrefix>
                            <mainClass>com.xxx.xxxService</mainClass>
                       </manifest>
                    </archive>
                </configuration>
            </plugin>
            <plugin>
                <groupId>org.apache.maven.plugins</groupId>
                <artifactId>maven-dependency-plugin</artifactId>
                <version>2.10</version>
                <executions>
                    <execution>
                        <id>copy-dependencies</id>
                        <phase>package</phase>
                        <goals>
                            <goal>copy-dependencies</goal>
                        </goals>
                        <configuration>
                            <outputDirectory>${project.build.directory}/lib</outputDirectory>
                        </configuration>
                    </execution>
                </executions>
            </plugin>
maven-assembly-plugin
这个插件可以把所有的依赖包打入到可执行jar包。但是该插件有个bug会缺失spring的xds文件,导致无法运行jar,同时如果同级目录还有其它可执行jar文件依赖可能会产生冲突。
             <plugin>
                 <artifactId>maven-assembly-plugin</artifactId>
                 <configuration>
                     <descriptorRefs>
                         <descriptorRef>jar-with-dependencies</descriptorRef>
                     </descriptorRefs>
                     <archive>
                         <manifest>
                             <mainClass>com.xxx.xxxService</mainClass>
                        </manifest>
                    </archive>
                </configuration>
                <executions>
                    <execution>
                        <id>make-assembly</id>
                        <phase>package</phase>
                        <goals>
                            <goal>single</goal>
                        </goals>
                    </execution>
                </executions>
            </plugin>
maven-shade-plugin
所有的依赖包打入到可执行jar包,如果同级目录有其它可执行jar,依赖可能会产生冲突,且运行jar时,有时会出现SF、DSA、RSA文件冲突的提示,需要排除META-INF目录下的文件。
    <plugin>
                <groupId>org.apache.maven.plugins</groupId>
                <artifactId>maven-shade-plugin</artifactId>
                <version>2.4.3</version>
                <executions>
                    <execution>
                        <phase>package</phase>
                        <goals>
                            <goal>shade</goal>
                        </goals>
                        <configuration>
                            <filters>
                                <filter>
                                    <artifact>*:*</artifact>
                                    <excludes>
                                        <exclude>META-INF/*.SF</exclude>
                                        <exclude>META-INF/*.DSA</exclude>
                                        <exclude>META-INF/*.RSA</exclude>
                                    </excludes>
                                </filter>
                            </filters>
                            <transformers>
                                <transformer
                                        implementation="org.apache.maven.plugins.shade.resource.AppendingTransformer">
                                    <resource>META-INF/spring.handlers</resource>
                                </transformer>
                                <transformer
                                        implementation="org.apache.maven.plugins.shade.resource.AppendingTransformer">
                                    <resource>META-INF/spring.schemas</resource>
                                </transformer>
                                <transformer
                                        implementation="org.apache.maven.plugins.shade.resource.AppendingTransformer">
                                    <resource>META-INF/spring.tooling</resource>
                                </transformer>
                                <transformer
                                        implementation="org.apache.maven.plugins.shade.resource.ManifestResourceTransformer">
                                    <mainClass>com.xxx.xxxInvoke</mainClass>
                                </transformer>
                            </transformers>
                            <minimizeJar>true</minimizeJar>
                            <shadedArtifactAttached>true</shadedArtifactAttached>
                        </configuration>
                    </execution>
                </executions>
            </plugin>
发布插件的功能就是把构建好的artifact部署到本地仓库,还有一个deploy插件是将构建好的artifact部署到远程仓库。
如果觉得我的文章对您有用,请随意打赏。你的支持将鼓励我继续创作!