社区微信群开通啦,扫一扫抢先加入社区官方微信群

社区微信群
本文记录一下Go语言环境搭建的整个过程(๑◡๑)
Go语言中文网下载SDK (go1.8.3.linux-amd64.tar.gz)
解压到/usr/local下:
tar xvzf go1.8.3.linux-amd64.tar.gz -C /usr/local
创建Go开发用户并设置密码:
[root@/root]# useradd -d /home/go -m go [root@/root]# passwd go
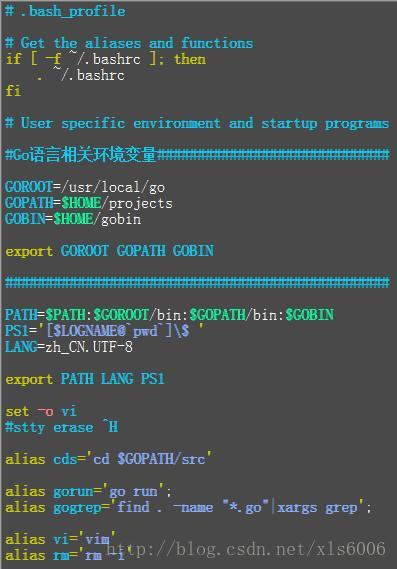
创建完成后切换到go用户并设置Go语言相关环境变量: [root@/root]# su - go $ vim .bash_profile
这里GOBIN环境变量不设置的话,Go默认会把编译好的执行文件放在$GOPATH/bin下边
GOROOT=/usr/local/go
GOPATH=$HOME/projects
GOBIN=$HOME/gobin

export GOROOT GOPATH GOBIN
附上我自己使用的.bash_profile的设置:
设置好环境变量以后确认生效,然后检查是否正确设置: $ . .bash_profile [go@/home/go]$ go version
go version go1.8.3 linux/amd64
出现go的版本号,说明环境变量设置成功了
写一个简单的程序测试一下效果如何: [go@/home/go]$ vim hello.go
package main

import "fmt"

func main() {
    fmt.Println("hello,world!")
}
[go@/home/go]$ go run new.go
hello,world!
到这里大家应该发现了一个问题,阿西吧?什么鬼?怎么vim连Go语言的变色都不支持,简直把强迫症直接逼到MAX级别啊!
翻了一圈资料以后,发现了几个靠谱的玩意儿:vim-go、YCM等等强大的插件儿,那么我们也不能免俗,安装起来吧:
如果你还没有安装git的话,切换到root用户执行: [root@/root]# yum install -y git
安装Vim-go插件:
vim-go利 用开源Vim插件管理器安装,gmarik/Vundle.vim是目前被推荐次数更多的Vim插件管理器: git clone https://github.com/VundleVim/Vundle.vim.git ~/.vim/bundle/Vundle.vim
然后回到go用户目录下配置.vimrc文件:
" -------------
" Vundle
" https://github.com/gmarik/Vundle.vim
" -------------
set nocompatible              " be iMproved, required
filetype off                  " required

" set the runtime path to include Vundle and initialize
set rtp+=~/.vim/bundle/Vundle.vim
call vundle#begin()
" alternatively, pass a path where Vundle should install plugins
"call vundle#begin('~/some/path/here')

" let Vundle manage Vundle, required
Plugin 'gmarik/Vundle.vim'

" The following are examples of different formats supported.
" Keep Plugin commands between vundle#begin/end.
" plugin on GitHub repo
""Plugin 'tpope/vim-fugitive'
" plugin from http://vim-scripts.org/vim/scripts.html
""Plugin 'L9'
" Git plugin not hosted on GitHub
""Plugin 'git://git.wincent.com/command-t.git'
" git repos on your local machine (i.e. when working on your own plugin)
""Plugin 'file:///home/gmarik/path/to/plugin'
" The sparkup vim script is in a subdirectory of this repo called vim.
" Pass the path to set the runtimepath properly.
""Plugin 'rstacruz/sparkup', {'rtp': 'vim/'}
" Avoid a name conflict with L9
""Plugin 'user/L9', {'name': 'newL9'}

" Install Vim-go
Plugin 'fatih/vim-go'

" All of your Plugins must be added before the following line
call vundle#end()            " required
filetype plugin indent on    " required
" To ignore plugin indent changes, instead use:
"filetype plugin on
"
" Brief help
" :PluginList       - lists configured plugins
" :PluginInstall    - installs plugins; append `!` to update or just :PluginUpdate
" :PluginSearch foo - searches for foo; append `!` to refresh local cache
" :PluginClean      - confirms removal of unused plugins; append `!` to auto-approve removal
"
" see :h vundle for more details or wiki for FAQ
" Put your non-Plugin stuff after this line
然后进入vim执行:PluginInstall安装vim-go插件
安装~/.vim/bundle/vim-go/plugin/go.vim中的go应用
安装完毕后会在vim状态栏显示DONE(整个过程差不多1分钟的时间)
安装好了vim-go插件以后就基本就完成了vim-go的配置,现在打开vim编辑一个.go的程序文件,就可以使用下边的命令来使用相应的功能了:
编辑刚才写好的hello.go:
- 新起一行输入fmt.,然后ctrl+x, ctrl+o,Vim 会弹出补齐提示下拉框,不过并非实时跟随的那种补齐,这个补齐是由gocode提供的。
– 输入一行代码:time.Sleep(time.Second),执行:GoImports,Vim会自动导入time包。
– 将光标移到Sleep函数上,执行:GoDef或命令模式下敲入gd,Vim会打开$GOROOT/src/time/sleep.go中 的Sleep函数的定义。执行:b 1返回到hellogolang.go。
– 执行:GoLint,运行golint在当前Go源文件上。
– 执行:GoDoc,打开当前光标对应符号的Go文档。
– 执行:GoVet,在当前目录下运行go vet在当前Go源文件上。
– 执行:GoRun,编译运行当前main package。
– 执行:GoBuild,编译当前包,这取决于你的源文件,GoBuild不产生结果文件。
– 执行:GoInstall,安装当前包。
– 执行:GoTest,测试你当前路径下地_test.go文件。
– 执行:GoCoverage,创建一个测试覆盖结果文件,并打开浏览器展示当前包的情况。
– 执行:GoErrCheck,检查当前包种可能的未捕获的errors。
– 执行:GoFiles,显示当前包对应的源文件列表。
– 执行:GoDeps,显示当前包的依赖包列表。
– 执行:GoImplements,显示当前类型实现的interface列表。
– 执行:GoRename [to],将当前光标下的符号替换为[to]。
最后我们来安装YCM这款强大的插件,简直就是Linux环境的开发神器:
配置.vimrc文件,加入YCM插件在vim-go下边另起一行:
Plugin 'Valloric/YouCompleteMe'然后进入再一次进入vim并执行:PluginInstall安装vim-go插件(整个过程极其漫长,大概有1个多小时。。。(;′⌒)) [go@/home/go/.vim/bundle/YouCompleteMe]$ Git submodule update –init –recursive
下载完成后进入到YCM的目录并安装依赖 [go@/home/go/.vim/bundle/YouCompleteMe]$ ./install.sh `
然后更新了VIM到版本 8.0.979并添加对Python的支持(在此不再赘述安装VIM的过程,请自行解决~)

最后安装插件:
这里我碰到了如下错误: CMake Error: your CXX compiler: "CMAKE_CXX_COMPILER-NOTFOUND" was not found. Please set CMAKE_CXX_COMPILER to a valid compiler path or name.
-- NOTE: You appear to be on CentOS version 7.2.1511. In order to use this application, you require a more modern compiler than the default compiler on this platform. Please install the devtoolset-6 or greater. For example, see this link: https://www.softwarecollections.org/en/scls/rhscl/devtoolset-6/
CMake Error at CMakeLists.txt:217 (message):
Your C++ compiler does NOT fully support C++11.
是C++11的环境不够完善,无比蛋疼过后发现是因为没有安装gcc-c++,切换到root权限安装一下,安装完gcc-c++后重新执行YCM插件的安装:
[root@/root]# yum install gcc-c++ [go@/home/go/.vim/bundle/YouCompleteMe]$ ./install.sh
– Configuring done
– Generating done
– Build files have been written to: /tmp/ycm_build_hgOvbS
Scanning dependencies of target BoostParts
[ 1%] Building CXX object BoostParts/CMakeFiles/BoostParts.dir/libs/filesystem/src/utf8_codecvt_facet.cpp.o
[ 3%] Building CXX object BoostParts/CMakeFiles/BoostParts.dir/libs/filesystem/src/codecvt_error_category.cpp.o
[ 4%] Building CXX object BoostParts/CMakeFiles/BoostParts.dir/libs/filesystem/src/unique_path.cpp.o
[ 6%] Building CXX object BoostParts/CMakeFiles/BoostParts.dir/libs/filesystem/src/windows_file_codecvt.cpp.o
[ 7%] Building CXX object BoostParts/CMakeFiles/BoostParts.dir/libs/filesystem/src/path_traits.cpp.o
[ 9%] Building CXX object BoostParts/CMakeFiles/BoostParts.dir/libs/filesystem/src/path.cpp.o
[ 10%] Building CXX object BoostParts/CMakeFiles/BoostParts.dir/libs/filesystem/src/portability.cpp.o
[ 12%] Building CXX object BoostParts/CMakeFiles/BoostParts.dir/libs/filesystem/src/operations.cpp.o
[ 13%] Building CXX object BoostParts/CMakeFiles/BoostParts.dir/libs/system/src/error_code.cpp.o
[ 15%] Building CXX object BoostParts/CMakeFiles/BoostParts.dir/libs/regex/src/static_mutex.cpp.o
[ 16%] Building CXX object BoostParts/CMakeFiles/BoostParts.dir/libs/regex/src/regex.cpp.o
为节省篇幅,此处省略N多行。。。
[ 98%] Building CXX object ycm/CMakeFiles/ycm_core.dir/Result.cpp.o
[100%] Building CXX object ycm/CMakeFiles/ycm_core.dir/IdentifierCompleter.cpp.o
Linking CXX shared library /home/go/.vim/bundle/YouCompleteMe/third_party/ycmd/ycm_core.so
[100%] Built target ycm_core
大功告成~ 看一下效果吧(网上找了个动图,but效果都是一样的~) (ノ゚▽゚)ノ
如果觉得我的文章对您有用,请随意打赏。你的支持将鼓励我继续创作!