社区微信群开通啦,扫一扫抢先加入社区官方微信群

社区微信群
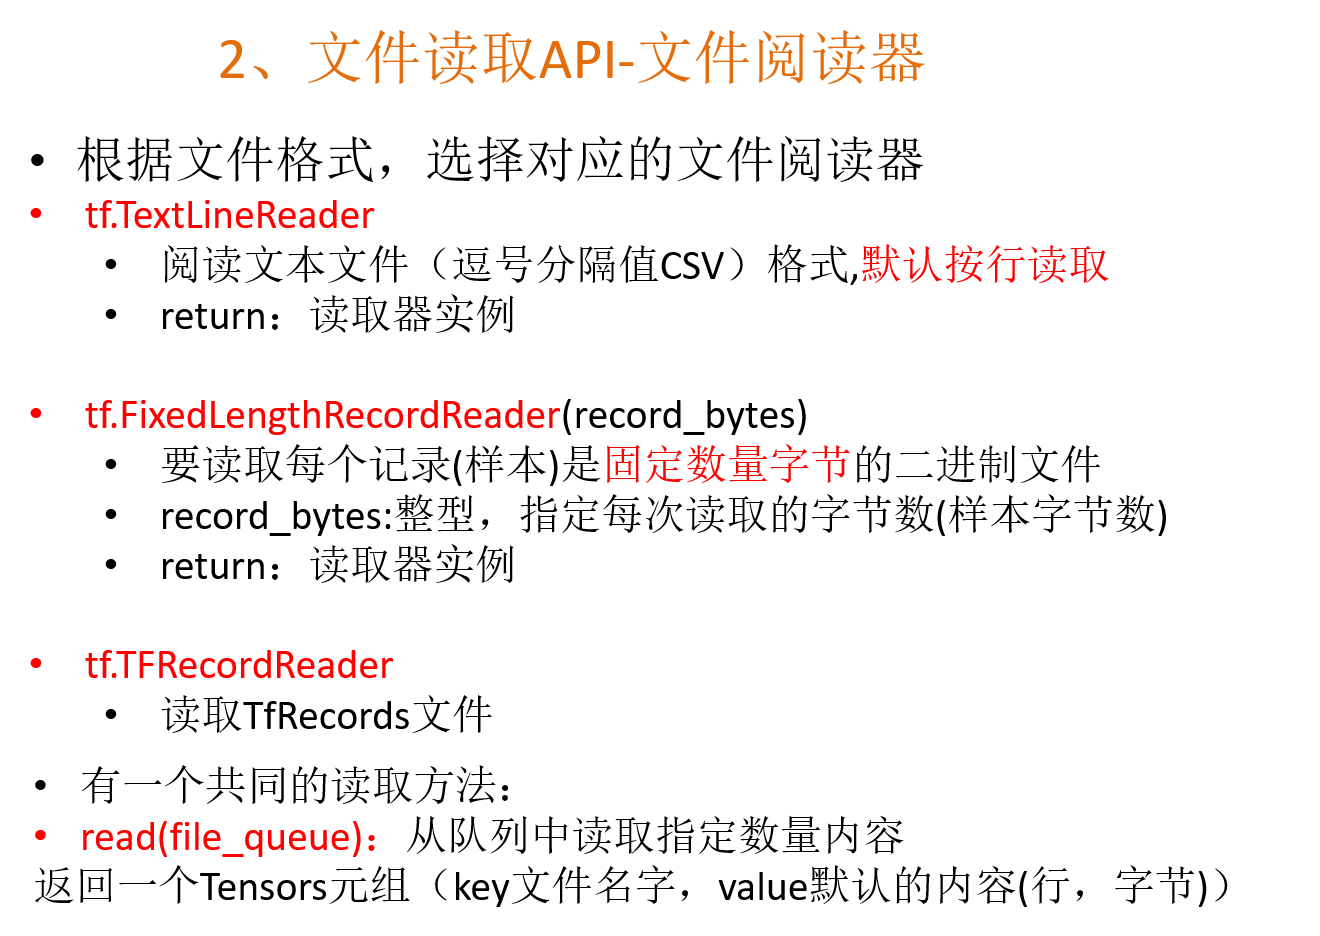
TensorFlow读取文件的流程:
1、构建一个文件名队列,存放文件的路径和文件名。
2、read,根据文件名队列读取文件内容,默认读取一个样本(csv按行读取,二进制文件按样本的bytes读取,图片一张一张地读取)
3、decode,对文件内容进行解码。
4、批处理,缓存多个样本到样本队列。
上面读取文件的四步都是由子线程完成的(TensorFlow已经封装好API),主线程只负责取样本进行训练。


demo.py(读取CSV文件案例):
import tensorflow as tf
import os
os.environ['TF_CPP_MIN_LOG_LEVEL']='2'  # 设置警告级别


# 读取CSV文件
# 批处理大小,跟队列,数据的数量没有关系,只和这批次取多少数据(batch_size)有关

# 找到数据文件,放入列表   路径+名字->列表当中
file_names = os.listdir("./data/")
print(file_names)  # ['C.csv', 'A.csv', 'B.csv']
# 拼接路径和文件名
filename_list = [os.path.join("./data/", file) for file in file_names ]

# 1、构造文件名队列
file_queue = tf.train.string_input_producer(filename_list)

# 2、构造csv阅读器读取数据
reader = tf.TextLineReader()  # 按行读取
key, value = reader.read(file_queue)  # 根据文件名队列读取(按行读取)
print(key)  # Tensor("ReaderReadV2:0", shape=(), dtype=string)
print(value)  # Tensor("ReaderReadV2:1", shape=(), dtype=string)

# 3、对每行内容解码
# record_defaults:指定每一个样本的每一列的类型和默认值[["None"], [4.0]]
records = [["None"], ["None"]]
example, label = tf.decode_csv(value, record_defaults=records)

# 4、想要读取多个数据,就需要批处理 (batch_size每批次取出样本的数量,和capacity无关。 文件读取完成后会从头开始再次读取(可能会重复))
example_batch, label_batch = tf.train.batch([example, label], batch_size=9, num_threads=1, capacity=9)  # batch_size和capacity一般设为相同的值。
print(example_batch)  # Tensor("batch:0", shape=(9,), dtype=string)
print(label_batch)  # Tensor("batch:1", shape=(9,), dtype=string)


# 开启会话运行结果
with tf.Session() as sess:
    # 创建一个线程协调器
    coord = tf.train.Coordinator()

    # 开启读文件的子线程 (和tf.train.string_input_producer配合使用)
    threads = tf.train.start_queue_runners(sess, coord=coord)

    # 打印读取的内容
    print(sess.run([example_batch, label_batch]))  # <class 'numpy.ndarray'> 类型
    '''
    [array([b'bb1', b'bb2', b'bb3', b'cc1', b'cc2', b'cc3', b'aa1', b'aa2',b'aa3'], dtype=object),
     array([b'11', b'22', b'33', b'11', b'22', b'33', b'11', b'22', b'33'], dtype=object)]
    '''
    # 结束子线程
    coord.request_stop()
    # 等待子线程结束
    coord.join(threads)
如果觉得我的文章对您有用,请随意打赏。你的支持将鼓励我继续创作!
