社区微信群开通啦,扫一扫抢先加入社区官方微信群

社区微信群
kubernetes高可用集群布署
#172826370@qq.com 20170509
本文分为两篇
1.http方式仿问kube-apiserver的高可用模式,无证书模式1.5x yum安装k8s所有组件
2.https方式访问kube-apiserver的高可用模式,即证书模式基于kubernetes1.6x,二进至安装kubernetes所有组件,证书模式请看后面.
#1.系统centos7 所有节点是yum 安装的kubernetes 1.5版本,本方案也实用于二进至版本k8s1.5X,1.6X版本, 物理机集群等。
#前提是集群已经正确运行没有任何问题
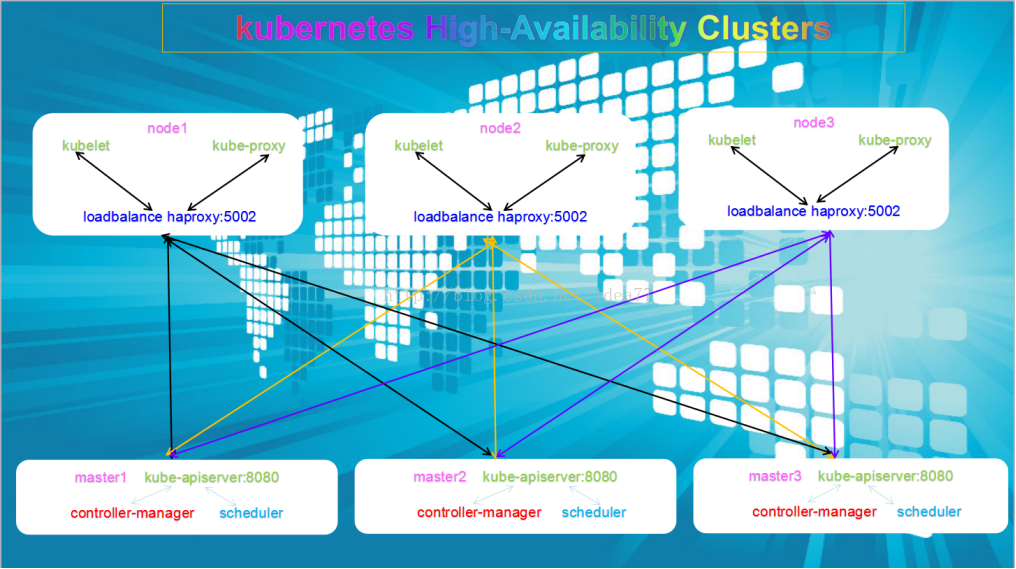
#原理参照 kubadm 和kargo 三个master做高可用所有node上安装haproxy 负载均衡反代三台kube-apiserver的8080端口 api-server为无状态服务
#注意,之前用过nginx配置反代三台apiserver出现创建、删除pod 容器非常慢,3-5分钟,应该有BUG ,建议用haproxy反代,非常顺畅.
#注意所有的机器的SELINUX=disabled # 关闭
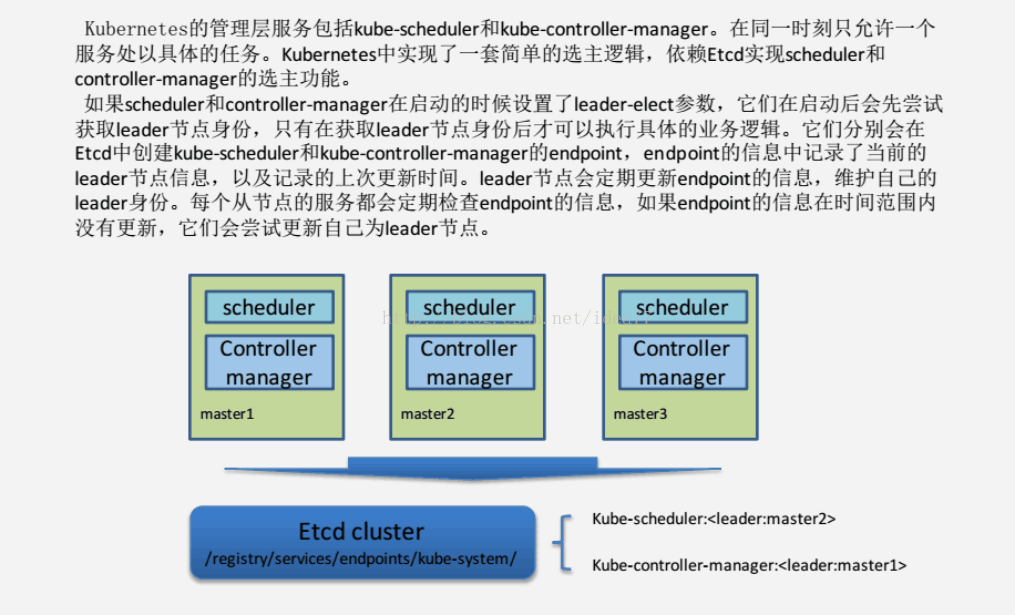
#controller-manager 和scheduler 为有状态服务,同一时间只有一台当选,会在三台master机之间进行选举,由其中一台担任leader的角色
原理图架构一, 本文档基于架构一
架构二
#节点构造如下
cat /etc/hosts
#master
192.168.1.61 master1.txg.com #512M
192.168.1.62 master2.txg.com #512M
192.168.1.63 master2.txg.com #512M
#master软件包
[root@master1 kubernetes]# rpm -qa|grep kube
kubernetes-client-1.5.2-0.2.gitc55cf2b.el7.x86_64
kubernetes-master-1.5.2-0.2.gitc55cf2b.el7.x86_64
flannel-0.7.0-1.el7.x86_64
#etcd-server
192.168.1.65 etcd1.txg.com #512M
192.168.1.66 etcd2.txg.com #512M
192.168.1.67 etcd3.txg.com #512M
#node节点
192.168.1.68 node1.txg.com #4G
192.168.1.69 node2.txg.com #4G
192.168.2.68 node3.txg.com #4G
192.168.2.69 node4.txg.com #4G
#node节点软件包
[root@node4 ~]# rpm -qa|egrep 'kube|docker'
kubernetes-client-1.5.2-0.5.gita552679.el7.x86_64
docker-common-1.12.6-11.el7.centos.x86_64
docker-1.12.6-11.el7.centos.x86_64
kubernetes-node-1.5.2-0.5.gita552679.el7.x86_64
docker-client-1.12.6-11.el7.centos.x86_64
flannel-0.7.0-1.el7.x86_64
[root@node4 ~]# uname -a
Linux node4.txg.com 3.10.0-514.6.2.el7.x86_64 #1 SMP Thu Feb 23 03:04:39 UTC 2017 x86_64 x86_64 x86_64 GNU/Linux
修改master server上的配置文件,我的配置文件在/etc/kubernetes/下面
[root@master1 kubernetes]# pwd
/etc/kubernetes
[root@master1 kubernetes]# ls
apiserver config controller-manager scheduler ssl sslbk
1.修改controller-manager和scheduler配置文件在KUBE_CONTROLLER_MANAGER_ARGS=" " 中间加入 --address=127.0.0.1 --leader-elect=true
KUBE_CONTROLLER_MANAGER_ARGS=" --address=127.0.0.1 --leader-elect=true --service-account-private-key-file=/etc/kubernetes/ssl/apiserver-key.pem --cluster-signing-cert-file=/etc/kubernetes/ssl/ca.pem --cluster-signing-key-file=/etc/kubernetes/ssl/ca-key.pem --root-ca-file=/etc/kubernetes/ssl/ca.pem"
修改scheduler 为 KUBE_SCHEDULER_ARGS=" --address=127.0.0.1 --leader-elect=true"
让节点有选举master leader 功能,ok master配置完成
同步master1上的配置文件到master2 3 节点
2.所有node节点安装 haproxy , yum install haproxy
#配置haproxy.cfg文件 监听5002端口,所向代理kube-apiserver:8080
[root@node4 ~]# cat /etc/haproxy/haproxy.cfg
#---------------------------------------------------------------------
# Example configuration for a possible web application. See the
# full configuration options online.
#
# http://haproxy.1wt.eu/download/1.4/doc/configuration.txt
#
#---------------------------------------------------------------------
#---------------------------------------------------------------------
# Global settings
#---------------------------------------------------------------------
global
# to have these messages end up in /var/log/haproxy.log you will
# need to:
#
# 1) configure syslog to accept network log events. This is done
# by adding the '-r' option to the SYSLOGD_OPTIONS in
# /etc/sysconfig/syslog
#
# 2) configure local2 events to go to the /var/log/haproxy.log
# file. A line like the following can be added to
# /etc/sysconfig/syslog
#
#
log 127.0.0.1 local3
# local2.* /var/log/haproxy.log
chroot /var/lib/haproxy
pidfile /var/run/haproxy.pid
maxconn 4000
user haproxy
group haproxy
daemon
# turn on stats unix socket
stats socket /var/lib/haproxy/stats
#---------------------------------------------------------------------
# common defaults that all the 'listen' and 'backend' sections will
# use if not designated in their block
#---------------------------------------------------------------------
defaults
mode http
log global
option httplog
option dontlognull
option http-server-close
option forwardfor except 127.0.0.0/8
option redispatch
retries 3
timeout http-request 10s
timeout queue 1m
timeout connect 10s
timeout client 1m
timeout server 1m
timeout http-keep-alive 10s
timeout check 10s
maxconn 3000
#---------------------------------------------------------------------
# main frontend which proxys to the backends
#---------------------------------------------------------------------
frontend main *:5002
stats uri /haproxy
# acl url_static path_beg -i /static /images /javascript /stylesheets
# acl url_static path_end -i .jpg .gif .png .css .js
# use_backend static if url_static
default_backend app
#---------------------------------------------------------------------
# static backend for serving up images, stylesheets and such
#---------------------------------------------------------------------
#backend static
# balance roundrobin
# server static 127.0.0.1:4331 check
#---------------------------------------------------------------------
# round robin balancing between the various backends
#---------------------------------------------------------------------
backend app
mode http
balance roundrobin
server app1 192.168.1.61:8080 check
server app2 192.168.1.62:8080 check
server app3 192.168.1.63:8080 check
#server 部份按照自己apiserver 三台 配置进来即可
3.配置rsyslog收集haproxy日志
[root@node4 ~]# echo -e '$ModLoad imudp n $UDPServerRun 514 n local3.* /var/log/haproxy.log' >> /etc/rsyslog.conf
4.配置node节点配置
#配置config 文件 KUBE_MASTER="--master=http://127.0.0.1:5002" 参数指向haproxy的5002端口
[root@node4 kubernetes]# pwd
/etc/kubernetes
[root@node4 kubernetes]# ls
config kubelet proxy
[root@node4 kubernetes]# cat config
###
# kubernetes system config
#
# The following values are used to configure various aspects of all
# kubernetes services, including
#
# kube-apiserver.service
# kube-controller-manager.service
# kube-scheduler.service
# kubelet.service
# kube-proxy.service
# logging to stderr means we get it in the systemd journal
KUBE_LOGTOSTDERR="--logtostderr=true"
# journal message level, 0 is debug
KUBE_LOG_LEVEL="--v=0"
# Should this cluster be allowed to run privileged docker containers
KUBE_ALLOW_PRIV="--allow-privileged=true"
# How the controller-manager, scheduler, and proxy find the apiserver
KUBE_MASTER="--master=http://127.0.0.1:5002"
#配置kubelet KUBELET_API_SERVER="--api-servers=http://127.0.0.1:5002"
[root@node4 kubernetes]# cat kubelet
# kubernetes kubelet (minion) config
# The address for the info server to serve on (set to 0.0.0.0 or "" for all interfaces)
KUBELET_ADDRESS="--address=0.0.0.0"
# The port for the info server to serve on
#KUBELET_PORT="--port=10250"
# You may leave this blank to use the actual hostname
KUBELET_HOSTNAME="--hostname-override=192.168.2.69"
# location of the api-server
KUBELET_API_SERVER="--api-servers=http://127.0.0.1:5002"
# pod infrastructure container
#KUBELET_POD_INFRA_CONTAINER="--pod-infra-container-image=registry.access.redhat.com/rhel7/pod-infrastructure:latest"
# Add your own!
KUBELET_ARGS="--cluster_dns=172.1.0.2 --cluster_domain=cluster.local"
#所有node节点照此配置完成
5.#重启所有node节点上的服务,在这里我用ansible来处理,ansible请自行脑补,建议大家用ansible来批量处理会快很多
#没有安装ansible的,请自行手动重启
[root@master1 ~]# ansible -m shell -a ' systemctl restart rsyslog.service ;service haproxy restart ;systemctl restart kubelet.service;systemctl restart kube-proxy.service' 'nodes'
node3.txg.com | SUCCESS | rc=0 >>
Redirecting to /bin/systemctl restart haproxy.service
node4.txg.com | SUCCESS | rc=0 >>
Redirecting to /bin/systemctl restart haproxy.service
node2.txg.com | SUCCESS | rc=0 >>
Redirecting to /bin/systemctl restart haproxy.service
node1.txg.com | SUCCESS | rc=0 >>
Redirecting to /bin/systemctl restart haproxy.service
#查看所有node上 haproxy 日志 200为正常
[root@node3 kubernetes]# tail -f /var/log/haproxy.log
2017-05-09T11:23:12+08:00 localhost haproxy[18278]: 127.0.0.1:42970 [09/May/2017:11:23:11.992] main app/app1 52/0/0/186/238 200 2507 - - ---- 6/6/5/2/0 0/0 "PUT /api/v1/nodes/192.168.2.69/status HTTP/1.1"
2017-05-09T11:23:22+08:00 localhost haproxy[18278]: 127.0.0.1:42970 [09/May/2017:11:23:12.229] main app/app2 10000/0/1/1/10002 200 2519 - - ---- 6/6/5/1/0 0/0 "GET /api/v1/nodes?fieldSelector=metadata.name%3D192.168.2.69&resourceVersion=0 HTTP/1.1"
2017-05-09T11:23:22+08:00 localhost haproxy[18278]: 127.0.0.1:42970 [09/May/2017:11:23:22.232] main app/app3 60/0/0/123/183 200 2507 - - ---- 6/6/5/2/0 0/0 "PUT /api/v1/nodes/192.168.2.69/status HTTP/1.1"
2017-05-09T11:23:28+08:00 localhost haproxy[18278]: 127.0.0.1:42722 [09/May/2017:11:22:21.385] main app/app1 7384/0/1/0/67387 200 167 - - sD-- 5/5/4/1/0 0/0 "GET /api/v1/watch/pods?fieldSelector=spec.nodeName%3D192.168.2.69&resourceVersion=2348326&timeoutSeconds=424 HTTP/1.1"
2017-05-09T11:23:32+08:00 localhost haproxy[18278]: 127.0.0.1:43096 [09/May/2017:11:23:32.416] main app/app2 0/0/0/1/1 200 2519 - - ---- 6/6/5/1/0 0/0 "GET /api/v1/nodes?fieldSelector=metadata.name%3D192.168.2.69&resourceVersion=0 HTTP/1.1"
2017-05-09T11:23:32+08:00 localhost haproxy[18278]: 127.0.0.1:43096 [09/May/2017:11:23:32.418] main app/app3 53/0/0/92/145 200 2507 - - ---- 6/6/5/2/0 0/0 "PUT /api/v1/nodes/192.168.2.69/status HTTP/1.1"
2017-05-09T11:23:35+08:00 localhost haproxy[18278]: 127.0.0.1:43096 [09/May/2017:11:23:32.564] main app/app1 2459/0/1/1/2461 200 2507 - - ---- 6/6/5/3/0 0/0 "GET /api/v1/namespaces/kube-system/secrets/default-token-p5l8p HTTP/1.1"
2017-05-09T11:23:42+08:00 localhost haproxy[18278]: 127.0.0.1:38410 [09/May/2017:11:14:38.515] main app/app3 0/0/1/1/544002 200 254800 - - ---- 6/6/4/1/0 0/0 "GET /api/v1/watch/endpoints?resourceVersion=2347840&timeoutSeconds=544 HTTP/1.1"
2017-05-09T11:23:42+08:00 localhost haproxy[18278]: 127.0.0.1:43096 [09/May/2017:11:23:35.024] main app/app3 7540/0/0/1/7541 200 2519 - - ---- 6/6/5/1/0 0/0 "GET /api/v1/nodes?fieldSelector=metadata.name%3D192.168.2.69&resourceVersion=0 HTTP/1.1"
2017-05-09T11:23:42+08:00 localhost haproxy[18278]: 127.0.0.1:43096 [09/May/2017:11:23:42.566] main app/app1 51/0/1/111/163 200 2507 - - ---- 6/6/5/2/0 0/0 "PUT /api/v1/nodes/192.168.2.69/status HTTP/1.1"
#重启所有master节点上的服务
ansible -m shell -a 'systemctl restart kube-apiserver.service;systemctl restart kube-controller-manager.service ;systemctl restart kube-scheduler.service ' 'masters'
6.查看leader信息位于哪个节点
[root@master3 ~]# tail -f /var/log/messages
May 9 11:09:43 master1 kube-scheduler: I0509 11:09:43.354272 4636 leaderelection.go:247] lock is held by master3.txg.com and has not yet expired
May 9 11:09:43 master1 kube-controller-manager: I0509 11:09:43.887592 4532 leaderelection.go:247] lock is held by master2.txg.com and has not yet expired
#这时, kube-scheduler leader位于master3 和kube-controller-manager 在master2
[root@master3 ~]# kubectl -n kube-system get ep kube-controller-manager -o yaml
apiVersion: v1
kind: Endpoints
metadata:
annotations:
control-plane.alpha.kubernetes.io/leader: '{"holderIdentity":"master2.txg.com","leaseDurationSeconds":15,"acquireTime":"2017-05-08T10:41:07Z","renewTime":"2017-05-09T03:14:02Z","leaderTransitions":0}'
creationTimestamp: 2017-05-08T10:41:07Z
name: kube-controller-manager
namespace: kube-system
resourceVersion: "2347791"
selfLink: /api/v1/namespaces/kube-system/endpoints/kube-controller-manager
uid: d7dae24f-33da-11e7-9a51-525400c2bc59
subsets: []
[root@master1 ~]# kubectl -n kube-system get ep kube-scheduler -o yaml
apiVersion: v1
kind: Endpoints
metadata:
annotations:
control-plane.alpha.kubernetes.io/leader: '{"holderIdentity":"master3.txg.com","leaseDurationSeconds":15,"acquireTime":"2017-05-08T10:41:08Z","renewTime":"2017-05-09T03:14:27Z","leaderTransitions":0}'
creationTimestamp: 2017-05-08T10:41:08Z
name: kube-scheduler
namespace: kube-system
resourceVersion: "2347830"
selfLink: /api/v1/namespaces/kube-system/endpoints/kube-scheduler
uid: d87a235a-33da-11e7-9eb5-52540081c06a
subsets: []
6.我们关掉一台集群,测试集群创建yaml看看会怎么样
[root@master2 ~]# poweroff
Connection to master2.txg.com closed by remote host.
Connection to master2.txg.com closed.
#可以看到 controller-manager和 scheduler已转移到master3
[root@master1 ~]# tail -f /var/log/messages
May 9 14:16:26 master1 kube-controller-manager: I0509 14:16:26.550307 4532 leaderelection.go:247] lock is held by master3.txg.com and has not yet expired
May 9 14:16:26 master1 kube-scheduler: I0509 14:16:26.574123 4636 leaderelection.go:247] lock is held by master3.txg.com and has not yet expired
May 9 14:16:27 master1 kube-apiserver: W0509 14:16:27.593709 4322 controller.go:392] Resetting endpoints for master service "kubernetes" to &TypeMeta{Kind:,APIVersion:,}
May 9 14:16:29 master1 kube-controller-manager: I0509 14:16:29.708160 4532 leaderelection.go:247] lock is held by master3.txg.com and has not yet expired
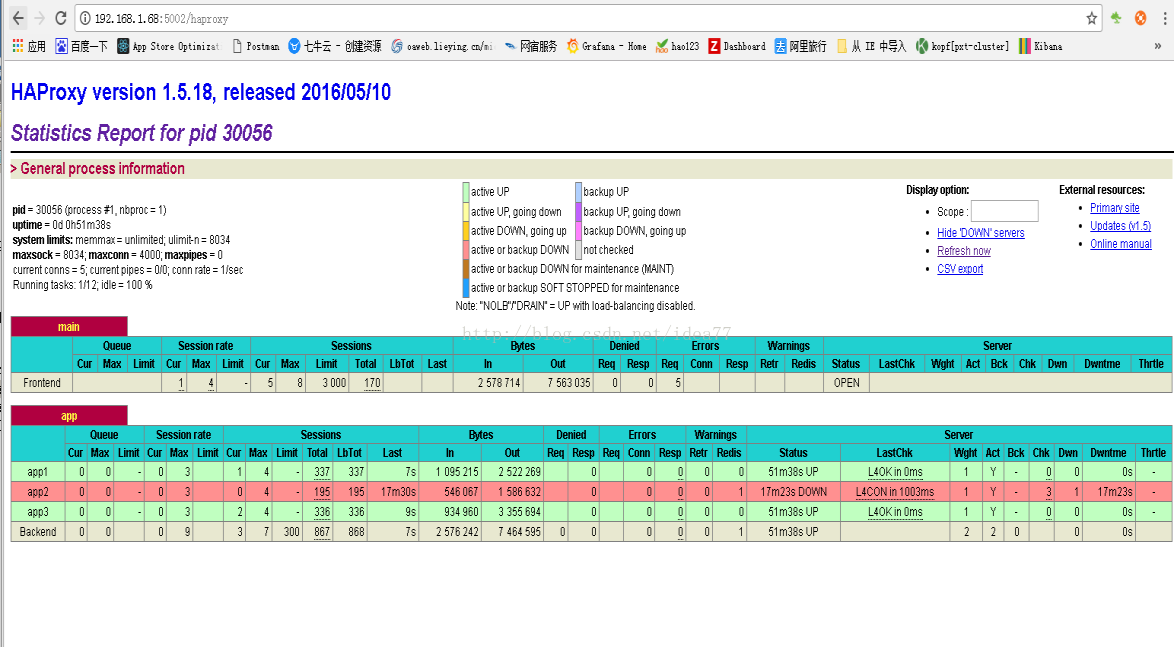
#看看haproxy状态,进入任意一台node监控页面查看haproxy状态
http://192.168.1.68:5002/haproxy
http://192.168.1.69:5002/haproxy
http://192.168.2.68:5002/haproxy
http://192.168.2.69:5002/haproxy
#master2已被踢出集群负载
集群状态正常
登录任意一台UI
可以正常仿问
Kubectl也应该正常
[root@master3 ~]# kubectl get cs
NAME STATUS MESSAGE ERROR
scheduler Healthy ok
controller-manager Healthy ok
etcd-1 Healthy {"health": "true"}
etcd-2 Healthy {"health": "true"}
etcd-0 Healthy {"health": "true"}
[root@master3 ~]# kubectl get all --all-namespaces
NAMESPACE NAME DESIRED CURRENT UP-TO-DATE AVAILABLE AGE
kube-system deploy/default-http-backend 1 1 1 1 6d
kube-system deploy/heapster-v1.2.0.1 1 1 1 1 19d
kube-system deploy/kube-dns 1 1 1 1 19d
kube-system deploy/kubernetes-dashboard 1 1 1 1 20d
NAMESPACE NAME DESIRED CURRENT READY AGE
default rc/nginx-controller 1 1 1 3h
NAMESPACE NAME CLUSTER-IP EXTERNAL-IP PORT(S) AGE
default svc/kubernetes 172.1.0.1 <none> 443/TCP 20d
default svc/nginx-service-nodeport 172.1.64.195 <nodes> 80:30097/TCP 2d
kube-system svc/default-http-backend 172.1.222.13 <none> 80/TCP 6d
kube-system svc/heapster 172.1.10.20 <none> 80/TCP 19d
kube-system svc/kube-dns 172.1.0.2 <none> 53/UDP,53/TCP 19d
kube-system svc/kubernetes-dashboard 172.1.118.216 <nodes> 80:31574/TCP 20d
kube-system svc/monitoring-grafana 172.1.220.49 <none> 80/TCP 19d
kube-system svc/monitoring-influxdb 172.1.111.159 <none> 8083/TCP,8086/TCP 19d
kube-system svc/traefik-web-ui 172.1.41.72 <none> 80/TCP 5d
NAMESPACE NAME DESIRED CURRENT READY AGE
kube-system rs/default-http-backend-673928963 1 1 1 6d
kube-system rs/heapster-v1.2.0.1-3604517863 1 1 1 19d
kube-system rs/kube-dns-167683681 1 1 1 19d
kube-system rs/kubernetes-dashboard-744911765 1 1 1 20d
NAMESPACE NAME READY STATUS RESTARTS AGE
default po/busybox 1/1 Running 2 2h
default po/nginx-controller-sb24q 1/1 Running 0 3h
kube-system po/default-http-backend-673928963-m2txz 1/1 Running 0 15h
kube-system po/heapster-v1.2.0.1-3604517863-l25wx 1/1 Running 0 15h
kube-system po/kube-dns-167683681-nzb98 4/4 Running 0 15h
kube-system po/kubernetes-dashboard-744911765-1l0gv 1/1 Running 1 2d
kube-system po/traefik-ingress-controller-2wnnz 1/1 Running 1 5d
kube-system po/traefik-ingress-controller-2xrf8 1/1 Running 1 5d
kube-system po/traefik-ingress-controller-4xx72 1/1 Running 1 5d
kube-system po/traefik-ingress-controller-cv0bt 1/1 Running 1 5d
[root@master3 ~]#
#至此非http方式的配置高可用集群配置完成
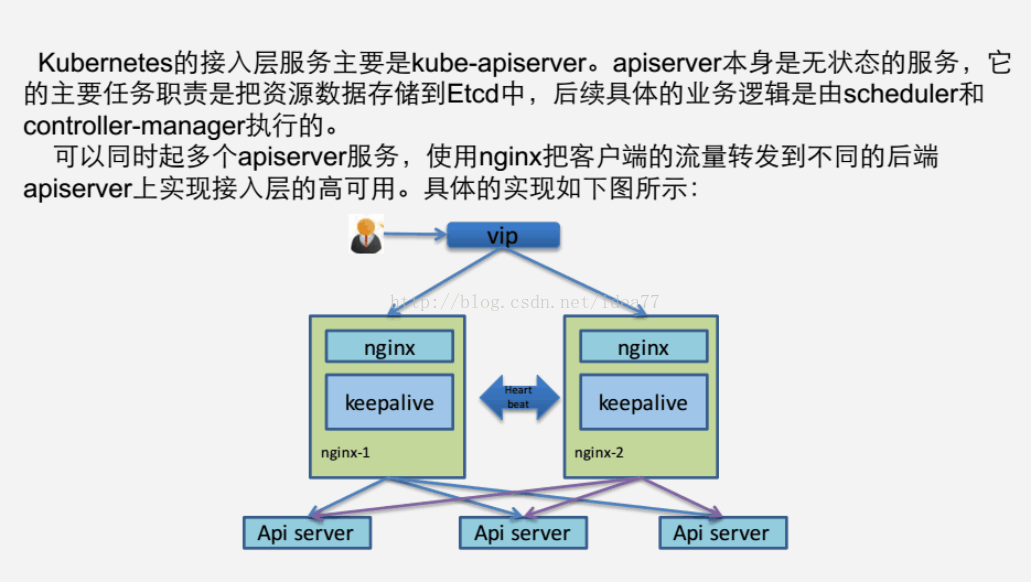
2.OK前面的http模式我们已经布署完成了,现在布署https集群模式
基于k8bernets 1.6x集群使用https证书来连接apiserver,前提条件是证书下发到所有节点,所有节点工作正常,存在以下文件
具体证书的制作请参考 宋静超大神的文章
https://github.com/rootsongjc/kubernetes-handbook/blob/master/practice/create-tls-and-secret-key.md
[root@node3 kubernetes]# cd /etc/kubernetes
[root@node3 kubernetes]# ls
bootstrap.kubeconfig kubelet.kubeconfig kube-proxy.kubeconfig ssl token.csv
[root@node3 kubernetes]# pwd
/etc/kubernetes
[root@node3 kubernetes]#
首选我们配置haproxy用tcp穿透https即haproxy可不用配置证书,注意此处非http模式
mode tcp
cat /etc/haproxy/haproxy.cfg
#---------------------------------------------------------------------
# Example configuration for a possible web application. See the
# full configuration options online.
#
# http://haproxy.1wt.eu/download/1.4/doc/configuration.txt
#
#---------------------------------------------------------------------
#---------------------------------------------------------------------
# Global settings
#---------------------------------------------------------------------
global
# to have these messages end up in /var/log/haproxy.log you will
# need to:
#
# 1) configure syslog to accept network log events. This is done
# by adding the '-r' option to the SYSLOGD_OPTIONS in
# /etc/sysconfig/syslog
#
# 2) configure local2 events to go to the /var/log/haproxy.log
# file. A line like the following can be added to
# /etc/sysconfig/syslog
#
#
log 127.0.0.1 local3
# local2.* /var/log/haproxy.log
chroot /var/lib/haproxy
pidfile /var/run/haproxy.pid
maxconn 4000
user haproxy
group haproxy
daemon
# turn on stats unix socket
stats socket /var/lib/haproxy/stats
#---------------------------------------------------------------------
# common defaults that all the 'listen' and 'backend' sections will
# use if not designated in their block
#---------------------------------------------------------------------
defaults
mode http
log global
option httplog
option dontlognull
option http-server-close
option forwardfor except 127.0.0.0/8
option redispatch
retries 3
timeout http-request 10s
timeout queue 1m
timeout connect 10s
timeout client 1m
timeout server 1m
timeout http-keep-alive 10s
timeout check 10s
maxconn 3000
#---------------------------------------------------------------------
# main frontend which proxys to the backends
#---------------------------------------------------------------------
#frontend main *:6443
# stats uri /haproxy
# acl url_static path_beg -i /static /images /javascript /stylesheets
# acl url_static path_end -i .jpg .gif .png .css .js
# use_backend static if url_static
# default_backend k8s-apiserver
#---------------------------------------------------------------------
# static backend for serving up images, stylesheets and such
#---------------------------------------------------------------------
#backend static
# balance roundrobin
# server static 127.0.0.1:4331 check
#---------------------------------------------------------------------
# round robin balancing between the various backends
#---------------------------------------------------------------------
#backend k8s-apiserver
listen k8s-apiserver
bind 0.0.0.0:6443
mode tcp #tcp模式
balance roundrobin
server master1.txg.com 192.168.1.61:6443 check #此处轮寻三台api
server master2.txg.com 192.168.1.62:6443 check
server master3.txg.com 192.168.1.63:6443 check
#--------------------------------------------------------------------
listen localhost 0.0.0.0:8090
mode http
transparent
stats refresh 30s
stats uri /haproxy-stats 监控页面
#ok 完成后
#修改三处证书文件
cd /etc/kubernetes/
bootstrap.kubeconfig kubelet.kubeconfig kube-proxy.kubeconfig
server: https://192.168.1.63:6443 为制作证书时使用的apiserver的地址
将server: https://192.168.1.63:6443 这里修改为 https://127.0.0.1:6443
重启相关服务 systemctl restart haproxy.service kubelet.service kube-proxy.service
下发证书文件到所有node节点
#去任意一台master上查看 集群状态
[root@master2 ~]# kubectl get node -o wide
NAME STATUS AGE VERSION EXTERNAL-IP OS-IMAGE KERNEL-VERSION
jenkins-2 Ready 11d v1.6.4 <none> CentOS Linux 7 (Core) 4.4.71-1.el7.elrepo.x86_64
node1.txg.com Ready 11d v1.6.4 <none> CentOS Linux 7 (Core) 4.4.71-1.el7.elrepo.x86_64
node2.txg.com Ready 11d v1.6.4 <none> CentOS Linux 7 (Core) 4.4.71-1.el7.elrepo.x86_64
node3.txg.com Ready 11d v1.6.4 <none> CentOS Linux 7 (Core) 4.4.71-1.el7.elrepo.x86_64
node4.txg.com Ready 11d v1.6.4 <none> CentOS Linux 7 (Core) 3.10.0-514.6.2.el7.x86_64
#所有集群节点应该OK,此时关闭任意一台apiserver集群应该能正常工作,haproxy会踢掉无法使用的apiserver节点
#仿问任一 node节点上的haproxy监控界面
http://192.168.2.68:8090/haproxy-stats
应该所有l4 ok
至此https高可用完成
如果觉得我的文章对您有用,请随意打赏。你的支持将鼓励我继续创作!