社区微信群开通啦,扫一扫抢先加入社区官方微信群

社区微信群
Spring是Java企业版(Java Enterprise Edition,JEE,也称J2EE)的轻量级代替品。无需开发重量级的Enterprise JavaBean(EJB),Spring为企业级Java开发提供了一种相对简单的方法,通过依赖注入和面向切面编程,用简单的Java对象(Plain Old Java Object,POJO)实现了EJB的功能。
虽然Spring的组件代码是轻量级的,但它的配置却是重量级的。一开始,Spring用XML配置,而且是很多XML配置。Spring 2.5引入了基于注解的组件扫描,这消除了大量针对应用程序自身组件的显式XML配置。Spring 3.0引入了基于Java的配置,这是一种类型安全的可重构配置方式,可以代替XML。
所有这些配置都代表了开发时的损耗。因为在思考Spring特性配置和解决业务问题之间需要进行思维切换,所以编写配置挤占了编写应用程序逻辑的时间。和所有框架一样,Spring实用,但与此同时它要求的回报也不少。
除此之外,项目的依赖管理也是一件耗时耗力的事情。在环境搭建时,需要分析要导入哪些库的坐标,而且还需要分析导入与之有依赖关系的其他库的坐标,一旦选错了依赖的版本,随之而来的不兼容问题就会严重阻碍项目的开发进度。
SpringBoot对上述Spring的缺点进行的改善和优化,基于约定优于配置的思想,可以让开发人员不必在配置与逻辑业务之间进行思维的切换,全身心的投入到逻辑业务的代码编写中,从而大大提高了开发的效率,一定程度上缩短了项目周期。
起步依赖
起步依赖本质上是一个Maven项目对象模型(Project Object Model,POM),定义了对其他库的传递依赖,这些东西加在一起即支持某项功能。
简单的说,起步依赖就是将具备某种功能的坐标打包到一起,并提供一些默认的功能。
自动配置
Spring Boot的自动配置是一个运行时(更准确地说,是应用程序启动时)的过程,考虑了众多因素,才决定Spring配置应该用哪个,不该用哪个。该过程是Spring自动完成的。
注意:起步依赖和自动配置的原理剖析会在第三章《SpringBoot原理分析》进行详细讲解
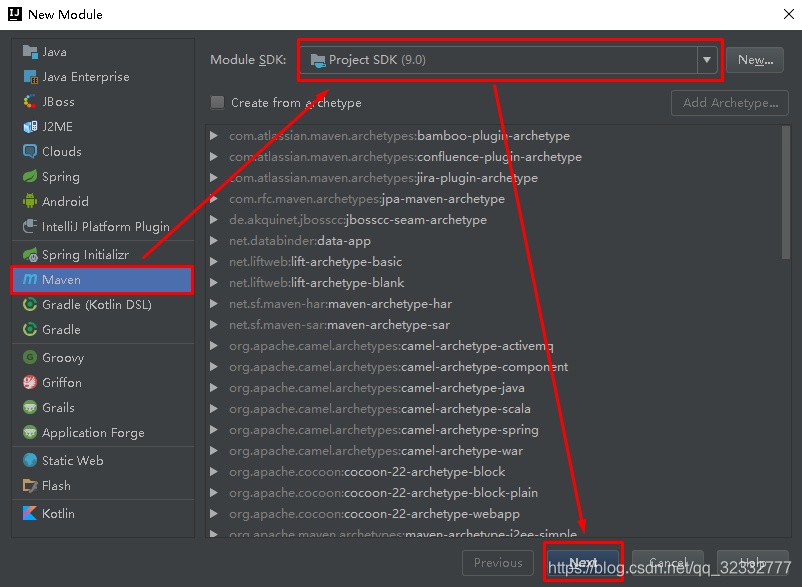
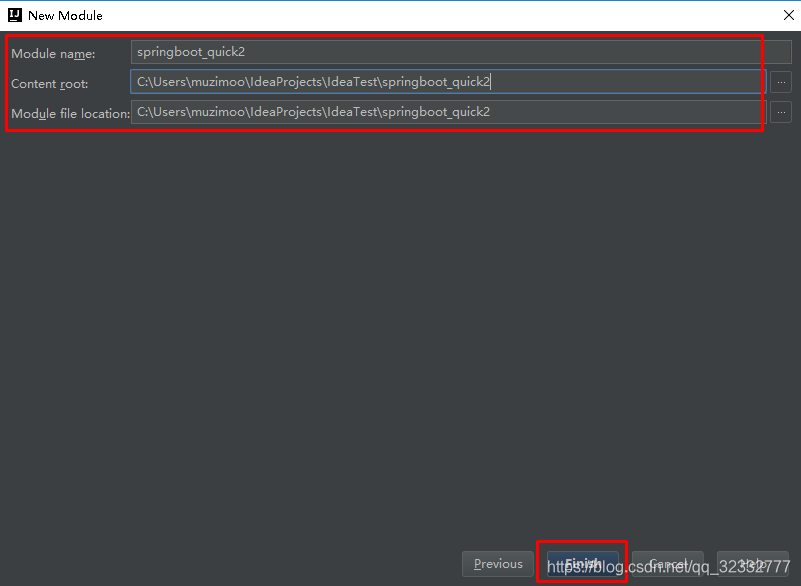
使用idea工具创建一个maven工程,该工程为普通的java工程即可

SpringBoot要求,项目要继承SpringBoot的起步依赖spring-boot-starter-parent
<parent>
    <groupId>org.springframework.boot</groupId>
    <artifactId>spring-boot-starter-parent</artifactId>
    <version>2.0.1.RELEASE</version>
</parent>
SpringBoot要集成SpringMVC进行Controller的开发,所以项目要导入web的启动依赖
<dependencies>
    <dependency>
        <groupId>org.springframework.boot</groupId>
        <artifactId>spring-boot-starter-web</artifactId>
    </dependency>
</dependencies>
要通过SpringBoot提供的引导类起步SpringBoot才可以进行访问
package com.itheima;

import org.springframework.boot.SpringApplication;
import org.springframework.boot.autoconfigure.SpringBootApplication;

@SpringBootApplication
public class MySpringBootApplication {

    public static void main(String[] args) {
        SpringApplication.run(MySpringBootApplication.class);
    }

}
在引导类MySpringBootApplication同级包或者子级包中创建QuickStartController
package com.itheima.controller;

import org.springframework.stereotype.Controller;
import org.springframework.web.bind.annotation.RequestMapping;
import org.springframework.web.bind.annotation.ResponseBody;

@Controller
public class QuickStartController {

    @RequestMapping("/quick")
    @ResponseBody
    public String quick(){
        return "springboot 访问成功!";
    }

}
执行SpringBoot起步类的主方法,控制台打印日志如下:
.   ____          _            __ _ _
 /\ / ___'_ __ _ _(_)_ __  __ _
( ( )___ | '_ | '_| | '_ / _` |
 \/  ___)| |_)| | | | | || (_| |  ) ) ) )
  '  |____| .__|_| |_|_| |___, | / / / /
 =========|_|==============|___/=/_/_/_/
 :: Spring Boot ::        (v2.0.1.RELEASE)

2018-05-08 14:29:59.714  INFO 5672 --- [           main] com.itheima.MySpringBootApplication      : Starting MySpringBootApplication on DESKTOP-RRUNFUH with PID 5672 (C:UsersmuzimooIdeaProjectsIdeaTestspringboot_quicktargetclasses started by muzimoo in C:UsersmuzimooIdeaProjectsIdeaTest)
... ... ...
o.s.w.s.handler.SimpleUrlHandlerMapping  : Mapped URL path [/**] onto handler of type [class org.springframework.web.servlet.resource.ResourceHttpRequestHandler]
2018-05-08 14:30:03.126  INFO 5672 --- [           main] o.s.j.e.a.AnnotationMBeanExporter        : Registering beans for JMX exposure on startup
2018-05-08 14:30:03.196  INFO 5672 --- [           main] o.s.b.w.embedded.tomcat.TomcatWebServer  : Tomcat started on port(s): 8080 (http) with context path ''
2018-05-08 14:30:03.206  INFO 5672 --- [           main] com.itheima.MySpringBootApplication      : Started MySpringBootApplication in 4.252 seconds (JVM running for 5.583)
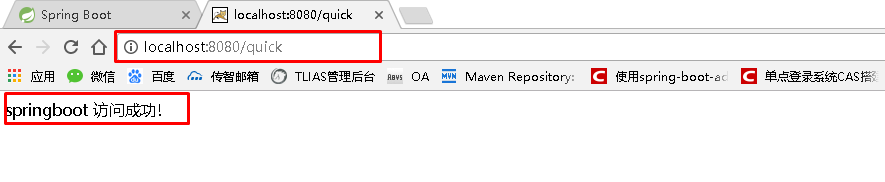
通过日志发现,Tomcat started on port(s): 8080 (http) with context path ‘’
tomcat已经起步,端口监听8080,web应用的虚拟工程名称为空
打开浏览器访问url地址为:http://localhost:8080/quick
我们在开发中反复修改类、页面等资源,每次修改后都是需要重新启动才生效,这样每次启动都很麻烦,浪费了大量的时间,我们可以在修改代码后不重启就能生效,在 pom.xml 中添加如下配置就可以实现这样的功能,我们称之为热部署。
<!--热部署配置-->
<dependency>
    <groupId>org.springframework.boot</groupId>
    <artifactId>spring-boot-devtools</artifactId>
</dependency>
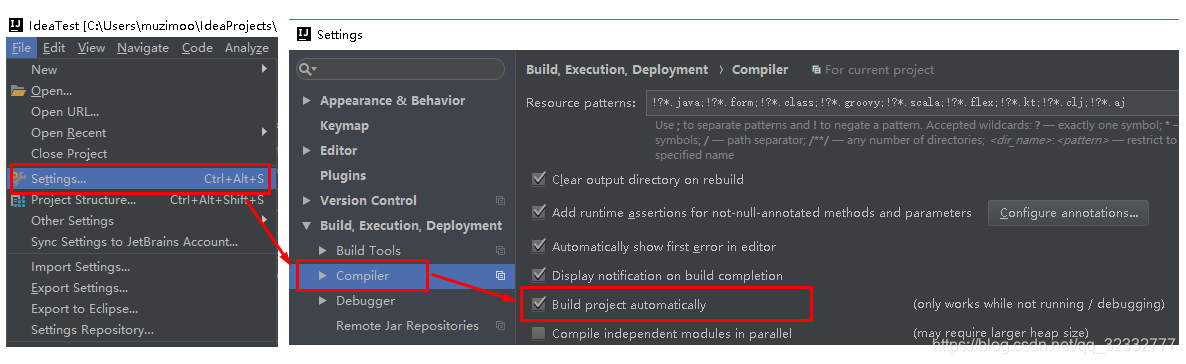
注意:IDEA进行SpringBoot热部署失败原因
出现这种情况,并不是热部署配置问题,其根本原因是因为Intellij IEDA默认情况下不会自动编译,需要对IDEA进行自动编译的设置,如下:
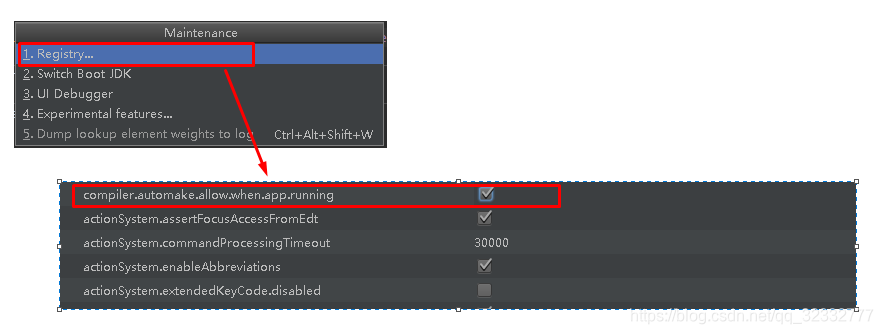
然后 Shift+Ctrl+Alt+/,选择Registry

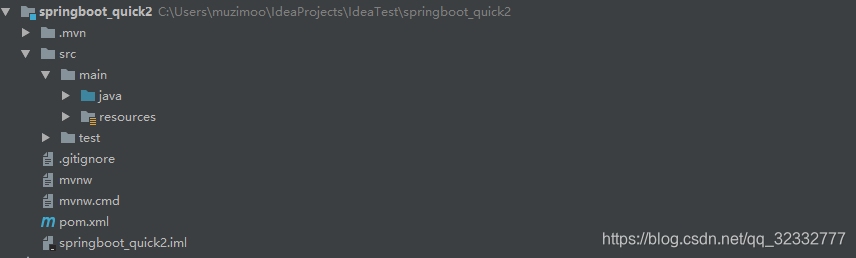
通过idea快速创建的SpringBoot项目的pom.xml中已经导入了我们选择的web的起步依赖的坐标
<?xml version="1.0" encoding="UTF-8"?>
<project xmlns="http://maven.apache.org/POM/4.0.0" xmlns:xsi="http://www.w3.org/2001/XMLSchema-instance"
	xsi:schemaLocation="http://maven.apache.org/POM/4.0.0 http://maven.apache.org/xsd/maven-4.0.0.xsd">
	<modelVersion>4.0.0</modelVersion>

	<groupId>com.itheima</groupId>
	<artifactId>springboot_quick2</artifactId>
	<version>0.0.1-SNAPSHOT</version>
	<packaging>jar</packaging>

	<name>springboot_quick2</name>
	<description>Demo project for Spring Boot</description>

	<parent>
		<groupId>org.springframework.boot</groupId>
		<artifactId>spring-boot-starter-parent</artifactId>
		<version>2.0.1.RELEASE</version>
		<relativePath/> <!-- lookup parent from repository -->
	</parent>

	<properties>
		<project.build.sourceEncoding>UTF-8</project.build.sourceEncoding>
		<project.reporting.outputEncoding>UTF-8</project.reporting.outputEncoding>
		<java.version>9</java.version>
	</properties>

	<dependencies>
		<dependency>
			<groupId>org.springframework.boot</groupId>
			<artifactId>spring-boot-starter-web</artifactId>
		</dependency>

		<dependency>
			<groupId>org.springframework.boot</groupId>
			<artifactId>spring-boot-starter-test</artifactId>
			<scope>test</scope>
		</dependency>
	</dependencies>

	<build>
		<plugins>
			<plugin>
				<groupId>org.springframework.boot</groupId>
				<artifactId>spring-boot-maven-plugin</artifactId>
			</plugin>
		</plugins>
	</build>


</project>
可以使用快速入门的方式创建Controller进行访问,此处不再赘述
按住Ctrl点击pom.xml中的spring-boot-starter-parent,跳转到了spring-boot-starter-parent的pom.xml,xml配置如下(只摘抄了部分重点配置):
<parent>
  <groupId>org.springframework.boot</groupId>
  <artifactId>spring-boot-dependencies</artifactId>
  <version>2.0.1.RELEASE</version>
  <relativePath>../../spring-boot-dependencies</relativePath>
</parent>
按住Ctrl点击pom.xml中的spring-boot-starter-dependencies,跳转到了spring-boot-starter-dependencies的pom.xml,xml配置如下(只摘抄了部分重点配置):
<properties>
  	<activemq.version>5.15.3</activemq.version>
  	<antlr2.version>2.7.7</antlr2.version>
  	<appengine-sdk.version>1.9.63</appengine-sdk.version>
  	<artemis.version>2.4.0</artemis.version>
  	<aspectj.version>1.8.13</aspectj.version>
  	<assertj.version>3.9.1</assertj.version>
  	<atomikos.version>4.0.6</atomikos.version>
  	<bitronix.version>2.1.4</bitronix.version>
  	<build-helper-maven-plugin.version>3.0.0</build-helper-maven-plugin.version>
  	<byte-buddy.version>1.7.11</byte-buddy.version>
  	... ... ...
</properties>
<dependencyManagement>
  	<dependencies>
      	<dependency>
        	<groupId>org.springframework.boot</groupId>
        	<artifactId>spring-boot</artifactId>
        	<version>2.0.1.RELEASE</version>
      	</dependency>
      	<dependency>
        	<groupId>org.springframework.boot</groupId>
        	<artifactId>spring-boot-test</artifactId>
        	<version>2.0.1.RELEASE</version>
      	</dependency>
      	... ... ...
	</dependencies>
</dependencyManagement>
<build>
  	<pluginManagement>
    	<plugins>
      		<plugin>
        		<groupId>org.jetbrains.kotlin</groupId>
        		<artifactId>kotlin-maven-plugin</artifactId>
        		<version>${kotlin.version}</version>
      		</plugin>
      		<plugin>
        		<groupId>org.jooq</groupId>
        		<artifactId>jooq-codegen-maven</artifactId>
        		<version>${jooq.version}</version>
      		</plugin>
      		<plugin>
        		<groupId>org.springframework.boot</groupId>
        		<artifactId>spring-boot-maven-plugin</artifactId>
        		<version>2.0.1.RELEASE</version>
      		</plugin>
          	... ... ...
    	</plugins>
  	</pluginManagement>
</build>
从上面的spring-boot-starter-dependencies的pom.xml中我们可以发现,一部分坐标的版本、依赖管理、插件管理已经定义好,所以我们的SpringBoot工程继承spring-boot-starter-parent后已经具备版本锁定等配置了。所以起步依赖的作用就是进行依赖的传递。
按住Ctrl点击pom.xml中的spring-boot-starter-web,跳转到了spring-boot-starter-web的pom.xml,xml配置如下(只摘抄了部分重点配置):
<?xml version="1.0" encoding="UTF-8"?>
<project xsi:schemaLocation="http://maven.apache.org/POM/4.0.0 http://maven.apache.org/xsd/maven-4.0.0.xsd" xmlns="http://maven.apache.org/POM/4.0.0"
    xmlns:xsi="http://www.w3.org/2001/XMLSchema-instance">
  	<modelVersion>4.0.0</modelVersion>
  	<parent>
    	<groupId>org.springframework.boot</groupId>
    	<artifactId>spring-boot-starters</artifactId>
    	<version>2.0.1.RELEASE</version>
  	</parent>
  	<groupId>org.springframework.boot</groupId>
  	<artifactId>spring-boot-starter-web</artifactId>
  	<version>2.0.1.RELEASE</version>
  	<name>Spring Boot Web Starter</name>

  	<dependencies>
    	<dependency>
      		<groupId>org.springframework.boot</groupId>
      		<artifactId>spring-boot-starter</artifactId>
      		<version>2.0.1.RELEASE</version>
      		<scope>compile</scope>
    	</dependency>
    	<dependency>
      		<groupId>org.springframework.boot</groupId>
      		<artifactId>spring-boot-starter-json</artifactId>
      		<version>2.0.1.RELEASE</version>
      		<scope>compile</scope>
    	</dependency>
    	<dependency>
      		<groupId>org.springframework.boot</groupId>
      		<artifactId>spring-boot-starter-tomcat</artifactId>
      		<version>2.0.1.RELEASE</version>
      		<scope>compile</scope>
    	</dependency>
    	<dependency>
      		<groupId>org.hibernate.validator</groupId>
      		<artifactId>hibernate-validator</artifactId>
      		<version>6.0.9.Final</version>
      		<scope>compile</scope>
    	</dependency>
    	<dependency>
      		<groupId>org.springframework</groupId>
      		<artifactId>spring-web</artifactId>
      		<version>5.0.5.RELEASE</version>
      		<scope>compile</scope>
    	</dependency>
    	<dependency>
      		<groupId>org.springframework</groupId>
      		<artifactId>spring-webmvc</artifactId>
      		<version>5.0.5.RELEASE</version>
      		<scope>compile</scope>
    	</dependency>
  	</dependencies>
</project>
从上面的spring-boot-starter-web的pom.xml中我们可以发现,spring-boot-starter-web就是将web开发要使用的spring-web、spring-webmvc等坐标进行了“打包”,这样我们的工程只要引入spring-boot-starter-web起步依赖的坐标就可以进行web开发了,同样体现了依赖传递的作用。
按住Ctrl点击查看启动类MySpringBootApplication上的注解@SpringBootApplication
@SpringBootApplication
public class MySpringBootApplication {
    public static void main(String[] args) {
        SpringApplication.run(MySpringBootApplication.class);
    }
}
注解@SpringBootApplication的源码
@Target(ElementType.TYPE)
@Retention(RetentionPolicy.RUNTIME)
@Documented
@Inherited
@SpringBootConfiguration
@EnableAutoConfiguration
@ComponentScan(excludeFilters = {
		@Filter(type = FilterType.CUSTOM, classes = TypeExcludeFilter.class),
		@Filter(type = FilterType.CUSTOM, classes = AutoConfigurationExcludeFilter.class) })
public @interface SpringBootApplication {

	/**
	 * Exclude specific auto-configuration classes such that they will never be applied.
	 * @return the classes to exclude
	 */
	@AliasFor(annotation = EnableAutoConfiguration.class)
	Class<?>[] exclude() default {};

	... ... ...

}
其中,
@SpringBootConfiguration:等同与@Configuration,既标注该类是Spring的一个配置类
@EnableAutoConfiguration:SpringBoot自动配置功能开启
按住Ctrl点击查看注解@EnableAutoConfiguration
@Target(ElementType.TYPE)
@Retention(RetentionPolicy.RUNTIME)
@Documented
@Inherited
@AutoConfigurationPackage
@Import(AutoConfigurationImportSelector.class)
public @interface EnableAutoConfiguration {
	... ... ...
}
其中,@Import(AutoConfigurationImportSelector.class) 导入了AutoConfigurationImportSelector类
按住Ctrl点击查看AutoConfigurationImportSelector源码
public String[] selectImports(AnnotationMetadata annotationMetadata) {
        ..

                            版权声明:本文来源CSDN,感谢博主原创文章,遵循 CC 4.0 by-sa 版权协议,转载请附上原文出处链接和本声明。

                            原文链接:https://blog.csdn.net/qq_32332777/article/details/84594831

                            站方申明:本站部分内容来自社区用户分享,若涉及侵权,请联系站方删除。
如果觉得我的文章对您有用,请随意打赏。你的支持将鼓励我继续创作!
