社区微信群开通啦,扫一扫抢先加入社区官方微信群

社区微信群
今天我们将在上一篇博客《Spring Boot(四):Spring Boot 集成 Thymeleaf》的基础上来集成Spring Security.
在pom.xml引用spring security.
<dependency>
  <groupId>org.springframework.boot</groupId>
  <artifactId>spring-boot-starter-security</artifactId>
</dependency>
添加Maven依赖后,运行项目,访问https://localhost:8443/SpringBootBase/ 浏览器会弹出如下身份验证框:
如图1所示:

这是因为Spring Security对我们的工程默认使用"basic"身份认证,只要引入了Spring Security, 那么整个web应用都是安全的,所有资源访问都要经过身份验证授权才可以访问。可用user 及 随机密码登录,随机密码可从web应用启动日志查询, 如:
Using default security password: 89c19869-277c-4eba-89c8-590e0405ae84
当然也可以在application.properties里自定义username和password.
security.user.name=admin
security.user.password=123456
或者直接关闭这个默认的basic认证
security.basic.enabled=false
详情请参考官方文档:https://docs.spring.io/spring-boot/docs/1.5.9.RELEASE/reference/html/boot-features-security.html
当你客制化自己的授权体系后,这个默认的"basic"认证将会自动被替代。
我们还是以上一篇博客的工程代码为基础来整合Spring Security.
<!DOCTYPE html>
<html lang="zh-cn" xmlns:th="http://www.thymeleaf.org">
<head>
<meta charset="utf-8"/>
<title>Login</title>
<link rel="stylesheet" th:href="@{css/bootstrap.min.css}"/>
<link rel="stylesheet" th:href="@{css/customer/login.css}"/>
</head>
<body>
<div class="container">
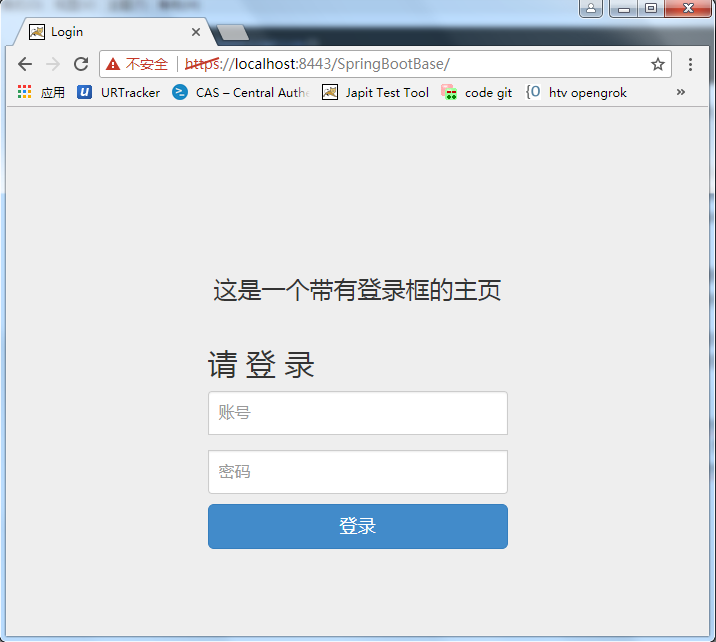
<h3 align="center">这是一个带有登录框的主页</h3>
<form class="form-signin" th:action="@{/login}" th:object="${user}" method="post">
<h2 class="form-signin-heading">请 登 录</h2>
<input type="text" class="form-control" placeholder="账号" th:field="*{username}"/>
<input type="password" class="form-control" placeholder="密码" th:field="*{password}"/>
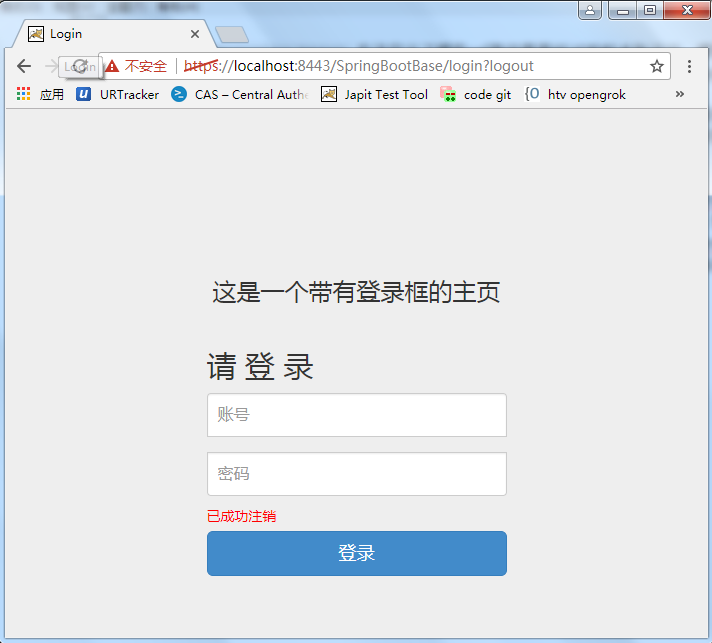
<p th:if="${param.logout}" class="error-code">已成功注销</p>
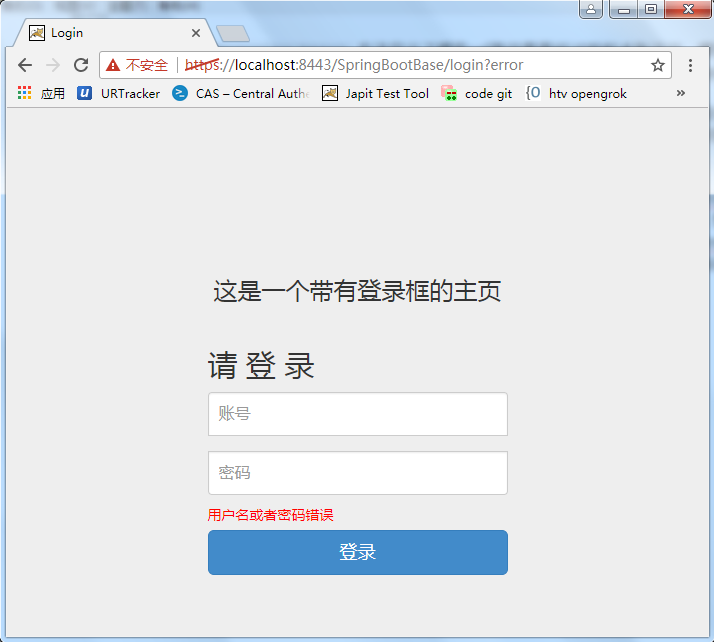
<p th:if="${param.error}" class="error-code">用户名或者密码错误</p>
<button class="btn btn-lg btn-primary btn-block" type="submit">登录</button>
</form>
</div>
</body>
</html>
这回我们新增了两行代码:
<p th:if="${param.logout}" class="error-code">已成功注销</p>
<p th:if="${param.error}" class="error-code">用户名或者密码错误</p>
其中th:if="${param.logout}" 为Thymeleaf模板引擎判断语法,表示如果http post/get 请求的参数中带有logout,则显示已成功注销。
<!DOCTYPE html>
<html xmlns:th="http://www.thymeleaf.org">
<head>
<meta charset="utf-8"/>
<title>Hello World!</title>
</head>
<body>
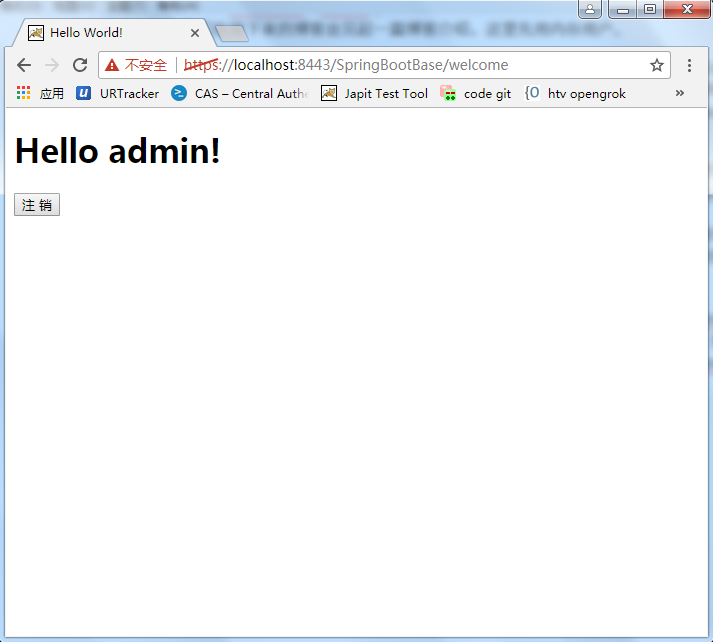
<h1 th:inline="text">Hello [[${#httpServletRequest.remoteUser}]]!</h1>
<form th:action="@{/logout}" method="post">
<input type="submit" value="注 销"/>
</form>
</body>
</html>
th:inline="text"表示文本内联,即取${#httpServletRequest.remoteUser}值作为文本显示。
@RequestMapping(value ="/welcome", method = RequestMethod.GET)
String welcome() {
  return "welcome";
}

@RequestMapping(value ="/login", method = RequestMethod.GET)
String login(Model model, UserVO user) {
  model.addAttribute("user", user);
  return "index";
}
一个是用来welcome跳转,一个是用来login页面跳转。
接下来写个类WebSecurityConfig来继承WebSecurityConfigurerAdapter,用于确保经过认证的用户才能访问我们设置的需要经过验证的url.
package tech.onroad.springbootbase.auth;

import org.springframework.beans.factory.annotation.Autowired;
import org.springframework.context.annotation.Configuration;
import org.springframework.security.config.annotation.authentication.builders.AuthenticationManagerBuilder;
import org.springframework.security.config.annotation.web.builders.HttpSecurity;
import org.springframework.security.config.annotation.web.builders.WebSecurity;
import org.springframework.security.config.annotation.web.configuration.WebSecurityConfigurerAdapter;

@Configuration
public class WebSecurityConfig extends WebSecurityConfigurerAdapter{

	@Autowired
    public void configureGlobal(AuthenticationManagerBuilder auth) throws Exception {
        auth.inMemoryAuthentication()
            .withUser("admin").password("123456").roles("USER");
    }


    @Override
    protected void configure(HttpSecurity http) throws Exception {
    	http
	        .authorizeRequests()
	            .antMatchers("/").permitAll()
	            .anyRequest().authenticated()
	            .and()
	        .formLogin()
	            .loginPage("/login")
	            .defaultSuccessUrl("/welcome")
	            .permitAll()
	            .and()
	        .logout()
	            .permitAll();
    }

    @Override
    public void configure(WebSecurity web) throws Exception {
        //解决静态资源被拦截的问题
        web.ignoring().antMatchers("/css/**");
    }
}
auth.inMemoryAuthentication()
            .withUser("admin").password("123456").roles("USER");
表示在内存中创建一个username为admin, password为123456,role为USER的用户。但大多数web应用肯定会有自己的用户管理系统,这个我们在接下来的博客会另起一篇博客介绍,这里先用内存用户。
注意:前台login表单传过来的账户名及密码的参数名必须为username和password,否则Spring Security无法正确获取用户名及密码与后台用户系统进行匹配,具体原因是Sping Security的默认定义用户系统的用户名和密码为username和password. 如果想详细了解一下为什么,可参考auth.inMemoryAuthentication().withUser(“admin”).password(“123456”).roles(“USER”)源码。
configure(HttpSecurity http)方法是用来定义安全策略,如哪些url路径需要经过授权才能访问,哪些不用。如上面的代码中,"/"就不需要授权就可以访问,即我们可以正常访问https://localhost:8443/SpringBootBase/,而不需要用户授权。
当一个用户成功登录后,即Spring Security认证成功后,我们的web应用将重定向到之前用户请求的页面,也可以客制化,使用defaultSuccessUrl方法将其重定向到指定页面。loginPage("/login")表示在没有授权前,任何访问需要授权才能访问的页面都会先跳转到/login登录页面。
web.ignoring().antMatchers("/css/**");表示所以css目录下的静态资源都不作拦截。
按照代码逻辑:我们访问https://localhost:8443/SpringBootBase/,首先会跳转到index.html界面(因为https://localhost:8443/SpringBootBase/和https://localhost:8443/SpringBootBase/index.html是一样的),然后输入账户名admin及密码123456,点击登录,将用户名及密码传到后台进行匹配,如果成功,则跳转到welcome.html界面,如果失败,则会默认指向/login?error,而从LoginController, 又将其定向到index.html页面,提示用户名或者密码错误。点击welcome界面注销按钮,则会默认跳转到/login?logout, 所以又回到index.html页面,显示已成功注销。
我们来运行一下,看结果是不是一样的?
一切如我们预期执行,说明我们spring security集成成功了。当然,这只用了spring security最简单的功能,还有自定义用户系统等等,我们接下来会慢慢介绍。
完整代码可到我的github下载:
https://github.com/onroadtech/SpringbootBase/
branch: master
commit-id: 2872ee008f23197b5fa28acee95aae378d4d1f01
本博文已同步发表于我的个人博客网站,欢迎转载指正并注明出处。
个人博客: www.onroad.tech
指正邮箱: onroad_tech@163.com
如果觉得我的文章对您有用,请随意打赏。你的支持将鼓励我继续创作!
