社区微信群开通啦,扫一扫抢先加入社区官方微信群

社区微信群
继承Thread类
public class TestDemo01 extends Thread {
    @Override
    public void run() {
        for (int i = 0; i < 5; i++) {
            System.out.println(getName() + " i=" + i);
        }
    }

    public static void main(String[] args) {
        TestDemo01 test = new TestDemo01();
        test.start();
    }
}
实现Runnable接口
public class TestDemo02 implements Runnable {

    @Override
    public void run() {
        // TODO Auto-generated method stub
        for (int i = 0; i < 5; i++) {
            System.out.println(Thread.currentThread().getName() + " is start");
        }
    }

    public static void main(String[] args) {
        TestDemo02 test = new TestDemo02();
        Thread t1 = new Thread(test, "thread1");
        Thread t2 = new Thread(test, "thread2");
        t1.start();
        t2.start();
    }
}
使用Callable和Future(Java 5 之后)
Callable接口提供call()作为线程执行体,call()方法比run()方法功能更强大。
Java5提供了Future接口代表Callable接口call()方法的返回值。
创建线程的步骤:
import java.util.concurrent.Callable;
import java.util.concurrent.ExecutionException;
import java.util.concurrent.FutureTask;

public class TestDemo03 implements Callable<Integer> {

    @Override
    public Integer call() throws Exception {
        // TODO Auto-generated method stub
        int i = 0;
        for (; i < 10; i++) {
            System.out.println(Thread.currentThread().getName() + " i=" + i);
        }
        return i;
    }

    public static void main(String[] args) {
        TestDemo03 test = new TestDemo03();
        FutureTask<Integer> task = new FutureTask<>(test);
        Thread thread = new Thread(task);
        thread.start();
        try {
            System.out.println(task.get());
        } catch (InterruptedException e) {
            // TODO Auto-generated catch block
            e.printStackTrace();
        } catch (ExecutionException e) {
            // TODO Auto-generated catch block
            e.printStackTrace();
        }
    }

}
三种方式的对比
采用Runnable,Callable接口实现线程:
采用继承Thread类实现线程:
一般使用接口的方式来创建多线程。
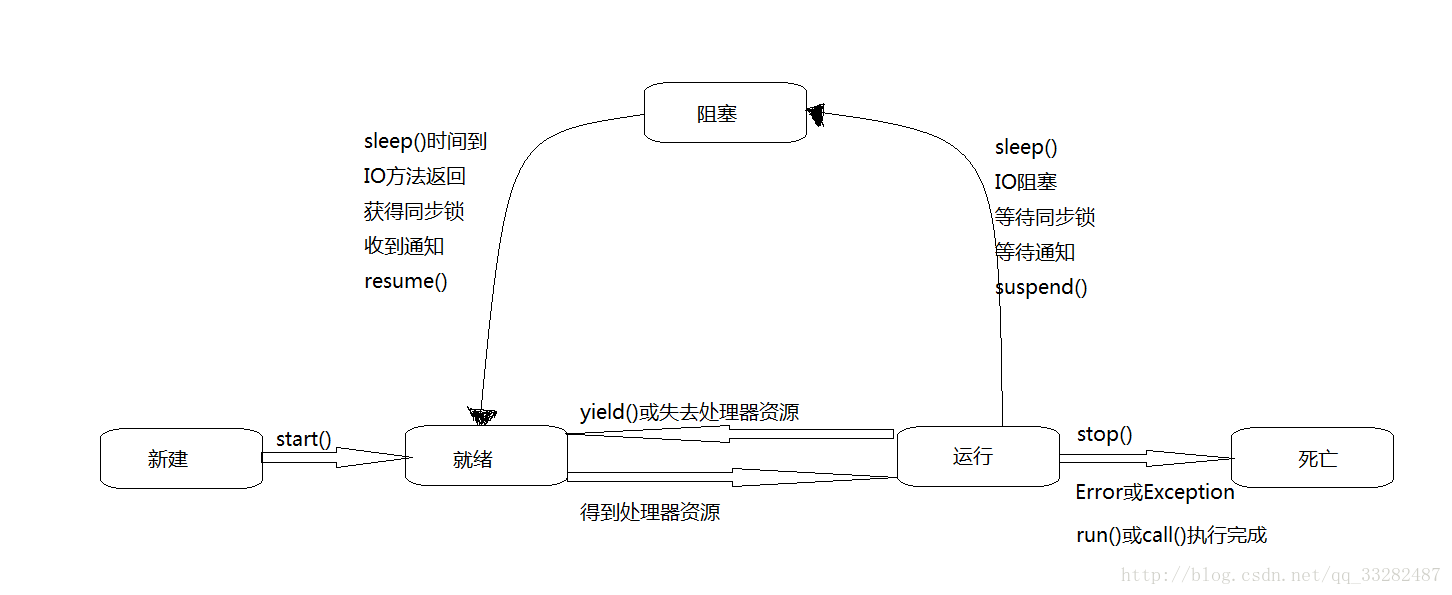
线程一共有5种状态:新建(New),就绪(Runnable),运行(Running),阻塞(Blocked),死亡(Dead)。
程序使用new关键字创建了一个线程之后,该线程处于新建状态。
线程对象调用了start()方法之后,线程处于就绪状态。
如果处于就绪状态的线程获得了CPU,开始执行run()方法的方法体,线程处于运行状态。
发生如下情况,线程会进入阻塞状态:
阻塞清清除后,线程进入就绪状态:
线程会以如下方法结束,结束后处于死亡状态:
死亡之后的线程不可以再次调用start()方法。
判断线程是否死亡可以调用isAlive()方法,新建和死亡状态会返回false,其他返回true。
3.控制线程
join线程
join()方法:让一个线程等待另一个线程完成。
在一个线程中调用其他线程的join()方法,该线程会阻塞,等到join()加入的线程执行完成后才会解除阻塞。
public class TestDemo04 implements Runnable {

    @Override
    public void run() {
        // TODO Auto-generated method stub
        for (int i = 0; i < 5; i++) {
            System.out.println(Thread.currentThread().getName() + " i=" + i);
        }
    }

    public static void main(String[] args) {
        Thread t = new Thread(new TestDemo04());
        for (int i = 0; i < 10; i++) {
            System.out.println(Thread.currentThread().getName() + " i=" + i);
            if (i == 5) {
                t.start();
                try {
                    t.join();
                } catch (InterruptedException e) {
                    // TODO Auto-generated catch block
                    e.printStackTrace();
                }
            }
        }
    }
}
后台线程
该线程是在后台运行的,任务是为其他线程提供服务。
如果所有前台线程死亡,后台线程会自动死亡。
调用Thread的setDaemon(true)方法可以将指定的线程设置成后台线程。
线程睡眠:sleep
sleep()方法:让当前线程休眠一段时间,进入阻塞状态。
import java.util.Date;

public class TestDemo05 implements Runnable {

    @Override
    public void run() {
        // TODO Auto-generated method stub
        while (true) {
            try {
                Thread.sleep(1000);
            } catch (InterruptedException e) {
                // TODO Auto-generated catch block
                e.printStackTrace();
            }
            System.out.println(new Date());
        }
    }

    public static void main(String[] args) {
        new Thread(new TestDemo05()).start();
    }
}
线程让步:yield
yield():让当前线程暂停,但不会阻塞该线程,而是转成就绪状态。
某个线程调用yield()方法暂停后,只有优先级大于或等于当前线程且处于就绪状态的线程才可以获得执行的机会。
sleep()方法和yield()方法的区别:
4.线程同步
线程安全问题
package com.lwcode.thread;

public class TestDemo06 {
    public static void main(String[] args) {
        BankAccount account = new BankAccount(1000);
        Customer c1 = new Customer(account);
        Customer c2 = new Customer(account);
        Thread t1 = new Thread(c1, "甲");
        Thread t2 = new Thread(c2, "乙");
        t1.start();
        t2.start();
    }
}

class Customer implements Runnable {
    private BankAccount account = null;

    public Customer(BankAccount account) {
        // TODO Auto-generated constructor stub
        this.account = account;
    }

    @Override
    public void run() {
        // TODO Auto-generated method stub
        while (true)
            account.getMoney(200);
    }

}

class BankAccount {
    private int money;

    public BankAccount(int money) {
        this.money = money;
    }

    public void getMoney(int num) {
        if (money >= num) {
            money -= num;
            System.out.println(Thread.currentThread().getName() + "取钱" + num + ",余额:" + money);
        } else {
            System.out.println("余额不足");
            System.exit(0);
        }
    }
}
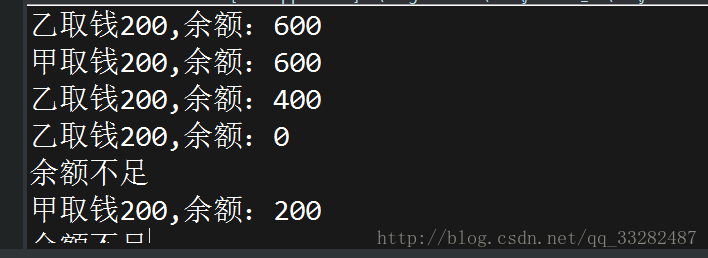
该代码就会出现线程安全问题,原因是CPU切换线程的不确定性。
解决方法
1) 同步代码块
使用同步监视器的通用方法就是同步代码块,使用synchronized关键字;
synchronized(obj){//obj就是同步监视器
    //code
}
线程开始执行同步代码块之前,必须先获得对同步监视器的锁定。任何时刻只有一个线程可以获得对同步监视器的锁定,当同步代码执行完成后,该线程释放对同步监视器的锁定。
利用同步代码块修改后的代码如下:
public void run() {
        // TODO Auto-generated method stub
        while (true) {
            try {
                Thread.sleep(10);
            } catch (InterruptedException e) {
                // TODO Auto-generated catch block
                e.printStackTrace();
            }
            synchronized (account) {
                account.getMoney(200);
            }
        }
    }
2)同步方法
同步方法就是使用synchronized关键字修饰该方法。对于同步方法,不需要指定同步监视器,同步方法同步监视this,也就是该对象本身。
通过使用同步方法方便实现线程安全的类:
synchronized关键字可以修饰方法,可以修饰代码块,但不能修饰构造器,属性。
public synchronized void getMoney(int num) {
        if (money >= num) {
            money -= num;
            System.out.println(Thread.currentThread().getName() + "取钱" + num + ",余额:" + money);
        } else {
            System.out.println("余额不足");
            System.exit(0);
        }
    }
3) 同步锁
Java 5 开始显式定义同步锁对象来实现同步,同步锁使用Lock对象。
实现线程安全控制中,比较常用的是ReentrantLock(可重入锁),使用该Lock对象可以显式的加锁、释放锁。
class TestLock {
    // 定义锁对象
    private final ReentrantLock lock = new ReentrantLock();

    // 定义需要保证线程安全的方法
    public void method() {
        // 加锁
        lock.lock();
        try {
            // 需要保证线程安全的代码
        } finally {
            lock.unlock();
        }
    }
}
使用同步锁后的代码如下:
class BankAccount {
    private int money;
    private final ReentrantLock lock = new ReentrantLock();

    public BankAccount(int money) {
        this.money = money;
    }

    public void getMoney(int num) {
        lock.lock();
        try {
            if (money >= num) {
                money -= num;
                System.out.println(Thread.currentThread().getName() + "取钱" + num + ",余额:" + money);
            } else {
                System.out.println("余额不足");
                System.exit(0);
            }
        } finally {
            lock.unlock();
        }

    }
}
死锁
当两个线程互相等对方释放同步监视器时就会发生死锁,Java虚拟机没有采取措施来处理死锁情况,所以应该避免出现死锁。
package com.lwcode.thread;

public class TestDemo07 implements Runnable {

    public static void main(String[] args) {
        TestDemo07 testDemo07 = new TestDemo07();
        new Thread(testDemo07).start();
        testDemo07.init();
    }

    A a = new A();
    B b = new B();

    @Override
    public void run() {
        // TODO Auto-generated method stub
        Thread.currentThread().setName("B线程");
        b.first(a);
        System.out.println("进入B线程后");
    }

    public void init() {
        Thread.currentThread().setName("A线程");
        a.first(b);
        System.out.println("进入A线程后");
    }
}

class A {
    public synchronized void first(B b) {
        System.out.println(Thread.currentThread().getName() + "进入了A类first方法");
        try {
            Thread.sleep(100);
        } catch (InterruptedException e) {
            // TODO Auto-generated catch block
            e.printStackTrace();
        }
        System.out.println(Thread.currentThread().getName() + "试图调用B类的last方法");
        b.last();
    }

    public synchronized void last() {
        System.out.println("A类的last方法");
    }
}

class B {
    public synchronized void first(A a) {
        System.out.println(Thread.currentThread().getName() + "进入了B类first方法");
        try {
            Thread.sleep(100);
        } catch (InterruptedException e) {
            // TODO Auto-generated catch block
            e.printStackTrace();
        }
        System.out.println(Thread.currentThread().getName() + "试图调用A类的last方法");
        a.last();
    }

    public synchronized void last() {
        System.out.println("B类的last方法");
    }
}
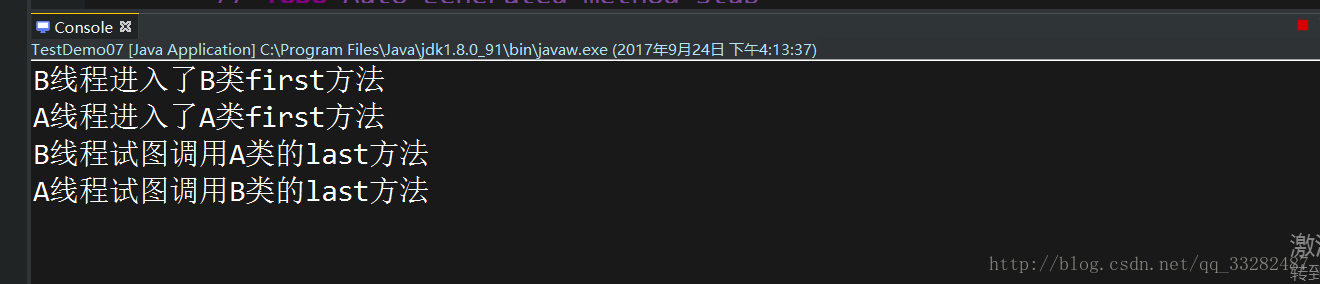
由图可以看出,程序并没有结束,但是不会向下运行,这就是产生了死锁。
如果觉得我的文章对您有用,请随意打赏。你的支持将鼓励我继续创作!