社区微信群开通啦,扫一扫抢先加入社区官方微信群

社区微信群
首先创建一个springboot项目。
添加pom配置:
		<dependency>
			<groupId>org.springframework.boot</groupId>
			<artifactId>spring-boot-starter-data-redis</artifactId>
		</dependency>
pom配置文件内容为:
<?xml version="1.0" encoding="UTF-8"?>
<project xmlns="http://maven.apache.org/POM/4.0.0" xmlns:xsi="http://www.w3.org/2001/XMLSchema-instance"
	xsi:schemaLocation="http://maven.apache.org/POM/4.0.0 http://maven.apache.org/xsd/maven-4.0.0.xsd">
	<modelVersion>4.0.0</modelVersion>

	<groupId>com.pangjh</groupId>
	<artifactId>springboot-redis</artifactId>
	<version>0.0.1-SNAPSHOT</version>
	<packaging>jar</packaging>

	<name>springboot-redis</name>
	<description>redis缓存</description>

	<parent>
		<groupId>org.springframework.boot</groupId>
		<artifactId>spring-boot-starter-parent</artifactId>
		<version>2.0.0.RELEASE</version>
		<relativePath/> <!-- lookup parent from repository -->
	</parent>

	<properties>
		<project.build.sourceEncoding>UTF-8</project.build.sourceEncoding>
		<project.reporting.outputEncoding>UTF-8</project.reporting.outputEncoding>
		<java.version>1.8</java.version>
	</properties>

	<dependencies>
		<dependency>
			<groupId>org.springframework.boot</groupId>
			<artifactId>spring-boot-starter-web</artifactId>
		</dependency>

		<dependency>
			<groupId>org.springframework.boot</groupId>
			<artifactId>spring-boot-starter-test</artifactId>
			<scope>test</scope>
		</dependency>
		<dependency>
			<groupId>org.springframework.boot</groupId>
			<artifactId>spring-boot-starter-data-redis</artifactId>
		</dependency>
	</dependencies>

    <build>
	    <plugins>
	        <plugin>
	            <groupId>org.springframework.boot</groupId>
	            <artifactId>spring-boot-maven-plugin</artifactId>
	        </plugin>
	   </plugins>
	</build>


</project>
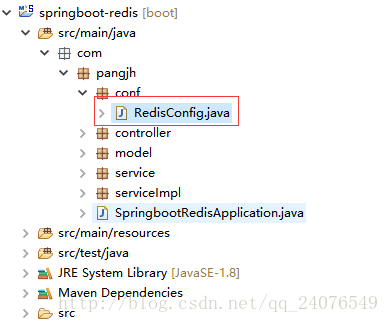
创建redis配置文件RedisConfig.java:
内容为:
package com.pangjh.conf;

import java.util.concurrent.CountDownLatch;

import org.springframework.beans.factory.annotation.Autowired;
import org.springframework.cache.annotation.CachingConfigurerSupport;
import org.springframework.cache.annotation.EnableCaching;
import org.springframework.context.annotation.Bean;
import org.springframework.context.annotation.Configuration;
import org.springframework.data.redis.connection.RedisConnectionFactory;
import org.springframework.data.redis.core.StringRedisTemplate;
import org.springframework.data.redis.listener.PatternTopic;
import org.springframework.data.redis.listener.RedisMessageListenerContainer;
import org.springframework.data.redis.listener.adapter.MessageListenerAdapter;


/**
 * redis配置
 * @author pangjianhui
 *
 */
@Configuration
@EnableCaching
public class RedisConfig extends CachingConfigurerSupport {

	@Bean
	RedisMessageListenerContainer container(RedisConnectionFactory connectionFactory,
			MessageListenerAdapter listenerAdapter) {

		RedisMessageListenerContainer container = new RedisMessageListenerContainer();
		container.setConnectionFactory(connectionFactory);
		container.addMessageListener(listenerAdapter, new PatternTopic("chat"));

		return container;
	}

	@Bean
	MessageListenerAdapter listenerAdapter(Receiver receiver) {
		return new MessageListenerAdapter(receiver, "receiveMessage");
	}

	@Bean
	Receiver receiver(CountDownLatch latch) {
		return new Receiver(latch);
	}

	@Bean
	CountDownLatch latch() {
		return new CountDownLatch(1);
	}

	@Bean
	StringRedisTemplate template(RedisConnectionFactory connectionFactory) {
		return new StringRedisTemplate(connectionFactory);
	}

	public class Receiver {


		private CountDownLatch latch;

		@Autowired
		public Receiver(CountDownLatch latch) {
		    this.latch = latch;
		}

		public void receiveMessage(String message) {
		    latch.countDown();
		}
	}


}
redis配置:
# REDIS
# Redis数据库索引(默认为0)
spring.redis.database=0
# Redis服务器地址 (默认为127.0.0.1)
spring.redis.host=127.0.0.1
# Redis服务器连接端口 (默认为6379)
spring.redis.port=6379
# Redis服务器连接密码(默认为空)
spring.redis.password=
# 连接超时时间(毫秒)
spring.redis.timeout=2000
以上操作基本完成了springboot2.0与redis的整合,下面我们测试使用:
编写controller:
package com.pangjh.controller;
import org.springframework.beans.factory.annotation.Autowired;
import org.springframework.data.redis.core.StringRedisTemplate;
import org.springframework.web.bind.annotation.RequestMapping;
import org.springframework.web.bind.annotation.RestController;
@RestController
public class PangjhController {
@Autowired
private StringRedisTemplate template;
@RequestMapping("/setValue")
public String setValue(){
if(!template.hasKey("shabao")){
template.opsForValue().append("shabao", "我是傻宝");
return "使用redis缓存保存数据成功";
}else{
template.delete("shabao");
return "key已存在";
}
}
@RequestMapping("/getValue")
public String getValue(){
if(!template.hasKey("shabao")){
return "key不存在,请先保存数据";
}else{
String shabao = template.opsForValue().get("shabao");//根据key获取缓存中的val
return "获取到缓存中的数据:shabao="+shabao;
}
}
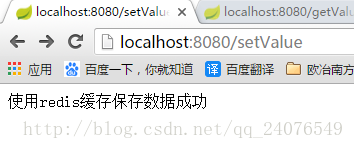
}启动项目(注意这里启动项目需要确保redis服务的开启状态)
请求:http://localhost:8080/setValue
存储数据到redis成功!
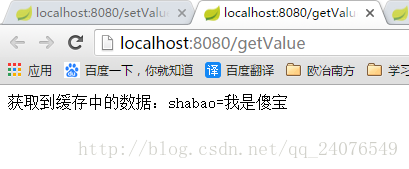
请求:http://localhost:8080/getValue,查询数据
编写model:
package com.pangjh.model;

import java.io.Serializable;

public class User implements Serializable {

	private static final long serialVersionUID = 1L;

	private String id;

	private String name;

	private int age;

	public User() {
		super();
	}

	public User(String id, String name, int age) {
		super();
		this.id = id;
		this.name = name;
		this.age = age;
	}

	public String getId() {
		return id;
	}

	public void setId(String id) {
		this.id = id;
	}

	public String getName() {
		return name;
	}

	public void setName(String name) {
		this.name = name;
	}

	public int getAge() {
		return age;
	}

	public void setAge(int age) {
		this.age = age;
	}


}
编写接口:
package com.pangjh.service;

import org.springframework.cache.annotation.CacheEvict;
import org.springframework.cache.annotation.Cacheable;

import com.pangjh.model.User;

public interface UserService {

	@Cacheable(value="users", key="'user_'+#id")
	User getUser(String id);

	@CacheEvict(value="users", key="'user_'+#id",condition="#id!=1")
	void deleteUser(String id);

}
编写接口实现类:
package com.pangjh.serviceImpl;

import org.springframework.stereotype.Service;

import com.pangjh.model.User;
import com.pangjh.service.UserService;

@Service
public class UserServiceImpl implements UserService {

	@Override
	public User getUser(String id) {
		System.out.println(id+"进入实现类获取数据!");
		User user = new User();
		user.setId(id);
		user.setName("香菇");
		user.setAge(18);
		return user;
	}

	@Override
	public void deleteUser(String id) {
		System.out.println(id+"进入实现类删除数据!");
	}

}
编写controller:
package com.pangjh.controller;

import org.springframework.beans.factory.annotation.Autowired;
import org.springframework.web.bind.annotation.RequestMapping;
import org.springframework.web.bind.annotation.RestController;

import com.pangjh.model.User;
import com.pangjh.service.UserService;

@RestController
public class UserController {

	@Autowired
	private UserService userService;

	@RequestMapping("/getUser")
    public User getUser(){
		User user = userService.getUser("xianggu");
		return user;
    }

	@RequestMapping("/deleteUser")
	public String deleteUser(){
		userService.deleteUser("xianggu");
		return "执行了删除";
	}


}
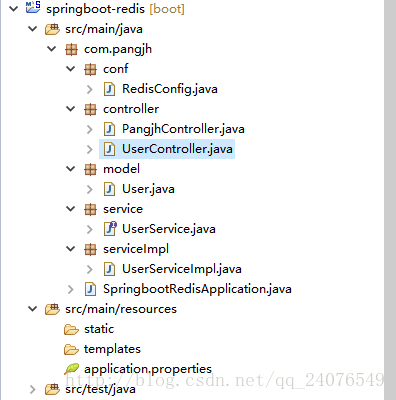
项目结构如下:
启动项目
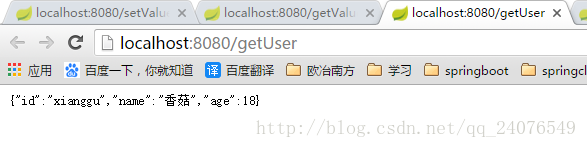
请求:http://localhost:8080/getUser
在缓存的有效时间内,重复请求,后台只会打印一次:
代码:https://github.com/pangjianhui1991/xianggu.git
如果觉得我的文章对您有用,请随意打赏。你的支持将鼓励我继续创作!