社区微信群开通啦,扫一扫抢先加入社区官方微信群

社区微信群
Android Things 是 2016 年 12 月份Google 推出的物联网操作系统。它是通过 Google 开发的物联网操作系统 Brillo 改进优化的。
Android Things使用和Android开发一样的工具,Android框架和Google APIs,这些都使得开发物联网变得更简单。
Android things的平台架构如下: 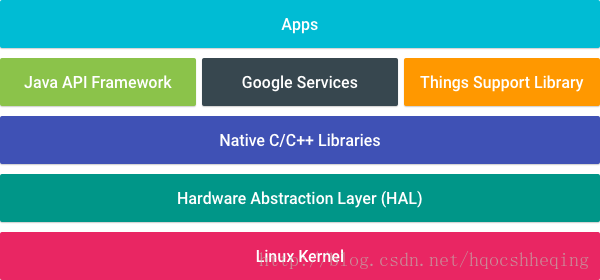
为嵌入式设备开发app比为手机或者电脑开发更加拉近开发者跟硬件外设和驱动的距离。此外,嵌入式设备对用户来说通常代表了一个单独的APP体验。接下来看看Android 开发和Android Things开发的不同。
Android Things继承了Android核心框架层并且通过支持包提供额外的APIs。这些APIs允许apps与新型的硬件之间交互,但是这些硬件并不存在于移动设备上。
Android Things平台仍然为单一应用程序使用。系统app不存在,并且你的app将会自动启动来给你的用户带来沉浸式体验。
外围I/O接口API
外围I/O接口API使你的应用程序与传感器和驱动器之间通过工业标准协议和接口进行交互,它支持GPIO,PWM,I2C,SPI,UART.
用户驱动API
用户驱动继承已经存在的Android框架服务,它允许app注入硬件事件到框架层来使得其他app可以通过Android标准API访问这些事假。
核心应用程序包
Android Things不包括一套标准的系统app以及content provider。开发者要避免使用通用intents(common intents)以及以下content provider API在你的APP中。
显示是可选的
Android Things使用与传统的Android app一样的UI 套件来支持图形用户界面。在图形模式下,应用程序的窗口将会全屏显示。Android Things不包括系统状态栏或者导航栏,使应用程序完全控制用户的视觉体验。
然而,Android Things并不要求一定有一个显示设备。在不存在图形显示的设备上,activities任然是你的Android Things APP的一个基础的组件。这是因为Android Things 框架层会传递所有的输入事件到获取了焦点的前台activity。你的app无法通过其他任何应用程序组件接收按键事件或者动作事件。
支持主界面
Android Things期望一个应用程序在它的manifest中暴露一个 主界面 作为主入口,这会使得系统在启动时自动启动这个入口。这个activity必须包含一个同时拥有 CATEGORY_DEFAULT 和 IOT_LAUNCHER的intent filter。
为了开发简单,这个主界面应该包含一个 CATEGORY_LAUNCHER intent filter,这样Android Studio在部署或调试的时候可以将它作为一个
默认的activity启动起来。
<application
    android:label="@string/app_name">
    <activity android:name=".HomeActivity">
        <!-- Launch activity as default from Android Studio -->
        <intent-filter>
            <action android:name="android.intent.action.MAIN"/>
            <category android:name="android.intent.category.LAUNCHER"/>
        </intent-filter>

        <!-- Launch activity automatically on boot -->
        <intent-filter>
            <action android:name="android.intent.action.MAIN"/>
            <category android:name="android.intent.category.IOT_LAUNCHER"/>
            <category android:name="android.intent.category.DEFAULT"/>
        </intent-filter>
    </activity>
</application>
不支持运行时申请权限,因为嵌入式设备不能保证有一个界面来弹出运行时对话框。在你的app的manifest文件中申明权限。在manifest中申明的所有的正常的和敏感的权限在安装时都会授权。
在Android Things中不支持通知,所以避免在你的应用程序里调用 NotificationManager接口。
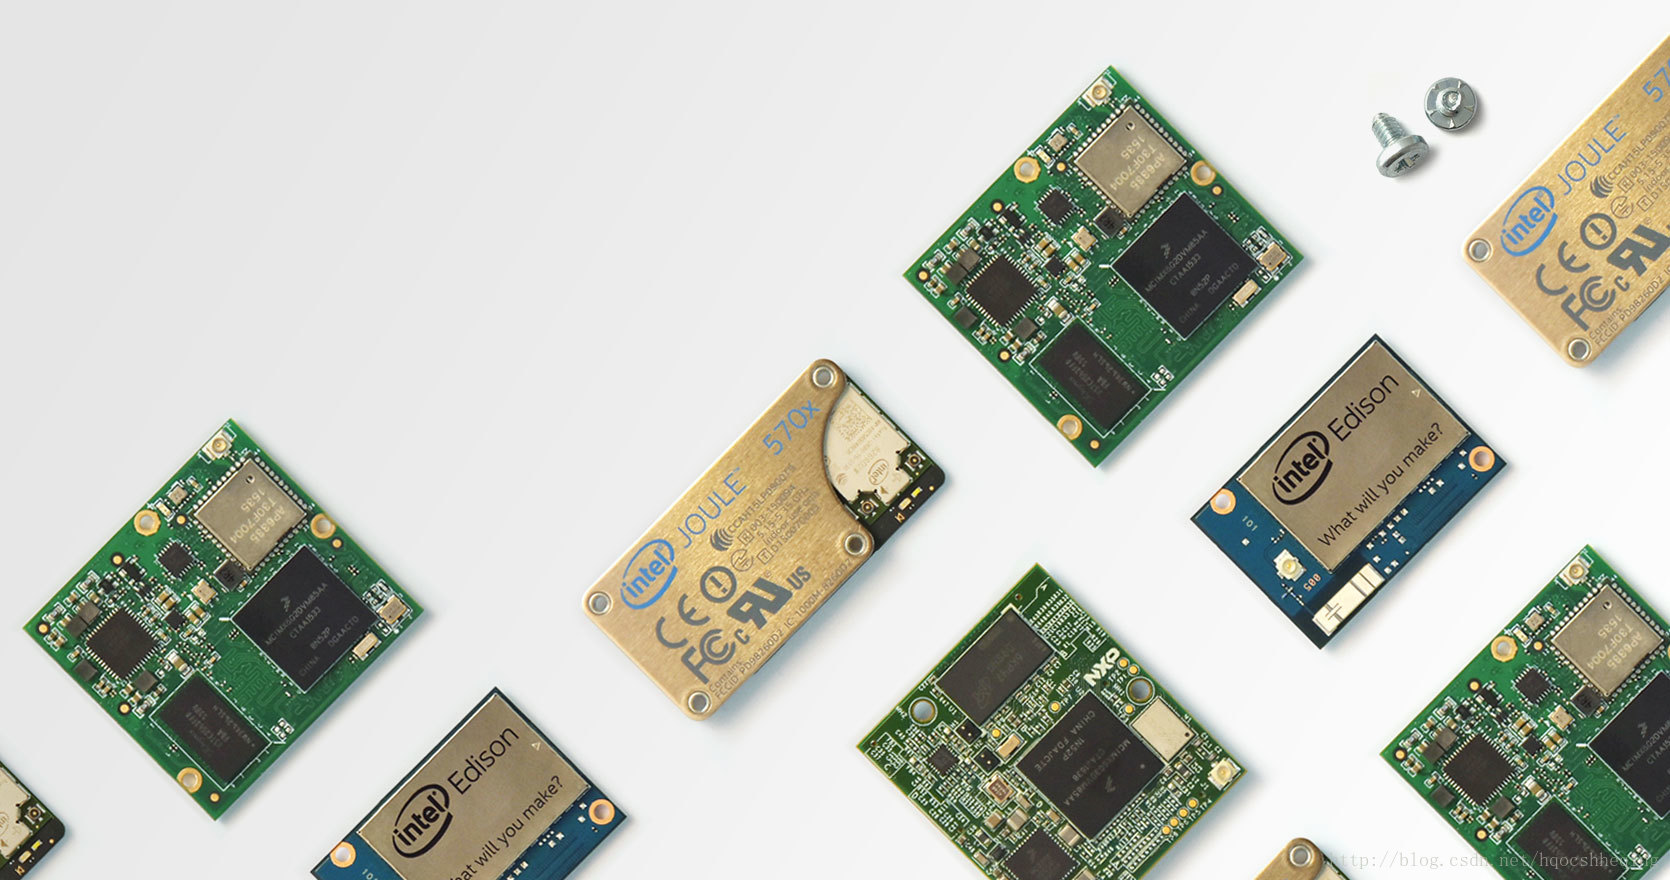
购买硬件
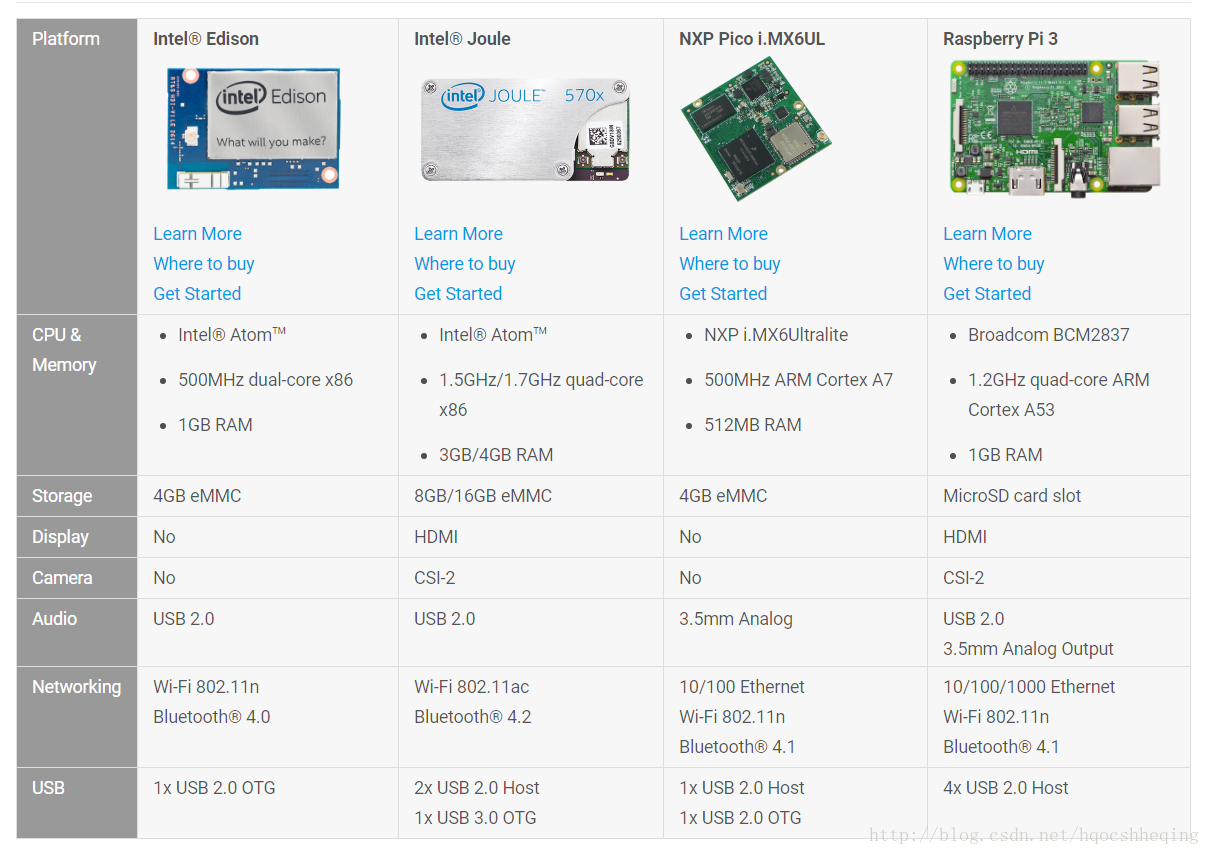
进行Android Things物联网开发,首先要准备一些硬件设备,Android Things目前支持四款硬件平台:
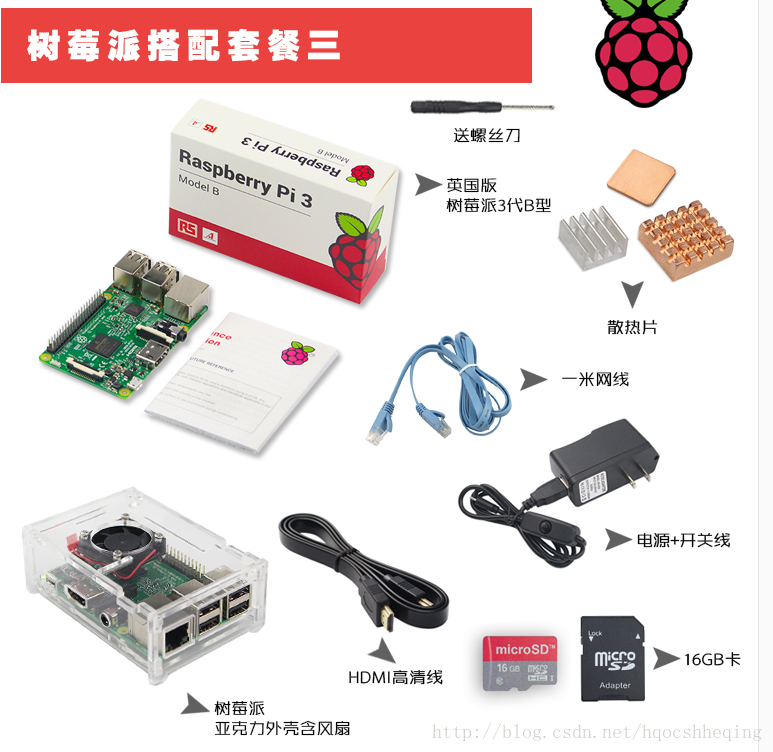
这些硬件可以在网上买到,当然仅仅有开发板还不行,还需要一些其他的配件,比如网线,HDMI线,电源线,SD卡,摄像头,显示屏等等,不过刚开始不用一次性全部买齐,等到开发时缺什么再去买什么,这样可以避免买错。笔者买的是树莓派3b(Raspberry Pi 3 b)的一个套餐(散热片,HDMI线,网线,16G SD卡,主板,风扇,外壳,电源线)300多。
烧写Android Things系统
首先下载各个开发板对应的Android Things系统镜像:
| 平台 | Android Things包 | 大小 | SHA-1 校验和 |
|---|---|---|---|
| Inter Edison | androidthings_edison_devpreview_2.zip | 249 MB (261384078bytes) |
0621e4a890c0cc25d6bb16aed87aee8d5ec819a7 |
| Inter Joule | androidthings_joule_devpreview_2.zip | 267 MB (280434440 bytes) |
b11317de771a85a0bbee514c383a8974d87866b2 |
| NXP | androidthings_imx6ul_pico_devpreview_2.zip | 239 MB (250738643 bytes) |
6571f00a785cd47f404722c8ae3ad63c821e5865 |
| Raspberry Pi | androidthings_rpi3_devpreview_2.zip | 244 MB (250738643 bytes) |
b8790030c1bb889b65b0222e462f9911fc0f0a71 |
针对不同的开发板,有不同的烧写方法,具体如下:
先决条件
1. 下载或者更新最新版本的Android Studio。
2. 更新你的SDK tools到24及以上(更新SDK tools允许你去构建和测试Things的app)
3. 更新你的SDK到Android 7.0(API 24)或者更高(更新后的平台为Things app提供新的API)
4. 创建或者更新你的项目的目标为Android 7.0(API level 24)或者更高。
5. 按照创建Android项目一样创建Things项目。
添加依赖包
Android Things设备通过支持包暴露APIs,这些支持包不属于Android SDK的一部分。要在你的Android Things的APP中添加Things支持包:
1. 在你的APP级别的build.gradle文件的dependencies 代码块中添加一下依赖:
dependencies {
    ...
    provided 'com.google.android.things:androidthings:0.2-devpreview'
}
2.在你的app的manifest文件中添加Android Things的共享库:
<application ...>
    <uses-library android:name="com.google.android.things"/>
    ...
</application>
注意:添加 provided 依赖是为了确保构建工具在编译时不会复制共享库到apk中。添加<uses-library> 是为了在app运行时让这个预构建的库可见。
申明主界面
一个应用程序要想在一个嵌入式设备上运行,必须在它的manifest文件中申明一个activity来作为设备启动后程序的主入口。提供一个包含以下元素的intent filter:
<application
    android:label="@string/app_name">
    <uses-library android:name="com.google.android.things"/>
    <activity android:name=".HomeActivity">
        <!-- Launch activity as default from Android Studio -->
        <intent-filter>
            <action android:name="android.intent.action.MAIN"/>
            <category android:name="android.intent.category.LAUNCHER"/>
        </intent-filter>

        <!-- Launch activity automatically on boot -->
        <intent-filter>
            <action android:name="android.intent.action.MAIN"/>
            <category android:name="android.intent.category.IOT_LAUNCHER"/>
            <category android:name="android.intent.category.DEFAULT"/>
        </intent-filter>
    </activity>
</application>
致此,硬件环境和软件环境已经搭建好,可以使用Android Things中的API了。
Android Things提供外围I/O接口APIs 使用工业标准协议和接口来与传感器和驱动器进行交互。
| 协议名称 | 传输类型 | 线缆数 | 外设数量 | 传输速度 |
|---|---|---|---|---|
| I2C | 同步 | 2 | 最大127 | 速度较低 |
| SPI | 同步 | 4+ | 无限 | 速度最高 |
| UART | 异步 | 2或者4 | 1 | 速度中等 |
通用输入输出(GPIO)针脚提供了一个可编程的接口来读取一个二进制输入设备的状态(比如一个按钮开关)或者控制二进制输出设备的打开或者关闭状态(比如一个LED灯)。 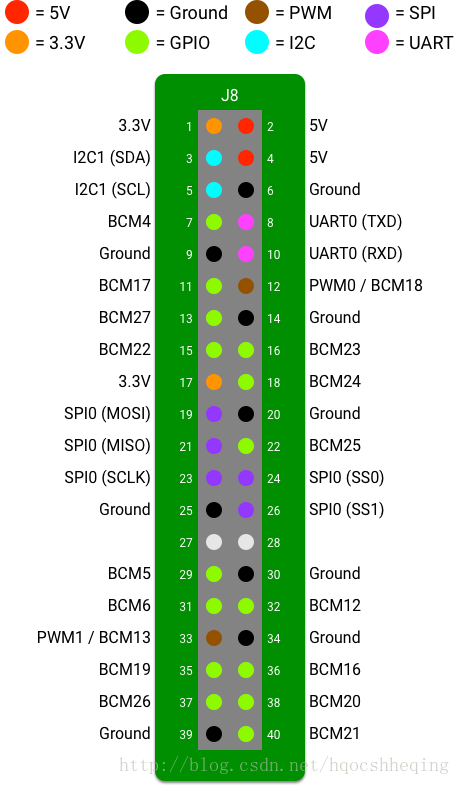
你可以配置具有高或低状态的 GPIO针脚作为输入或者输出。如果作为一个输入,一个外部源决定它的状态,并且你的app可以读取当前值或者对状态的变化作出反应。如果作为一个输出,你的app可以配置针脚的状态。
注意:为避免损坏GPIO针脚,进行电线连接之前务必查看你的硬件的输入和输出的范围。
为了打开一个到GPIO端口的连接,你应该知道唯一的端口名。在开发的初期阶段,或者当连接一个app到一个新设备时,通过 PeripheralManagerService 使用 getGpioList(): 方法查看所有可用的端口名称是很有用的。
<span style="color:#000000"><code>PeripheralManagerService manager <span style="color:#4f4f4f !important">=</span> <span style="color:#006666 !important">new</span> PeripheralManagerService();
<span style="color:#4f4f4f !important">List</span><span style="color:#4f4f4f !important"><</span><span style="color:#4f4f4f !important">String</span><span style="color:#4f4f4f !important">></span> portList <span style="color:#4f4f4f !important">=</span> manager<span style="color:#4f4f4f !important">.</span>getGpioList();
<span style="color:#000088 !important">if</span> (portList<span style="color:#4f4f4f !important">.</span>isEmpty()) {
    <span style="color:#000088 !important">Log</span><span style="color:#4f4f4f !important">.</span>i(<span style="color:#4f4f4f !important">TAG</span>, <span style="color:#009900 !important">"No GPIO port available on this device."</span>);
} <span style="color:#000088 !important">else</span> {
    <span style="color:#000088 !important">Log</span><span style="color:#4f4f4f !important">.</span>i(<span style="color:#4f4f4f !important">TAG</span>, <span style="color:#009900 !important">"List of available ports: "</span> <span style="color:#4f4f4f !important">+</span> portList);
}</code></span>
一旦你知道目标端口的名称,使用 PeripheralManagerService 来连接这个端口。当你完成与GPIO端口的交互后,你应该关闭连接来释放资源。另外,你不能打开一个新的连接到同样的端口直到现有的连接已经关闭。为了关闭连接,使用端口的 close() 方法。
<span style="color:#000000"><code> <span style="color:#000088 !important">public</span> <span style="color:#000088 !important">class</span> <span style="color:#4f4f4f !important">HomeActivity</span> <span style="color:#000088 !important">extends</span> <span style="color:#4f4f4f !important">Activity</span> {
    <span style="color:#880000 !important"><em>// GPIO Pin Name</em></span>
    <span style="color:#000088 !important">private</span> <span style="color:#000088 !important">static</span> <span style="color:#000088 !important">final</span> String GPIO_NAME = ...;

    <span style="color:#000088 !important">private</span> Gpio mGpio;

    <span style="color:#9b859d !important">@Override</span>
    <span style="color:#000088 !important">protected</span> <span style="color:#000088 !important">void</span> <span style="color:#009900 !important">onCreate</span>(Bundle savedInstanceState) {
        <span style="color:#000088 !important">super</span>.onCreate(savedInstanceState);
        <span style="color:#880000 !important"><em>// Attempt to access the GPIO</em></span>
        <span style="color:#000088 !important">try</span> {
            PeripheralManagerService manager = <span style="color:#000088 !important">new</span> PeripheralManagerService();
            mGpio = manager.openGpio(GPIO_NAME);
        } <span style="color:#000088 !important">catch</span> (IOException e) {
             Log.w(TAG, <span style="color:#009900 !important">"Unable to access GPIO"</span>, e);
        }
    }

    <span style="color:#9b859d !important">@Override</span>
    <span style="color:#000088 !important">protected</span> <span style="color:#000088 !important">void</span> <span style="color:#009900 !important">onDestroy</span>() {
        <span style="color:#000088 !important">super</span>.onDestroy();

        <span style="color:#000088 !important">if</span> (mGpio != <span style="color:#000088 !important">null</span>) {
            <span style="color:#000088 !important">try</span> {
                mGpio.close();
                mGpio = <span style="color:#000088 !important">null</span>;
            } <span style="color:#000088 !important">catch</span> (IOException e) {
                Log.w(TAG, <span style="color:#009900 !important">"Unable to close GPIO"</span>, e);
            }
        }
    }
}</code></span>
读取一个GPIO端口作为输入:
1. 使用 setDirection() 的 DIRECTION_IN 参数配置一个端口作为输入端口。
2. 通过使用ACTIVE_HIGH或者ACTIVE_LOW调用setActiveType() 方法配置返回为true时是高电压还是低电压信号。
3. 通过调用getValue()方法访问当前的状态。
下面的代码向你展示了如何将高电压信号与一个输入返回true值关联起来。
<span style="color:#000000"><code><span style="color:#000088 !important">public</span> <span style="color:#000088 !important">void</span> <span style="color:#009900 !important">configureInput</span>(Gpio gpio) <span style="color:#000088 !important">throws</span> IOException {
    <span style="color:#880000 !important"><em>// Initialize the pin as an input</em></span>
    gpio.setDirection(Gpio.DIRECTION_IN);
    <span style="color:#880000 !important"><em>// High voltage is considered active</em></span>
    gpio.setActiveType(Gpio.ACTIVE_HIGH);

    ...

    <span style="color:#880000 !important"><em>// Read the active high pin state</em></span>
    <span style="color:#000088 !important">if</span> (gpio.getValue()) {
        <span style="color:#880000 !important"><em>// Pin is HIGH</em></span>
    } <span style="color:#000088 !important">else</span> {
        <span style="color:#880000 !important"><em>// Pin is LOW</em></span>
    }
}</code></span>
一个被配置为输入的GPIO端口可以当它的状态在高和低之间变化时通知你的app。你只需要注册这些变更事件的监听器即可:
1. 关联一个GpioCallback到现有的端口连接。
2. 调用 setEdgeTriggerType()方法申明哪一种状态的改变会触发一个中断事件。边沿触发支持一下四种类型:
3.在onGpioEdge()方法中返回true时表示监听器将会继续接收端口的状态变化事件。
下面的代码在给定的输入端口上为所有的状态变化注册一个中断事件监听器:
<span style="color:#000000"><code><span style="color:#000088 !important">public</span> <span style="color:#000088 !important">void</span> <span style="color:#009900 !important">configureInput</span>(Gpio gpio) <span style="color:#000088 !important">throws</span> IOException {
    <span style="color:#880000 !important"><em>// Initialize the pin as an input</em></span>
    gpio.setDirection(Gpio.DIRECTION_IN);
    <span style="color:#880000 !important"><em>// Low voltage is considered active</em></span>
    gpio.setActiveType(Gpio.ACTIVE_LOW);

    <span style="color:#880000 !important"><em>// Register for all state changes</em></span>
    gpio.setEdgeTriggerType(Gpio.EDGE_BOTH);
    gpio.registerGpioCallback(mGpioCallback);
}

<span style="color:#000088 !important">private</span> GpioCallback mGpioCallback = <span style="color:#000088 !important">new</span> GpioCallback() {
    <span style="color:#9b859d !important">@Override</span>
    <span style="color:#000088 !important">public</span> <span style="color:#000088 !important">boolean</span> <span style="color:#009900 !important">onGpioEdge</span>(Gpio gpio) {
        <span style="color:#880000 !important"><em>// Read the active low pin state</em></span>
        <span style="color:#000088 !important">if</span> (mDevice.getValue()) {
            <span style="color:#880000 !important"><em>// Pin is LOW</em></span>
        } <span style="color:#000088 !important">else</span> {
            <span style="color:#880000 !important"><em>// Pin is HIGH</em></span>
        }

        <span style="color:#880000 !important"><em>// Continue listening for more interrupts</em></span>
        <span style="color:#000088 !important">return</span> <span style="color:#000088 !important">true</span>;
    }

    <span style="color:#9b859d !important">@Override</span>
    <span style="color:#000088 !important">public</span> <span style="color:#000088 !important">void</span> <span style="color:#009900 !important">onGpioError</span>(Gpio gpio, <span style="color:#000088 !important">int</span> error) {
        Log.w(TAG, gpio + <span style="color:#009900 !important">": Error event "</span> + error);
    }
};</code></span>
4.当你的app不再需要监听传入的事件时,应该取消注册任何中断处理器。
<span style="color:#000000"><code><span style="color:#000088 !important">public</span> <span style="color:#000088 !important">class</span> <span style="color:#4f4f4f !important">HomeActivity</span> <span style="color:#000088 !important">extends</span> <span style="color:#4f4f4f !important">Activity</span> {
    <span style="color:#000088 !important">private</span> Gpio mGpio;
    ...

    <span style="color:#9b859d !important">@Override</span>
    <span style="color:#000088 !important">protected</span> <span style="color:#000088 !important">void</span> <span style="color:#009900 !important">onStart</span>() {
        <span style="color:#000088 !important">super</span>.onStart();

        <span style="color:#880000 !important"><em>// Begin listening for interrupt events</em></span>
        mGpio.registerGpioCallback(mGpioCallback);
    }

    <span style="color:#9b859d !important">@Override</span>
    <span style="color:#000088 !important">protected</span> <span style="color:#000088 !important">void</span> <span style="color:#009900 !important">onStop</span>() {
        <span style="color:#000088 !important">super</span>.onStop();
        <span style="color:#880000 !important"><em>// Interrupt events no longer necessary</em></span>
        mGpio.unregisterGpioCallback(mGpioCallback);
    }
}</code></span>
以编程方式控制GPIO端口的状态:
1. 使用setDirction()方法的DIRECTION_OUT_INITIALLY_HIGH 或者DIRECTION_OUT_INITIALLY_HIGH 模式来配置一个端口作为输出端口。这些方法确保在配置的同时也正确的设置端口的初始状态。
2. 通过使用ACTIVE_HIGH或者ACTIVE_LOW调用setActiveType() 方法配置返回为true时是高电压还是低电压信号。
3. 通过setValue()方法设置当前状态。
下面的代码为你展示如何设置一个输出端口的初始状态为高,然后通过使用setValue()方法切换它的状态为低。
<span style="color:#000000"><code>public void configureOutput(Gpio gpio) throws IOException {
    // Initialize the pin as a high output
    gpio.setDirection(Gpio.DIRECTION_OUT_INITIALLY_HIGH);
    // Low voltage is considered active
    gpio.setActiveType(Gpio.ACTIVE_LOW);

    <span style="color:#000088 !important">...</span>

    // Toggle the value to be LOW
    gpio.setValue(true);
}</code></span>
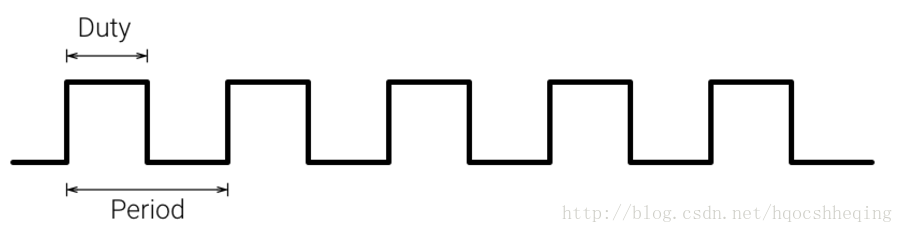
PWM是用于使用数字输出引脚将比例控制信号应用于外部设备的常用方法。例如:伺服机使用输入PWM信号的脉冲宽度来确定它们的旋转角度。LCD显示屏根据PWM信号的平均值来调整它们的亮度。
PWM是一个根据给定的频率和占空比震荡的数字(即方波)信号:
为了打开一个到PWM端口的连接,你需要知道那个唯一的PWM名称。在开发的初始阶段,或者移植app到一个新硬件,使用PeripheralManagerService 的getPwmList()方法获取所有可用PWM的端口名称是很帮助的:
<span style="color:#000000"><code>PeripheralManagerService manager <span style="color:#4f4f4f !important">=</span> <span style="color:#006666 !important">new</span> PeripheralManagerService();
<span style="color:#4f4f4f !important">List</span><span style="color:#4f4f4f !important"><</span><span style="color:#4f4f4f !important">String</span><span style="color:#4f4f4f !important">></span> portList <span style="color:#4f4f4f !important">=</span> manager<span style="color:#4f4f4f !important">.</span>getPwmList();
<span style="color:#000088 !important">if</span> (portList<span style="color:#4f4f4f !important">.</span>isEmpty()) {
    <span style="color:#000088 !important">Log</span><span style="color:#4f4f4f !important">.</span>i(<span style="color:#4f4f4f !important">TAG</span>, <span style="color:#009900 !important">"No PWM port available on this device."</span>);
} <span style="color:#000088 !important">else</span> {
    <span style="color:#000088 !important">Log</span><span style="color:#4f4f4f !important">.</span>i(<span style="color:#4f4f4f !important">TAG</span>, <span style="color:#009900 !important">"List of available ports: "</span> <span style="color:#4f4f4f !important">+</span> portList);
}</code></span>
一旦你知道了目标端口的名称,使用PeripheralManagerService 来连接到该端口。当你完成与PWM端口的交互后,要关闭连接来释放资源。另外,直到当前连接关闭之前你不能在此端口上重新打开一个连接。使用端口的close()方法来关闭连接。
<span style="color:#000000"><code><span style="color:#000088 !important">public</span> <span style="color:#000088 !important">class</span> <span style="color:#4f4f4f !important">HomeActivity</span> <span style="color:#000088 !important">extends</span> <span style="color:#4f4f4f !important">Activity</span> {
    <span style="color:#880000 !important"><em>// PWM Name</em></span>
    <span style="color:#000088 !important">private</span> <span style="color:#000088 !important">static</span> <span style="color:#000088 !important">final</span> String PWM_NAME = ...;

    <span style="color:#000088 !important">private</span> Pwm mPwm;

    <span style="color:#9b859d !important">@Override</span>
    <span style="color:#000088 !important">protected</span> <span style="color:#000088 !important">void</span> <span style="color:#009900 !important">onCreate</span>(Bundle savedInstanceState) {
        <span style="color:#000088 !important">super</span>.onCreate(savedInstanceState);
        <span style="color:#880000 !important"><em>// Attempt to access the PWM port</em></span>
        <span style="color:#000088 !important">try</span> {
            mPwm = mPeripheralManager.openPwm(PWM_NAME);
        } <span style="color:#000088 !important">catch</span> (IOException e) {
            Log.w(TAG, <span style="color:#009900 !important">"Unable to access PWM"</span>, e);
        }
    }

    <span style="color:#9b859d !important">@Override</span>
    <span style="color:#000088 !important">protected</span> <span style="color:#000088 !important">void</span> <span style="color:#009900 !important">onDestroy</span>() {
        <span style="color:#000088 !important">super</span>.onDestroy();

        <span style="color:#000088 !important">if</span> (mPwm != <span style="color:#000088 !important">null</span>) {
            <span style="color:#000088 !important">try</span> {
                mPwm.close();
                mPwm = <span style="color:#000088 !important">null</span>;
            } <span style="color:#000088 !important">catch</span> (IOException e) {
                Log.w(TAG, <span style="color:#009900 !important">"Unable to close PWM"</span>, e);
            }
        }
    }
}</code></span>
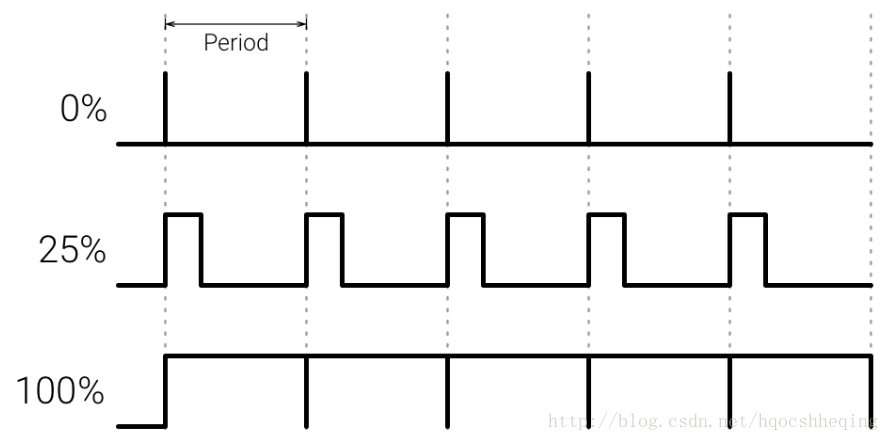
在获取到连接之后,为PWM信号配置时序参数。你在第一次激活信号之前必须设置这些参数。调用setEnabled(true)来激活PWM信号,如果你需要暂时禁用信号,你可以调用setEnabled(false)。
下面的例子配置了PWM的频率为120HZ(周期为8.33ms),并且占空比为25%(每个周期的高电平时间是2.08ms):
<span style="color:#000000"><code><span style="color:#000088 !important">public</span> <span style="color:#000088 !important">void</span> <span style="color:#009900 !important">initializePwm</span>(Pwm pwm) <span style="color:#000088 !important">throws</span> IOException {
    pwm.setPwmFrequencyHz(<span style="color:#006666 !important">120</span>);
    pwm.setPwmDutyCycle(<span style="color:#006666 !important">25</span>);

    <span style="color:#880000 !important"><em>// Enable the PWM signal</em></span>
    pwm.setEnabled(<span style="color:#000088 !important">true</span>);
}</code></span>
I2C总线连接一些简单的设备,这些设备的数据负载较小。传感器和执行器用的就是I2C,还有其他的比如加速度计,温度计,LED显示器和电机驱动器。
I2C是一个同步串行接口,这意味着它依赖一个共享的时钟信号来在设备间同步传输数据。控制触发时钟信号的器件称为主设备,所有连接上的外设称为从设备。每一个设备连接到同一组数据信号以形成总线。
I2C设备使用3线接口连接,包括:
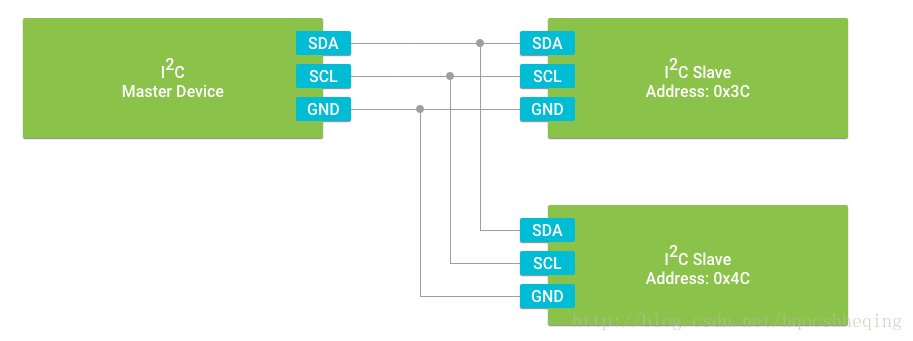
因为所有数据都通过一根线传输,I2C仅仅支持半双工通信。所有的通信都由主设备启动,主设备传输完成后从设备必须响应。
I2C支持同一个总线连接多个从设备。不同于 SPI ,从设备使用 I2C 软件协议来寻址。每一个设备都有一个唯一的地址,并且仅响应主设备发送到的地址。
为了打开一个到普通 I2C 从设备的连接,你必须知道那个总线的唯一的名字。在开发的初始阶段,或者移植一个app到新设备的时候,使用PeripheralManagerService 的getI2CBusList()方法获取所用可用的设备名是很有帮助的。
<span style="color:#000000"><code>PeripheralManagerService manager <span style="color:#4f4f4f !important">=</span> <span style="color:#006666 !important">new</span> PeripheralManagerService();
<span style="color:#4f4f4f !important">List</span><span style="color:#4f4f4f !important"><</span><span style="color:#4f4f4f !important">String</span><span style="color:#4f4f4f !important">></span> deviceList <span style="color:#4f4f4f !important">=</span> manager<span style="color:#4f4f4f !important">.</span>getI2cBusList();
<span style="color:#000088 !important">if</span> (deviceList<span style="color:#4f4f4f !important">.</span>isEmpty()) {
    <span style="color:#000088 !important">Log</span><span style="color:#4f4f4f !important">.</span>i(<span style="color:#4f4f4f !important">TAG</span>, <span style="color:#009900 !important">"No I2C bus available on this device."</span>);
} <span style="color:#000088 !important">else</span> {
    <span style="color:#000088 !important">Log</span><span style="color:#4f4f4f !important">.</span>i(<span style="color:#4f4f4f !important">TAG</span>, <span style="color:#009900 !important">"List of available devices: "</span> <span style="color:#4f4f4f !important">+</span> deviceList);
}</code></span>
一旦你知道了目标设备的名称,使用PeripheralManagerService 来连接到这个设备。当你完成与外设的通信后,应该关闭连接释放资源。另外,你不能在同一个设备连接关闭之前再次打开一个新的连接。使用 close() 方法来关闭连接:
<span style="color:#000000"><code><span style="color:#000088 !important">public</span> <span style="color:#000088 !important">class</span> <span style="color:#4f4f4f !important">HomeActivity</span> <span style="color:#000088 !important">extends</span> <span style="color:#4f4f4f !important">Activity</span> {
    <span style="color:#880000 !important"><em>// I2C Device Name</em></span>
    <span style="color:#000088 !important">private</span> <span style="color:#000088 !important">static</span> <span style="color:#000088 !important">final</span> String I2C_DEVICE_NAME = ...;
    <span style="color:#880000 !important"><em>// I2C Slave Address</em></span>
    <span style="color:#000088 !important">private</span> <span style="color:#000088 !important">static</span> <span style="color:#000088 !important">final</span> <span style="color:#000088 !important">int</span> I2C_ADDRESS = ...;

    <span style="color:#000088 !important">private</span> I2cDevice mDevice;

    <span style="color:#9b859d !important">@Override</span>
    <span style="color:#000088 !important">protected</span> <span style="color:#000088 !important">void</span> <span style="color:#009900 !important">onCreate</span>(Bundle savedInstanceState) {
        <span style="color:#000088 !important">super</span>.onCreate(savedInstanceState);
        <span style="color:#880000 !important"><em>// Attempt to access the I2C device</em></span>
        <span style="color:#000088 !important">try</span> {
            PeripheralManagerService manager = <span style="color:#000088 !important">new</span> PeripheralManagerService();
            mDevice = manager.openI2cDevice(I2C_DEVICE_NAME, I2C_ADDRESS);
        } <span style="color:#000088 !important">catch</span> (IOException e) {
            Log.w(TAG, <span style="color:#009900 !important">"Unable to access I2C device"</span>, e);
        }
    }

    <span style="color:#9b859d !important">@Override</span>
    <span style="color:#000088 !important">protected</span> <span style="color:#000088 !important">void</span> <span style="color:#009900 !important">onDestroy</span>() {
        <span style="color:#000088 !important">super</span>.onDestroy();

        <span style="color:#000088 !important">if</span> (mDevice != <span style="color:#000088 !important">null</span>) {
            <span style="color:#000088 !important">try</span> {
                mDevice.close();
                mDevice = <span style="color:#000088 !important">null</span>;
            } <span style="color:#000088 !important">catch</span> (IOException e) {
                Log.w(TAG, <span style="color:#009900 !important">"Unable to close I2C device"</span>, e);
            }
        }
    }
}</code></span>
注意:设备名称代表了 I2C 总线,地址代表了总线上的指定从设备。因此,一个 I2cDevice 是一个连接到相应 I2C 总线上的指定从设备 。
I2C 从设备将他们的内容放到可写或者可读的寄存器中。

Register Address标识了要访问的寄存器的地址,Data[N] 是要读取或者写入的数据。从设备上的逻辑数据通常由多位组成,因此可以包含多个寄存器地址。
注意:对于SMBus协议,设备将会在地址(Register Address)和数据(Data[N])之间发送一个重复的开始位。
外围I/O接口为访问寄存器数据提供SMBus命令的三种类型。
<span style="color:#000000"><code><span style="color:#880000 !important"><em>// Modify the contents of a single register</em></span>
<span style="color:#000088 !important">public</span> <span style="color:#000088 !important">void</span> <span style="color:#009900 !important">setRegisterFlag</span>(I2cDevice device, <span style="color:#000088 !important">int</span> address) throws IOException {
    <span style="color:#880000 !important"><em>// Read one register from slave</em></span>
    <span style="color:#000088 !important">byte</span> <span style="color:#000088 !important">value</span> = device.readRegByte(address);
    <span style="color:#880000 !important"><em>// Set bit 6</em></span>
    <span style="color:#000088 !important">value</span> |= <span style="color:#006666 !important">0x40</span>;
    <span style="color:#880000 !important"><em>// Write the updated value back to slave</em></span>
    device.writeRegByte(address, <span style="color:#000088 !important">value</span>);
}

<span style="color:#880000 !important"><em>// Read a register block</em></span>
<span style="color:#000088 !important">public</span> <span style="color:#000088 !important">byte</span>[] <span style="color:#009900 !important">readCalibration</span>(I2cDevice device, <span style="color:#000088 !important">int</span> startAddress) throws IOException {
    <span style="color:#880000 !important"><em>// Read three consecutive register values</em></span>
    <span style="color:#000088 !important">byte</span>[] data = <span style="color:#000088 !important">new</span> <span style="color:#000088 !important">byte</span>[<span style="color:#006666 !important">3</span>];
    device.readRegBuffer(startAddress, data, data.length);
    <span style="color:#000088 !important">return</span> data;
}
</code></span>
当需要与定义了跟SMBus不同的寄存器的 I2C 外设交互时,或者根本不用寄存器,使用原始的 read() 和 write()方法来完全控制在线缆上传输的字节数据。这些方法将会向下面那样执行一个单个的 I2C 事物: 
使用原始传输方法,设备将在传输之前发送开始标志,并在传输完成之后发送停止标志。这使得通过 传输重复的开始标识来结合多个事物变的不再可能。
注意:原始传输方式能处理的数据没有明确的最大长度,但是在你设备上的 I2C 控制硬件在它能处理的字节数上有一个限制。如果你的外设要求传输大量的数据,那么请查看硬件的说明书。
下面的代码展示了如何构造一个原始的字节缓冲区,并把它写入到 I2C 从设备:
<span style="color:#000000"><code><span style="color:#000088 !important">public</span> <span style="color:#000088 !important">void</span> <span style="color:#009900 !important">writeBuffer</span>(I2cDevice device, <span style="color:#000088 !important">byte</span>[] buffer) <span style="color:#000088 !important">throws</span> IOException {
    <span style="color:#000088 !important">int</span> count = device.write(buffer, buffer.length);
    Log.d(TAG, <span style="color:#009900 !important">"Wrote "</span> + count + <span style="color:#009900 !important">" bytes over I2C."</span>);
}</code></span>
SPI(Serial Peripheral Interface )是串行外设接口的缩写。SPI,是一种高速的,全双工,同步的通信总线,经常用于需要高速传输数据的设备。SPI非常适合高带宽的使用场景,比如外部非易失性存储器以及图形显示设备。很多传感器设备除了支持 I2C 之外还支持SPI。
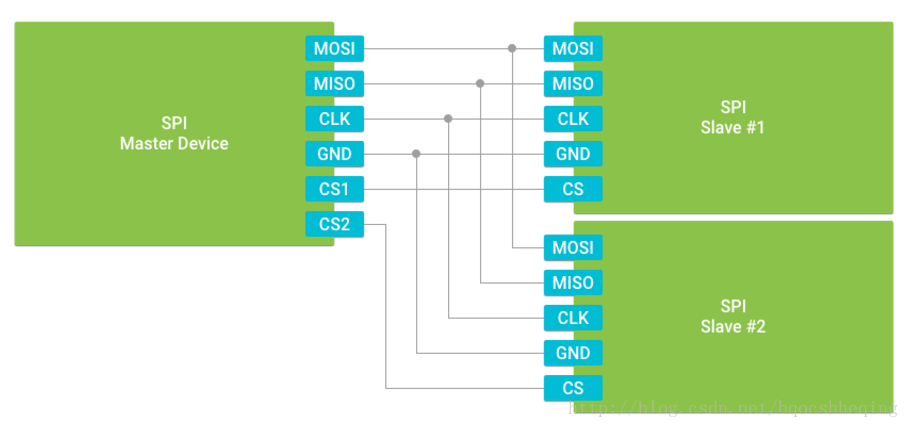
SPI是一个同步串行接口,这意味着它依赖于一个共享时钟信号来同步设备间的数据传输。一个主设备控制时钟信号的触发,所有的连接上的设备都作为从设备。每个设备连接到同一组数据信号以形成总线。
理论上,SPI传输数据的速率仅仅受限于主设备能以多快的速率切换时钟信号。时钟速率的范围一般在16MHZ到25MHZ之间。这种高速时钟信号允许SPI外设更快的传输数据而且还比UART误码率少。
SPI支持全双工数据传输,这意味着主设备与从设备之间可以同时交换信息。为了支持全双工传输,总线必须提供如下单独的信号,这使得SPI最少有4根线缆接口:
SPI支持多个从设备连接到同一个总线。不像 I2C 设备需要使用硬件寻址。每个从设备需要一个额外的片选信号,以允许主设备寻址到该特定设备,并将该设备作为数据传输目标。如果仅使用单个从设备,则不需要此信号。
如果觉得我的文章对您有用,请随意打赏。你的支持将鼓励我继续创作!