社区微信群开通啦,扫一扫抢先加入社区官方微信群

社区微信群
spring boot 从字面上来理解就是spring 引导。是由Pivotal团队提供的全新框架,其设计目的是用来简化新Spring应用的初始搭建以及开发过程。
官网描述:Spring Boot makes it easy to create stand-alone, production-grade Spring based Applications that you can “just run”.
Spring boot使创建独立的、产品级的基于Spring的应用程序变得很容易。以往基于spring的应用需要配置引入各种依赖、各种配置,解决各种依赖冲突等;而spring boot提供了各种starter,只需要在pom文件引入对应的starter,由对应的starter指向具体的依赖,引入默认配置,大大减少了spring应用配置的复杂度。
当然spring boot也不仅仅是starter,还包括一系列非常良好的支持,比如:内嵌的Tomcat,无需部署WAR文件,直接运行;应用监管程序actuator等。
spring boot如何简化spring应用的搭建的呢?其实就是通过利用pom文件的继承机制,预定义依赖包版本+根据应用场景,抽取依赖包,并封装,利用pom的传递依赖,完成完整的依赖包引入。我们分三部分来分析spring boot。1,spring boot依赖版本管理;2,spring boot 启动器;3,spring boot 启动过程,组件整合生效过程。
我从一个简单的spring boot pom文件来看一下。
先看看spring boot 的pom配置parent 指向spring-boot-starter-parent;spring-boot-starter-parent的parent又指向spring-boot-dependencies;在其pom文件中引入了几乎所有常用的依赖jar包。这个就是spring boot应用的依赖包版本的统一管理。其后,在spring boot 的应用中,实际引入的依赖包,就不需要再定义版本,避免了依赖版本冲突等问题。
查看spring boot应用的pom文件,我们发现,依赖相当简明,就是引入的spring-boot-stater-;
这个starter就是spring boot 的启动器。spring boot预先根据各种应用程序场景,整合需要引入的依赖包,组成一个个满足不同应用场景需要的stater;比如:spring-boot-starter-web、spring-boot-starter-thymeleaf、mybatis-spring-boot-starter等等(spring 官方提供的starter一般为:spring-boot-starter-*;其它提供通过SPI扩展的,如mybatis的,就不一样了)。每个starter会引入spring-boot-starters+自身需要的其他依赖,以满足当前场景启动需要的依赖。
spring boot就是通过这种方式,简化了依赖配置,使得开发spring应用时的配置简单清晰。
我们以最常见的web应用环境来分析spring boot 应用启动。(就是在spring boot应用中依赖spring-boot-starter-web;spring boot 版本为:1.5.14.RELEASE)
1,创建一个新的Spring应用程序实例。
    //springboot启动时,初始化环境
    @SuppressWarnings({ "unchecked", "rawtypes" })
    private void initialize(Object[] sources) {
        //将当前启动类放入资源;
        if (sources != null && sources.length > 0) {
            this.sources.addAll(Arrays.asList(sources));
        }
        //web环境诊断;处理了webEnvironment为true
        this.webEnvironment = deduceWebEnvironment();
        //;
        //设置初始化器;getSpringFactoriesInstances获取spring应用上下文初始化工厂实例;
        //从spring-boot-1.5.14.RELEASE.jar!/META-INF/spring.factories下根据映射加载,不同版本,会有细微差异;
        setInitializers((Collection) getSpringFactoriesInstances(
                ApplicationContextInitializer.class));
        //设置监听器;getSpringFactoriesInstances获取spring应用监听器工厂实例;
        setListeners((Collection) getSpringFactoriesInstances(ApplicationListener.class));
        //诊断当前启动类是不是main函数启动,如是,返回当前启动类的类;通过栈信息,依次往上找,直到找到main函数所在的类;找到后,设置进入mainApplicationClass属性
        this.mainApplicationClass = deduceMainApplicationClass();
    }
2,spring boot 启动spring
    //spring boot 启动 spring应用
    /**
     * Run the Spring application, creating and refreshing a new
     * {@link ApplicationContext}.
     * @param args the application arguments (usually passed from a Java main method)
     * @return a running {@link ApplicationContext}
     */
    public ConfigurableApplicationContext run(String... args) {
        StopWatch stopWatch = new StopWatch();
        //开始一个简单的watch,记录每个指定任务的总运行时间和运行时间。
        stopWatch.start();
        ConfigurableApplicationContext context = null;
        FailureAnalyzers analyzers = null;
        //设置java.awt.headless属性;如果没有在属性文件中配置,则默认为true;
        configureHeadlessProperty();
        //创建并设置进入:listeners;并返回org.springframework.boot.context.event.EventPublishingRunListener
        SpringApplicationRunListeners listeners = getRunListeners(args);
        listeners.starting();
        try {
            //设置默认的应用程序参数;默认命令行参数;
            ApplicationArguments applicationArguments = new DefaultApplicationArguments(args);
            //准备环境;装载.properties、.yaml等配置文件等
            ConfigurableEnvironment environment = prepareEnvironment(listeners,
                    applicationArguments);
            //打印spring标识;
            Banner printedBanner = printBanner(environment);
            //创建应用程序上下文;设置了reader、ClassPathBeanDefinitionScanner含web的是AnnotationConfigEmbeddedWebApplicationContext;不含web的是:AnnotationConfigApplicationContext;
            context = createApplicationContext();
            //创建故障分析器,包含一系列spring默认的故障分析器,并给每个分析器设置beanfactory;
            analyzers = new FailureAnalyzers(context);
            //准备ApplicationContext;
            prepareContext(context, environment, listeners, applicationArguments,
                    printedBanner);
            //调用的方法,在下面public void refresh() 详细说明处理;(这里最终调用到spring框架的refresh,这个里面就是spring的启动流程;下面详细描述spring框架的refresh过程;)
            refreshContext(context);
            //如果有扩展ApplicationRunner、CommandLineRunner;则执行。
            afterRefresh(context, applicationArguments);
            //启动监听结束,发布事件;简单的直接启动,这里发布了启动结束事件。
            listeners.finished(context, null);
            //结束watch,打印启动结束事件等;
            stopWatch.stop();
            if (this.logStartupInfo) {
                new StartupInfoLogger(this.mainApplicationClass)
                        .logStarted(getApplicationLog(), stopWatch);
            }
            return context;
        }
        catch (Throwable ex) {
            handleRunFailure(context, listeners, analyzers, ex);
            throw new IllegalStateException(ex);
        }
    }
//下面是一些细节,可以略过先;
//这里也看看,装载bean的代码:
//这个方法被prepareContext调用;
    /**
     * Load beans into the application context.
     * @param context the context to load beans into
     * @param sources the sources to load
     */
    protected void load(ApplicationContext context, Object[] sources) {
        if (logger.isDebugEnabled()) {
            logger.debug(
                    "Loading source " + StringUtils.arrayToCommaDelimitedString(sources));
        }
        //getBeanDefinitionRegistry(context)检查当前的context是否是:BeanDefinitionRegistry;如果是,则将context转化为BeanDefinitionRegistry返回;如果不是,则检查是否AbstractApplicationContext,转化返回;否则抛异常;
        //createBeanDefinitionLoader()处理创建annotatedReader、xmlReader、groovyReader、scanner(扫描器--ClassPathBeanDefinitionScanner)、scanner中的过滤器等;
        BeanDefinitionLoader loader = createBeanDefinitionLoader(
                getBeanDefinitionRegistry(context), sources);
        if (this.beanNameGenerator != null) {
            loader.setBeanNameGenerator(this.beanNameGenerator);
        }
        if (this.resourceLoader != null) {
            loader.setResourceLoader(this.resourceLoader);
        }
        if (this.environment != null) {
            loader.setEnvironment(this.environment);
        }
        //装载器装载;实际会调用到下面BeanDefinitionLoader的load方法;
        loader.load();
    }

    private int load(Class<?> source) {
        if (isGroovyPresent()) {
            // Any GroovyLoaders added in beans{} DSL can contribute beans here
            if (GroovyBeanDefinitionSource.class.isAssignableFrom(source)) {
                GroovyBeanDefinitionSource loader = BeanUtils.instantiateClass(source,
                        GroovyBeanDefinitionSource.class);
                load(loader);
            }
        }
        if (isComponent(source)) {
            //
            this.annotatedReader.register(source);
            return 1;
        }
        return 0;
    }


    /**
     * Register a bean from the given bean class, deriving its metadata from
     * class-declared annotations.
     * 从给定的bean类注册一个bean,从类声明的注释派生它的元数据。
     * @param annotatedClass the class of the bean
     * @param name an explicit name for the bean
     * @param qualifiers specific qualifier annotations to consider,
     * in addition to qualifiers at the bean class level
     */
    @SuppressWarnings("unchecked")
    public void registerBean(Class<?> annotatedClass, String name, Class<? extends Annotation>... qualifiers) {
        //AnnotatedGenericBeanDefinition 扩展 org.springframework.beans.factory.support.genericbeandefinition类,添加对通过AnnotatedBeanDefinition接口公开的注释元数据的支持。
        //abd 包含了bean的class、注解、注解是否嵌套信息;
        AnnotatedGenericBeanDefinition abd = new AnnotatedGenericBeanDefinition(annotatedClass);
        if (this.conditionEvaluator.shouldSkip(abd.getMetadata())) {
            return;
        }
        //解析适用于提供的bean定义的作用域元数据
        ScopeMetadata scopeMetadata = this.scopeMetadataResolver.resolveScopeMetadata(abd);
        abd.setScope(scopeMetadata.getScopeName());
        String beanName = (name != null ? name : this.beanNameGenerator.generateBeanName(abd, this.registry));
        AnnotationConfigUtils.processCommonDefinitionAnnotations(abd);
        if (qualifiers != null) {
            for (Class<? extends Annotation> qualifier : qualifiers) {
                if (Primary.class == qualifier) {
                    abd.setPrimary(true);
                }
                else if (Lazy.class == qualifier) {
                    abd.setLazyInit(true);
                }
                else {
                    abd.addQualifier(new AutowireCandidateQualifier(qualifier));
                }
            }
        }

        BeanDefinitionHolder definitionHolder = new BeanDefinitionHolder(abd, beanName);
        definitionHolder = AnnotationConfigUtils.applyScopedProxyMode(scopeMetadata, definitionHolder, this.registry);
        BeanDefinitionReaderUtils.registerBeanDefinition(definitionHolder, this.registry);
}spring boot最终调用了spring的启动refresh处理;这一块儿是spring启动的关键。(ConfigurableApplicationContext run(String… args) 方法中通过refreshContext方法调用到spring框架的刷新方法;)
详细参考:spring注解及扩展 的第八节。
持久层常见使用mybatis、druid;这里一步步描述spring boot整合mybatis、druid。
        <dependency>
            <groupId>mysql</groupId>
            <artifactId>mysql-connector-java</artifactId>
            <scope>runtime</scope>
        </dependency>
        <dependency>
            <groupId>org.mybatis.spring.boot</groupId>
            <artifactId>mybatis-spring-boot-starter</artifactId>
            <version>1.3.2</version>
        </dependency>
        <dependency>
            <groupId>com.alibaba</groupId>
            <artifactId>druid</artifactId>
            <version>1.1.8</version>
</dependency>spring:
datasource:
username: root
password: 123456
driver-class-name: com.mysql.jdbc.Driver
url: jdbc:mysql://127.0.0.1:3306/mybatis
type: com.alibaba.druid.pool.DruidDataSource
# druid连接池配置
initialSize: 5
minIdle: 5
maxActive: 20
maxWait: 60000
timeBetweenEvictionRunsMillis: 60000
minEvictableIdleTimeMillis: 300000
validationQuery: SELECT 1 FROM DUAL
testWhileIdle: true
testOnBorrow: false
testOnReturn: false
poolPreparedStatements: true
filters: stat,log4j
maxPoolPreparedStatementPerConnectionSize: 20
useGlobalDataSourceStat: true
connectionProperties: druid.stat.mergeSql=true;druid.stat.slowSqlMillis=500
mybatis:
config-location: classpath:mybatis/mybatis-config.xml
mapper-locations: classpath:mybatis/mapper/*.xml
#只配置了druid管理页登录用户名、密码;
druid:
servlet:
username: appAdmin
password: 111111 spring 所有自带默认配置的,可以覆盖和扩展的配置信息,请参阅参考官方文档(以1.5.14.release版本为例):
druid配置:
@Configuration
@PropertySource(value= {"classpath:application.properties"})
public class DruidConfig {

    @ConfigurationProperties(prefix = "spring.datasource")
    @Bean
    public DataSource druid(){
        return  new DruidDataSource();
    }

    @Value("${druid.servlet.username}")
    private String loginUserName;
    @Value("${druid.servlet.password}")
    private String loginPassword;

    //
    //1、配置Druid的管理Servlet
    @Bean
    public ServletRegistrationBean statViewServlet(){
        ServletRegistrationBean bean = new ServletRegistrationBean(new StatViewServlet(), "/druid/*");
        final Map<String, String> initParams = new HashMap<String, String>();

        initParams.put("loginUsername",loginUserName);
        initParams.put("loginPassword",loginPassword);

        bean.setInitParameters(initParams);
        return bean;
    }

    //配置Druid的web监控的filter
    @Bean
    public FilterRegistrationBean webStatFilter(){
        FilterRegistrationBean bean = new FilterRegistrationBean();
        bean.setFilter(new WebStatFilter());
        bean.setUrlPatterns(Arrays.asList("/*"));
        return  bean;
    }
}
mybatis配置:
@Configuration
public class MyBatisConfig {

    //通过ConfigurationCustomizer定制mybatis相关规则:
    @Bean
    public ConfigurationCustomizer configurationCustomizer(){
        return new ConfigurationCustomizer(){
            @Override
            public void customize(org.apache.ibatis.session.Configuration configuration) {
                //自定义规则,覆盖默认规则
                //开启驼峰命名映射规则
                configuration.setMapUnderscoreToCamelCase(true);
            }
        };
    }
}
以上三步就一起完成了mybatis、druid整合到spring boot应用。
        <dependency>
            <groupId>org.springframework.boot</groupId>
            <artifactId>spring-boot-starter-data-redis</artifactId>
</dependency>spring.redis.database=0
# pool settings ...
spring.redis.pool.max-idle=50
spring.redis.pool.min-idle=10
spring.redis.pool.max-active=200
spring.redis.pool.max-wait=500
# name of Redis server
spring.redis.sentinel.master=mysentinel
spring.redis.sentinel.nodes=192.168.6.211:26379,192.168.6.211:26380,192.168.6.211:26381类似如下:
@Configuration
public class RedisConfig {
    private static Logger logger = LoggerFactory.getLogger(RedisConfig.class);

    @Bean
    public RedisTemplate<String, Object> getRedisTemplate(RedisConnectionFactory factory) {
        RedisTemplate<String, Object> redisTemplate = new RedisTemplate<>();
        redisTemplate.setConnectionFactory(factory);
        RedisSerializer<String> redisSerializer = new StringRedisSerializer();
        redisTemplate.setKeySerializer(redisSerializer);
        redisTemplate.setHashKeySerializer(redisSerializer);
        //系列化为json
        Jackson2JsonRedisSerializer jackson2JsonRedisSerializer = new Jackson2JsonRedisSerializer(Object.class);
        ObjectMapper om = new ObjectMapper();
        om.setVisibility(PropertyAccessor.ALL, JsonAutoDetect.Visibility.ANY);
        om.enableDefaultTyping(ObjectMapper.DefaultTyping.NON_FINAL);
        jackson2JsonRedisSerializer.setObjectMapper(om);

        redisTemplate.setValueSerializer(jackson2JsonRedisSerializer);
        redisTemplate.setHashValueSerializer(jackson2JsonRedisSerializer);
        redisTemplate.afterPropertiesSet();

        return redisTemplate;
    }
}实际应用程序开发中,由于需要考虑解耦、快速响应和流量削峰,很多时候采用异步机制,这个时候基于消息的架构就是很好的选择,RabbitMQ是高级消息队列协议的一个优秀开源实践,在实际应用中,很多时候选择使用RabbitMQ。
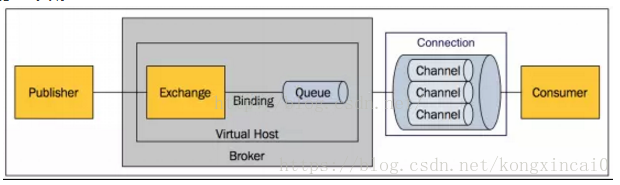
基本架构图:
Message:消息由消息头和消息体组成。消息头由一系列可选属性组成,这些属性包括routing-key(用于路由)、priority(相对优先级)、delivery-mode(是否持久存储)等;
Publisher:消息的生产者,向交换器发布消息;
Exchange:交换器,用来接收生产者发送的消息,并根据类型,将消息路由到消息队列;Exchange有4种:direct(默认,点对点)、fanout(广播)、topic(基于路由键匹配队列)和headers(通过消息头信息处理消息发布到队列)。
Queue:消息队列;消息的容器,保存消息直到消费者取走。
Binding:绑定,就是基于Exchange类型和路由键绑定Exchange和Queue的路由规则。交换器和队列间的绑定关系是多对多的。
Virtual Host:虚拟主机;每个虚拟主机就是一个服务器;除了将众多客户逻辑隔离,还能起到命名空间的作用。
Broker:消息队列代理。代理一个消息队列服务器。
Connection:网络连接。
Channel:信道,用于复用一条TCP连接。建立在真实的TCP连接内的虚拟连接,避免TCP连接的建立、销毁的开销。一个TCP连接,开辟多个信道,实际消息的发送、接收等,通过信道完成。
Consumer:消息的消费者,从消息队列中获取消息。
1,引入 高级消息队列starter:spring-boot-starter-amqp
        <dependency>
            <groupId>org.springframework.boot</groupId>
            <artifactId>spring-boot-starter-amqp</artifactId>
        </dependency>
2,添加yaml配置
spring:
  rabbitmq:
    host: 192.168.6.211
    username: guest
    password: guest
3,使用AmqpAdmin 管理交换器、队列、绑定;
    //AmqpAdmin 在springboot启动时,已经默认创建完成,直接使用;AmqpAdmin提供了接口,实际参见对应版本接口
    @Autowired
    AmqpAdmin amqpAdmin;
//实际使用代码类似如下:
    //创建交换器:
    amqpAdmin.declareExchange(new DirectExchange("exchangename"));
    //创建队列:
    amqpAdmin.declareQueue(new Queue("queuename",true));
    //创建绑定规则(将指定交换器(参数1)以指定路由键(参数4)绑定到到指定类型(参数2,队列or交换机)、指定目的地(参数1,比如队列名)),最后一个参数为参数头信息;
    amqpAdmin.declareBinding(new Binding("queuename", Binding.DestinationType.QUEUE,"exchangename","plan.*",null));
4,配置消息转换器及开启
@EnableRabbit//启用监听器
@Configuration
public class AMQPConfig {

    //默认是使用:SimpleMessageConverter();这里直接使用本身提供的Jackson2JsonMessageConverter;方便管理工具可读;
    @Bean
    public MessageConverter messageConverter(){
        return new Jackson2JsonMessageConverter();
    }
}
5,发送消息:
    //上面定义了具体的消息转换器,rabbitTemplate中的消息转换器采用了定义的bean;
    @Autowired
    RabbitTemplate rabbitTemplate;
    //具体消息发送rabbitTemplate的接口,类似使用:rabbitTemplate.receiveAndConvert等;
6,消息监听:
注意在配置类中,通过@EnableRabbit启用了监听监听;实际使用,只需要将监听方法添加@RabbitListener注解,即可监听指定队列。
    @RabbitListener(queues = "myvrdirect")
    public void receive02(Message message){
}actuator:执行器是spring提供的应用程序运行监控管理工具,可以方便的收集、监控当前应用的运行情况。
endpoint:执行器端点(endpoints)用于监控应用程序和与应用进行交互,Spring Boot默认包含很多内置的端点,也可以自定义端点。
    <dependency>
        <groupId>org.springframework.boot</groupId>
        <artifactId>spring-boot-starter-actuator</artifactId>
    </dependency>
    <!--security配合actuator使用,以控制端点访问-->
    <dependency>
        <groupId>org.springframework.boot</groupId>
        <artifactId>spring-boot-starter-security</artifactId>
</dependency>原生端点:
| 端点名 | 描述 |
|---|---|
| autoconfig | 所有自动配置信息 |
| auditevents | 审计事件 |
| beans | 所有Bean的信息 |
| configprops | 所有配置属性 |
| dump | 线程状态信息 |
| env | 当前环境信息 |
| health | 应用健康状况 |
| info | 当前应用信息 |
| metrics | 当前应用的重要度量指标,如:内存信息、线程信息、垃圾回收信息等各项指标 |
| mappings | 应用@RequestMapping映射路径 |
| shutdown | 关闭当前应用(默认关闭) (post) |
| trace | 追踪信息(最新的100个http请求) |
yaml配置:
#关闭shutdown
endpoints:
  shutdown:
    enabled: false
#actuator端点范文路径和端口指定
management:
  port: 8081
  context-path: /acmanage
  #关闭权限验证;
  security:
    enabled: false
    roles:
    - SUPERUSER
#security用户名、密码设置
security:
  user:
    name: ac
    password: ac
actuatorsecurity配置类:
/**
 * 只针对访问路径包含指定配置的,做验证。
 */
@Configuration
@EnableWebSecurity
public class ActuatorSecurityConfig extends WebSecurityConfigurerAdapter{
        @Autowired
        Environment env;
        @Override
        protected void configure(HttpSecurity http) throws Exception {
            String managePath = env.getProperty("management.context-path");
            if(StringUtils.isEmpty(managePath)) {
                managePath = "";
            }
            http.csrf().disable();
            http.authorizeRequests()
                    .antMatchers("/**"+managePath+"/**").authenticated()
                    .anyRequest().permitAll()
                    .and().httpBasic();
        }
}经过如上配置,可以访问actuator端点,查看运行信息,本例如访问端点health:http://localhost:8081/acmanage/health
获得json信息:
{
  status: "UP",
  componentOne: {
    status: "UP"
  },
  diskSpace: {
    status: "UP",
    total: 104864092160,
    free: 52482588672,
    threshold: 10485760
  },
  rabbit: {
    status: "UP",
    version: "3.7.7"
  },
  redis: {
    status: "UP",
    version: "4.0.10"
  },
  db: {
    status: "UP",
    database: "MySQL",
    hello: 1
  }
}实际应用中,我们需要针对特定组件,进行健康状况监控,需要扩展health端点监控信息;
扩展代码:
/**
 * 自定义组件健康检查指示器
 * 所有健康检查指示器命名规则为:*** + HealthIndicator;如:RedisHealthIndicator
 * 所有HealthIndicator的实现,注册入容器后,会被放入:CompositeHealthIndicator.indicators中,并全部被执行;
 */
@Component
public class ComponentOneHealthIndicator extends AbstractHealthIndicator {

    @Override
    protected void doHealthCheck(Health.Builder builder) throws Exception {
        //检查组件运行健康情况;
        //check***();
        //检查结果:
        builder.up();
        //builder.down();
    }
}
实际扩展后,health端点访问结果,参见上节返回的json信息中的componentOne;
spring boot实际使用,异常简单,并且提供有各种良好的扩展方式。常见组件都有相应的starter和默认配置支持,只需要根据实际情况进行配置调整覆盖就可以良好运用。
如果觉得我的文章对您有用,请随意打赏。你的支持将鼓励我继续创作!