社区微信群开通啦,扫一扫抢先加入社区官方微信群

社区微信群
在前面的博客中,我们实现了配置文件统一管理的功能,但是我们可以发现,我们仅仅只用了一个server,如果当这个server挂掉的话,整个配置中心就会不可用,下面,我们就来解决配置中心的高可用问题。
下面我们通过整合Eureka来实现配置中心的高可用,因为作为架构内的配置管理,本身其实也是可以看作架构中的一个微服务,我们可以把config server也注册为服务,这样所有客户端就能以服务的方式进行访问。通过这种方法,只需要启动多个指向同一Gitlab仓库位置的config server端就能实现高可用了。
一、Config Server端加入Eureka
1、加入Eureka依赖
<dependency>
			<groupId>org.springframework.cloud</groupId>
			<artifactId>spring-cloud-starter-eureka</artifactId>
</dependency>@EnableEurekaClient加入Eureka注册的配置,bootstrap.yml
server:
  port: 8889
eureka:
  client:
    service-url:
      defaultZone: http://localhost:8761/eureka
  instance:
    prefer-ip-address: true
spring:
  application:
      name: foo
  cloud:
    config:
      server:
        git:
          uri: https://gitlab.xxx.com/xxxxx/xxxxx.git     # 配置gitlab仓库的地址
          search-paths: /config-repo # gitlab仓库地址下的相对地址,可以配置多个,用,分割。
          username: your name      # gitlab仓库的账号
password: your password # gitlab仓库的密码4、修改端口号,再启动一个Config Server
5、查看服务是否注册成功
二、Config 客户端加入Eureka
1、加入Eureka的pom依赖,同Config Server
2、修改Config客户端的配置文件
bootstrap.properties经过测试,此处客户端只能是bootstrap.properties,否则会一直连端口8888
server.port=8890
spring.application.name=configserver
spring.cloud.config.name=configserver
spring.cloud.config.profile=dev
spring.cloud.config.label=master
# 开启Config服务发现支持
spring.cloud.config.discovery.enabled=true
# 此处需要设置成Config Server在Eureka上注册的服务名
spring.cloud.config.discovery.service-id=foo
# 指定服务发现中心
eureka.client.service-url.defaultZone=http://localhost:8761/eureka其中,通过eureka.client.service-url.defaultZone参数指定服务注册中心,用于服务的注册与发现,再将spring.cloud.config.discovery.enabled参数设置为true,开启通过服务来访问Config Server的功能,最后利用spring.cloud.config.discovery.serviceId参数来指定Config Server注册的服务名。这里的spring.application.name和spring.cloud.config.profile和前面博客中的意义一致。
3、在Application主类上添加Eureka支持,同Config Server一致
三、验证
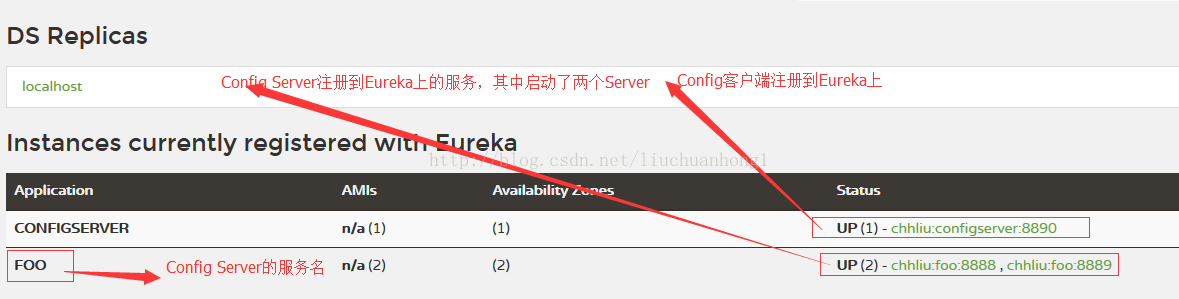
1、查看Eureka Server上的服务
2、查看Config Server是否正常
在浏览器中分别输入:http://localhost:8888/configserver/dev/master,http://localhost:8889/configserver/dev/master,看是否有返回结果如下:
{

    "name": "configserver",
    "profiles": [
        "dev"
    ],
    "label": "master",
    "version": "8949024814dcb6d61f97dc49db7e9dadcfc724b1",
    "state": null,
    "propertySources": [
        {
            "name": "https://gitlab.xxx.com/xxxxx/xxxxx/project/config-repo/configserver.properties",
            "source": {
                "name": "chhliuxyh",
                "hello": "i'm the king of the world!!!",
                "profile": "profile-default"
            }
        }
    ]

}
3、查看客户端是否正常
在浏览器中输入http://localhost:8890/hello,看是否有如下返回
i'm the king of the world!!!
如果上面几步正常,则说明是ok的。
4、将8888端口对应的Config Server停掉,然后重新输入http://localhost:8890/hello,看是否ok!我们发现仍然是ok的,这样我们就完成了配置中心的高可用了!
如果觉得我的文章对您有用,请随意打赏。你的支持将鼓励我继续创作!