社区微信群开通啦,扫一扫抢先加入社区官方微信群

社区微信群
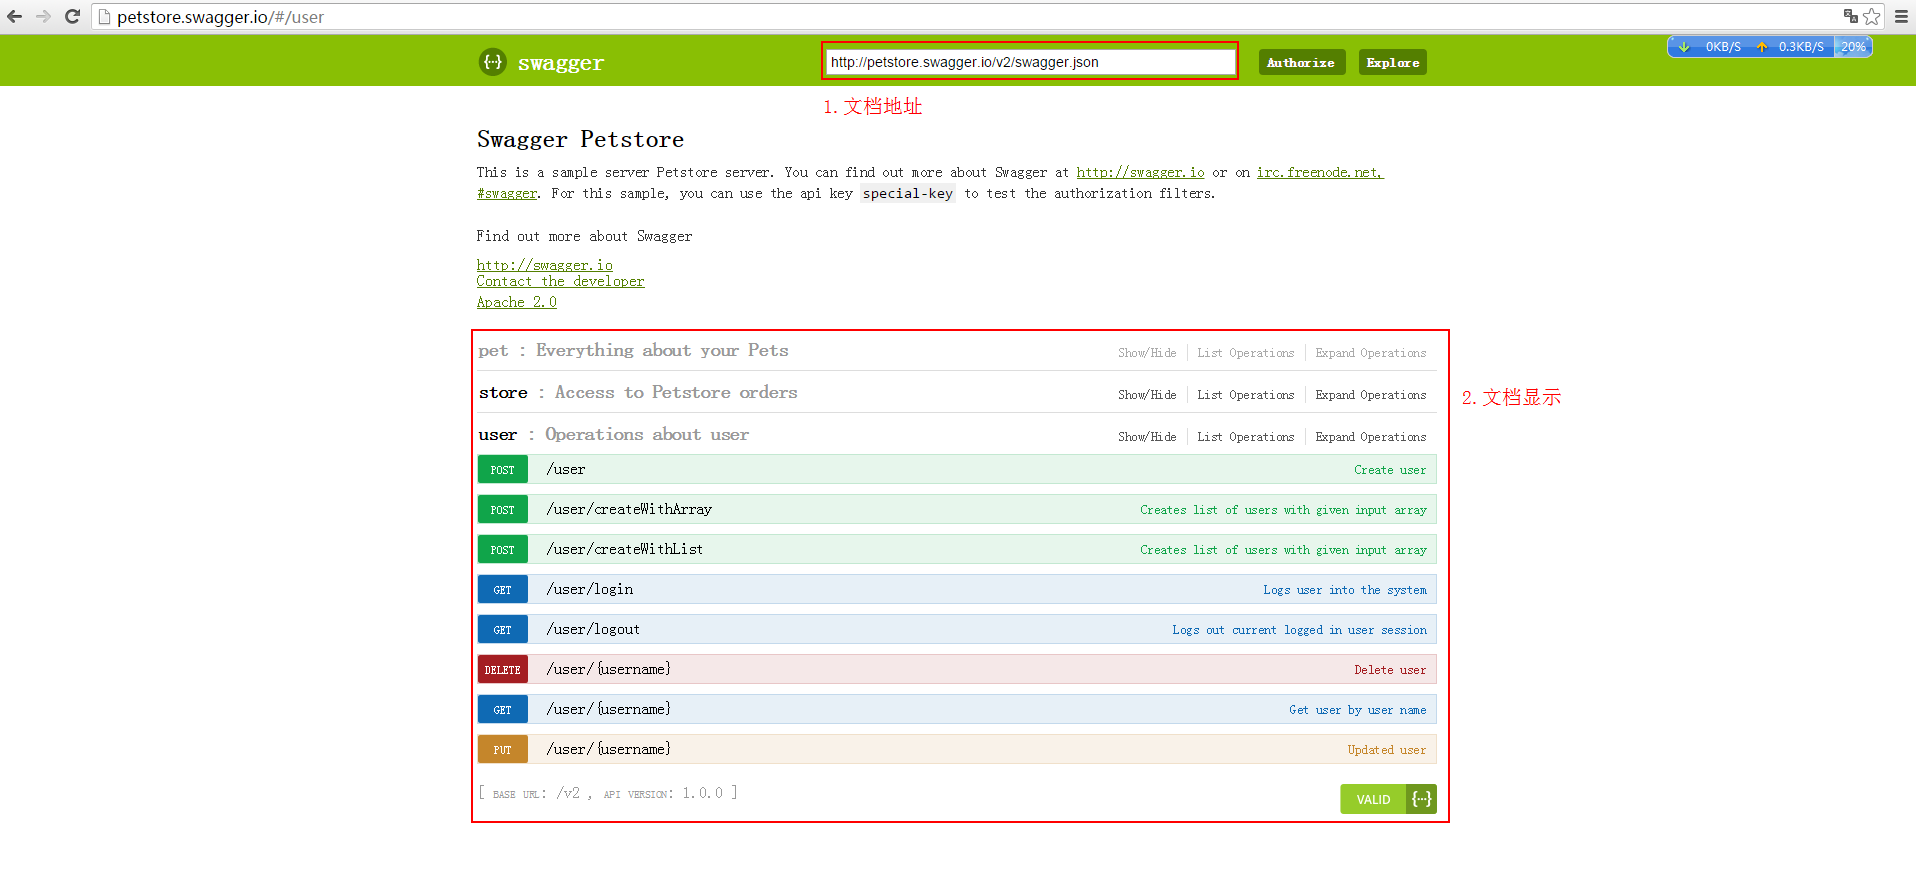
关于Swagger UI官方解释是这样的:The Swagger UI is an open source project to visually render documentation for a Swagger defined API directly from the API’s Swagger specifcation 官网地址
下面是官方的效果图:
我将上图分成了两部分
Swagger可以将某种固定格式的JSON数据生成可以视图的在线API文档,支持在线测试,可以清楚的观察到IO数据。
目的:在原有的SpringMVC系统中添加Swagger,通过在接口上添加注解实现,接口文档的同步效果。
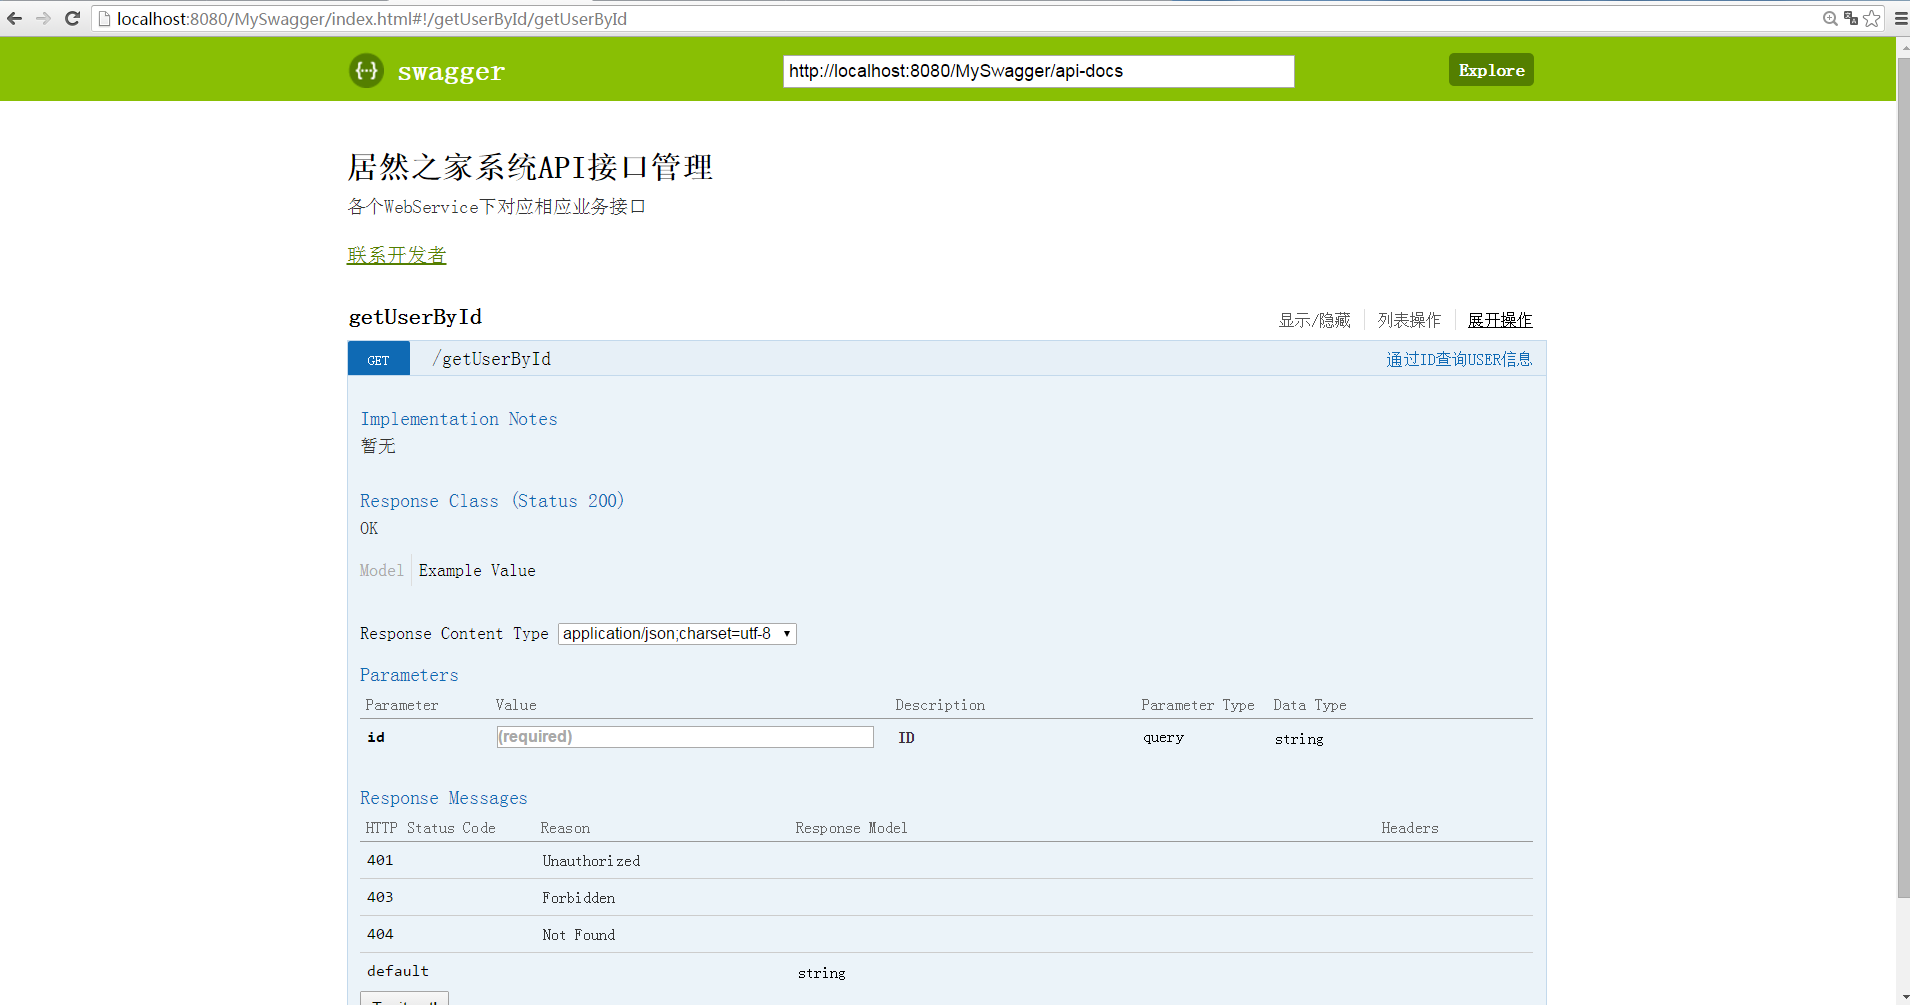
下图为我实现之后的效果:
我的工具:Eclipse开发工具(安装Spring插件,当然也可以不要,就是麻烦点),Maven,Tomcat,Internet访问,Chrome浏览器
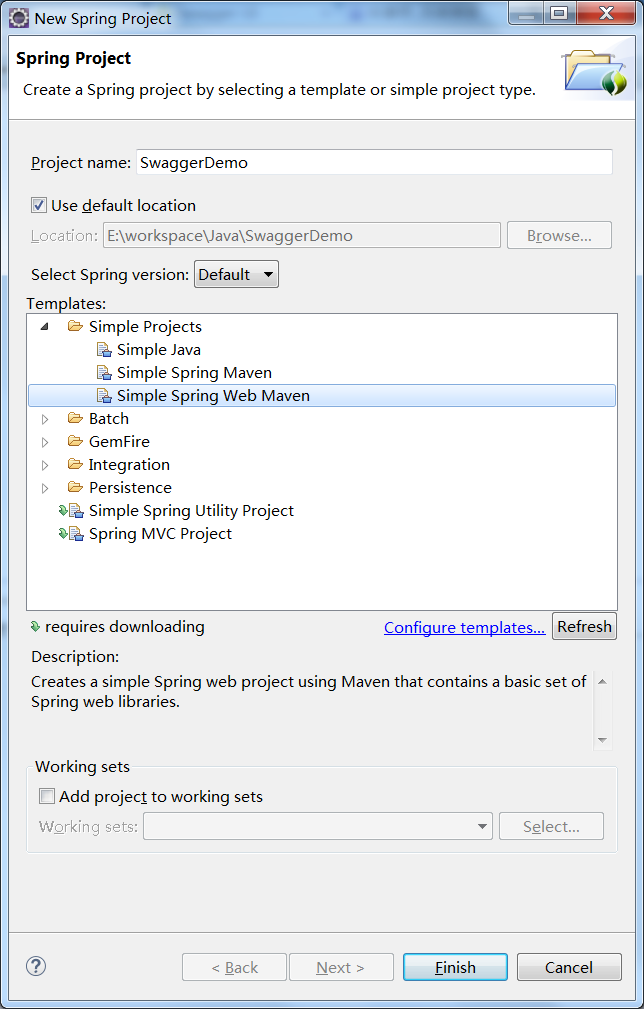
1.创建Simple Spring Web Maven工程
右键New->Spring Project,选择对应类型,finish, 如下图:
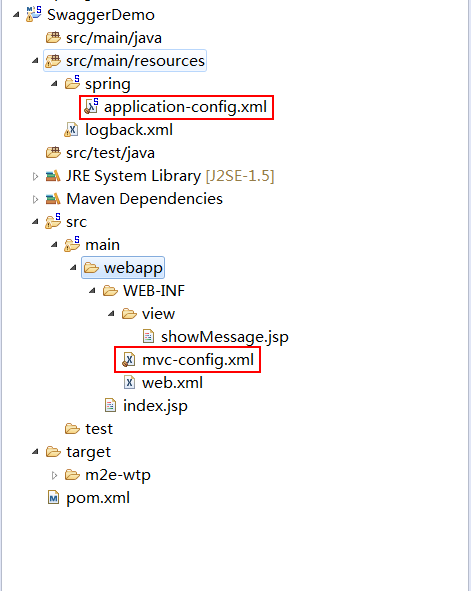
我的工程的结构,注意那两个配置文件,名称不重要,可以随便改,注意要对应好web.xml中的名称就行。
想了想还是把三个配置文件贴出来吧。
web.xml
<?xml version="1.0" encoding="ISO-8859-1"?>
<web-app xmlns:xsi="http://www.w3.org/2001/XMLSchema-instance"
         xmlns="http://java.sun.com/xml/ns/javaee"
         xsi:schemaLocation="http://java.sun.com/xml/ns/javaee
http://java.sun.com/xml/ns/javaee/web-app_2_5.xsd"
         id="WebApp_ID" version="2.5">

    <display-name>SwaggerDemo</display-name>

   <!--
        - Location of the XML file that defines the root application context.
        - Applied by ContextLoaderListener.
    -->
    <context-param>
        <param-name>contextConfigLocation</param-name>
        <param-value>classpath:spring/application-config.xml</param-value>
    </context-param>

    <listener>
        <listener-class>org.springframework.web.context.ContextLoaderListener</listener-class>
    </listener>


    <!--
        - Servlet that dispatches request to registered handlers (Controller implementations).
    -->
    <servlet>
        <servlet-name>dispatcherServlet</servlet-name>
        <servlet-class>org.springframework.web.servlet.DispatcherServlet</servlet-class>
        <init-param>
            <param-name>contextConfigLocation</param-name>
            <param-value>/WEB-INF/mvc-config.xml</param-value>
        </init-param>
        <load-on-startup>1</load-on-startup>
    </servlet>

    <servlet-mapping>
        <servlet-name>dispatcherServlet</servlet-name>
        <url-pattern>/</url-pattern>
    </servlet-mapping>

</web-app>
application-config.xml
<?xml version="1.0" encoding="UTF-8"?>

<beans xmlns="http://www.springframework.org/schema/beans" xmlns:xsi="http://www.w3.org/2001/XMLSchema-instance"
    xmlns:context="http://www.springframework.org/schema/context"
    xsi:schemaLocation="http://www.springframework.org/schema/beans http://www.springframework.org/schema/beans/spring-beans.xsd
        http://www.springframework.org/schema/context http://www.springframework.org/schema/context/spring-context.xsd">

    <!-- Uncomment and add your base-package here:
         <context:component-scan
            base-package="org.springframework.samples.service"/>  -->

</beans>
mvc-config.xml
<?xml version="1.0" encoding="UTF-8"?>

<beans xmlns="http://www.springframework.org/schema/beans" xmlns:xsi="http://www.w3.org/2001/XMLSchema-instance"
    xmlns:mvc="http://www.springframework.org/schema/mvc" xmlns:context="http://www.springframework.org/schema/context"
    xsi:schemaLocation="http://www.springframework.org/schema/mvc http://www.springframework.org/schema/mvc/spring-mvc.xsd
        http://www.springframework.org/schema/beans http://www.springframework.org/schema/beans/spring-beans.xsd
        http://www.springframework.org/schema/context http://www.springframework.org/schema/context/spring-context.xsd">

    <!-- Uncomment and your base-package here:
         <context:component-scan
            base-package="org.springframework.samples.web"/>  -->


    <mvc:annotation-driven />

    <bean class="org.springframework.web.servlet.view.InternalResourceViewResolver">
            <!-- Example: a logical view name of 'showMessage' is mapped to '/WEB-INF/jsp/showMessage.jsp' -->
            <property name="prefix" value="/WEB-INF/view/"/>
            <property name="suffix" value=".jsp"/>
    </bean>

</beans>
这样配置到后面配置Swagger会出现无法自动注入的问题,后面再说,以上为工具自动生成的代码。
2.添加Swagger-Spring MVC包、JSON和jackson
pom.xml文件中
properties标签里面添加jackson版本号
<version.jackson>2.4.4</version.jackson>dependencies标签中添加
    <!-- Swagger -->
    <dependency>
        <groupId>com.mangofactory</groupId>
        <artifactId>swagger-springmvc</artifactId>
        <version>0.9.5</version>
    </dependency>
    <!-- JSON -->
    <dependency>
        <groupId>net.sf.json-lib</groupId>
        <artifactId>json-lib</artifactId>
        <version>2.4</version>
        <classifier>jdk15</classifier>
    </dependency>
    <!-- JACKSON -->
    <dependency>
        <groupId>com.fasterxml.jackson.core</groupId>
        <artifactId>jackson-annotations</artifactId>
        <version>${version.jackson}</version>
    </dependency>
    <dependency>
        <groupId>com.fasterxml.jackson.core</groupId>
        <artifactId>jackson-databind</artifactId>
        <version>${version.jackson}</version>
    </dependency>
    <dependency>
        <groupId>com.fasterxml.jackson.core</groupId>
        <artifactId>jackson-core</artifactId>
        <version>${version.jackson}</version>
    </dependency>
3.下面是重点,Swagger所有API文档都在这里存储,添加Swagger配置类
创建一个配置类MySwaggerConfig,添加私有成员SpringSwaggerConfig,set方法使用@Autowired注解自动注入,使用@Bean注解添加SwaggerSpringMvcPlugin,并使用自定义的ApiInfo,SwaggerConfig类需要添加@Configuration以及@EnableSwagger
package com.edu.xk;

import org.springframework.beans.factory.annotation.Autowired;
import org.springframework.context.annotation.Bean;
import org.springframework.context.annotation.Configuration;
import org.springframework.web.servlet.config.annotation.EnableWebMvc;

import com.mangofactory.swagger.configuration.SpringSwaggerConfig;
import com.mangofactory.swagger.models.dto.ApiInfo;
import com.mangofactory.swagger.plugin.EnableSwagger;
import com.mangofactory.swagger.plugin.SwaggerSpringMvcPlugin;

@Configuration
@EnableSwagger
@EnableWebMvc
public class MySwaggerConfig {

    private SpringSwaggerConfig springSwaggerConfig;

    /**
     * Required to autowire SpringSwaggerConfig
     */
    @Autowired
    public void setSpringSwaggerConfig(SpringSwaggerConfig springSwaggerConfig) {
        this.springSwaggerConfig = springSwaggerConfig;
    }

    /**
     * Every SwaggerSpringMvcPlugin bean is picked up by the swagger-mvc
     * framework - allowing for multiple swagger groups i.e. same code base
     * multiple swagger resource listings.
     */
    @Bean
    public SwaggerSpringMvcPlugin customImplementation() {
        // 暂时不用过滤
        /*return new SwaggerSpringMvcPlugin(this.springSwaggerConfig).apiInfo(apiInfo()).includePatterns(".*pet.*");*/
        return new SwaggerSpringMvcPlugin(this.springSwaggerConfig).apiInfo(apiInfo());
    }

    private ApiInfo apiInfo() {
        ApiInfo apiInfo = new ApiInfo(
                  "My Apps API Title",
                  "My Apps API Description",
                  "My Apps API terms of service",
                  "My Apps API Contact Email",
                  "My Apps API Licence Type",
                  "My Apps API License URL"
            );
        return apiInfo;
    }
}
官方原话:
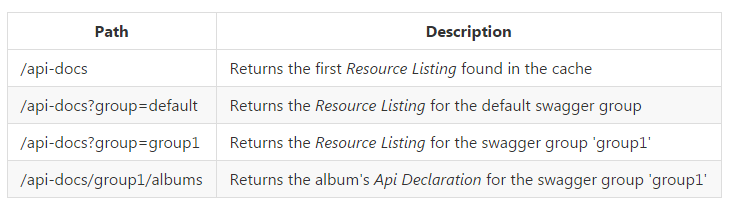
The @EnableSwagger annotation, in this example, enables swagger-springmvc out of the box. The generated swagger json Resource Listing is available at /api-docs
4.添加Controller:WebServiceForCSS,Swagger文档在此处添加
package com.edu.xk.webservice;

import javax.servlet.http.HttpServletRequest;

import org.springframework.stereotype.Controller;
import org.springframework.web.bind.annotation.RequestMapping;
import org.springframework.web.bind.annotation.RequestMethod;
import org.springframework.web.bind.annotation.RequestParam;
import org.springframework.web.bind.annotation.ResponseBody;

import com.edu.xk.model.User;
import com.wordnik.swagger.annotations.ApiOperation;
import com.wordnik.swagger.annotations.ApiParam;

import net.sf.json.JSONObject;

/**
 * @moudle: WebServiceForCSS
 * @version:v1.0
 * @Description: TODO
 * @author: xukai
 * @date: 2016年12月1日 下午5:37:30
 *
 */
@Controller
public class WebServiceForCSS {

    @ResponseBody
    @RequestMapping(value = "getUserById", method = RequestMethod.GET, produces = {"application/json; charset=utf-8","application/xml"})
    @ApiOperation(value = "通过ID查询USER信息", httpMethod = "GET", notes = "暂无")
    public String getUserById(
            @ApiParam(required = true, name = "id", value = "ID")
            @RequestParam(value = "id") String id,HttpServletRequest request) {
        User user = new User();
        user.setId(id);
        user.setName("测试人员");
        user.setAge(25);
        JSONObject object = JSONObject.fromObject(user);
        return object.toString();
    }
}
5.配置文件修改
context加载的时候需要配置的文件,此处配置文件为application-config.xml
        <mvc:annotation-driven /> <!-- mvc-config.xml中的可以去掉 -->
        <context:component-scan base-package="com.edu"/>
        <bean class="com.edu.xk.configer.SwaggerConfig"/>
6.下载Swagger UI组件
去官网下载Zip包,或者在github上下载也可以,需要将dist文件夹下的所有文件的复制到webapp目录下。
7.修改Project Properties
将jdk1.5换成最新的本地的jdk,对应的Java complier也改为对应的,还有maven包依赖也需要添加,不然启动的时候会找不到ContextLoader.class。
8.添加拦截器,不然无法访问.html后缀文件,在web.xml中添加
<servlet-mapping>
<servlet-name>default</servlet-name>
<url-pattern>*.jpg</url-pattern>
</servlet-mapping>
<servlet-mapping>
<servlet-name>default</servlet-name>
<url-pattern>*.png</url-pattern>
</servlet-mapping>
<servlet-mapping>
<servlet-name>default</servlet-name>
<url-pattern>*.gif</url-pattern>
</servlet-mapping>
<servlet-mapping>
<servlet-name>default</servlet-name>
<url-pattern>*.ico</url-pattern>
</servlet-mapping>
<servlet-mapping>
<servlet-name>default</servlet-name>
<url-pattern>*.js</url-pattern>
</servlet-mapping>
<servlet-mapping>
<servlet-name>default</servlet-name>
<url-pattern>*.css</url-pattern>
</servlet-mapping>
<servlet-mapping>
<servlet-name>default</servlet-name>
<url-pattern>*.html</url-pattern>
</servlet-mapping>
<servlet-mapping>
<servlet-name>default</servlet-name>
<url-pattern>*.xls</url-pattern>
</servlet-mapping>
<servlet-mapping>
<servlet-name>default</servlet-name>
<url-pattern>*.doc</url-pattern>
</servlet-mapping>
<servlet-mapping>
<servlet-name>default</servlet-name>
<url-pattern>*.json</url-pattern>
</servlet-mapping>
<!-- 字体相关 开始 -->
<servlet-mapping>
<servlet-name>default</servlet-name>
<url-pattern>*.eot</url-pattern>
</servlet-mapping>
<servlet-mapping>
<servlet-name>default</servlet-name>
<url-pattern>*.svg</url-pattern>
</servlet-mapping>
<servlet-mapping>
<servlet-name>default</servlet-name>
<url-pattern>*.ttf</url-pattern>
</servlet-mapping>
<servlet-mapping>
<servlet-name>default</servlet-name>
<url-pattern>*.woff</url-pattern>
</servlet-mapping>
<servlet-mapping>
<servlet-name>default</servlet-name>
<url-pattern>*.woff2</url-pattern>
</servlet-mapping>
<!-- 字体相关 结束 -->
<welcome-file-list>
<welcome-file>index.html</welcome-file>
<welcome-file>index.htm</welcome-file>
<welcome-file>index.jsp</welcome-file>
<welcome-file>default.html</welcome-file>
<welcome-file>default.htm</welcome-file>
<welcome-file>default.jsp</welcome-file>
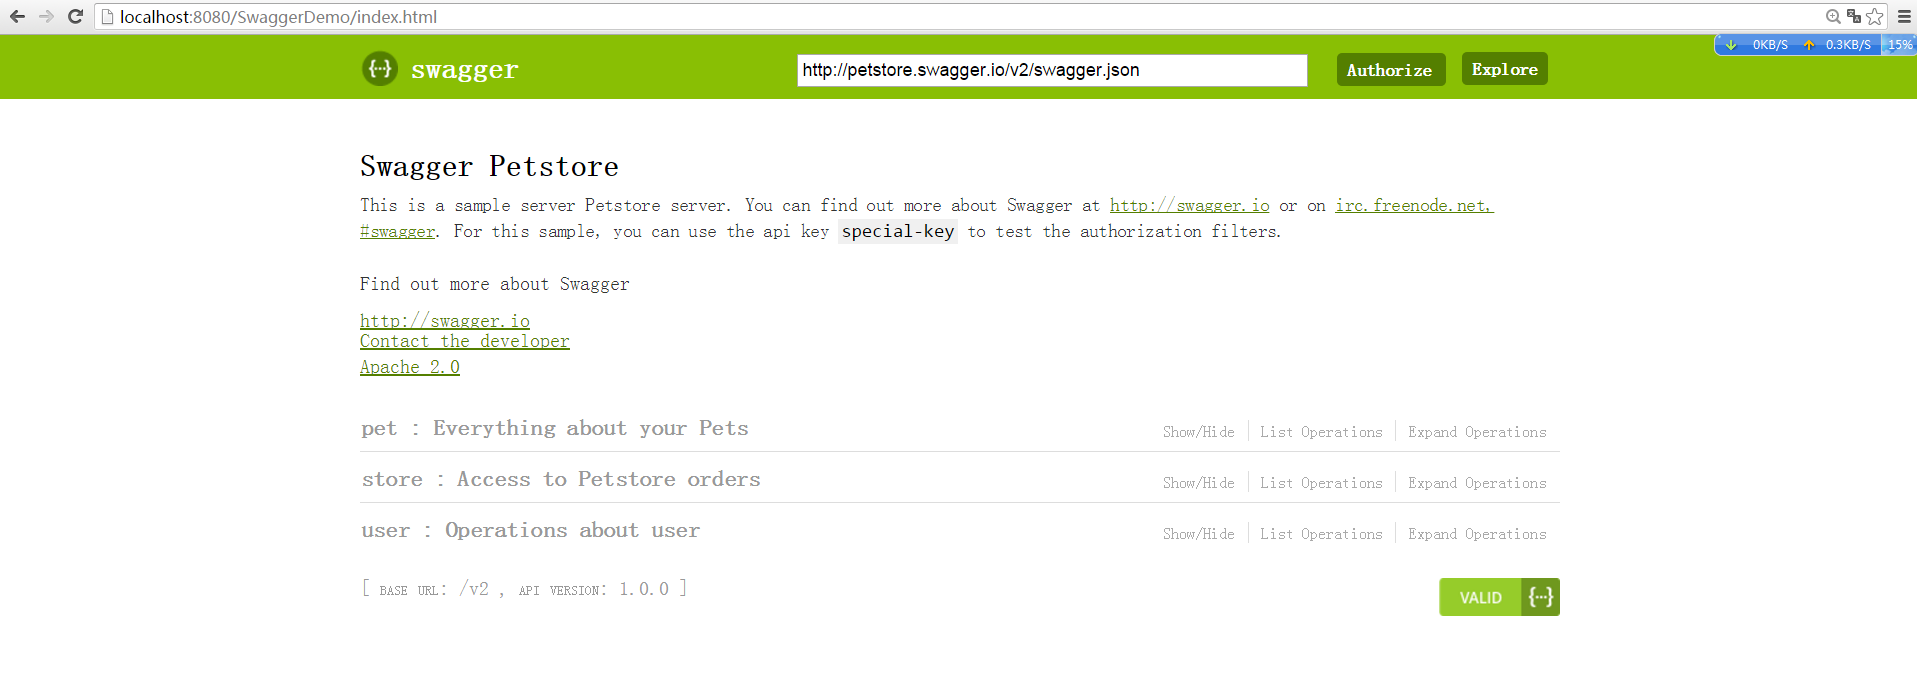
</welcome-file-list>运行项目,可以看到效果图:
可以看到,现在效果还是和官网上一样的。改为自己的API文档可以通过修改index.html中的url = "http://petstore.swagger.io/v2/swagger.json";或者直接修改访问的地址栏为:http://localhost:8080/SwaggerDemo/api-docs
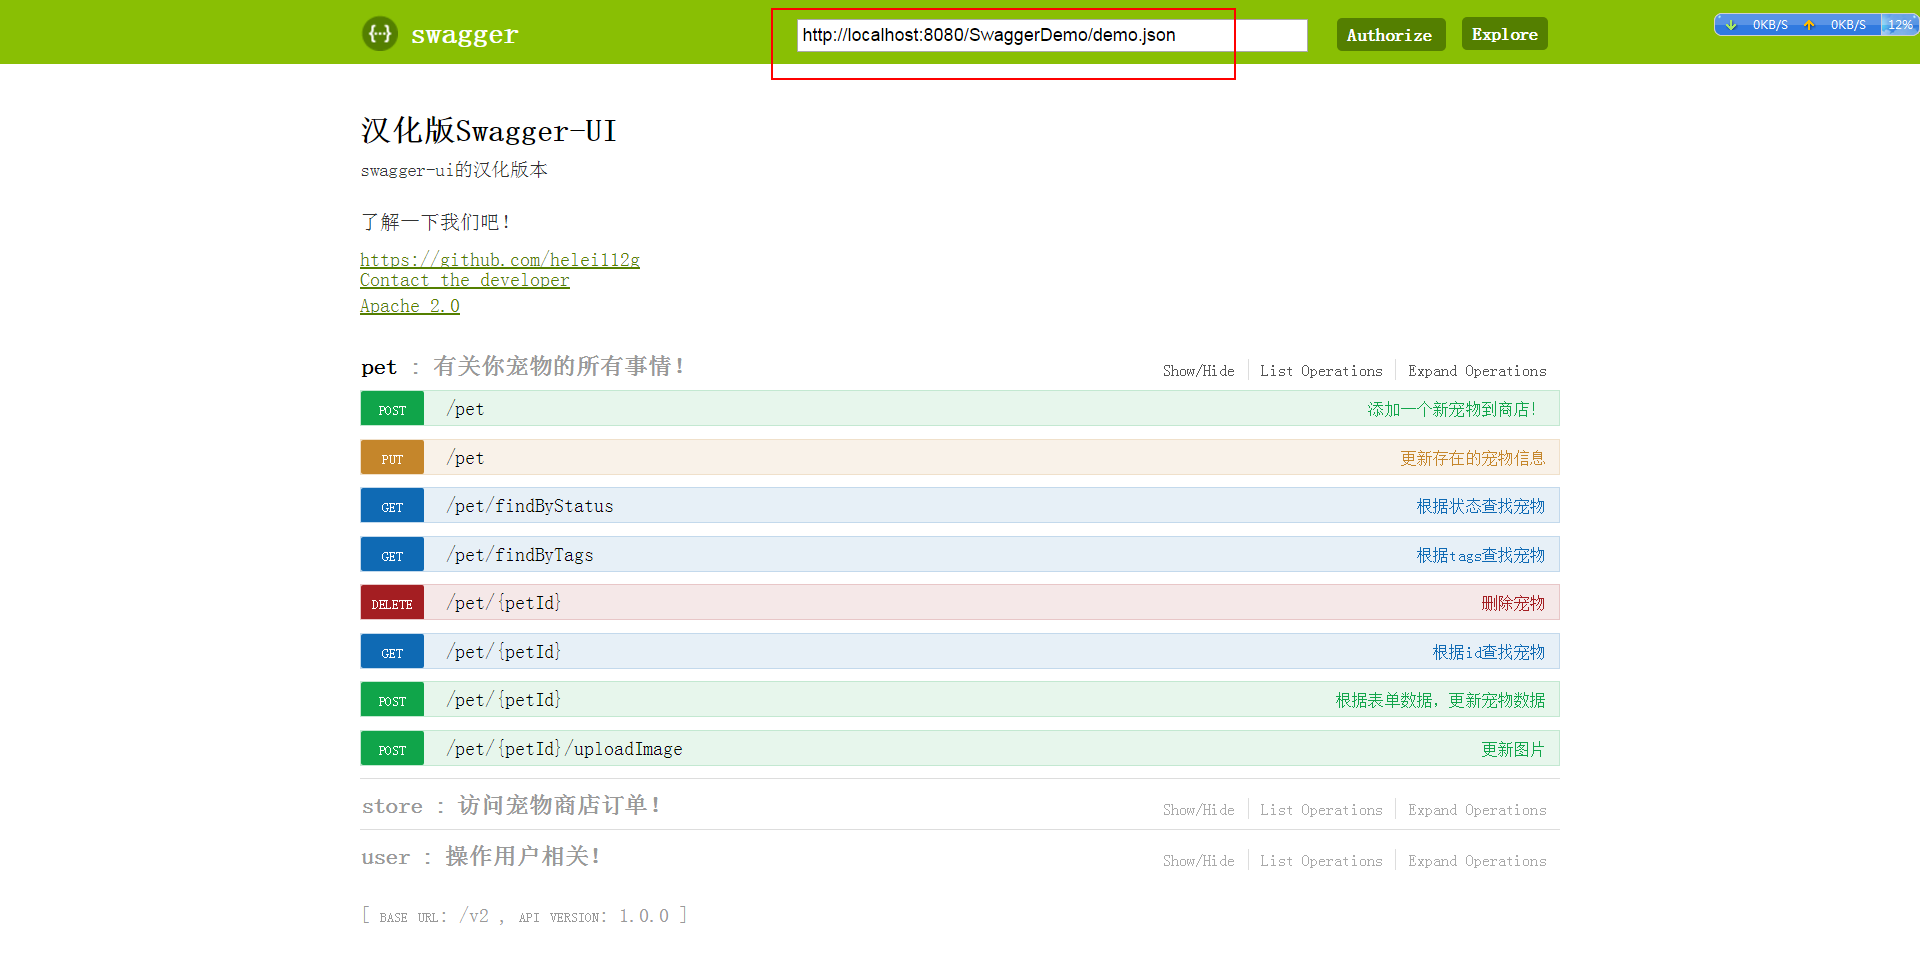
SpringMVC+Swagger其实就是在系统加载的时候,Swagger配置类去扫描所有添加注释的接口,并且储存起来通过下面地址进行访问,返回JSON数据,在前端界面显示出来
这里我在网上看到一个汉化的版本(原效果),下载了他工程,将他生成demo.json放入的我的工程中的webapp目录下,下面是效果图
问题4:org.springframework.beans.factory.BeanCreationException,出现这个异常是因为SpringSwaggerConfig的私有成员RequestMappingHandlerMapping造成的,将<mvc:annotation-driven />放入到web.xml的context-param标签对应的配置文件application-config.xml中,完美解决,官网解释该标签作用为: Required so swagger-springmvc can access spring’s RequestMappingHandlerMapping 。
org.springframework.beans.factory.NoSuchBeanDefinitionException: No
qualifying bean of type
[org.springframework.web.servlet.mvc.method.annotation.RequestMappingHandlerMapping]
found for dependency [collection of
org.springframework.web.servlet.mvc.method.annotation.RequestMappingHandlerMapping]:
expected at least 1 bean which qualifies as autowire candidate for
this dependency. Dependency annotations: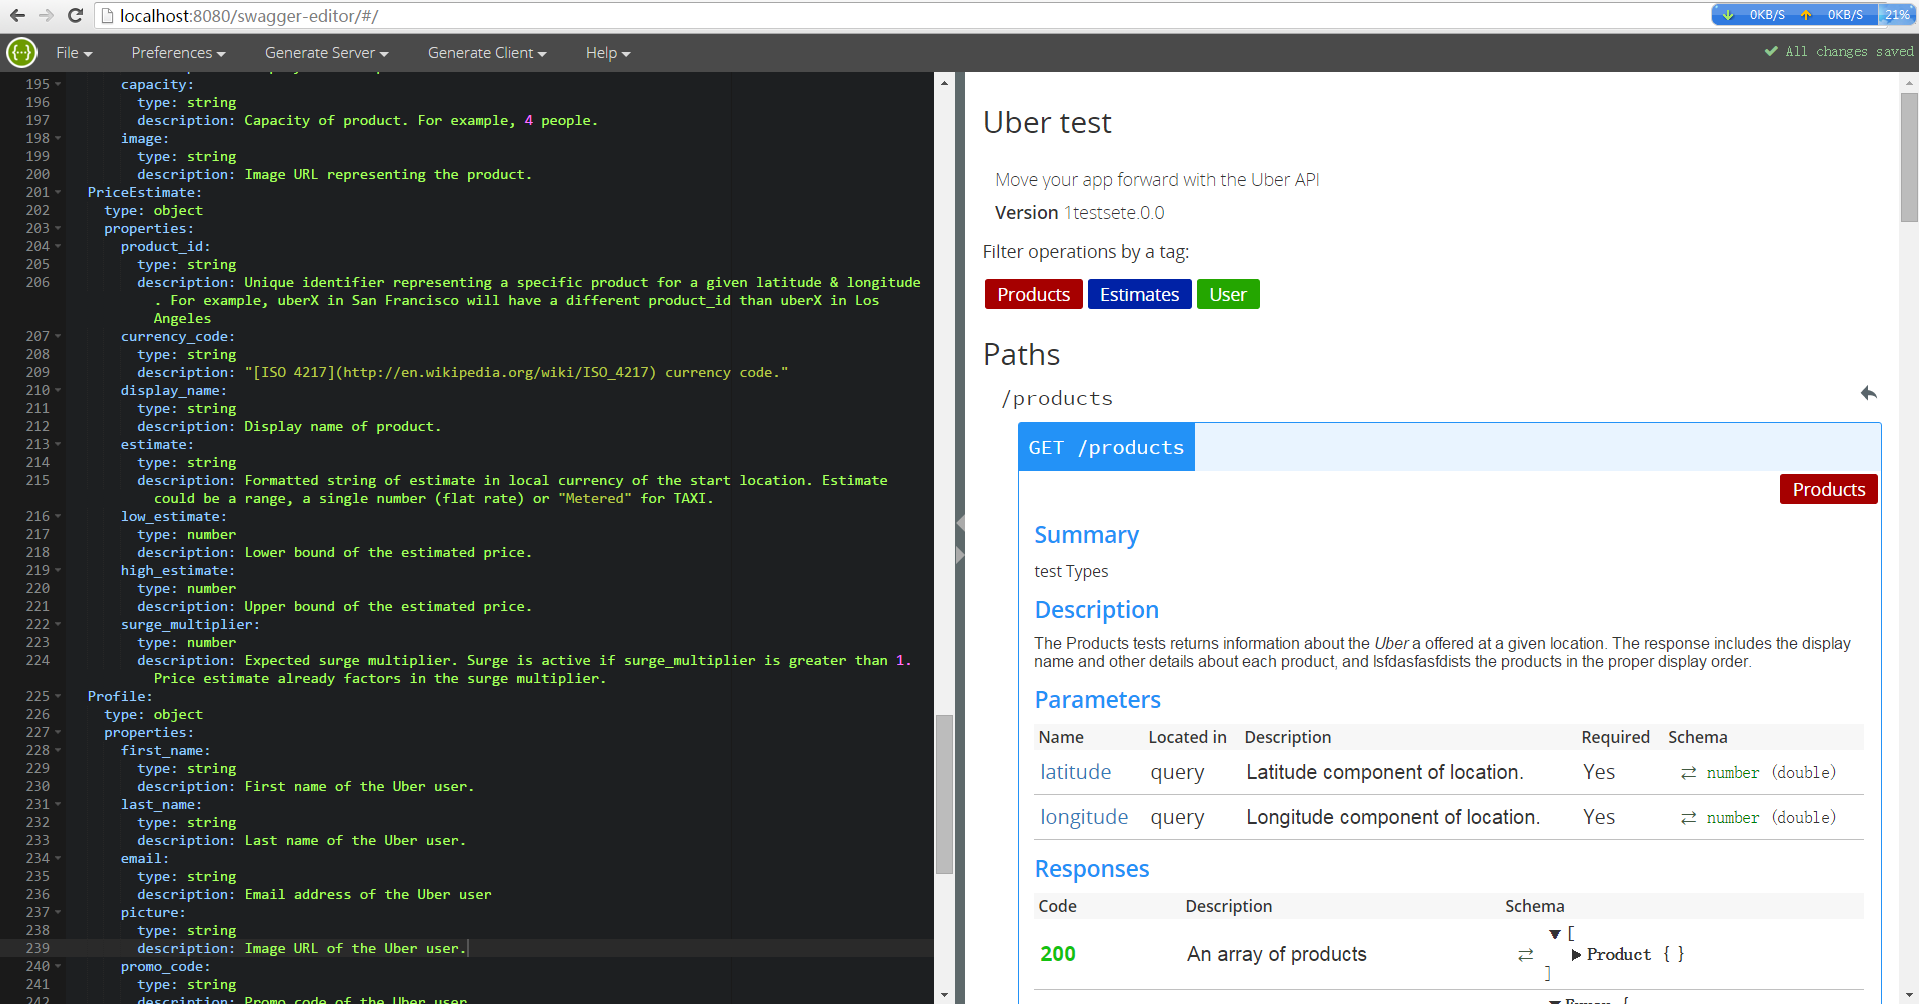
{@org.springframework.beans.factory.annotation.Autowired(required=true)}反正顺路,顺便的Editor也写完,Editor个人感觉就是一个文档编辑器,感觉SosoApi还是好些。试着在Swagger官网下载了一个Swagger Editor跑着玩了玩.下载swagger-editor.zip,解压到Tomcat的webapps文件夹中,来看一下效果图
Swagger UI结合Swagger Editor更好用,但是在线编辑那个太卡了,备份一个本地的,以备不时只需。
官方swagger-ui-master.zip:解压可得上文所说dist中所有文件
SwaggerDemo.zip:上文中的DEMO
如果觉得我的文章对您有用,请随意打赏。你的支持将鼓励我继续创作!