社区微信群开通啦,扫一扫抢先加入社区官方微信群

社区微信群
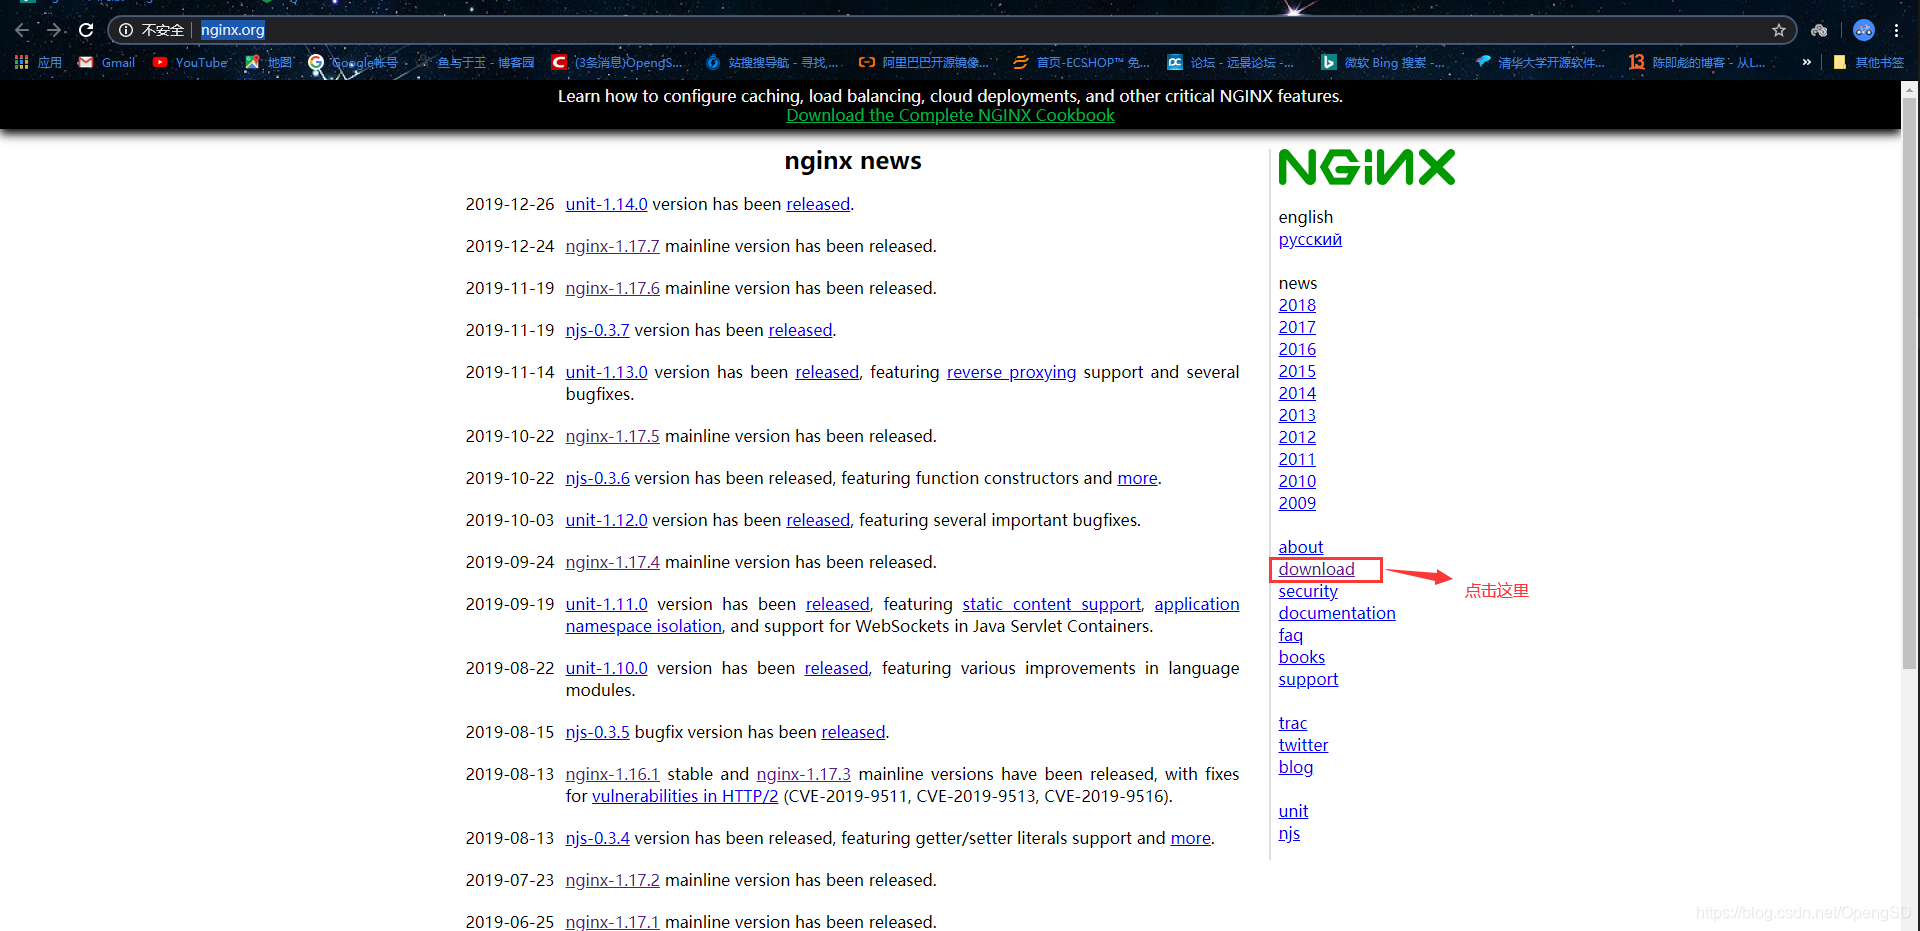
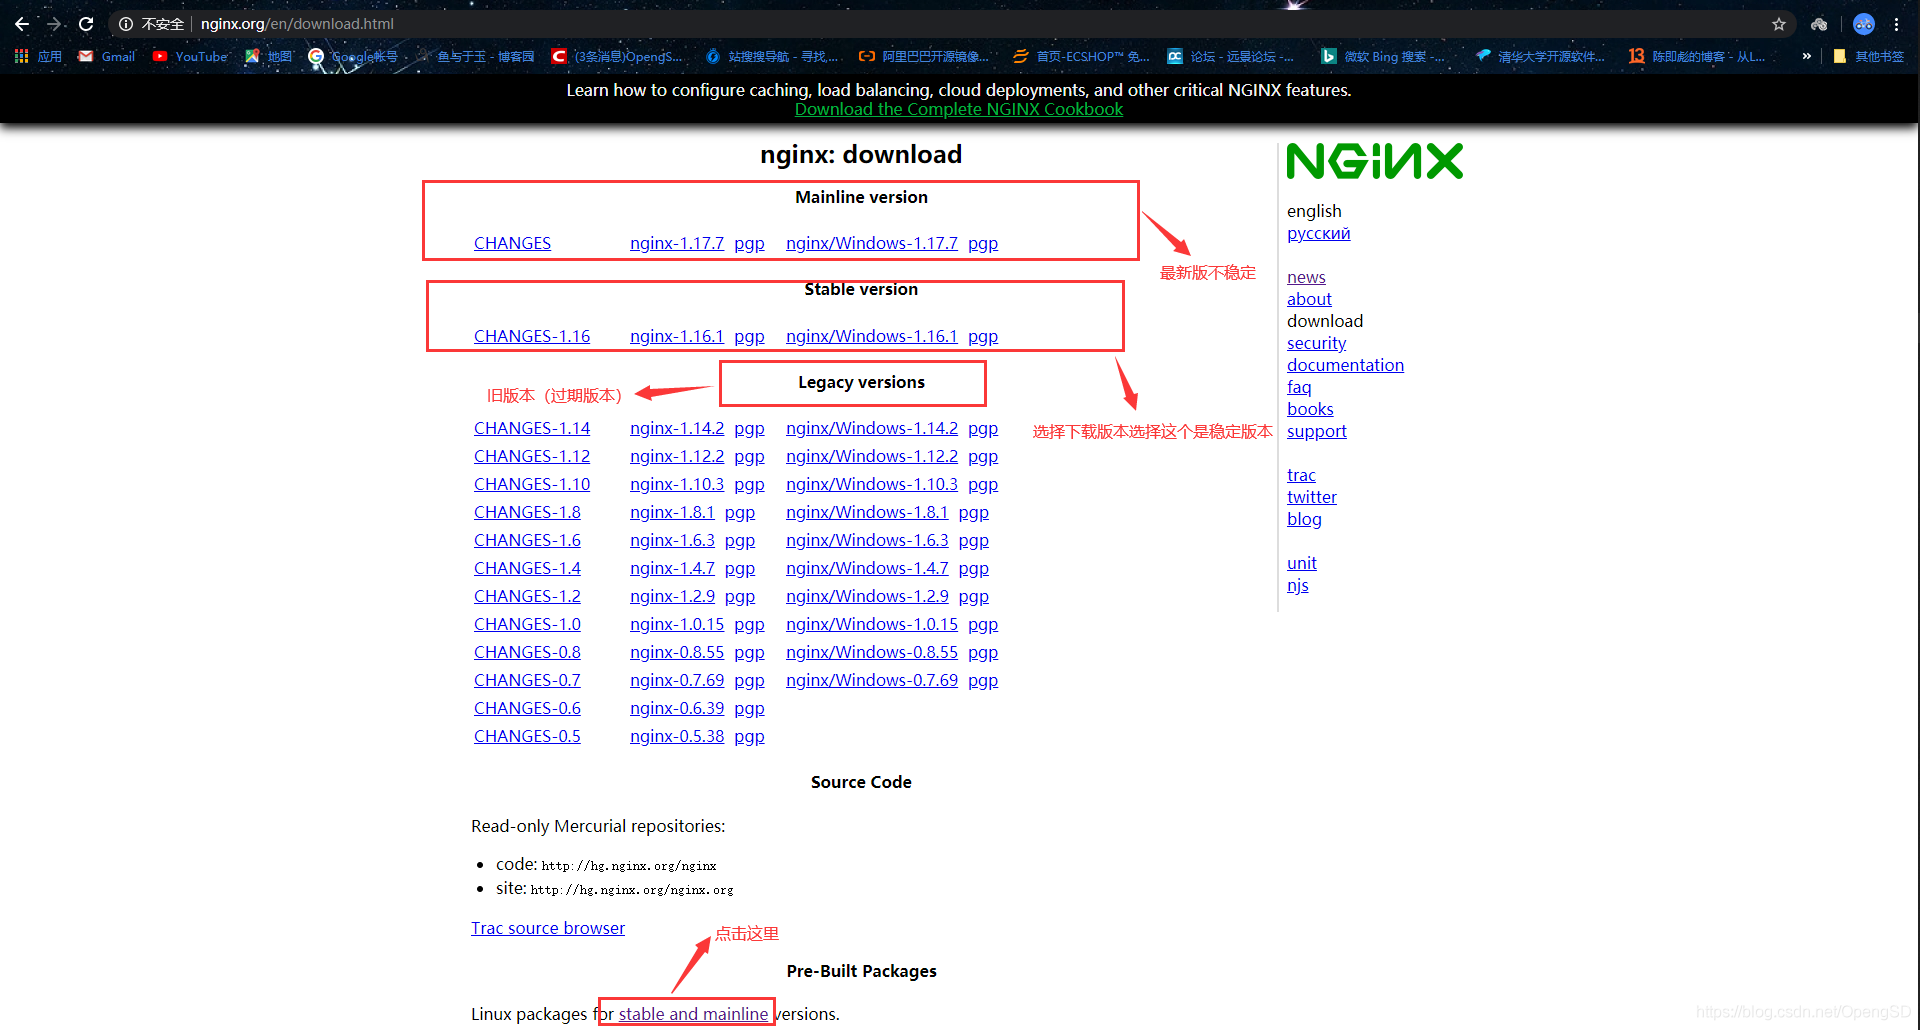
Nginx的安装版本分为Mainline version(主要开发版本,其实就是还处于开发版)、Stable version(当前最新稳定版)和Legacy versions(旧的稳定版), Nginx安装可以使⽤yum或源码安装,但是推荐使⽤源码,⼀是yum的版本⽐较旧,⼆是编译安装可以更⽅便⾃定义相关路径,三是使⽤源码编译可以⾃定义相关功能,更⽅便业务的上的使⽤,源码安装需要提前准备标准的编译器,GCC的全称是(GNU Compiler collection),其有GNU开发,并以GPL即LGPL许可,是⾃由的类UNIX即苹果电脑Mac OS X操作系统的标准编译器,因为GCC原本只能处理C语⾔,所以原名为GNU C语⾔编译器,后来得到快速发展,可以处理C++,Fortran,pascal,objective-C,java以及Ada等其他语⾔,此外还需要Automake⼯具,以完成⾃动创建Makefile的⼯作,Nginx的⼀些模块需要依赖第三⽅库,⽐如pcre(⽀持rewrite),zlib(⽀持gzip模块)和openssl(⽀持ssl模块)等。
# yum安装准备
一台ubuntu 1804版本的虚拟机
# 编译安装准备
一台ubuntu 1804版本的虚拟机
Nginx源码包
root@magedu:~# apt-cache madison nginx
     nginx | 1.14.0-0ubuntu1.6 | http://cn.archive.ubuntu.com/ubuntu bionic-updates/main amd64 Packages
     nginx | 1.14.0-0ubuntu1.6 | http://cn.archive.ubuntu.com/ubuntu bionic-updates/main i386 Packages
     nginx | 1.14.0-0ubuntu1.6 | http://security.ubuntu.com/ubuntu bionic-security/main amd64 Packages
     nginx | 1.14.0-0ubuntu1.6 | http://security.ubuntu.com/ubuntu bionic-security/main i386 Packages
     nginx | 1.14.0-0ubuntu1 | http://cn.archive.ubuntu.com/ubuntu bionic/main amd64 Packages
     nginx | 1.14.0-0ubuntu1 | http://cn.archive.ubuntu.com/ubuntu bionic/main i386 Packages
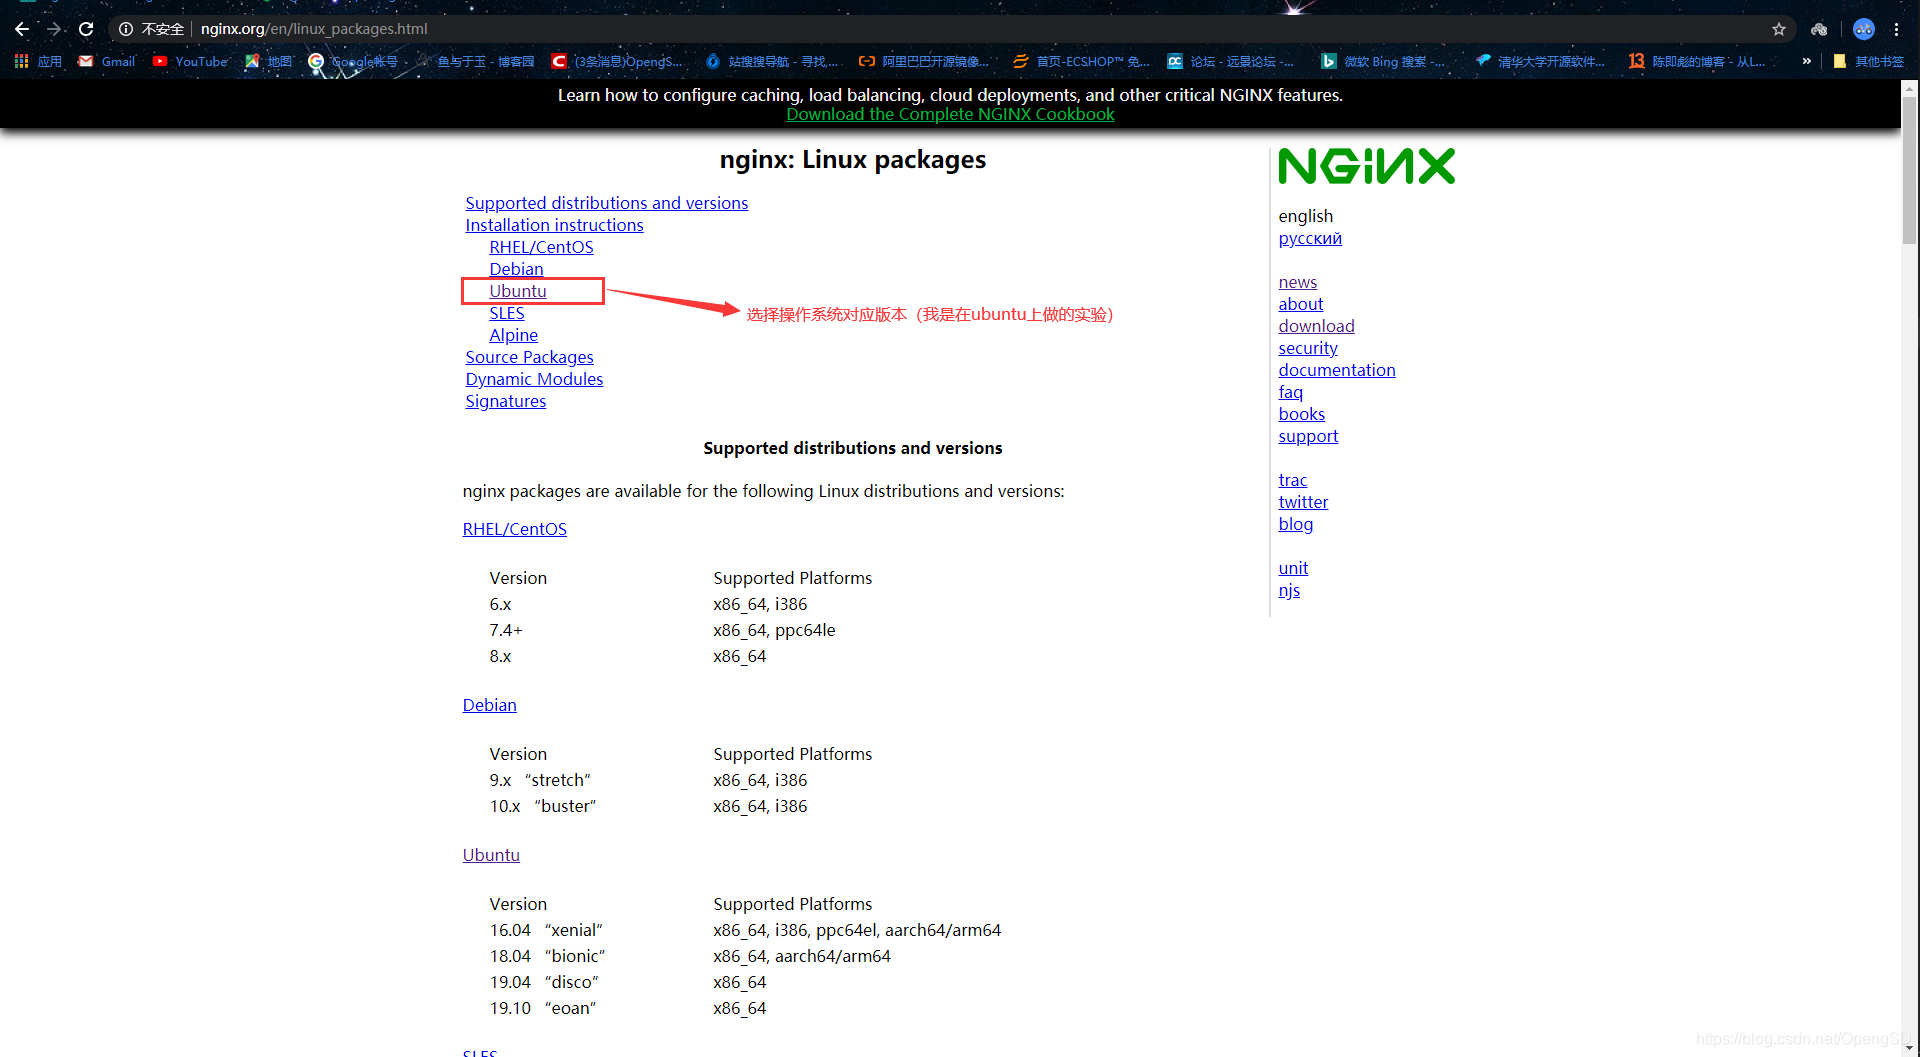
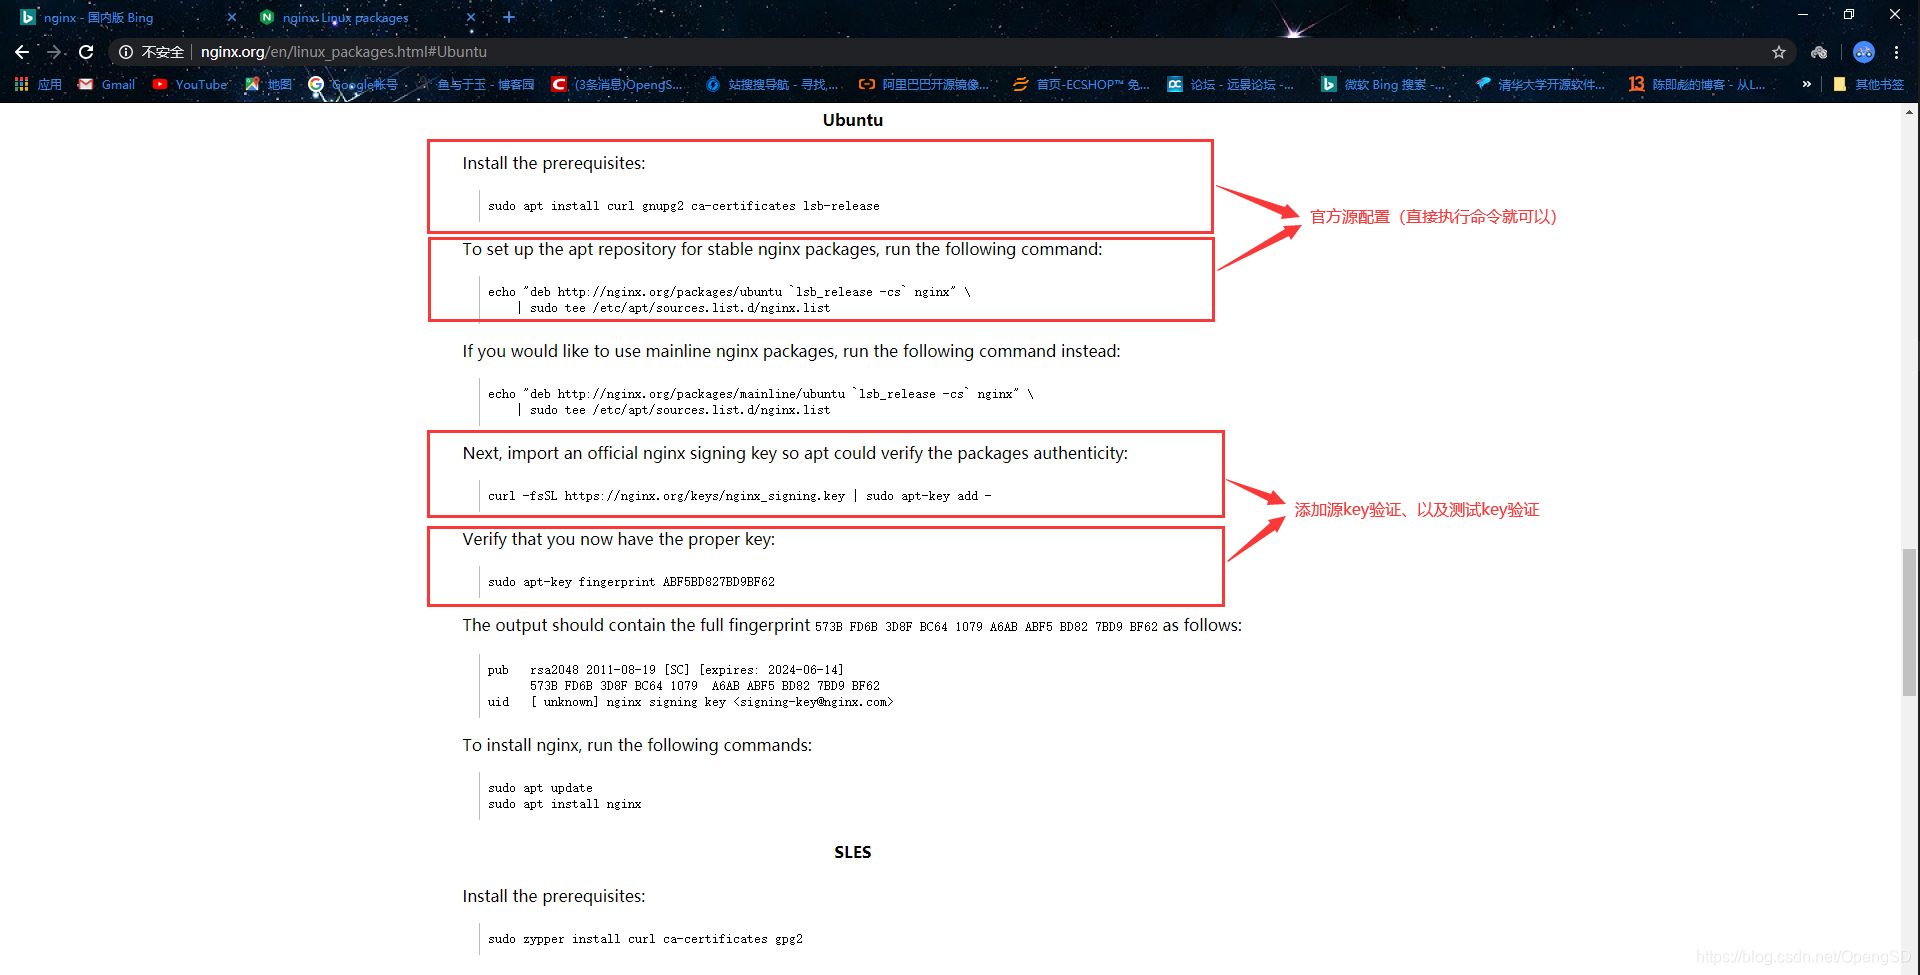
# 导入官方yum源
root@magedu:~# sudo apt install curl gnupg2 ca-certificates lsb-release
root@magedu:~# echo "deb http://nginx.org/packages/ubuntu `lsb_release -cs` nginx"
>     | sudo tee /etc/apt/sources.list.d/nginx.list

# 导入key验证
root@magedu:~# curl -fsSL https://nginx.org/keys/nginx_signing.key | sudo apt-key add -
root@magedu:~# sudo apt-key fingerprint ABF5BD827BD9BF62

# 重新加载源
root@magedu:~# apt update
Hit:1 http://security.ubuntu.com/ubuntu bionic-security InRelease
Hit:2 http://cn.archive.ubuntu.com/ubuntu bionic InRelease
Hit:3 http://nginx.org/packages/ubuntu bionic InRelease
Hit:4 http://cn.archive.ubuntu.com/ubuntu bionic-updates InRelease
Hit:5 http://cn.archive.ubuntu.com/ubuntu bionic-backports InRelease
Reading package lists... Done
Building dependency tree
Reading state information... Done
225 packages can be upgraded. Run 'apt list --upgradable' to see them.
N: Skipping acquire of configured file 'nginx/binary-i386/Packages' as repository 'http://nginx.org/packages/ubuntu bionic InRelease' doesn't support architecture 'i386'
root@magedu:~# apt install nginx=1.16.1-1~bionic -y

root@magedu:~# whereis nginx  # nginx的变量会自动设置
nginx: /usr/sbin/nginx /usr/lib/nginx /etc/nginx /usr/share/nginx /usr/share/man/man8/nginx.8.gz
root@magedu:~# nginx -h
nginx version: nginx/1.16.1
Usage: nginx [-?hvVtTq] [-s signal] [-c filename] [-p prefix] [-g directives]

Options:
-?,-h : this help
-v : show version and exit
-V : show version and configure options then exit #显⽰版本和编译参数
-t : test configuration and exit #测试配置⽂件是否异常
-T : test configuration, dump it and exit #测试并打印
-q : suppress non-error messages during configuration testing #静默模式
-s signal : send signal to a master process: stop, quit, reopen, reload #发送信号
-p prefix : set prefix path (default: /usr/share/nginx/) #指定Nginx ⽬录
-c filename : set configuration file (default: /etc/nginx/nginx.conf) #配置⽂件路径
-g directives : set global directives out of configuration file #设置全局指令
root@magedu:~# nginx -V
nginx version: nginx/1.16.1
built by gcc 7.4.0 (Ubuntu 7.4.0-1ubuntu1~18.04.1)
built with OpenSSL 1.1.1  11 Sep 2018
TLS SNI support enabled
configure arguments: --prefix=/etc/nginx --sbin-path=/usr/sbin/nginx --modules-path=/usr/lib/nginx/modules --conf-path=/etc/nginx/nginx.conf --error-log-path=/var/log/nginx/error.log --http-log-path=/var/log/nginx/access.log --pid-path=/var/run/nginx.pid --lock-path=/var/run/nginx.lock --http-client-body-temp-path=/var/cache/nginx/client_temp --http-proxy-temp-path=/var/cache/nginx/proxy_temp --http-fastcgi-temp-path=/var/cache/nginx/fastcgi_temp --http-uwsgi-temp-path=/var/cache/nginx/uwsgi_temp --http-scgi-temp-path=/var/cache/nginx/scgi_temp --user=nginx --group=nginx --with-compat --with-file-aio --with-threads --with-http_addition_module --with-http_auth_request_module --with-http_dav_module --with-http_flv_module --with-http_gunzip_module --with-http_gzip_static_module --with-http_mp4_module --with-http_random_index_module --with-http_realip_module --with-http_secure_link_module --with-http_slice_module --with-http_ssl_module --with-http_stub_status_module --with-http_sub_module --with-http_v2_module --with-mail --with-mail_ssl_module --with-stream --with-stream_realip_module --with-stream_ssl_module --with-stream_ssl_preread_module --with-cc-opt='-g -O2 -fdebug-prefix-map=/data/builder/debuild/nginx-1.16.1/debian/debuild-base/nginx-1.16.1=. -fstack-protector-strong -Wformat -Werror=format-security -Wp,-D_FORTIFY_SOURCE=2 -fPIC' --with-ld-opt='-Wl,-Bsymbolic-functions -Wl,-z,relro -Wl,-z,now -Wl,--as-needed -pie'
root@magedu:~# nginx -t   # 启动nginx服务之前先测试
nginx: the configuration file /etc/nginx/nginx.conf syntax is ok
nginx: configuration file /etc/nginx/nginx.conf test is successful
root@magedu:~# systemctl start nginx
root@magedu:~# systemctl status nginx
● nginx.service - nginx - high performance web server
   Loaded: loaded (/lib/systemd/system/nginx.service; enabled; vendor preset: enabled)
   Active: active (running) since Thu 2020-01-02 11:17:47 CST; 6h ago
     Docs: http://nginx.org/en/docs/
  Process: 856 ExecStart=/usr/sbin/nginx -c /etc/nginx/nginx.conf (code=exited, status=0/SU
 Main PID: 874 (nginx)
    Tasks: 2 (limit: 1083)
   CGroup: /system.slice/nginx.service
           ├─874 nginx: master process /usr/sbin/nginx -c /etc/nginx/nginx.conf
           └─875 nginx: worker process

Jan 02 11:17:47 magedu.org systemd[1]: Starting nginx - high performance web server...
Jan 02 11:17:47 magedu.org systemd[1]: Started nginx - high performance web server.

root@magedu:~# vim /etc/nginx/nginx.conf
# 默认页面路径查找
root@magedu:~# vim /etc/nginx/nginx.conf  # 主配置文件寻找子配置文件路径
 include /etc/nginx/conf.d/*.conf;   # 子配置文件
root@magedu:~# vim /etc/nginx/conf.d/default.conf # 子配置文件寻找网站主页面路径
        root   /usr/share/nginx/html;  # 网站主页面路径
root@magedu:~# cat /usr/share/nginx/html/
50x.html    index.html
root@magedu:~# cat /usr/share/nginx/html/index.html
<!DOCTYPE html>
<html>
<head>
<title>Welcome to nginx!</title>
<style>
    body {
        width: 35em;
        margin: 0 auto;
        font-family: Tahoma, Verdana, Arial, sans-serif;
    }
</style>
</head>
<body>
<h1>Welcome to nginx!</h1>
<p>If you see this page, the nginx web server is successfully installed and
working. Further configuration is required.</p>

<p>For online documentation and support please refer to
<a href="http://nginx.org/">nginx.org</a>.<br/>
Commercial support is available at
<a href="http://nginx.com/">nginx.com</a>.</p>

<p><em>Thank you for using nginx.</em></p>
</body>
</html>
root@magedu:~# cat /lib/systemd/system/nginx.service
[Unit]
Description=nginx - high performance web server
Documentation=http://nginx.org/en/docs/
After=network-online.target remote-fs.target nss-lookup.target
Wants=network-online.target

[Service]
Type=forking
PIDFile=/var/run/nginx.pid
ExecStart=/usr/sbin/nginx -c /etc/nginx/nginx.conf
ExecReload=/bin/kill -s HUP $MAINPID
ExecStop=/bin/kill -s TERM $MAINPID

[Install]
WantedBy=multi-user.target
[root@ubuntu]#apt install -y vim lrzsz tree screen psmisc lsof tcpdump wget ntpdate gcc gcc-c++ glibc glibc-devel pcre pcre-devel openssl openssl-devel systemd-devel nettools iotop bc zip unzip zlib-devel bash-completion nfs-utils automake libxml2 libxml2-devel libxslt libxslt-devel perl perl-ExtUtils-Embed libgd-dev libgeoip-dev
[root@ubuntu]#wget https://nginx.org/download/nginx-1.16.1.tar.gz
[root@ubuntu data]#ll
total 1036
drwxr-xr-x  3 root root    4096 Jan  5 17:06 ./
drwxr-xr-x 24 root root    4096 Jan  3 20:06 ../
drwx------  2 root root   16384 Jan  3 20:02 lost+found/
-rw-r--r--  1 root root 1032630 Dec 30 18:49 nginx-1.16.1.tar.gz
[root@ubuntu data]#tar xvf nginx-1.16.1.tar.gz -C /usr/local/
[root@ubuntu nginx-1.16.1]#./configure --prefix=/apps/nginx
> --user=nginx
> --group=nginx
> --with-http_ssl_module
> --with-http_v2_module
> --with-http_realip_module
> --with-http_stub_status_module
> --with-http_gzip_static_module
> --with-pcre
> --with-stream
> --with-stream_ssl_module
> --with-stream_realip_module
[root@ubuntu nginx-1.16.1]#make   #根据Makefile⽂件⽣成相应的模块
[root@ubuntu nginx-1.16.1]#make install  #创建⽬录,并将⽣成的模块和⽂件复制到相应的⽬录:
[root@ubuntu nginx-1.16.1]#useradd nginx -s /sbin/nologin -u 2000   #创建一个服务用户,以普通⽤⼾启动nginx
[root@ubuntu nginx-1.16.1]#chown nginx.nginx -R /apps/nginx/

[root@ubuntu nginx-1.16.1]#id nginx   # 查看创建的用户信息
uid=2000(nginx) gid=2000(nginx) groups=2000(nginx)
conf:该⽬录中保存了nginx所有的配置⽂件,其中nginx.conf是nginx服务器的最核⼼最主要的配置⽂件,其他
的.conf则是⽤来配置nginx相关的功能的,例如fastcgi功能使⽤的是fastcgi.conf和fastcgi_params两个⽂
件,配置⽂件⼀般都有个样板配置⽂件,是⽂件名.default结尾,使⽤的使⽤将其复制为并将default去掉即可。
html:该⽬录中保存了nginx服务器的web⽂件,但是可以更改为其他⽬录保存web⽂件,另外还有⼀个50x的web⽂件是
默认的错误⻚⾯提⽰⻚⾯。
logs:该⽬录⽤来保存nginx服务器的访问⽇志错误⽇志等⽇志,logs⽬录可以放在其他路径,⽐
如/var/logs/nginx⾥⾯。
sbin:该⽬录⽤来保存nginx⼆进制启动脚本,可以接受不同的参数以实现不同的功能。
[root@ubuntu nginx-1.16.1]#/apps/nginx/sbin/nginx -V
nginx version: nginx/1.16.1
built by gcc 7.4.0 (Ubuntu 7.4.0-1ubuntu1~18.04.1)
built with OpenSSL 1.1.1  11 Sep 2018
TLS SNI support enabled
configure arguments: --prefix=/apps/nginx --user=nginx --group=nginx --with-http_ssl_module --with-http_v2_module --with-http_realip_module --with-http_stub_status_module --with-http_gzip_static_module --with-pcre --with-stream --with-stream_ssl_module --with-stream_realip_module
[root@ubuntu ~]#/apps/nginx/sbin/nginx
[root@ubuntu ~]#ps -ef|grep nginx
root       5853      1  0 17:27 ?        00:00:00 nginx: master process /apps/nginx/sbin/nginx
nginx      5854   5853  0 17:27 ?        00:00:00 nginx: worker process
root       5856   1677  0 17:28 pts/0    00:00:00 grep --color=auto nginx

[root@ubuntu ~]#vim /lib/systemd/system/nginx.service
[Unit]
Description=The nginx HTTP and reverse proxy server
After=network.target remote-fs.target nss-lookup.target

[Service]
Type=forking
PIDFile=/run/nginx.pid
# Nginx will fail to start if /run/nginx.pid already exists but has the wrong
# SELinux context. This might happen when running `nginx -t` from the cmdline.
# https://bugzilla.redhat.com/show_bug.cgi?id=1268621
ExecStartPre=/bin/rm -f /run/nginx.pid   # 注意这个路径要对应系统的文件路径 最好(which查询一下rm -f)
ExecStartPre=/apps/nginx/sbin/nginx -t
ExecStart=/apps/nginx/sbin/nginx
ExecReload=/bin/kill -s HUP $MAINPID
KillSignal=SIGQUIT
TimeoutStopSec=5
KillMode=process
PrivateTmp=true

[Install]
WantedBy=multi-user.target
[root@ubuntu ~]#systemctl daemon-reload
[root@ubuntu ~]#systemctl start nginx  # 有可能启动报错的问题(pid文件路径不对 和rm -f命令的路径不对)
Job for nginx.service failed because the control process exited with error code.
See "systemctl status nginx.service" and "journalctl -xe" for details.

# 查看配置文件pid文件位置
[root@ubuntu ~]#vim /apps/nginx/conf/nginx.conf
#user  nobody;
worker_processes  1;

#error_log  logs/error.log;
#error_log  logs/error.log  notice;
#error_log  logs/error.log  info;

pid        logs/nginx.pid;  # 配置文件这一行的路径和启动文件写的不一样

# 修改启动脚本这两行
[root@ubuntu ~]#vim /lib/systemd/system/nginx.service
PIDFile=/apps/nginx/logs/nginx.pid
ExecStartPre=/bin/rm -f /apps/nginx/logs/nginx.pid

# 修改完先关闭服务在重新加载配置启动
[root@ubuntu ~]#/apps/nginx/sbin/nginx -s stop  # 关闭服务
[root@ubuntu ~]#systemctl daemon-reload         # 重新加载配置
[root@ubuntu ~]#systemctl start nginx           # 启动nginx
[root@ubuntu ~]#systemctl enable nginx          # 设置为开机启动
Created symlink /etc/systemd/system/multi-user.target.wants/nginx.service → /lib/systemd/system/nginx.service.

# 查看启动状态
[root@ubuntu ~]#systemctl status nginx
● nginx.service - The nginx HTTP and reverse proxy server
   Loaded: loaded (/lib/systemd/system/nginx.service; disabled; vendor preset: enabled)
   Active: active (running) since Sun 2020-01-05 17:57:03 CST; 4min 25s ago
  Process: 6489 ExecStart=/apps/nginx/sbin/nginx (code=exited, status=0/SUCCESS)
  Process: 6488 ExecStartPre=/apps/nginx/sbin/nginx -t (code=exited, status=0/SUCCESS)
  Process: 6487 ExecStartPre=/bin/rm -f /apps/nginx/logs/nginx.pid (code=exited, status=0/SUCCESS)
 Main PID: 6490 (nginx)
    Tasks: 2 (limit: 2290)
   CGroup: /system.slice/nginx.service
           ├─6490 nginx: master process /apps/nginx/sbin/nginx
           └─6491 nginx: worker process

Jan 05 17:57:03 ubuntu systemd[1]: Starting The nginx HTTP and reverse proxy server...
Jan 05 17:57:03 ubuntu nginx[6488]: nginx: the configuration file /apps/nginx/conf/nginx.conf syntax is ok
Jan 05 17:57:03 ubuntu nginx[6488]: nginx: configuration file /apps/nginx/conf/nginx.conf test is successful
Jan 05 17:57:03 ubuntu systemd[1]: nginx.service: Failed to parse PID from file /apps/nginx/logs/nginx.pid: Invali
Jan 05 17:57:03 ubuntu systemd[1]: Started The nginx HTTP and reverse proxy server.
Nginx的配置⽂件的组成部分: 主配置⽂件:nginx.conf,⼦配置⽂件 include conf.d/*.conf
fastcgi, uwsgi,scgi等协议相关的配置⽂件
mime.types:⽀持的mime类型,MIME(Multipurpose Internet Mail Extensions)多⽤途互联⽹邮件扩展类
型,MIME消息能包含⽂本、图像、⾳频、视频以及其他应⽤程序专⽤的数据,是设定某种扩展名的⽂件⽤⼀种应⽤程序来
打开的⽅式类型,当该扩展名⽂件被访问的时候,浏览器会⾃动使⽤指定应⽤程序来打开。多⽤于指定⼀些客⼾端⾃定义
的⽂件名,以及⼀些媒体⽂件打开⽅式。

Nginx主配置⽂件的配置指令⽅式:
directive value [value2 ...];

注意:
(1) 指令必须以分号结尾
(2) ⽀持使⽤配置变量
    内建变量:由Nginx模块引⼊,可直接引⽤
    ⾃定义变量:由⽤⼾使⽤set命令定义
        set variable_name value;
    引⽤变量:$variable_name
[root@ubuntu ~]#grep -v "#" /apps/nginx/conf/nginx.conf | grep -v "^$"
#全局配置端,对全局⽣效,主要设置nginx的启动⽤⼾/组,启动的⼯作进程数量,⼯作模式,Nginx的PID路径,⽇
志路径等。
user nginx nginx;
worker_processes 1; #启动⼯作进程数数量
events { #events设置快,主要影响nginx服务器与⽤⼾的⽹络连接,⽐如是否允许同时接受多个⽹络连接,使⽤哪
种事件驱动模型处理请求,每个⼯作进程可以同时⽀持的最⼤连接数,是否开启对多⼯作进程下的⽹络连接进⾏序列化
等。
worker_connections 1024; #设置单个nginx⼯作进程可以接受的最⼤并发,作为web服务器的时候最
⼤并发数为worker_connections * worker_processes,作为反向代理的时候为(worker_connections *
worker_processes)/2
}
http { #http块是Nginx服务器配置中的重要部分,缓存、代理和⽇志格式定义等绝⼤多数功能和第三⽅模块都可以
在这设置,http块可以包含多个server块,⽽⼀个server块中⼜可以包含多个location块,server块可以配置⽂
件引⼊、MIME-Type定义、⽇志⾃定义、是否启⽤sendfile、连接超时时间和单个链接的请求上限等。
include mime.types;
default_type application/octet-stream;
sendfile on; #作为web服务器的时候打开sendfile加快静态⽂件传输,指定是否使⽤sendfile系
统调⽤来传输⽂件,sendfile系统调⽤在两个⽂件描述符之间直接传递数据(完全在内核中操作),从⽽避免了数据在内
核缓冲区和⽤⼾缓冲区之间的拷⻉,操作效率很⾼,被称之为零拷⻉,硬盘 >> kernel buffer (快速拷⻉到
kernelsocket buffer) >>协议栈。
keepalive_timeout 65; #⻓连接超时时间,单位是秒
server { #设置⼀个虚拟机主机,可以包含⾃⼰的全局快,同时也可以包含多个location模块。⽐如本虚拟机
监听的端⼝、本虚拟机的名称和IP配置,多个server 可以使⽤⼀个端⼝,⽐如都使⽤80端⼝提供web服务、
listen 80; #配置server监听的端⼝
server_name localhost; 本server的名称,当访问此名称的时候nginx会调⽤当前serevr内部的配
置进程匹配。
location / { #location其实是server的⼀个指令,为nginx服务器提供⽐较多⽽且灵活的指令,都是
在location中提现的,主要是基于nginx接受到的请求字符串,对⽤⼾请求的UIL进⾏匹配,并对特定的指令进⾏处
理,包括地址重定向、数据缓存和应答控制等功能都是在这部分实现,另外很多第三⽅模块的配置也是在location模
块中配置。
root html; #相当于默认⻚⾯的⽬录名称,默认是相对路径,可以使⽤绝对路径配置。
index index.html index.htm; #默认的⻚⾯⽂件名称
}
error_page 500 502 503 504 /50x.html; #错误⻚⾯的⽂件名称
location = /50x.html { #location处理对应的不同错误码的⻚⾯定义到/50x.html,这个跟对应其
server中定义的⽬录下。
root html; #定义默认⻚⾯所在的⽬录
}
}
#和邮件相关的配置
#mail {
# ...
# } mail 协议相关配置段
#tcp代理配置,1.9版本以上⽀持
#stream {
# ...
# } stream 服务器相关配置段
#导⼊其他路径的配置⽂件
#include /apps/nginx/conf.d/*.conf
}
user nginx nginx; #启动Nginx⼯作进程的⽤⼾和组
worker_processes [number | auto]; #启动Nginx⼯作进程的数量

worker_cpu_affinity 00000001 00000010 00000100 00001000; #将Nginx⼯作进程绑定到指定的CPU核
⼼,默认Nginx是不进⾏进程绑定的,绑定并不是意味着当前nginx进程独占以⼀核⼼CPU,但是可以保证此进程不会
运⾏在其他核⼼上,这就极⼤减少了nginx的⼯作进程在不同的cpu核⼼上的来回跳转,减少了CPU对进程的资源分配与
回收以及内存管理等,因此可以有效的提升nginx服务器的性能。
[root@s2 ~]#ps axo pid,cmd,psr,user | grep nginx
4106 nginx: master process /apps 1 root
4181 nginx: worker process 0 nginx
4182 nginx: worker process 1 nginx
4184 grep --color=auto nginx 0 root

#错误⽇志记录配置,语法:error_log file [debug | info | notice | warn | error | crit |
alert | emerg]
#error_log logs/error.log;
#error_log logs/error.log notice;
error_log /apps/nginx/logs/error.log error;

#pid⽂件保存路径
pid /apps/nginx/logs/nginx.pid;
worker_priority 0; #⼯作进程nice值,-20~19
worker_rlimit_nofile 65536; #这个数字包括Nginx的所有连接(例如与代理服务器的连接等),⽽不仅仅是与
客⼾端的连接,另⼀个考虑因素是实际的并发连接数不能超过系统级别的最⼤打开⽂件数的限制.
[root@s2 ~]# watch -n1 'ps -axo pid,cmd,nice | grep nginx' #验证进程优先级
daemon off; #前台运⾏Nginx服务⽤于测试、docker等环境。
master_process off|on; #是否开启Nginx的master-woker⼯作模式,仅⽤于开发调试场景。
events { #事件模型配置参数
worker_connections 65536; #设置单个⼯作进程的最⼤并发连接数
use epoll; #使⽤epoll事件驱动,Nginx⽀持众多的事件驱动,⽐如select、poll、epoll,只能设置在
events模块中设置。
accept_mutex on; #优化同⼀时刻只有⼀个请求⽽避免多个睡眠进程被唤醒的设置,on为防⽌被同时唤醒默认
为off,全部唤醒的过程也成为"惊群",因此nginx刚安装完以后要进⾏适当的优化。
multi_accept on; Nginx服务器的每个⼯作进程可以同时接受多个新的⽹络连接,但是需要在配置⽂件中配
置,此指令默认为关闭,即默认为⼀个⼯作进程只能⼀次接受⼀个新的⽹络连接,打开后⼏个同时接受多个。
}
http {
include mime.types; #导⼊⽀持的⽂件类型
default_type application/octet-stream; #设置默认的类型,会提⽰下载不匹配的类型⽂件
#⽇志配置部分
#log_format main '$remote_addr - $remote_user [$time_local] "$request" '
# '$status $body_bytes_sent "$http_referer" '
# '"$http_user_agent" "$http_x_forwarded_for"';
#access_log logs/access.log main;
#⾃定义优化参数
sendfile on; #实现⽂件零拷⻉
#tcp_nopush on; #在开启了sendfile的情况下,合并请求后统⼀发送给客⼾端。
#tcp_nodelay off; #在开启了keepalived模式下的连接是否启⽤TCP_NODELAY选项,当为off时,延
迟0.2s发送,默认On时,不延迟发送,⽴即发送⽤⼾相应报⽂。
#keepalive_timeout 0;
keepalive_timeout 65 65; #设置会话保持时间
#gzip on; #开启⽂件压缩
server {
listen 80; #设置监听地址和端⼝
server_name localhost; #设置server name,可以以空格隔开写多个并⽀持正则表达式,如
*.magedu.com www.magedu.* www.(sited+).magedu.com$ default_server
#charset koi8-r; #设置编码格式,默认是俄语格式,可以改为utf-8
#access_log logs/host.access.log main;
location / {
root html;
index index.html index.htm;
}
#error_page 404 /404.html;
# redirect server error pages to the static page /50x.html
#
error_page 500 502 503 504 /50x.html; #定义错误⻚⾯
location = /50x.html {
root html;
}
# proxy the PHP scripts to Apache listening on 127.0.0.1:80
#
#location ~ .php$ { #以http的⽅式转发php请求到指定web服务器
# proxy_pass http://127.0.0.1;
#}
# pass the PHP scripts to FastCGI server listening on 127.0.0.1:9000
#
#location ~ .php$ { #以fastcgi的⽅式转发php请求到php处理
# root html;
# fastcgi_pass 127.0.0.1:9000;
# fastcgi_index index.php;
# fastcgi_param SCRIPT_FILENAME /scripts$fastcgi_script_name;
# include fastcgi_params;
#}
# deny access to .htaccess files, if Apache's document root
# concurs with nginx's one
#
#location ~ /.ht { #拒绝web形式访问指定⽂件,如很多的⽹站都是通过.htaccess⽂件来改变⾃⼰
的重定向等功能。
# deny all;
#}
location ~ /passwd.html {
deny all;
}
}
# another virtual host using mix of IP-, name-, and port-based configuration
#
#server { #⾃定义虚拟server
# listen 8000;
# listen somename:8080;
# server_name somename alias another.alias;
# location / {
# root html;
# index index.html index.htm; #指定默认⽹⻚⽂件,此指令由ngx_http_index_module模
块提供
# }
#}
# HTTPS server
#
#server { #https服务器配置
# listen 443 ssl;
# server_name localhost;
# ssl_certificate cert.pem;
# ssl_certificate_key cert.key;
# ssl_session_cache shared:SSL:1m;
# ssl_session_timeout 5m;
# ssl_ciphers HIGH:!aNULL:!MD5;
# ssl_prefer_server_ciphers on;
# location / {
# root html;
# index index.html index.htm;
# }
location /linux38/passwd.ht {
deny all;
}
#}
基于不同的IP、不同的端⼝以及不⽤得域名实现不同的虚拟主机,依赖于核⼼模块ngx_http_core_module实现。
# 主配置文件添加指向子配置文件的配置路径
[root@ubuntu ~]#vim /apps/nginx/conf/nginx.conf
http {
include mime.types;
default_type application/octet-stream;
include /apps/nginx/conf/conf.d/*.conf; # 新添加配置在http模块里面
# 创建PC网页文件夹
[root@ubuntu ~]#mkdir /apps/nginx/conf/conf.d
# 创建子配置文件
[root@ubuntu ~]#vim /apps/nginx/conf/conf.d/pc.conf
server {
listen 80;
server_name www.OpengSD.net;
charset utf-8;
location / {
root /data/nginx/html/pc;
index index.html index.htm;
}
}
# 创建PC网页目录
[root@ubuntu ~]#mkdir /data/nginx/html/pc -p
# 创建一个测试页面
[root@ubuntu ~]#vim /data/nginx/html/pc/index.html
<!DOCTYPE html>
<html lang="en">
<head>
<meta charset="UTF-8">
<title>taotaobao 博客</title>
</head>
<body>
<h2>淘淘宝博客PC网址</h2>
</body>
</html>
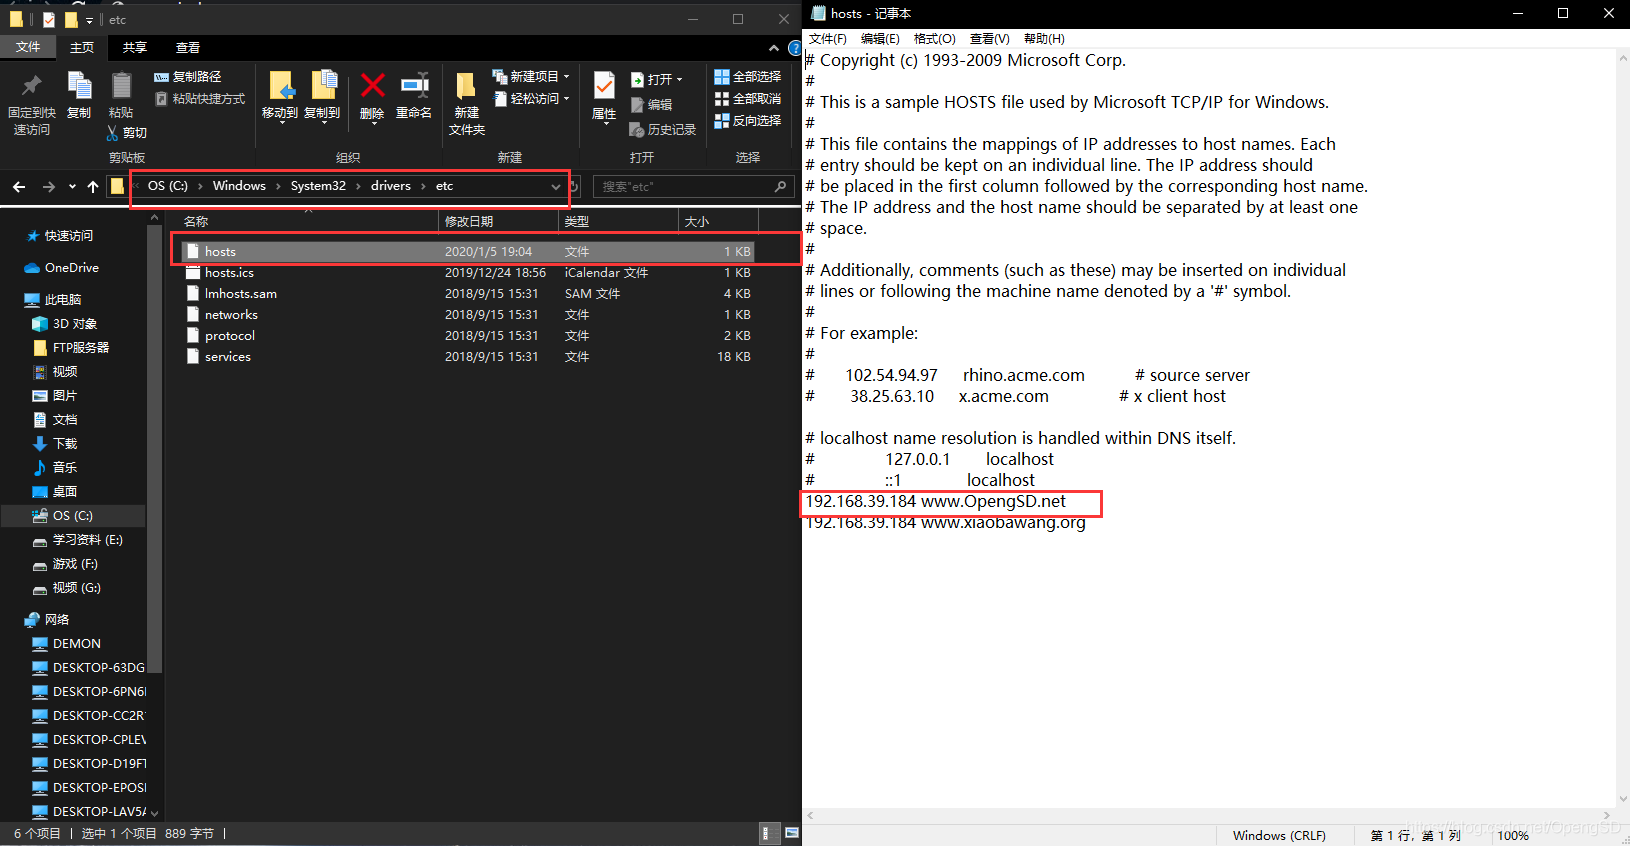
# 添加本地域名解析(服务器端测试使用如果只在web端看效果可以不加)
[root@ubuntu ~]#vim /etc/hosts
192.168.39.184 www.OpengSD.net
# 添加Windows本地解析(在后面图片示例)
# 重新加载服务
[root@ubuntu ~]#systemctl reload nginx

# 拷贝之前PC端的配置文件修改使用
[root@ubuntu ~]#cp /apps/nginx/conf/conf.d/pc.conf /apps/nginx/conf/conf.d/mobile.conf
[root@ubuntu ~]#vim /apps/nginx/conf/conf.d/mobile.conf
server {
listen 80;
server_name www.xiaobawang.org; # 修改域名
charset utf-8;
location / {
root /data/nginx/html/mobile; # 修改网页目录
index index.html index.htm;
}
}
# 创建mobile网页文件夹
[root@ubuntu ~]#mkdir /data/nginx/html/mobile -p
# 拷贝PC端的测试文件
[root@ubuntu ~]#cp /data/nginx/html/pc/index.html /data/nginx/html/mobile/index.html
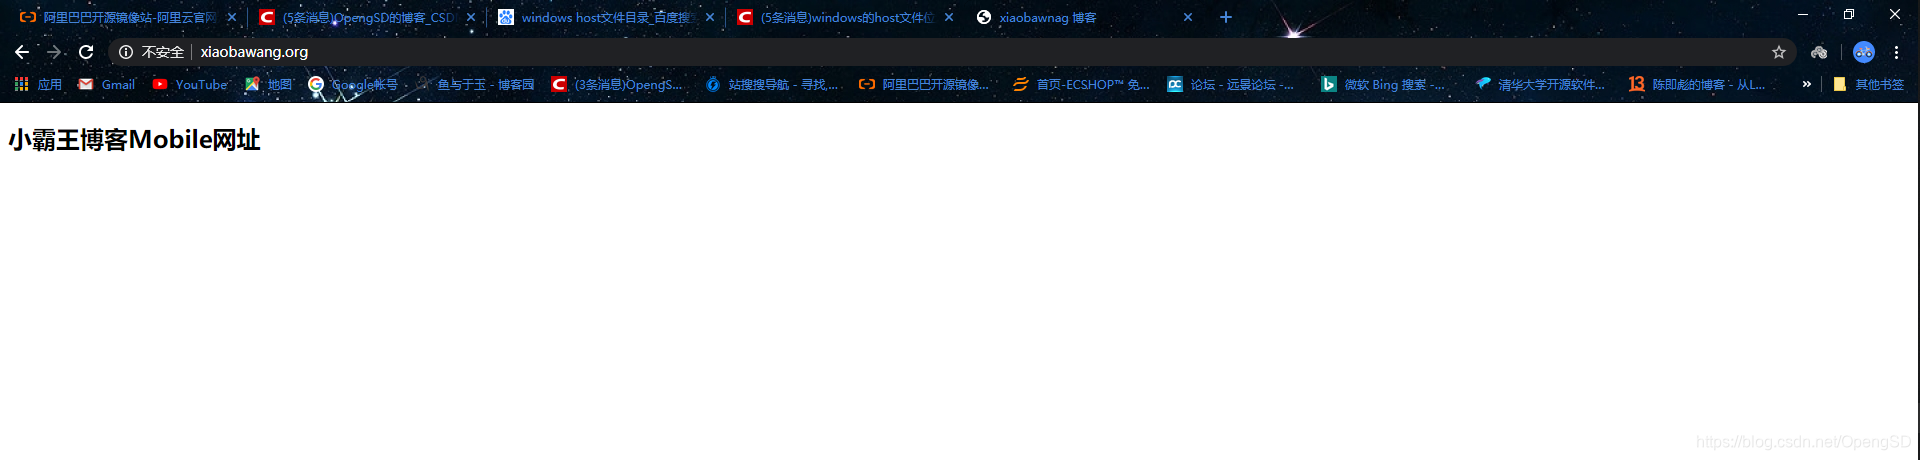
# 修改测试文件使用
[root@ubuntu ~]#vim /data/nginx/html/mobile/index.html
<!DOCTYPE html>
<html lang="en">
<head>
<meta charset="UTF-8">
<title>xiaobawnag 博客</title>
</head>
<body>
<h2>小霸王博客Mobile网址</h2>
</body>
</html>
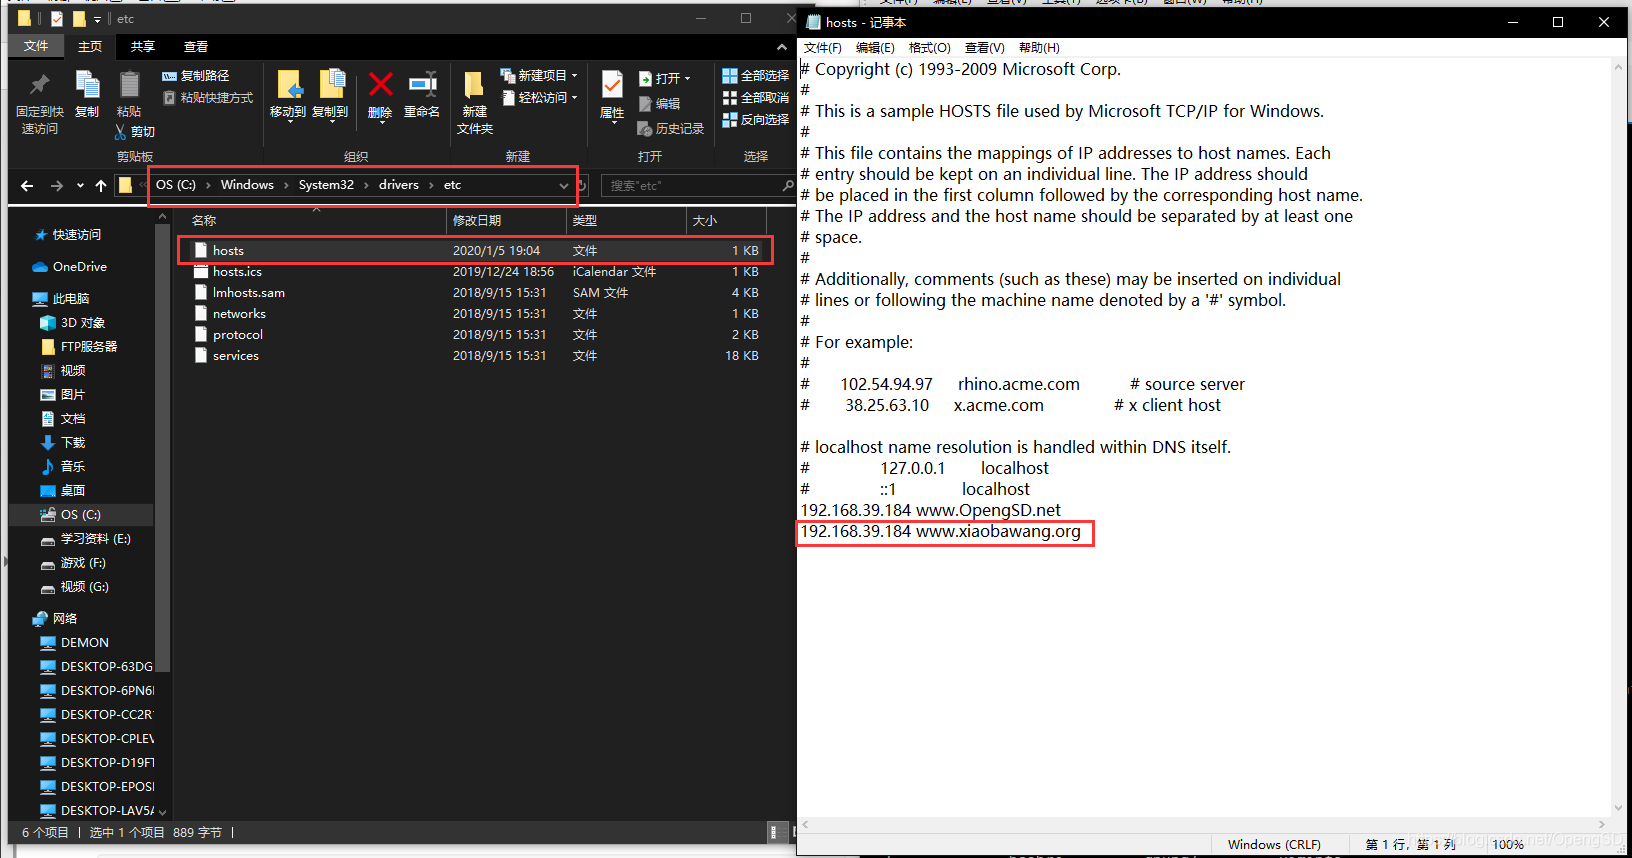
# 添加本地域名解析(服务器端测试使用如果只在web端看效果可以不加)
[root@ubuntu ~]#vim /etc/hosts
192.168.39.184 www.OpengSD.net www.xiaobawang.org
# 添加Windows本地解析(在后面图片示例)
# 重新加载服务
[root@ubuntu ~]#systemctl reload nginx
root:指定web的家⽬录,在定义location的时候,⽂件的绝对路径等于 root+location,如:
server {
listen 80;
server_name www.magedu.net;
location / {
root /data/nginx/html/pc;
}
location /about {
root /data/nginx/html/pc; #必须要在html⽬录中创建⼀个about⽬录才可以访问,否则报错。
index index.html;
}
}
[root@s2 ~]# mkdir /data/nginx/html/pc/about
[root@s2 ~]# echo about > /data/nginx/html/pc/about/index.html
alias:定义路径别名,会把访问的路径重新定义到其指定的路径,如:
server {
listen 80;
server_name www.magedu.net;
location / {
root /data/nginx/html/pc;
}
location /about { #使⽤alias的时候uri后⾯如果加了斜杠则下⾯的路径配置必须加斜杠,否则403
alias /data/nginx/html/pc; #当访问about的时候,会显⽰alias定义的/data/nginx/html/pc⾥⾯的
内容。
index index.html;
}
}
重启Nginx并访问测试
http://www.magedu.net/about/index.html #访问指定⽂件资源
如果觉得我的文章对您有用,请随意打赏。你的支持将鼓励我继续创作!
