社区微信群开通啦,扫一扫抢先加入社区官方微信群

社区微信群
接上小白实践:用Springboot写最简单的HTTP Get接口,写出了Get接口,写Post, Put, Delete接口基本就照猫画虎了,只是注解不同, 对应关系如下:
| 接口 | Sprinboot里的注解 |
|---|---|
| Get | @GetMapping |
| Post | @PostMapping |
| Put | @PutMapping |
| Delete | @DeleteMapping |
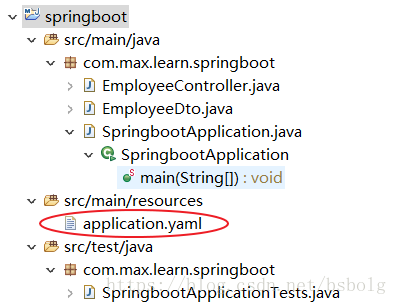
先新增一个EmployeeDto对象:
package com.max.learn.springboot;

public class EmployeeDto {

    private String name;
    private int id;
    private int age;
    private int salary;

    public EmployeeDto(){}

    public EmployeeDto(String name,int age, int salary){
        this.name = name;
        this.age = age;
        this.salary = salary;
    }

    public String getName() {
        return name;
    }
    public void setName(String name) {
        this.name = name;
    }
    public int getId() {
        return id;
    }
    public void setId(int id) {
        this.id = id;
    }
    public int getAge() {
        return age;
    }
    public void setAge(int age) {
        this.age = age;
    }
    public int getSalary() {
        return salary;
    }
    public void setSalary(int salary) {
        this.salary = salary;
    }

    public String toString(){
        String myInfo = "name:" + this.name + ",age:" + Integer.toString(this.age) + ",salary:" + Integer.toString(this.salary);
        return myInfo;
    }

}
在EmployeeController里面, 添加对应的post, put, delete接口方法,每个方法只有极少的代码,只要证明这些方法能被调用成功即可。EmployeeController里的代码如下:
package com.max.learn.springboot;

import java.util.ArrayList;
import java.util.List;

import org.springframework.web.bind.annotation.DeleteMapping;
import org.springframework.web.bind.annotation.GetMapping;
import org.springframework.web.bind.annotation.PathVariable;
import org.springframework.web.bind.annotation.PostMapping;
import org.springframework.web.bind.annotation.PutMapping;
import org.springframework.web.bind.annotation.RequestBody;
import org.springframework.web.bind.annotation.RequestMapping;
import org.springframework.web.bind.annotation.RestController;


@RestController
@RequestMapping("/employee")
public class EmployeeController {

    @GetMapping
    public List<EmployeeDto> getAll(){

        List<EmployeeDto> el = new ArrayList<>();

        EmployeeDto aEmployee = new EmployeeDto("张三",23,5001);
        aEmployee.setId(1);
        el.add(aEmployee);

        aEmployee = new EmployeeDto("李四",25,6001);
        aEmployee.setId(2);
        el.add(aEmployee);

        return el;
    }

     @GetMapping("/{id}")
    public EmployeeDto getOnebyId(@PathVariable int id){
         if(id == 1)
             return new EmployeeDto("张三",23,5000);
         else
             return new EmployeeDto("李四",25,6000);

        // Or Do anything you want
    }


     @PostMapping
     public EmployeeDto addOne(@RequestBody EmployeeDto newEmployee){
         newEmployee.setId(20);
         return newEmployee;
    }

     @PutMapping("/{id}")
     public String updateOne(@PathVariable int id, @RequestBody EmployeeDto aEmployee){
         return "updateOne " + Integer.toString(id) + aEmployee.toString();
         // Or Do anything you want
    }

     @DeleteMapping("/{id}")
     public String deleteOne(@PathVariable int id){
         return "deleteOne " + Integer.toString(id);
        // Or Do anything you want
    }


}
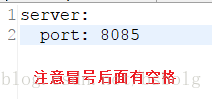
由于我的机器8080端口被其他程序占用,所有把这个程序运行端口改成了8085,在这里修改:
我把该文件的扩展名修成了yaml格式,内容如下:
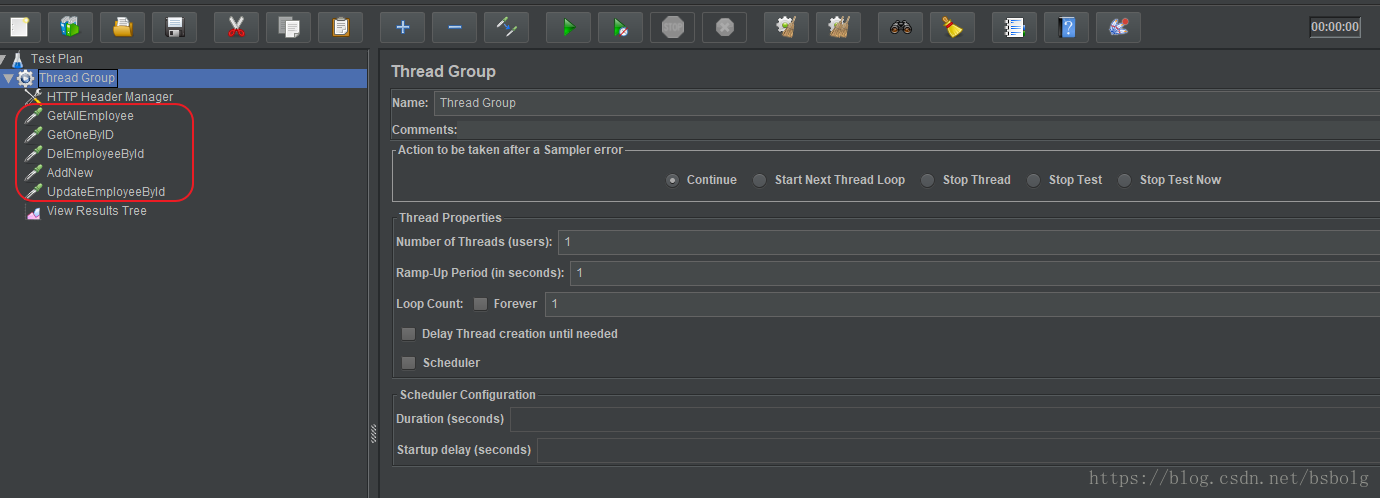
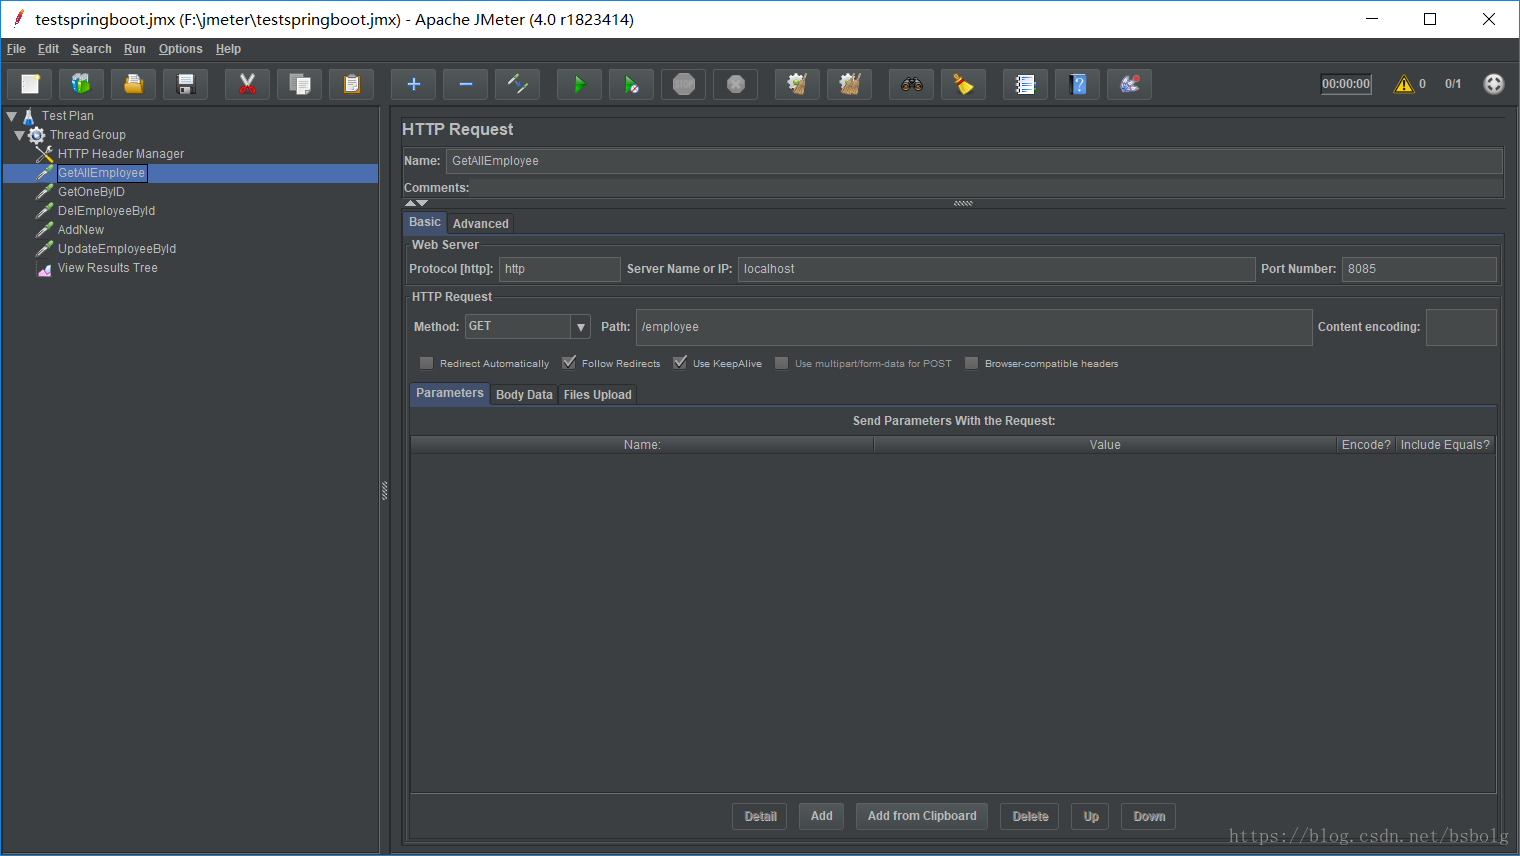
对于Post, Put,Delete方法的验证可以考虑使用curl, postman或者JMeter这样工具来做,这里我用的是JMeter.在JMeter里建立了5个Http request, 分别对应EmployeeController里面的相应方法,
| 接口类型 | Controller里的方法名 | JMeter里的Http Request | 说明 |
|---|---|---|---|
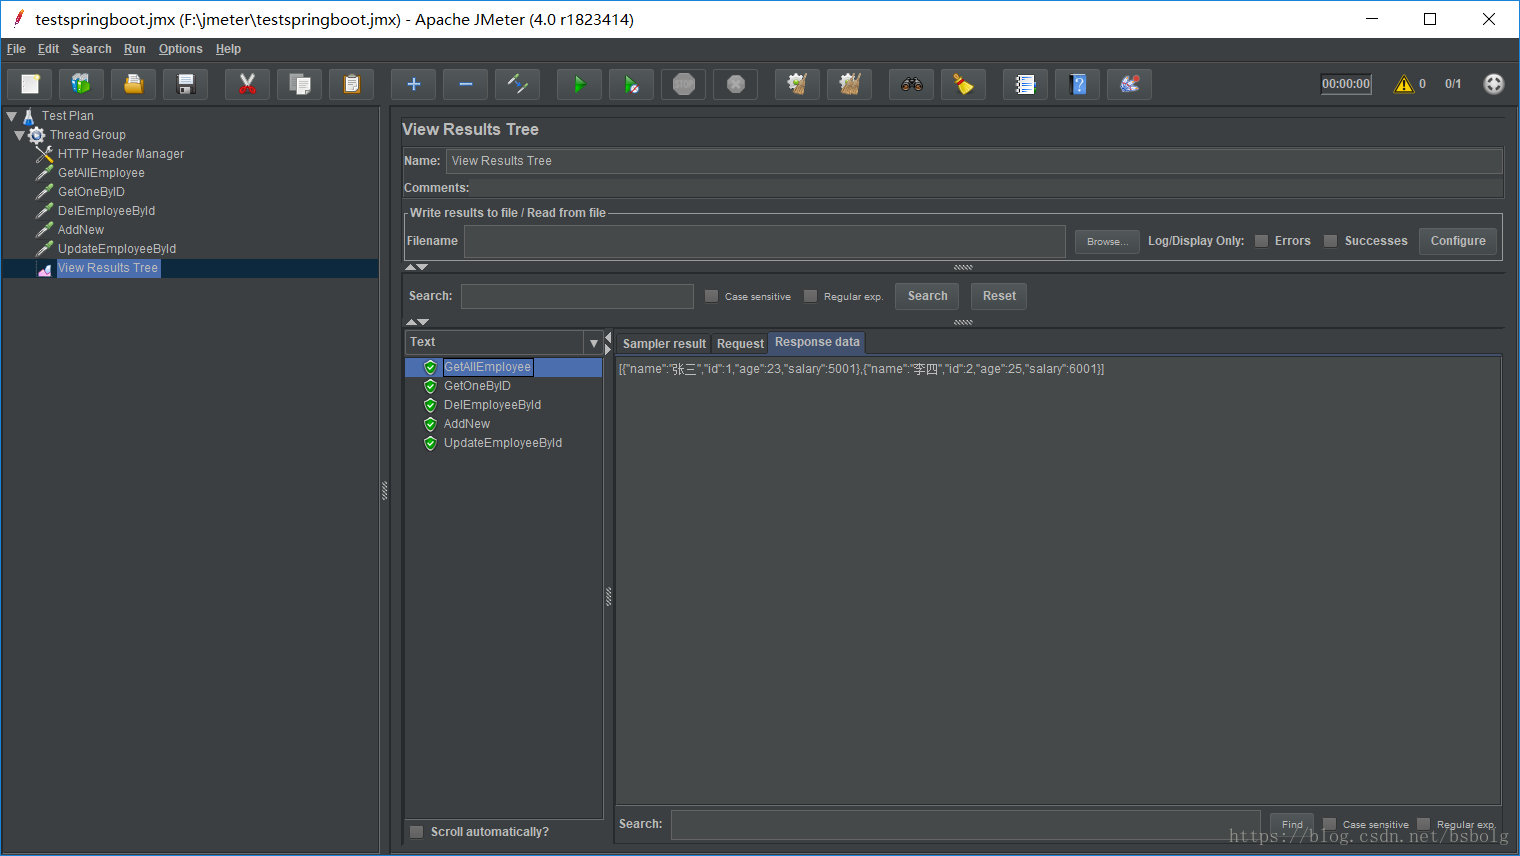
| GET | getAll() | GetAllEmployee | 查询所有Employee信息 |
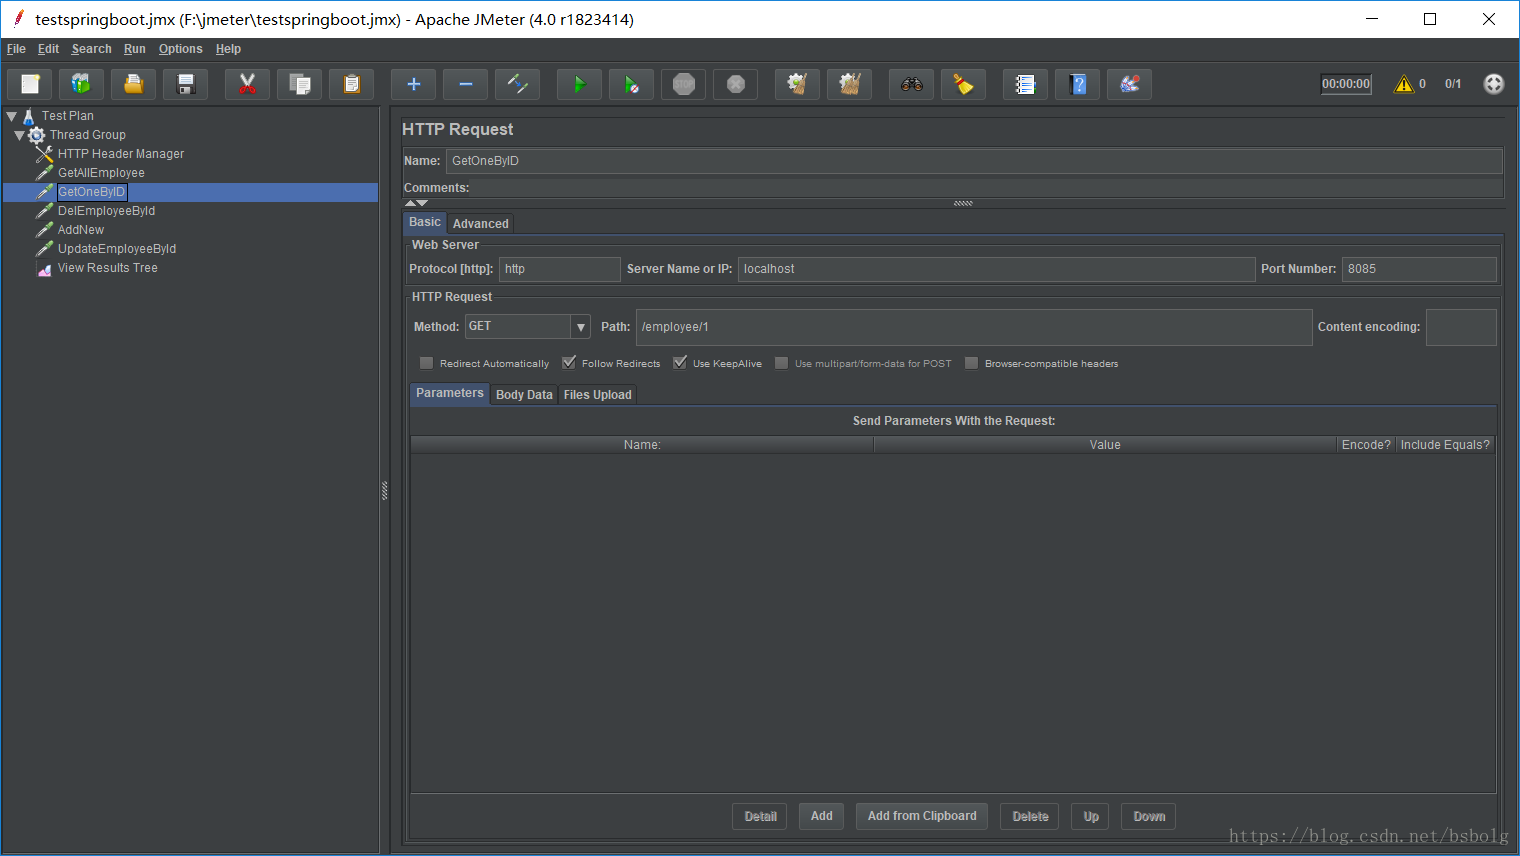
| GET | getOnebyId() | GetOneByID | 根据ID查找某个Employee信息 |
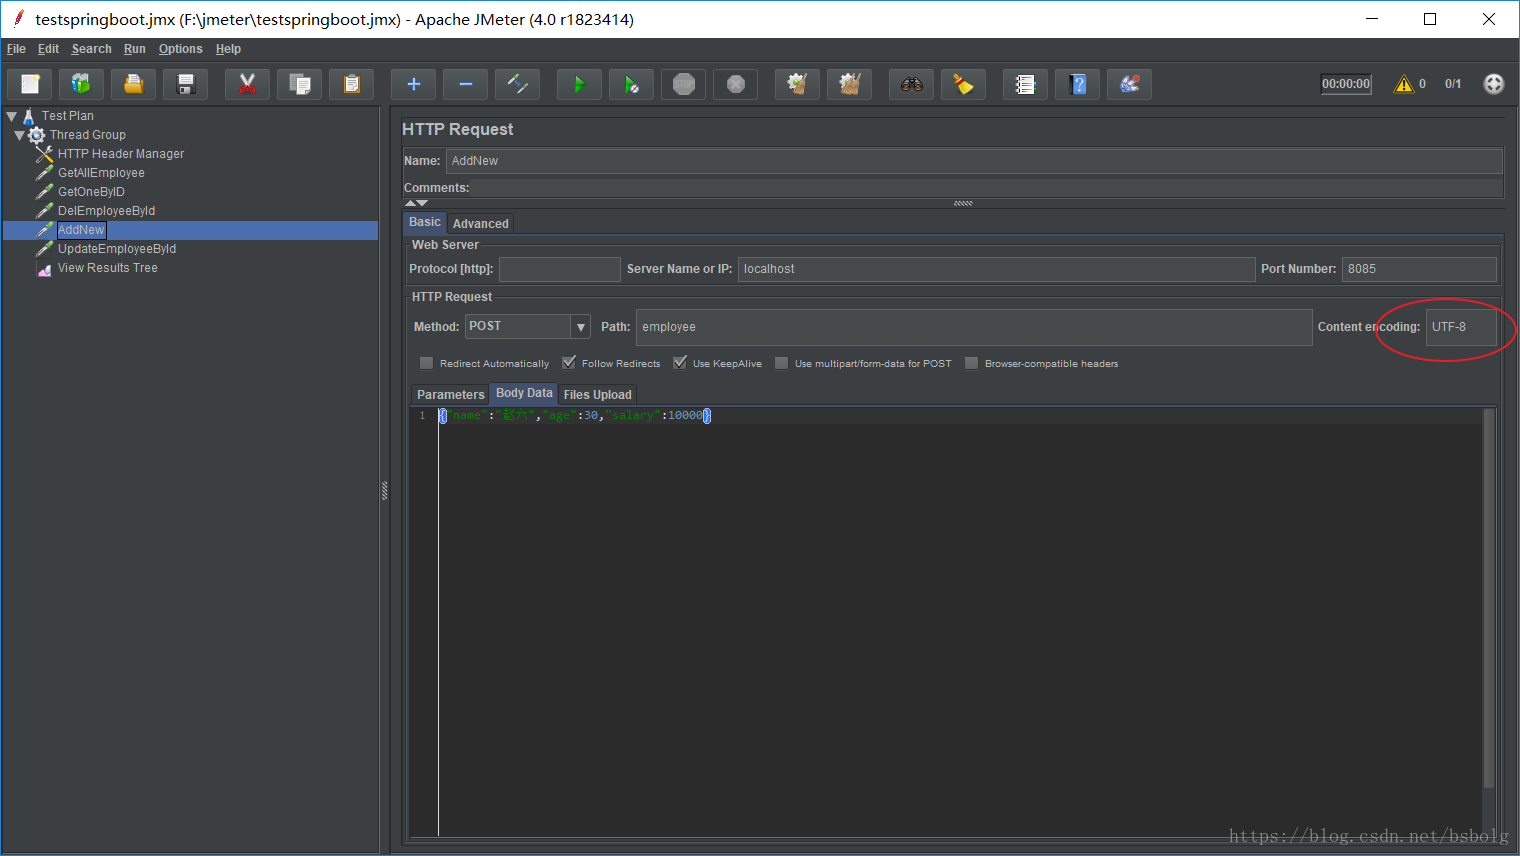
| POST | addOne() | AddNew | 新增一条Employee信息,HTTP Request 头的Content-Type需要定义成对应的拟上传数据类型,由于本例中使用request中用的是Json格式的数据,因此这里用的 application/json。 |
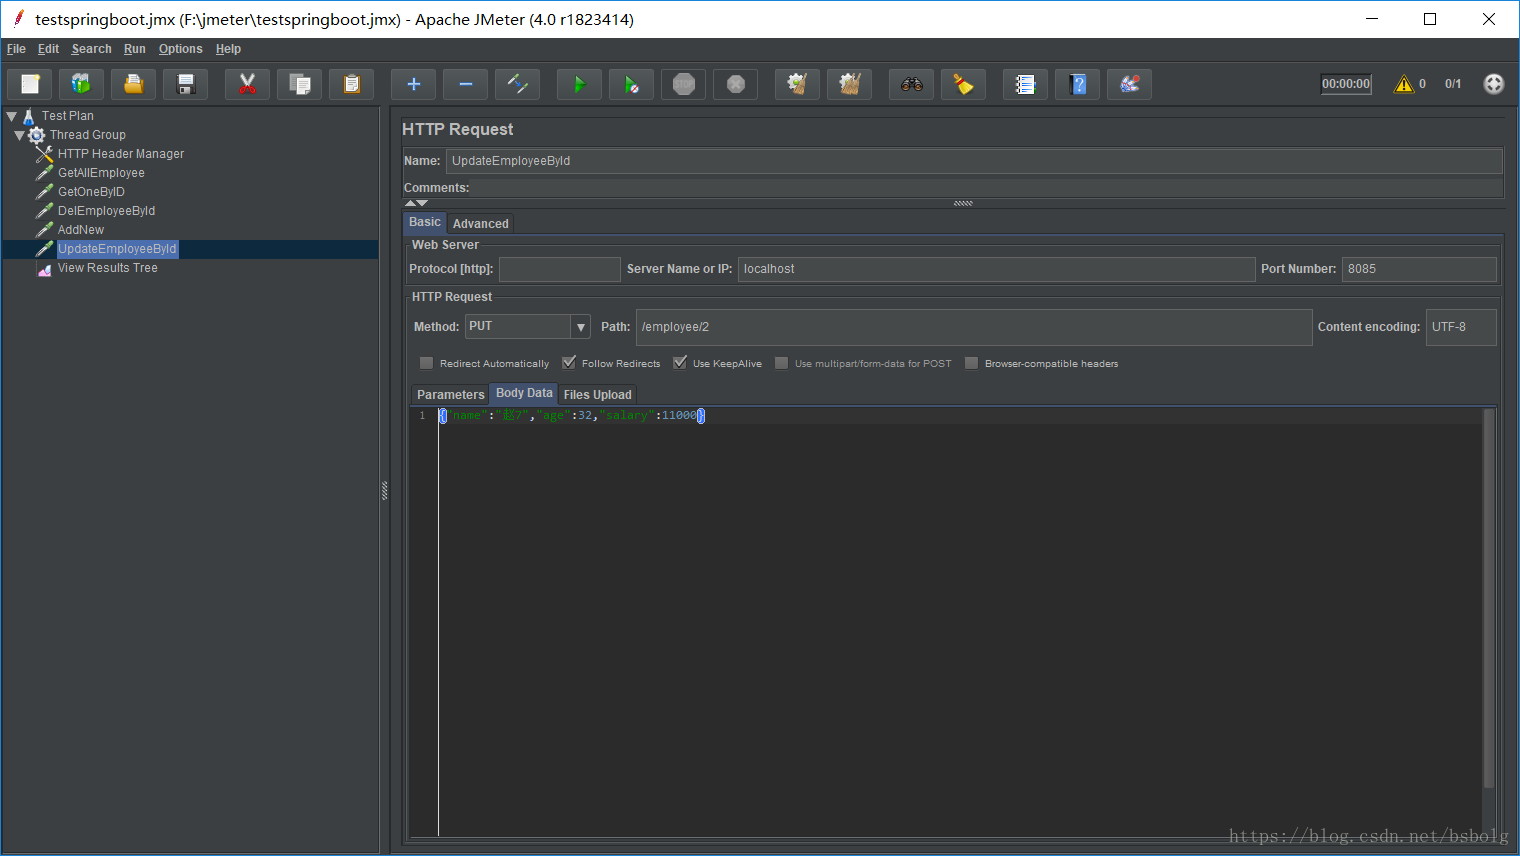
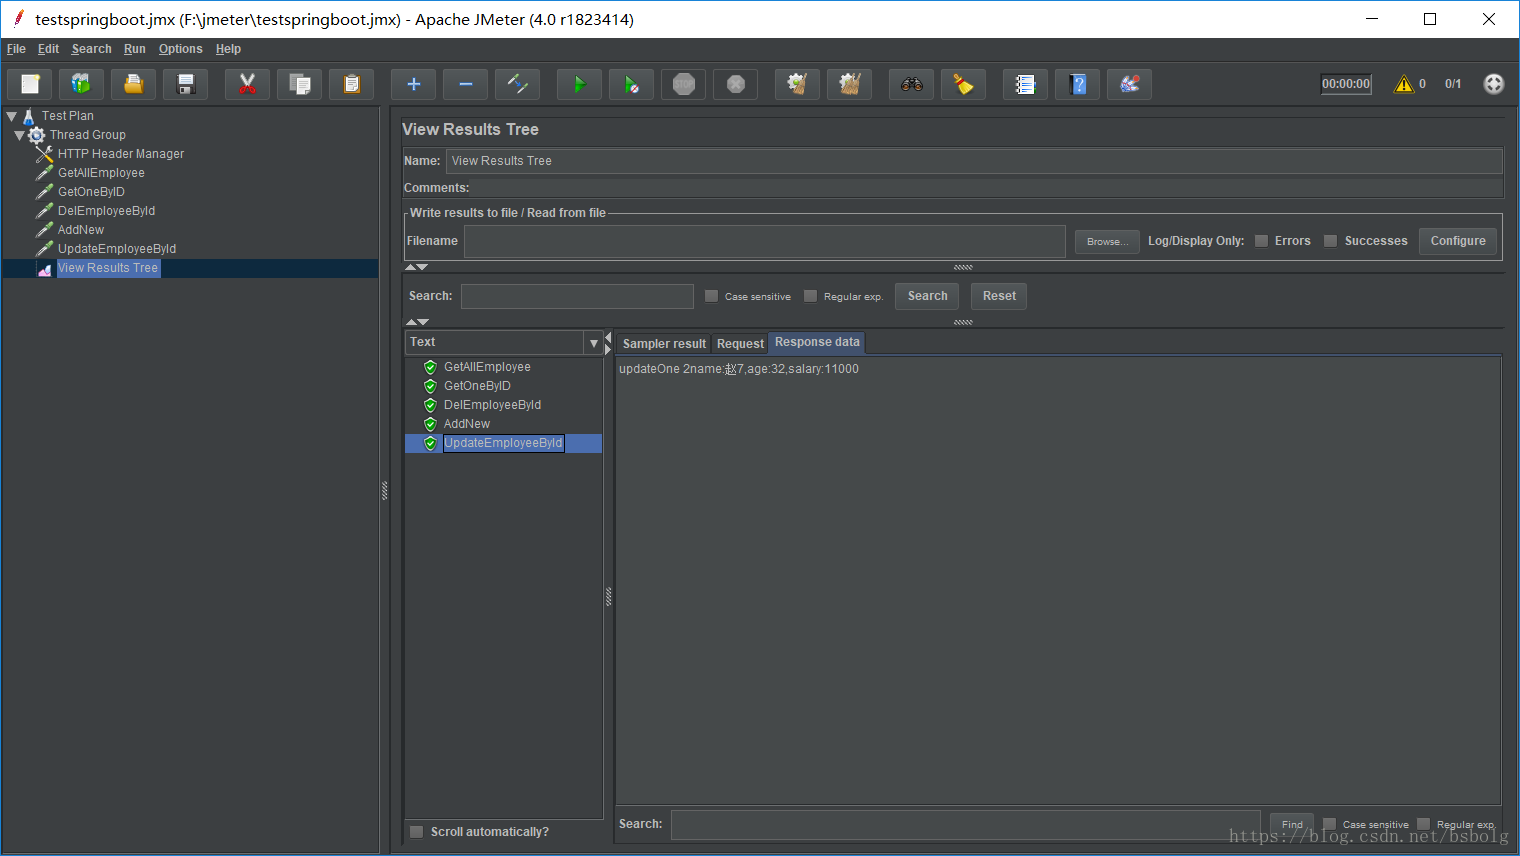
| PUT | updateOnebyId() | UpdateEmployee | 根据ID更新Employee信息, 同上HTTP Request 头的Content-Type需要定义成对应的拟上传数据类型,这里用 application/json |
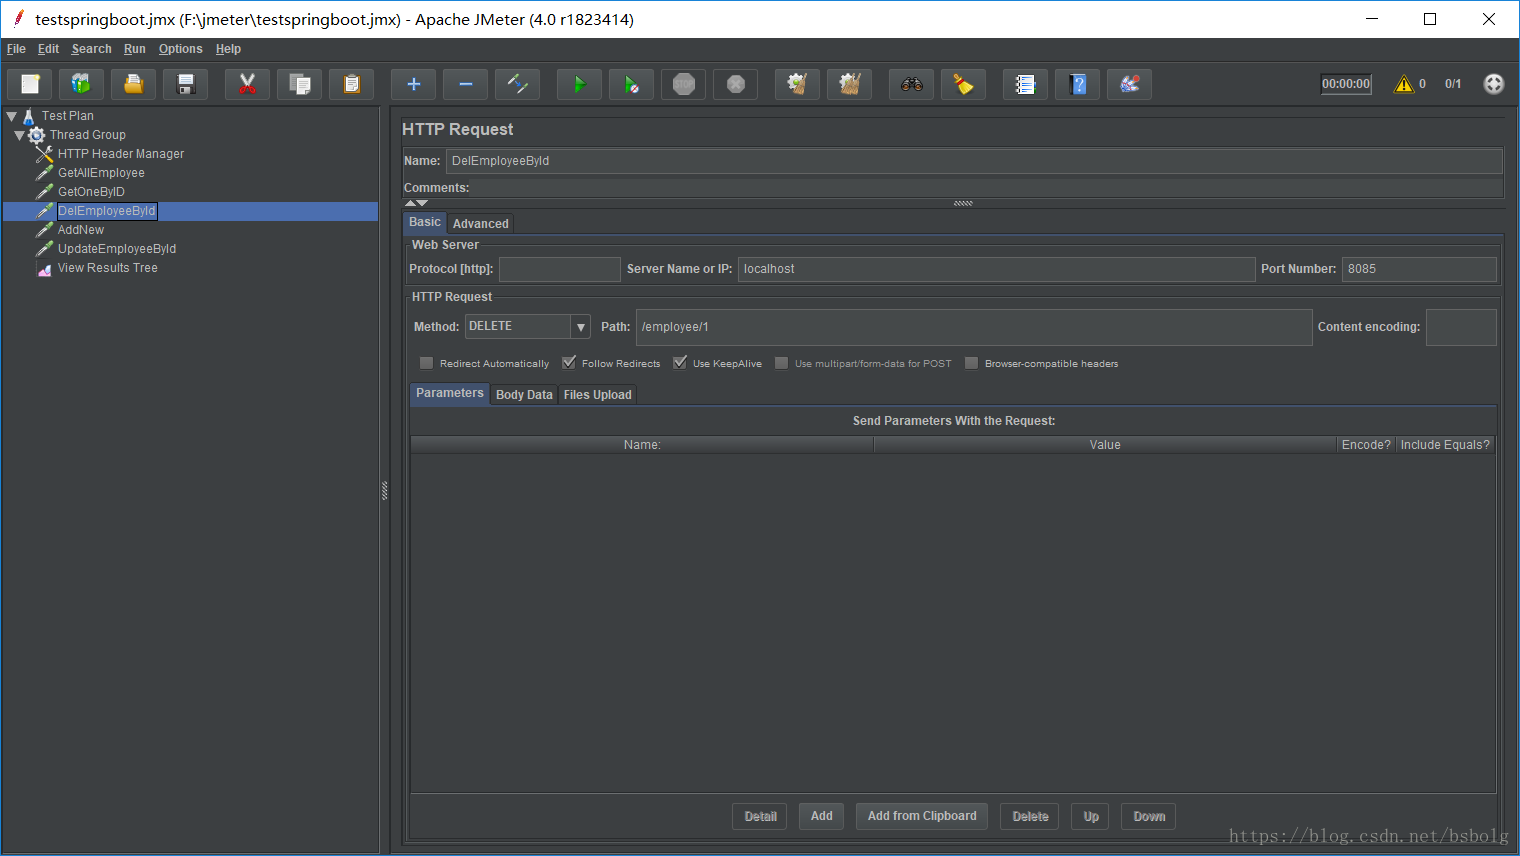
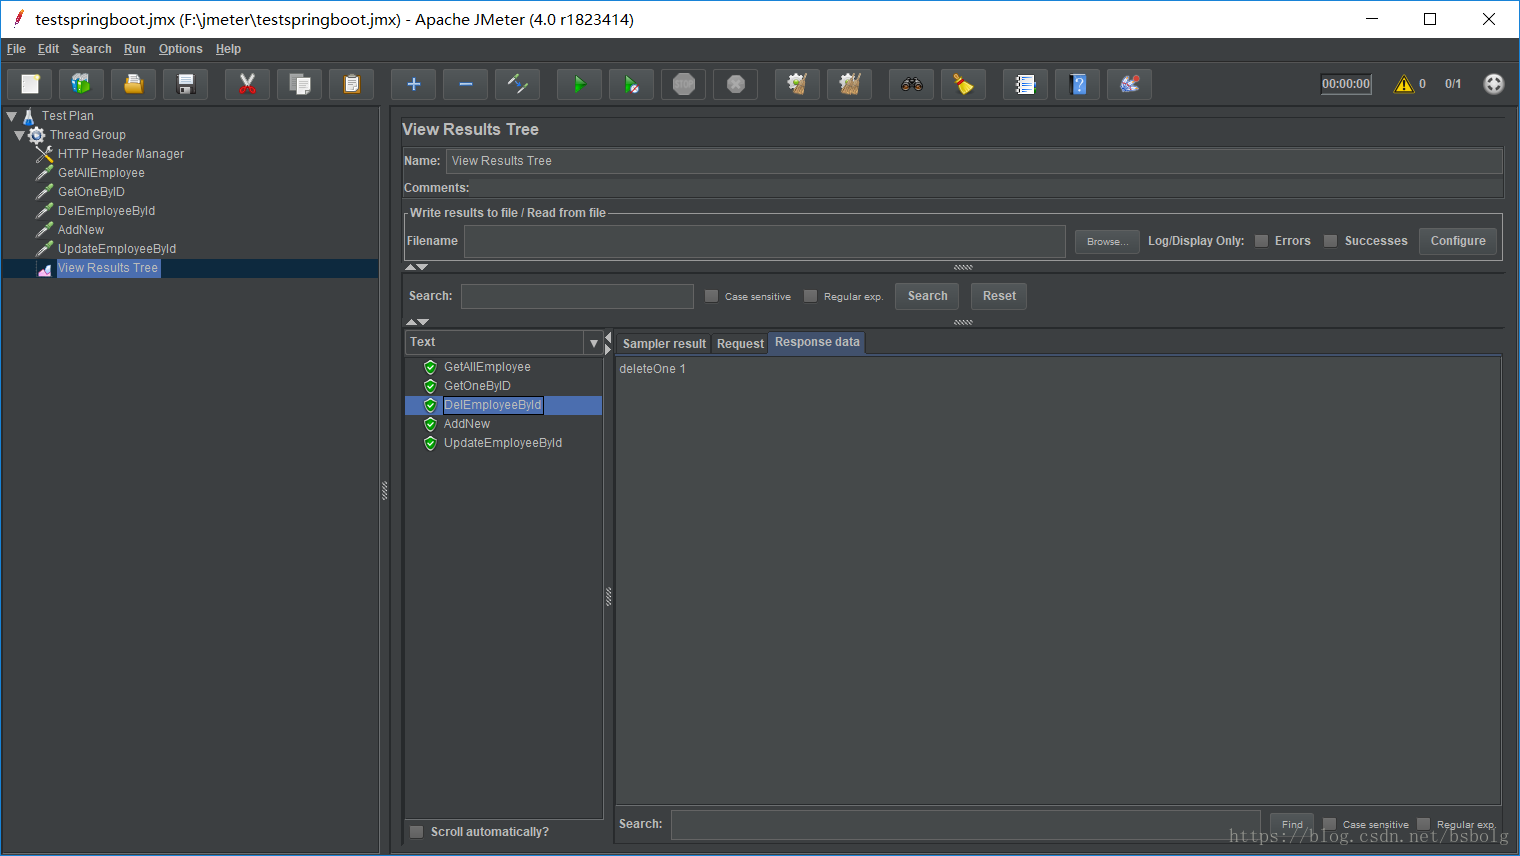
| DELETE | deleteOnebyId() | DelEmployeeById | 根据ID删除Employee信息 |
JMeter里设置如下:
各元件(JMeter里对各组件的的称呼)具体设置:
设置完成之后,在View Results Tree中,点击运行,可以运行所有http request,结果全部通过,然后以此查看每个接口返回是否与代码里设计的一致,结果一致,成功!
如果觉得我的文章对您有用,请随意打赏。你的支持将鼓励我继续创作!