社区微信群开通啦,扫一扫抢先加入社区官方微信群

社区微信群
数据库(Database)是按照数据结构来组织、存储和管理数据的建立在计算机存储设备上的仓库。
简单来说是本身可视为电子化的文件柜——存储电子文件的处所,用户可以对文件中的数据进行新增、截取、更新、删除等操作。
所谓“数据库”是以一定方式储存在一起、能与多个用户共享、具有尽可能小的冗余度、与应用程序彼此独立的数据集合。
数据库可以分为关系型数据库和非关系型数据库
1.MySQL
(1)MariaDB(MySQL的代替品,英文维基百科从MySQL转向MariaDB)
(2)Percona Server(MySQL的代替品·)
2.PostgreSQL
3.Microsoft Access
4.Microsoft SQL Server
5.Google Fusion Tables
6.FileMaker
7.Oracle数据库
8.Sybase
9.dBASE
10.Clipper
11.FoxPro
12.foshub
几乎所有的数据库管理系统都配备了一个开放式数据库连接(ODBC)驱动程序,令各个数据库之间得以互相集成。
主条目:NoSQL
1.BigTable(Google)
2.Cassandra
3.MongoDB
4.CouchDB
5.键值(key-value)数据库
(1) Apache Cassandra(为Facebook所使用):高度可扩展
(2)Dynamo
(3)LevelDB(Google)
关系型数据库: 一对一 一对多 多对多
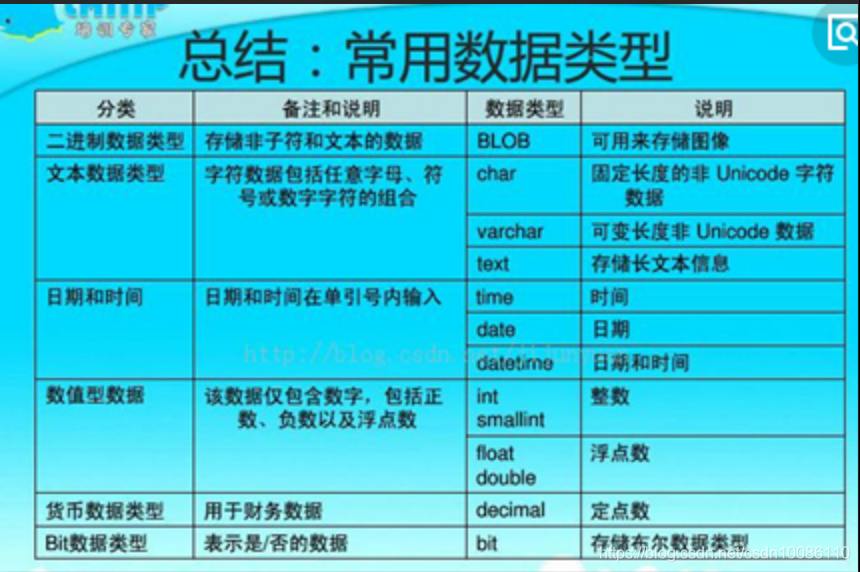
首先了解一下常用数据的类型
了解知识点
在定义文本数据类型是 char 和varchar的区别
| char和varchar |
|---|
| char的长度是不可变的 varchar的长度是可变的 |
| 定义一个char[10]和varchar[10],如果存进去的是‘abcd’,那么char所占的长度依然为10,除了字符‘abcd’外,后面跟六个空格,而varchar就立马把长度变为4了,取数据的时候,char类型的要用trim()去掉多余的空格,而varchar是不需要的, |
| char的存取数度还是要比varchar要快得多,因为其长度固定,方便程序的存储与查找;但是char也为此付出的是空间的代价,因为其长度固定,所以难免会有多余的空格占位符占据空间,可谓是以空间换取时间效率,而varchar是以空间效率为首位的。 |
| char的存储方式是,对英文字符(ASCII)占用1个字节,对一个汉字占用两个字节;而varchar的存储方式是,对每个英文字符占用2个字节,汉字也占用2个字节,两者的存储数据都非unicode的字符数据 |
数据库的三种语言
| DML(data manipulation language)数据操纵语言: | 就是我们最经常用到的 SELECT、UPDATE、INSERT、DELETE。 主要用来对数据库的数据进行一些操作。  |
|---|---|
| DDL(data definition language)数据库定义语言: | 其实就是我们在创建表的时候用到的一些sql,比如说:CREATE、ALTER、DROP等。DDL主要是用在定义或改变表的结构,数据类型,表之间的链接和约束等初始化工作上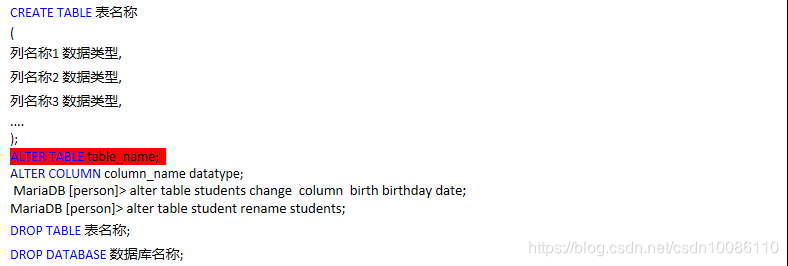 |
| DCL(Data Control Language)数据库控制语言: | 是用来设置或更改数据库用户或角色权限的语句,包括(grant,revoke等)语句。这个比较少用到。 |
#系统默认已经安装该数据库,如果没有安装,使用以下命令进行安装
[root@mail ~]# yum install -y mariadb
#启动数据库服务
[root@mail ~]# systemctl restart mariadb
#初始化数据库
[root@mail ~]# mysql_secure_installation
#在防火墙添加永久允许策略
[root@mail ~]# firewall-cmd --permanent --add-service=mysql
#重新加载防火墙配置
[root@mail ~]# firewall-cmd --reload
[root@localhost ~]# netstat -tlunup | grep mysql (查看数据库的默认监听端口 为3306)
tcp 0 0 0.0.0.0:3306 0.0.0.0:* LISTEN 3926/mysqld
[root@localhost ~]# mysql_secure_installation
/usr/bin/mysql_secure_installation:行379: find_mysql_client: 未找到命令
NOTE: RUNNING ALL PARTS OF THIS SCRIPT IS RECOMMENDED FOR ALL MariaDB
SERVERS IN PRODUCTION USE! PLEASE READ EACH STEP CAREFULLY!
In order to log into MariaDB to secure it, we’ll need the current
password for the root user. If you’ve just installed MariaDB, and
you haven’t set the root password yet, the password will be blank,
so you should just press enter here.
Enter current password for root (enter for none):
OK, successfully used password, moving on…
Setting the root password ensures that nobody can log into the MariaDB
root user without the proper authorisation.
Set root password? [Y/n] y
New password:
Re-enter new password:
Password updated successfully!
Reloading privilege tables…
… Success!
By default, a MariaDB installation has an anonymous user, allowing anyone
to log into MariaDB without having to have a user account created for
them. This is intended only for testing, and to make the installation
go a bit smoother. You should remove them before moving into a
production environment.
Remove anonymous users? [Y/n] y
… Success!
Normally, root should only be allowed to connect from ‘localhost’. This
ensures that someone cannot guess at the root password from the network.
Disallow root login remotely? [Y/n] y
… Success!
By default, MariaDB comes with a database named ‘test’ that anyone can
access. This is also intended only for testing, and should be removed
before moving into a production environment.
Remove test database and access to it? [Y/n] y
Reloading the privilege tables will ensure that all changes made so far
will take effect immediately.
Reload privilege tables now? [Y/n] y
… Success!
Cleaning up…
All done! If you’ve completed all of the above steps, your MariaDB
installation should now be secure.
Thanks for using MariaDB!
因为第一次 创建 一直YES 即可,中间会需要你创建登录数据库用户的密码
#数据库系统登陆
[root@mail ~]# mysql -uroot -predhat
[root@mail ~]# mysql -uroot -p
[root@mail ~]# mysql -u root -h localhost -p [DATABASE NAME]
#退出数据库系统
MariaDB [(none)]> quit
MariaDB [(none)]> exit
#查看系统有多少数据库
MariaDB [(none)]> show databases;
#创建一个数据库
MariaDB [mysql]> create database luntan;
#切换到某个数据库下
MariaDB [mysql]> use mysql;
#查看数据库的表
MariaDB [mysql]> show tables;
#查看数据表的表结构
MariaDB [mysql]> desc user;
#查询user表中的某些数据
MariaDB [mysql]> select host,user,password from user;
在数据库中创建一张表 并对表进行操作的命令
创建一个新的表
MariaDB [luntun]> create table student (
    ->      number int,
    ->      name varchar(255),
    ->     age int,
    ->     sex varchar(10),
    ->      birth date );
Query OK, 0 rows affected (0.01 sec)
MariaDB [luntun]>  insert into student (number,name,birth) values (1,'haha',20160509);
Query OK, 1 row affected (0.00 sec)
对表的操作
#插入几条数据
MariaDB [mysql]> insert into person (number,name,birthday) values (1,'haha',20160509);
MariaDB [mysql]> insert into person (number,name,birthday) values (2,'heihei',20160609);
MariaDB [mysql]> insert into person (number,name,birthday) values (3,'maomao',20160709);
#查询表的内容
MariaDB [mysql]> SELECT * FROM person;
#删除表的内容
MariaDB [mysql]> delete from person where name="maomao";
MariaDB [mysql]> delete from person where number=1;
#更新表中的数据
MariaDB [mysql]> update person set name="xixi" where name="heihei";
MariaDB [mysql]> update person set name="haha" where number=2;
创建数据库登陆用户
MariaDB [mysql]> create user maomao@localhost identified by 'redhat';
MariaDB [mysql]> create user xixi@localhost identified by 'xixi';
查看当前使用用户:MariaDB [(none)]> select user();
查看当前用户的数据库:MariaDB [(none)]> select database();

#查看结果
MariaDB [mysql]> select name,number from person  where name="maomao";
#退出重新使用maomao用户登录数据库
[root@mail ~]# mysql -u maomao -p
#查看可以访问的数据库
MariaDB [(none)]> show databases;

#给maomao用户一张表的权限  赋予权限
MariaDB [mysql]> grant select,update,insert,delete on mysql.person to maomao@localhost;
                                    权限信息
退出数据库系统,并使用maomao用户重新登陆
#测试查询的权限
MariaDB [mysql]> select * from person;
#测试插入的权限
MariaDB [mysql]> insert person (number,NAME,BIRTHDAY) value (1,"hehe",20161010);
#测试更新数据的权限
MariaDB [mysql]> update person set name="heihei" where number=2;
#测试删除数据的权限
MariaDB [mysql]> delete from person where number=1;
#使用root用户登录,改变maomao用户的权限  回收权限
MariaDB [mysql]> revoke select on mysql.person from maomao@localhost;
#使用select语句进行查询表,确认权限已被禁用
MariaDB [mysql]> select * from person;
[root@mail ~]# mysqldump -u root -p mysql > /mysql_backup_20160510.dump
#使用root用户登录数据库,删除person表
#查询person表
MariaDB [mysql]> select * from person;
#删除表
MariaDB [mysql]> drop table person;

#退出系统,进行还原操作
[root@mail ~]# mysql -u root -p mysql < /mysql_backup_20160510.dump

#登陆数据库系统
[root@mail ~]# mysql -u root -p
#查看person表  检验
MariaDB [mysql]> select * from person;
如果觉得我的文章对您有用,请随意打赏。你的支持将鼓励我继续创作!