社区微信群开通啦,扫一扫抢先加入社区官方微信群

社区微信群
yum install -y git版本库又名仓库,英文名repository,你可以简单理解成一个目录,这个目录里面的所有文件都可以被Git管理起来,每个文件的修改、删除,Git都能跟踪,以便任何时刻都可以追踪历史,或者在将来某个时刻可以“还原”。
step1:创建一个空目录
[root@foundation8 ~]# mkdir KatyGit
[root@foundation8 ~]# cd KatyGit/
[root@foundation8 KatyGit]# pwd
/root/KatyGit
step2:把这个目录变成Git可以管理的仓库
[root@foundation8 KatyGit]# git init
Initialized empty Git repository in /root/KatyGit/.git/
#瞬间Git就把仓库建好了,而且告诉你是一个空的仓库(empty Git repository),细心的读者可以发现当前目录下多了一个.git的目录,这个目录是Git来跟踪管理版本库的,没事千万不要手动修改这个目录里面的文件,不然改乱了,就把Git仓库给破坏了。

[root@foundation8 KatyGit]# ls -a
.  ..  .git
step3:编写一个纯文本文件
#在Git仓库(/root/KatyGit/当前目录或其子目录)中编写一个readme.txt文件,内容如下:

[root@foundation8 KatyGit]# cat readme.txt
这是Git仓库中的一个纯文本文件
step4:把一个文件放到Git仓库中
第一步,用命令git add告诉Git,把文件添加到仓库:
[root@foundation8 KatyGit]# git add readme.txt

第二步,用命令git commit告诉Git,把文件提交到仓库:
[root@foundation8 KatyGit]# git commit -m "wrote a readme file"
[master (root-commit) 40d7cf2] wrote a readme file
 Committer: root <root@foundation8.ilt.example.com>
Your name and email address were configured automatically based
on your username and hostname. Please check that they are accurate.
You can suppress this message by setting them explicitly:

    git config --global user.name "Your Name"
    git config --global user.email you@example.com

After doing this, you may fix the identity used for this commit with:

    git commit --amend --reset-author

 1 file changed, 1 insertion(+)
 create mode 100644 readme.txt
#简单解释一下git commit命令,-m后面输入的是本次提交的说明,可以输入任意内容,当然最好是有意义的,这样你就能从历史记录里方便地找到改动记录。首先我们先把之前的readme.txt进行修改:
[root@foundation8 KatyGit]# cat readme.txt
这是Git仓库中的一个纯文本文件
这是Git仓库中的一个纯文本文件 第二版
然后尝试提交:
[root@foundation8 KatyGit]# git add readme.txt
[root@foundation8 KatyGit]# git commit -m "readme.txt 第二版"
[master 9f1c3eb] readme.txt 第二版
 Committer: root <root@foundation8.ilt.example.com>
Your name and email address were configured automatically based
on your username and hostname. Please check that they are accurate.
You can suppress this message by setting them explicitly:

    git config --global user.name "Your Name"
    git config --global user.email you@example.com

After doing this, you may fix the identity used for this commit with:

    git commit --amend --reset-author

 1 file changed, 1 insertion(+)
在Git中,我们用git log命令查看历史记录:
[root@foundation8 KatyGit]# git log
commit 9f1c3ebd24f5b3144c49f7e06a48b47763c9e706
Author: root <root@foundation8.ilt.example.com>
Date:   Sun Feb 4 23:51:07 2018 +0800

    readme.txt 第二版

commit 40d7cf210cf3081b9042988a0d261a0c00a0abbf
Author: root <root@foundation8.ilt.example.com>
Date:   Sun Feb 4 23:46:13 2018 +0800

    wrote a readme file

#如果嫌输出信息太多,看得眼花缭乱的,可以试试加上--pretty=oneline参数:
[root@foundation8 KatyGit]# git log --pretty=oneline
9f1c3ebd24f5b3144c49f7e06a48b47763c9e706 readme.txt 第二版
40d7cf210cf3081b9042988a0d261a0c00a0abbf wrote a readme file
把readme.txt回退到上一个版本:
首先,Git必须知道当前版本是哪个版本,在Git中,用HEAD表示当前版本,上一个版本就是HEAD^,上上一个版本就是HEAD^^,当然往上100个版本写100个^比较容易数不过来,所以写成HEAD~100
[root@foundation8 KatyGit]# git reset --hard HEAD^
HEAD is now at 40d7cf2 wrote a readme file
如果想要在回去readme.txt第二版的该怎么做呢?
首先当前窗口不要关闭,找对应版本的ID,不需要全部写出来,前几个就可以了
[root@foundation8 KatyGit]# git reset --hard 9f1c
HEAD is now at 9f1c3eb readme.txt 第二版
[root@foundation8 KatyGit]# cat readme.txt
这是Git仓库中的一个纯文本文件
这是Git仓库中的一个纯文本文件 第二版
同时,Git提供了一个命令git reflog用来记录你的每一次命令:
[root@foundation8 KatyGit]# git reflog
9f1c3eb HEAD@{0}: reset: moving to 9f1c
40d7cf2 HEAD@{1}: reset: moving to HEAD^
9f1c3eb HEAD@{2}: commit: readme.txt 第二版
40d7cf2 HEAD@{3}: commit (initial): wrote a readme fileKatyGit .git 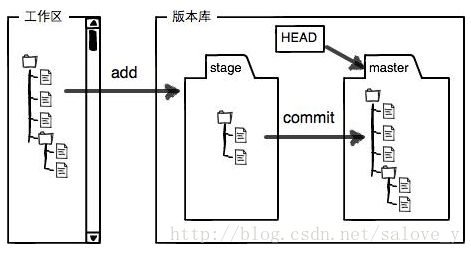
git checkout -- file可以丢弃工作区的修改[root@foundation8 KatyGit]# cat readme.txt
这是Git仓库中的一个纯文本文件
这是Git仓库中的一个纯文本文件 第二版
[root@foundation8 KatyGit]# git checkout -- readme.txt
[root@foundation8 KatyGit]# cat readme.txt
这是Git仓库中的一个纯文本文件
这是Git仓库中的一个纯文本文件 第二版
这是Git仓库中的一个纯文本文件 第二版
这是Git仓库中的一个纯文本文件 第二版
这是Git仓库中的一个纯文本文件 第二版
这是Git仓库中的一个纯文本文件 第二版git reset HEAD file可以把暂存区的修改撤销掉[root@foundation8 KatyGit]# cat readme.txt
这是Git仓库中的一个纯文本文件
这是Git仓库中的一个纯文本文件 第二版
这是Git仓库中的一个纯文本文件 第三版
[root@foundation8 KatyGit]# git add readme.txt
[root@foundation8 KatyGit]# git status
# On branch master
# Changes to be committed:
# (use "git reset HEAD <file>..." to unstage)
#
# modified: readme.txt
#
[root@foundation8 KatyGit]# git reset HEAD readme.txt
Unstaged changes after reset:
M readme.txt
首先,先添加一个新文件test.txt到Git并且提交
[root@foundation8 KatyGit]# git add test.txt
[root@foundation8 KatyGit]# git commit -m "add test.txt"
[master 7f5e03e] add test.txt
 Committer: root <root@foundation8.ilt.example.com>
Your name and email address were configured automatically based
on your username and hostname. Please check that they are accurate.
You can suppress this message by setting them explicitly:

    git config --global user.name "Your Name"
    git config --global user.email you@example.com

After doing this, you may fix the identity used for this commit with:

    git commit --amend --reset-author

 1 file changed, 0 insertions(+), 0 deletions(-)
 create mode 100644 test.txt
一般情况下,你通常直接在文件管理器中把没用的文件删了,或者用rm命令删了:
rm -rf test.txt这个时候,Git知道你删除了文件,因此,工作区和版本库就不一致了,git status命令会立刻告诉你哪些文件被删除了:
[root@foundation8 KatyGit]# git status
# On branch master
# Changes not staged for commit:
#   (use "git add/rm <file>..." to update what will be committed)
#   (use "git checkout -- <file>..." to discard changes in working directory)
#
#   modified:   readme.txt
#   deleted:    test.txt
#
no changes added to commit (use "git add" and/or "git commit -a")
现在你有两个选择,一是确实要从版本库中删除该文件,那就用命令git rm删掉,并且git commit:
[root@foundation8 KatyGit]# git rm test.txt
rm 'test.txt'
[root@foundation8 KatyGit]# git commit -m "remove test.txt"
[master 15d7313] remove test.txt
 Committer: root <root@foundation8.ilt.example.com>
Your name and email address were configured automatically based
on your username and hostname. Please check that they are accurate.
You can suppress this message by setting them explicitly:

    git config --global user.name "Your Name"
    git config --global user.email you@example.com

After doing this, you may fix the identity used for this commit with:

    git commit --amend --reset-author

 1 file changed, 0 insertions(+), 0 deletions(-)
 delete mode 100644 test.txt
现在,文件就从版本库中被删除了。
另一种情况是删错了,因为版本库里还有呢,所以可以很轻松地把误删的文件恢复到最新版本:
[root@foundation8 KatyGit]# git checkout -- test.txt
[root@foundation8 KatyGit]# ls
readme.txt  test.txt
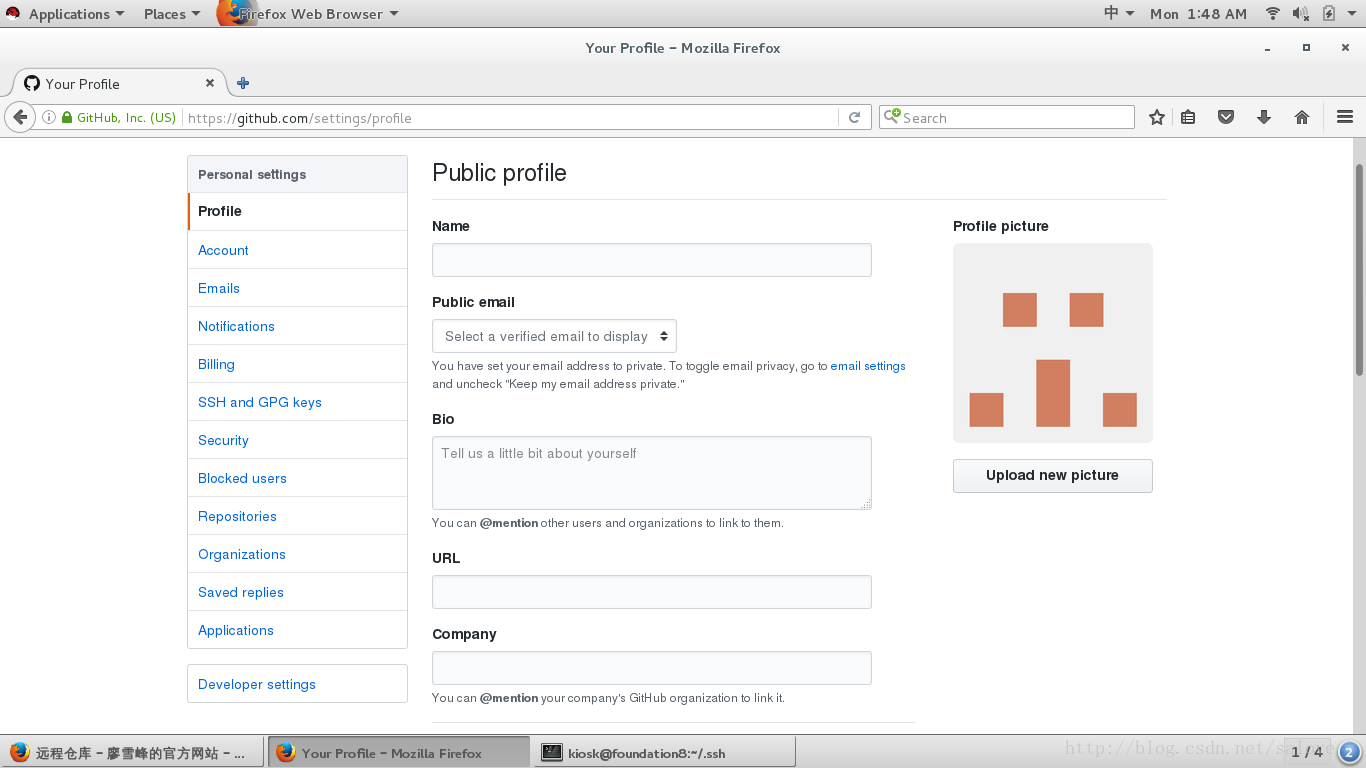
第一步:获得Git远程仓库(注册一个Github帐号)
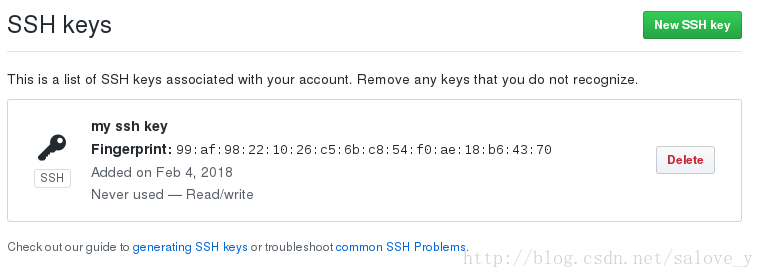
第二步:使用SSH进行通讯
//在用户主目录下,看看有没有.ssh目录,如果有,再看看这个目录下有没有id_rsa和id_rsa.pub这两个文件,如果已经有了,可直接跳到下一步。如果没有,打开Shell,创建SSH Key:
 ssh-keygen -t rsa -C "youremail@example.com"

git remote add origin git@github.com:MaMaMiYA1/KatyGit加后,远程库的名字就是origin,这是Git默认的叫法,也可以改成别的,但是origin这个名字一看就知道是远程库。
下一步,就可以把本地库的所有内容推送到远程库上:
[root@foundation8 KatyGit]# git push -u origin master
The authenticity of host 'github.com (192.30.255.113)' can't be established.
RSA key fingerprint is 16:27:ac:a5:76:28:2d:36:63:1b:56:4d:eb:df:a6:48.
Are you sure you want to continue connecting (yes/no)? yes
Warning: Permanently added 'github.com,192.30.255.113' (RSA) to the list of known hosts.
Counting objects: 14, done.
Delta compression using up to 4 threads.
Compressing objects: 100% (9/9), done.
Writing objects: 100% (14/14), 1.19 KiB | 0 bytes/s, done.
Total 14 (delta 3), reused 0 (delta 0)
remote: Resolving deltas: 100% (3/3), done.
To git@github.com:MaMaMiYA1/KatyGit
 * [new branch]      master -> master
Branch master set up to track remote branch master from origin1.
把本地库的内容推送到远程,用git push命令,实际上是把当前分支master推送到远程。
由于远程库是空的,我们第一次推送master分支时,加上了-u参数,Git不但会把本地的master分支内容推送的远程新的master分支,还会把本地的master分支和远程的master分支关联起来,在以后的推送或者拉取时就可以简化命令。
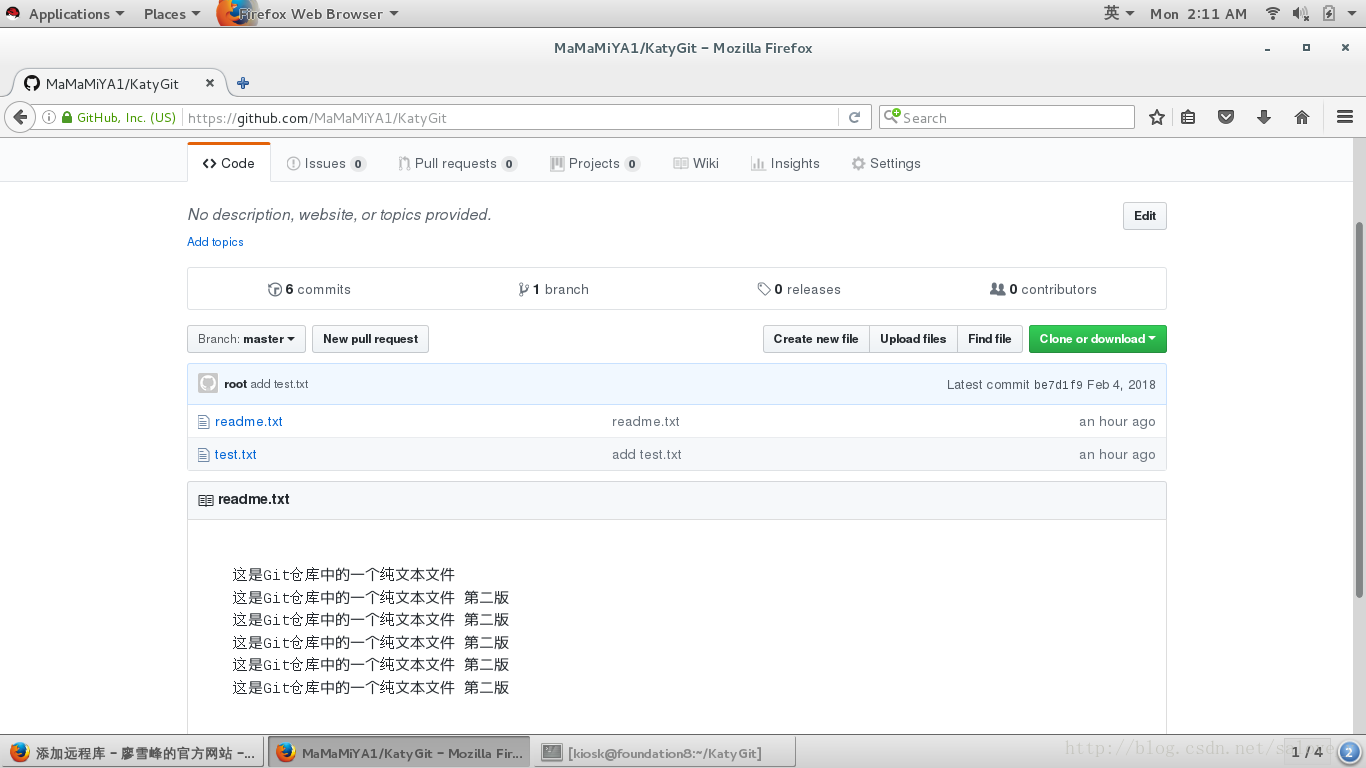
推送成功后,可以立刻在GitHub页面中看到远程库的内容已经和本地一模一样:
从现在起,只要本地作了提交,就可以通过命令:
git push origin master把本地master分支的最新修改推送至GitHub,现在,你就拥有了真正的分布式版本库!
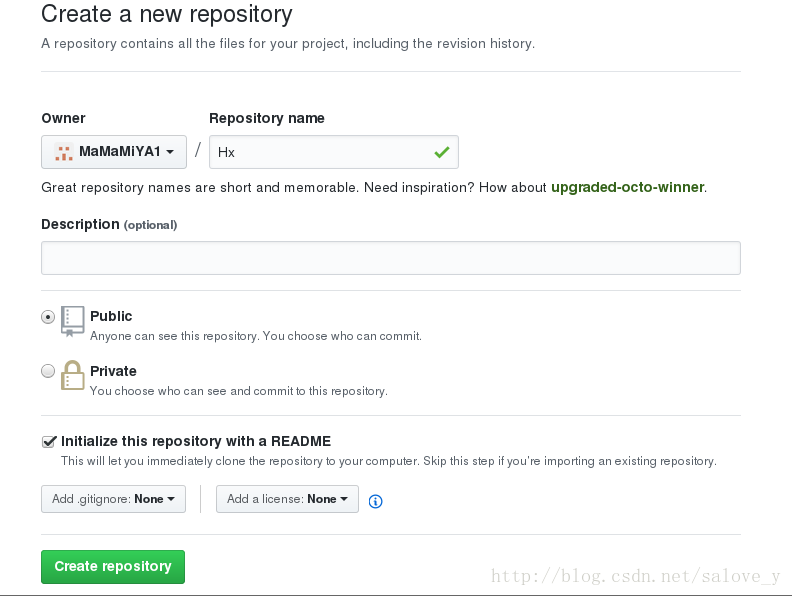
首先,登陆GitHub,创建一个新的仓库,名字叫Hx:
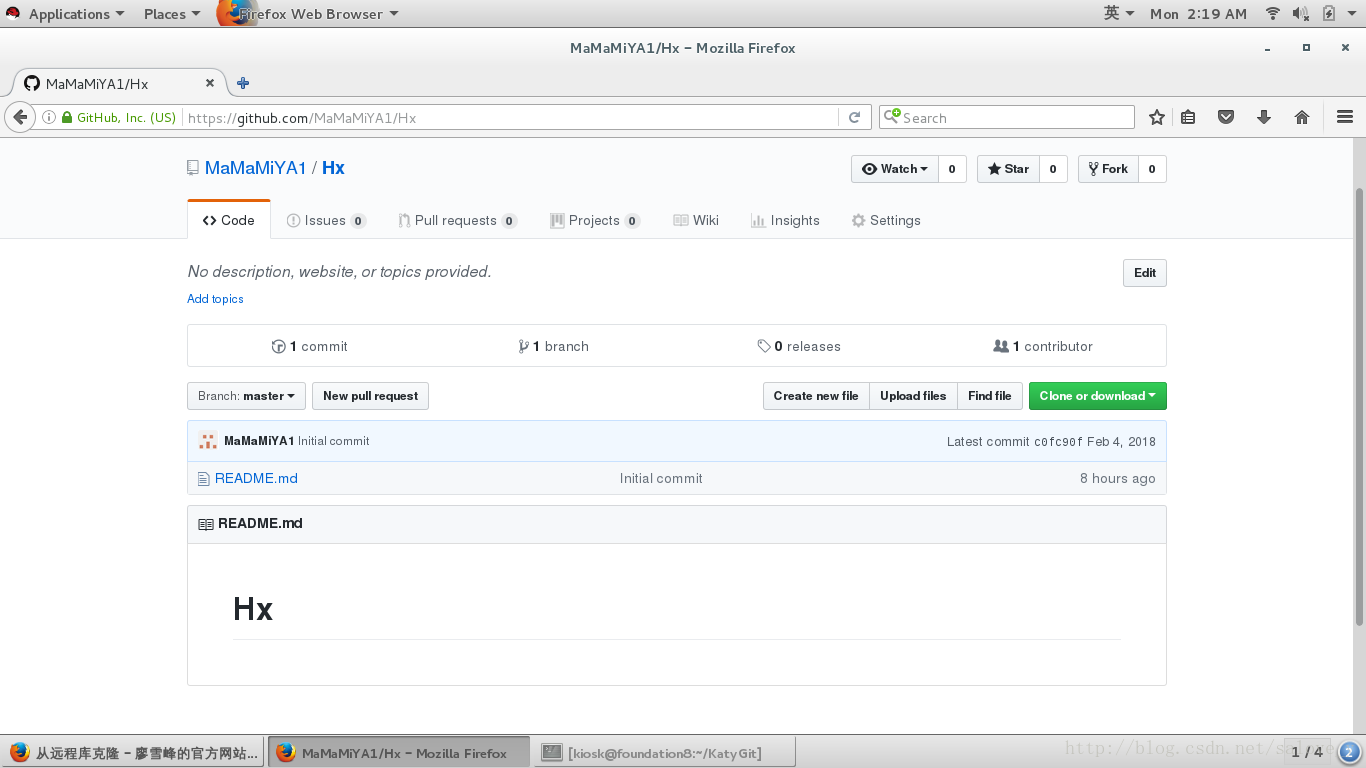
我们勾选Initialize this repository with a README,这样GitHub会自动为我们创建一个README.md文件。创建完毕后,可以看到README.md文件:
现在,远程库已经准备好了,下一步是用命令git clone克隆一个本地库:
[root@foundation8 KatyGit]# git clone https://github.com/MaMaMiYA1/Hx
Cloning into 'Hx'...
remote: Counting objects: 3, done.
remote: Total 3 (delta 0), reused 0 (delta 0), pack-reused 0
Unpacking objects: 100% (3/3), done.
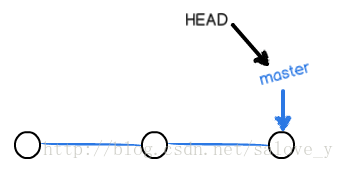
在版本回退里,你已经知道,每次提交,Git都把它们串成一条时间线,这条时间线就是一个分支。截止到目前,只有一条时间线,在Git里,这个分支叫主分支,即master分支。
每次提交,master分支都会向前移动一步,这样,随着你不断提交,master分支的线也越来越长
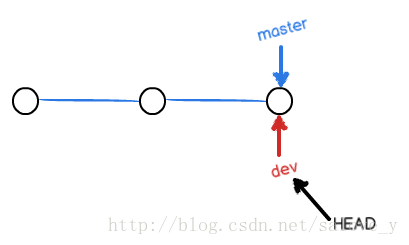
当我们创建新的分支,例如dev时,Git新建了一个指针叫dev,指向master相同的提交,再把HEAD指向dev,就表示当前分支在dev上:
[root@foundation8 KatyGit]# git checkout -b dev
M   readme.txt
Switched to a new branch 'dev'
git checkout命令加上-b参数表示创建并切换,相当于以下两条命令:
 git branch dev
 git checkout dev
然后,用git branch命令查看当前分支:
[root@foundation8 KatyGit]# git branch
* dev
  master
然后,我们就可以在dev分支上正常提交,比如对readme.txt做个修改,加上一行,
然后提交:
[root@foundation8 KatyGit]# vim readme.txt
[root@foundation8 KatyGit]# git add readme.txt
[root@foundation8 KatyGit]# git commit -m "branch test"
[dev 4e32bfd] branch test
 Committer: root <root@foundation8.ilt.example.com>
Your name and email address were configured automatically based
on your username and hostname. Please check that they are accurate.
You can suppress this message by setting them explicitly:

    git config --global user.name "Your Name"
    git config --global user.email you@example.com

After doing this, you may fix the identity used for this commit with:

    git commit --amend --reset-author

 1 file changed, 2 insertions(+), 4 deletions(-)
现在,dev分支的工作完成,我们就可以切换回master分支:
[root@foundation8 KatyGit]# git checkout master
Switched to branch 'master'
[root@foundation8 KatyGit]# git branch
  dev
* master
切换回master分支后,再查看一个readme.txt文件,刚才添加的内容不见了!因为那个提交是在dev分支上,而master分支此刻的提交点并没有变:
现在,我们把dev分支的工作成果合并到master分支上:
[root@foundation8 KatyGit]# cat readme.txt
这是Git仓库中的一个纯文本文件
这是Git仓库中的一个纯文本文件 第二版
这是Git仓库中的一个纯文本文件 第三版
[root@foundation8 KatyGit]# git merge dev
Updating be7d1f9..4e32bfd
Fast-forward
 readme.txt | 6 ++----
 1 file changed, 2 insertions(+), 4 deletions(-)
[root@foundation8 KatyGit]# cat readme.txt
这是Git仓库中的一个纯文本文件
这是Git仓库中的一个纯文本文件 第二版
这是Git仓库中的一个纯文本文件 第三版
creating a new branch dev
合并完成后,就可以放心地删除dev分支了:
[root@foundation8 KatyGit]# git branch -d dev
Deleted branch dev (was 4e32bfd).
[root@foundation8 KatyGit]# git branch
* master人生不如意之事十之八九,合并分支往往也不是一帆风顺的。
准备新的feature1分支,继续我们的新分支开发:
[root@foundation8 KatyGit]# git checkout -b feature1
Switched to a new branch 'feature1'
修改readme.txt最后一行,改为:
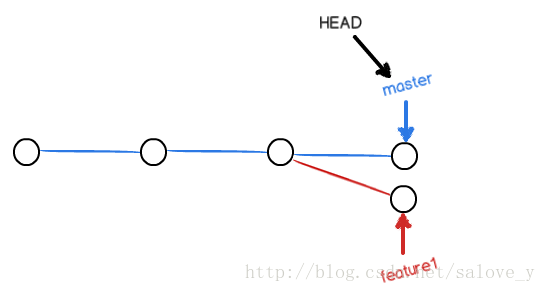
creating a new branch feature1在feature1分支上提交:
[root@foundation8 KatyGit]# git add readme.txt
[root@foundation8 KatyGit]# git commit -m "a new branch feature1"
切换到master分支:
[root@foundation8 KatyGit]# git checkout master
Switched to branch 'master'
Your branch is ahead of 'origin1/master' by 1 commit.
  (use "git push" to publish your local commits)
Git还会自动提示我们当前master分支比远程的master分支要超前1个提交。
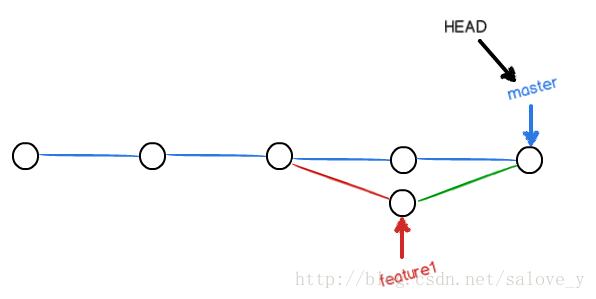
在master分支上把readme.txt文件的最后一行改为:
creating a new branch FEATURE1提交:
[root@foundation8 KatyGit]# git add readme.txt
[root@foundation8 KatyGit]# git commit -m " FEATURE1"
现在,master分支和feature1分支各自都分别有新的提交,变成了这样:
这种情况下,Git无法执行“快速合并”,只能试图把各自的修改合并起来,但这种合并就可能会有冲突,我们试试看:
[root@foundation8 KatyGit]# git merge feature1
Auto-merging readme.txt
CONFLICT (content): Merge conflict in readme.txt
Automatic merge failed; fix conflicts and then commit the result.
果然冲突了!Git告诉我们,readme.txt文件存在冲突,必须手动解决冲突后再提交。git status也可以告诉我们冲突的文件:
[root@foundation8 KatyGit]# git status
# On branch master
# Your branch is ahead of 'origin1/master' by 2 commits.
#   (use "git push" to publish your local commits)
#
# You have unmerged paths.
#   (fix conflicts and run "git commit")
#
# Unmerged paths:
#   (use "git add <file>..." to mark resolution)
#
#   both modified:      readme.txt
#
# Untracked files:
#   (use "git add <file>..." to include in what will be committed)
#
#   Hx/
no changes added to commit (use "git add" and/or "git commit -a")
我们可以直接查看readme.txt的内容:
[root@foundation8 KatyGit]# cat readme.txt
这是Git仓库中的一个纯文本文件
这是Git仓库中的一个纯文本文件 第二版
这是Git仓库中的一个纯文本文件 第三版
<<<<<<< HEAD
creating a new branch FEATURE1
=======
creating a new branch feature1
>>>>>>> feature1
Git用<<<<<<<,=======,>>>>>>>标记出不同分支的内容,我们修改如下后保存:
creating a new branch feature1
再提交:
[root@foundation8 KatyGit]# git add readme.txt
[root@foundation8 KatyGit]# git commit -m "conflict fixed"
现在,master分支和feature1分支变成了下图所示:
用带参数的git log也可以看到分支的合并情况:
[root@foundation8 KatyGit]# git log --graph --pretty=oneline --abbrev-commit
*   5b74425 conflict fixed
|
| * 1d64287 a new branch feature1
* | b9e378e  FEATURE1
|/
* 4e32bfd branch test
* be7d1f9 add test.txt
* 15d7313 remove test.txt
* 7f5e03e add test.txt
* 29c8692 readme.txt
* 9f1c3eb readme.txt 第二版
* 40d7cf2 wrote a readme file
最后,删除feature1分支:
[root@foundation8 KatyGit]# git branch -d feature1
Deleted branch feature1 (was 1d64287).
工作完成。
通常,合并分支时,如果可能,Git会用Fast forward模式,但这种模式下,删除分支后,会丢掉分支信息。
如果要强制禁用Fast forward模式,Git就会在merge时生成一个新的commit,这样,从分支历史上就可以看出分支信息。
下面我们实战一下--no-ff方式的git merge:
首先,仍然创建并切换dev分支:
[root@foundation8 KatyGit]# git checkout -b dev
Switched to a new branch 'dev'
修改readme.txt文件,并提交一个新的commit:
[root@foundation8 KatyGit]# vim readme.txt
[root@foundation8 KatyGit]# git add readme.txt
[root@foundation8 KatyGit]# git commit -m " add merge"
[dev f725295]  add merge
 Committer: root <root@foundation8.ilt.example.com>
Your name and email address were configured automatically based
on your username and hostname. Please check that they are accurate.
You can suppress this message by setting them explicitly:

    git config --global user.name "Your Name"
    git config --global user.email you@example.com

After doing this, you may fix the identity used for this commit with:

    git commit --amend --reset-author

 1 file changed, 3 insertions(+)
现在,我们切换回master:
[root@foundation8 KatyGit]# git checkout master
Switched to branch 'master'
Your branch is ahead of 'origin1/master' by 4 commits.
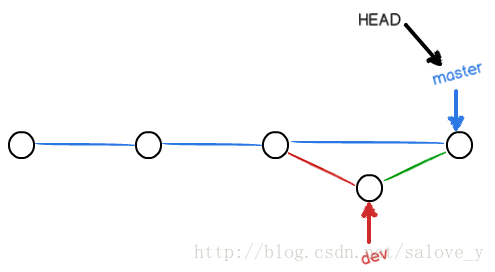
(use "git push" to publish your local commits)准备合并dev分支,请注意–no-ff参数,表示禁用Fast forward:
[root@foundation8 KatyGit]# git merge --no-ff -m "merge with no-ff" dev
Merge made by the 'recursive' strategy.
 readme.txt | 3 +++
 1 file changed, 3 insertions(+)
因为本次合并要创建一个新的commit,所以加上-m参数,把commit描述写进去。
合并后,我们用git log看看分支历史:
[root@foundation8 KatyGit]# git log --graph --pretty=oneline --abbrev-commit
*   0835900 merge with no-ff
|
| * f725295  add merge
|/
*   5b74425 conflict fixed
|
| * 1d64287 a new branch feature1
* | b9e378e  FEATURE1
|/
* 4e32bfd branch test
* be7d1f9 add test.txt
* 15d7313 remove test.txt
* 7f5e03e add test.txt
* 29c8692 readme.txt
* 9f1c3eb readme.txt 第二版
* 40d7cf2 wrote a readme file
可以看到,不使用Fast forward模式,merge后就像这样:
分支管理策略
Reads: 473799
通常,合并分支时,如果可能,Git会用Fast forward模式,但这种模式下,删除分支后,会丢掉分支信息。
如果要强制禁用Fast forward模式,Git就会在merge时生成一个新的commit,这样,从分支历史上就可以看出分支信息。
下面我们实战一下–no-ff方式的git merge:
首先,仍然创建并切换dev分支:
$ git checkout -b dev
Switched to a new branch ‘dev’
修改readme.txt文件,并提交一个新的commit:
git commit -m “add merge”
[dev 6224937] add merge
1 file changed, 1 insertion(+)
现在,我们切换回master:
$ git checkout master
Switched to branch ‘master’
准备合并dev分支,请注意–no-ff参数,表示禁用Fast forward:
$ git merge –no-ff -m “merge with no-ff” dev
Merge made by the ‘recursive’ strategy.
readme.txt | 1 +
1 file changed, 1 insertion(+)
因为本次合并要创建一个新的commit,所以加上-m参数,把commit描述写进去。
合并后,我们用git log看看分支历史:
$ git log –graph –pretty=oneline –abbrev-commit
* 7825a50 merge with no-ff
|
| * 6224937 add merge
|/
* 59bc1cb conflict fixed
…
可以看到,不使用Fast forward模式,merge后就像这样:
git-no-ff-mode
分支策略
在实际开发中,我们应该按照几个基本原则进行分支管理:
首先,master分支应该是非常稳定的,也就是仅用来发布新版本,平时不能在上面干活;
那在哪干活呢?干活都在dev分支上,也就是说,dev分支是不稳定的,到某个时候,比如1.0版本发布时,再把dev分支合并到master上,在master分支发布1.0版本;
你和你的小伙伴们每个人都在dev分支上干活,每个人都有自己的分支,时不时地往dev分支上合并就可以了。
软件开发中,bug就像家常便饭一样。有了bug就需要修复,在Git中,由于分支是如此的强大,所以,每个bug都可以通过一个新的临时分支来修复,修复后,合并分支,然后将临时分支删除。
当你接到一个修复一个代号101的bug的任务时,很自然地,你想创建一个分支issue-101来修复它,但是,等等,当前正在dev上进行的工作还没有提交:
[root@foundation8 KatyGit]# git status
# On branch dev
# Untracked files:
#   (use "git add <file>..." to include in what will be committed)
#
#   Hx/
#   hello.txt
nothing added to commit but untracked files present (use "git add" to track)
并不是你不想提交,而是工作只进行到一半,还没法提交,预计完成还需1天时间。但是,必须在两个小时内修复该bug,怎么办?
幸好,Git还提供了一个stash功能,可以把当前工作现场“储藏”起来,等以后恢复现场后继续工作:
[root@foundation8 KatyGit]# git stash
Saved working directory and index state WIP on dev: f725295  add merge
HEAD is now at f725295  add merge
现在,用git status查看工作区,就是干净的(除非有没有被Git管理的文件),因此可以放心地创建分支来修复bug。
首先确定要在哪个分支上修复bug,假定需要在master分支上修复,就从master创建临时分支:
[root@foundation8 KatyGit]# git checkout master
Switched to branch 'master'
Your branch is ahead of 'origin1/master' by 6 commits.
  (use "git push" to publish your local commits)
[root@foundation8 KatyGit]# git checkout -b issue-101
Switched to a new branch 'issue-101'
现在修复bug,假如需要在readme.txt中追加Successfully然后提交:
[root@foundation8 KatyGit]# git add readme.txt
[root@foundation8 KatyGit]# git commit -m "fix bug 101"
[issue-101 abc5cbe] fix bug 101
 Committer: root <root@foundation8.ilt.example.com>
Your name and email address were configured automatically based
on your username and hostname. Please check that they are accurate.
You can suppress this message by setting them explicitly:

    git config --global user.name "Your Name"
    git config --global user.email you@example.com

After doing this, you may fix the identity used for this commit with:

    git commit --amend --reset-author

 1 file changed, 1 insertion(+)
太棒了,原计划两个小时的bug修复只花了5分钟!现在,是时候接着回到dev分支干活了!
[root@foundation8 KatyGit]# git checkout dev
Switched to branch 'dev'
[root@foundation8 KatyGit]# git checkout dev
Switched to branch 'dev'
[root@foundation8 KatyGit]# git status
# On branch dev
# Untracked files:
#   (use "git add <file>..." to include in what will be committed)
#
#   Hx/
nothing added to commit but untracked files present (use "git add" to track)
工作区是干净的,刚才的工作现场存到哪去了?用git stash list命令看看:
[root@foundation8 KatyGit]# git stash list
stash@{0}: WIP on dev: f725295 add merge
工作现场还在,Git把stash内容存在某个地方了,但是需要恢复一下,有两个办法:
一是用git stash apply恢复,但是恢复后,stash内容并不删除,你需要用git stash drop来删除;
另一种方式是用git stash pop,恢复的同时把stash内容也删了:
[root@foundation8 KatyGit]# git stash pop
# On branch dev
# Changes to be committed:
#   (use "git reset HEAD <file>..." to unstage)
#
#   new file:   hello.txt
#
# Untracked files:
#   (use "git add <file>..." to include in what will be committed)
#
#   Hx/
Dropped refs/stash@{0} (4a92e21d2cdc7f57c116399b4452e57ac19a3b28)
再用git stash list查看,就看不到任何stash内容了:
[root@foundation8 KatyGit]# git stash list
[root@foundation8 KatyGit]#
你可以多次stash,恢复的时候,先用git stash list查看,然后恢复指定的stash,用命令:
git stash apply stash@{0}软件开发中,总有无穷无尽的新的功能要不断添加进来。
添加一个新功能时,你肯定不希望因为一些实验性质的代码,把主分支搞乱了,所以,每添加一个新功能,最好新建一个feature分支,在上面开发,完成后,合并,最后,删除该feature分支。
现在,你终于接到了一个新任务:开发代号为HX的新功能,该功能计划用于下一代软件。
于是准备开发:
[root@foundation8 KatyGit]# git checkout -b feature-HX
A   hello.txt
Switched to a new branch 'feature-HX'
5分钟后,开发完毕:
[root@foundation8 KatyGit]# git add HX.py
[root@foundation8 KatyGit]# git status
# On branch feature-HX
# Changes to be committed:
#   (use "git reset HEAD <file>..." to unstage)
#
#   new file:   HX.py
#   new file:   hello.txt
#
# Untracked files:
#   (use "git add <file>..." to include in what will be committed)
#
#   Hx/
[root@foundation8 KatyGit]# git commit -m "add feature-HX"
[feature-HX 94d7b67] add feature-HX
 Committer: root <root@foundation8.ilt.example.com>
Your name and email address were configured automatically based
on your username and hostname. Please check that they are accurate.
You can suppress this message by setting them explicitly:

    git config --global user.name "Your Name"
    git config --global user.email you@example.com

After doing this, you may fix the identity used for this commit with:

    git commit --amend --reset-author

 2 files changed, 0 insertions(+), 0 deletions(-)
 create mode 100644 HX.py
 create mode 100644 hello.txt
切回dev,准备合并:
[root@foundation8 KatyGit]# git checkout dev
Switched to branch 'dev'
一切顺利的话,feature分支和bug分支是类似的,合并,然后删除。
但是,
就在此时,接到上级命令,因经费不足,新功能必须取消!
虽然白干了,但是这个分支还是必须就地销毁:
[root@foundation8 KatyGit]# git branch -d feature-HX
error: The branch 'feature-HX' is not fully merged.
If you are sure you want to delete it, run 'git branch -D feature-HX'.
销毁失败。Git友情提醒,feature-HX分支还没有被合并,如果删除,将丢失掉修改,如果要强行删除,需要使用命令git branch -D feature-HX。
现在我们强行删除:
[root@foundation8 KatyGit]# git branch -D feature-HX
Deleted branch feature-HX (was 94d7b67).
终于删除成功!
当你从远程仓库克隆时,实际上Git自动把本地的master分支和远程的master分支对应起来了,并且,远程仓库的默认名称是origin。
要查看远程库的信息,用git remote:
[root@foundation8 KatyGit]# git remote
origin
或者,用git remote -v显示更详细的信息:
[root@foundation8 KatyGit]# git remote -v
origin  git@github.com:MaMaMiYA1/KatyGit (fetch)
origin  git@github.com:MaMaMiYA1/KatyGit (push)
上面显示了可以抓
如果觉得我的文章对您有用,请随意打赏。你的支持将鼓励我继续创作!