社区微信群开通啦,扫一扫抢先加入社区官方微信群

社区微信群
在苹果开发者大会之后,苹果要在iOS 11 、Xcode9中添加ARKit框架,似乎AR没有那么神秘,我们早就用过了,比如QQ的视频挂件、花椒的礼物动画、还有支付宝的扫福都应该属于AR技术。今天我就浅谈视频特效挂件。
思路
涉及到的技术
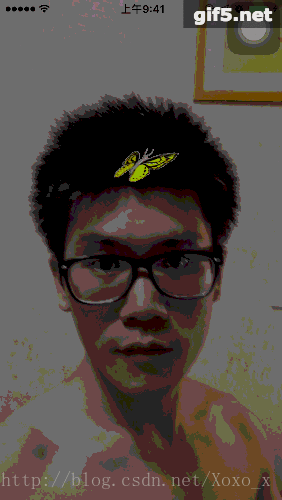
我做的是显示GIF特效。效果图: 请忽略我的模样( ̄︶ ̄)/
Demo没有做美颜,可查看我GPUImage其他博客、应该会有收获
主要步骤:
    [self initGPUImageView];//初始化GPUImageView
    //初始化滤镜GPUImageAlphaBlendFilter,主要用来做半透明的混合的
    [self initFilter];
    [self initCamera];//初始化相机
GPUImageUIElement 是GPUImage提供的可以将我们的普通UI转化为纹理输出到视频中
- (UIView *)elementView {
    if (!_elementView) {
        gifImageView = [[FLAnimatedImageView alloc] init];
        gifImageView.frame                = CGRectMake(0, 0, 160, 160);
        [self.view addSubview:gifImageView];
        NSData   *gifImageData             = [NSData dataWithContentsOfFile:[[NSBundle mainBundle]pathForResource:[NSString stringWithFormat:@"hudie"] ofType:@"gif" inDirectory:nil]];
        [self animatedImageView:gifImageView data:gifImageData];
        [_elementView addSubview:gifImageView];
    }
    return _elementView;
}
FLAnimatedImageView 用于播放gif动画
    GPUImageFilter* progressFilter = [[GPUImageFilter alloc] init];

    [videoCamera addTarget:progressFilter];
将两个纹理输出到GPUImageView
[progressFilter addTarget:filter];
    [pictureView addTarget:filter];

    [filter addTarget:filterView];
设置处理回调
__strong typeof(self) strongSelf = self;

    [progressFilter setFrameProcessingCompletionBlock:^(GPUImageOutput *output, CMTime time) {
        // update capImageView's frame
        CGRect rect = strongSelf.faceBounds;
        CGSize size = gifImageView.frame.size;


        [UIView animateWithDuration:0.2 animations:^{
            gifImageView.frame = CGRectMake(rect.origin.x +  (rect.size.width - size.width)/2, rect.origin.y - size.height, size.width, size.height);
        }];
        [pictureView updateWithTimestamp:time];


        [strongSelf->pictureView updateWithTimestamp:time];
    }];
使用屏幕刷新频率
 CADisplayLink * displayLink = [CADisplayLink displayLinkWithTarget:self selector:@selector(onDisplayLink:)];
    [displayLink addToRunLoop:[NSRunLoop currentRunLoop] forMode:NSRunLoopCommonModes];
视频回调代理、获取原始数据
- (void)willOutputSampleBuffer:(CMSampleBufferRef)sampleBuffer {
    if (!_faceThinking) {
        CFAllocatorRef allocator = CFAllocatorGetDefault();
        CMSampleBufferRef sbufCopyOut;
        CMSampleBufferCreateCopy(allocator,sampleBuffer,&sbufCopyOut);
        [self performSelectorInBackground:@selector(grepFacesForSampleBuffer:) withObject:CFBridgingRelease(sbufCopyOut)];
    }
}
将CMSampleBufferRef进行图像转化识别、提取特征
    CVPixelBufferRef pixelBuffer = CMSampleBufferGetImageBuffer(sampleBuffer);
    CFDictionaryRef attachments = CMCopyDictionaryOfAttachments(kCFAllocatorDefault, sampleBuffer, kCMAttachmentMode_ShouldPropagate);
    CIImage *convertedImage = [[CIImage alloc] initWithCVPixelBuffer:pixelBuffer options:(__bridge NSDictionary *)attachments];
imageOptions = [NSDictionary dictionaryWithObject:[NSNumber numberWithInt:exifOrientation] forKey:CIDetectorImageOrientation];
    NSArray *features = [self.faceDetector featuresInImage:convertedImage options:imageOptions];

    // get the clean aperture
    // the clean aperture is a rectangle that defines the portion of the encoded pixel dimensions
    // that represents image data valid for display.
    CMFormatDescriptionRef fdesc = CMSampleBufferGetFormatDescription(sampleBuffer);
    CGRect clap = CMVideoFormatDescriptionGetCleanAperture(fdesc, false /*originIsTopLeft == false*/);
进行识别
    dispatch_async(dispatch_get_main_queue(), ^{
        CGRect previewBox = self.view.frame;
        if (featureArray.count) {
            gifImageView.hidden = NO;
        }
        else {
//            gifImageView.hidden = YES;

            return ;

        }
        for ( CIFaceFeature *faceFeature in featureArray) {

            // find the correct position for the square layer within the previewLayer
            // the feature box originates in the bottom left of the video frame.
            // (Bottom right if mirroring is turned on)
            //Update face bounds for iOS Coordinate System
            CGRect faceRect = [faceFeature bounds];

            // flip preview width and height
            CGFloat temp = faceRect.size.width;
            faceRect.size.width = faceRect.size.height;
            faceRect.size.height = temp;
            temp = faceRect.origin.x;
            faceRect.origin.x = faceRect.origin.y;
            faceRect.origin.y = temp;
            // scale coordinates so they fit in the preview box, which may be scaled
            CGFloat widthScaleBy = previewBox.size.width / clap.size.height;
            CGFloat heightScaleBy = previewBox.size.height / clap.size.width;
            faceRect.size.width *= widthScaleBy;
            faceRect.size.height *= heightScaleBy;
            faceRect.origin.x *= widthScaleBy;
            faceRect.origin.y *= heightScaleBy;

            faceRect = CGRectOffset(faceRect, previewBox.origin.x, previewBox.origin.y);

            //mirror
            CGRect rect = CGRectMake(previewBox.size.width - faceRect.origin.x - faceRect.size.width, faceRect.origin.y, faceRect.size.width, faceRect.size.height);
            if (fabs(rect.origin.x - self.faceBounds.origin.x) > 5.0) {
                self.faceBounds = rect;
                //                if (self.faceView) {
                //                    [self.faceView removeFromSuperview];
                //                    self.faceView =  nil;
                //                }
                //
                //                // create a UIView using the bounds of the face
                //                self.faceView = [[UIView alloc] initWithFrame:self.faceBounds];
                //
                //                // add a border around the newly created UIView
                //                self.faceView.layer.borderWidth = 1;
                //                self.faceView.layer.borderColor = [[UIColor redColor] CGColor];
                //
                //                // add the new view to create a box around the face
                //                [self.view addSubview:self.faceView];
            }
        }
    });
然后再回到中更改蝴蝶的位置为头顶的位置
如果觉得我的文章对您有用,请随意打赏。你的支持将鼓励我继续创作!