社区微信群开通啦,扫一扫抢先加入社区官方微信群

社区微信群
由于本系列教程叫做“边做边学”,因此我们在后续的讲解会以实践为主,穿插着介绍基本概念。请大家有条件的话跟着我们一起上机实践,而不要过于纠结深层次的原理,这些我们会在后续的教程中为大家慢慢解释。
启动VirtualEnv,输入pip install flask即可完成Flask框架的安装,由于Flask基础框架很小,整个过程会很快。安装完成后,打开Python命令行解释器,输入import flask,如果未提示错误则安装成功。
Flask的Hello World应用很简单,简单到不到10行代码。
from flask import Flask
app = Flask(__name__) #创建一个wsgi应用
@app.route('/') #添加路由:根
def hello_world():
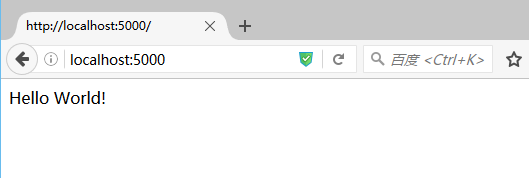
return 'Hello World!' #输出一个字符串
if __name__ == '__main__':
app.run(debug=True) #启动app的调试模式打开浏览器访问http://localhost:5000,可以看到我们的helloworld页面已经可以正常工作了。
本例中app是Flask类的一个实例,在实例化过程中传递了一个参数name,Flask通过这个参数识别app是模块级别还是包级别的。实际上app符合相关接口,它是一个WSGI应用。
有了app对象以后,它就成为了一个中心节点,把所有的URL规则、视图函数、模板配置等连接起来,最终形成一个Web应用。
使用@app.route修饰函数创建一个URL规则,直接在被修饰的函数中写出处理该URL要做的事情。使用过PHP、ASP的童鞋可能刚开始不习惯这种URL命名规则,因为最早使用脚本开发Web应用的时候,一个文件就会对应一个URL。
在一些极其简单的应用中,我们可能只需要Flask提供一些文本类的输出,比如我们需要输出一些简单的状态字符串,或者需要实现一个REST风格的数据接口。
上面我们已经看到了Flask如何输出文本:简单的将文本return就可以了。聪明的你肯定想到了,通过return我们可以输出一段html代码,便能够得到我们想要的页面效果,例如:
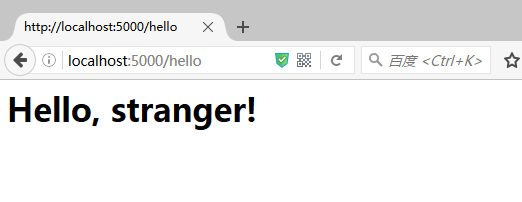
@app.route('/hello')           #添加路由:hello
def do_hello():
return '<h1>Hello, stranger!'</h1> #输出一个字符串打开浏览器,输入http://localhost:5000/hello,可以看到下图的结果:
接口已经成为当今Web应用普遍采用的数据传输方式了,通常我们在Web应用接口中喜欢使用json格式的数据,因为它比起XML用起来方便太多了。借用Python的json库可以方便地输出json格式的数据:
import json
...
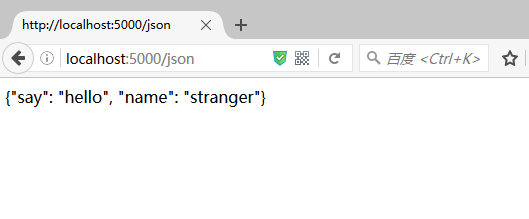
@app.route('/json')
def do_json():
hello = {"name":"stranger", "say":"hello"}
return json.dumps(hello)打开浏览器,输入http://localhost:5000/json,可以看到下图的结果。
如果你已启动Flask内置的调试服务器,修改完代码后Flask会自动重新载入代码文件,这样不需要重启Flask应用,你的改动能直接在浏览器上体现出来。
除了上述的简单输出文本,我们可以自定义地控制HTTP协议所支持的更多输出项,比如状态码、HTTP头、Cookie等。
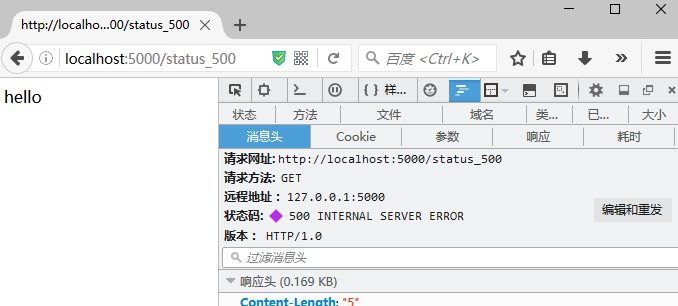
HTTP状态码指附加在HTTP响应前的一个代表状态的数字。常见的状态码有200(正常),404(找不到页面),500(错误)等。只需在return的字符串后面加上一个数字就好了。
@app.route('/status_500')
def status_500():
return "hello",500访问http://localhost:5000/status_500,我们能够看到下图中的结果。
虽然HTTP状态设置为500,但浏览器正文仍然能够正常显示文本,这和浏览器设置有关系,HTTP状态在400以上一般都代表发生错误,详细的可以查阅HTTP协议的相关资料。
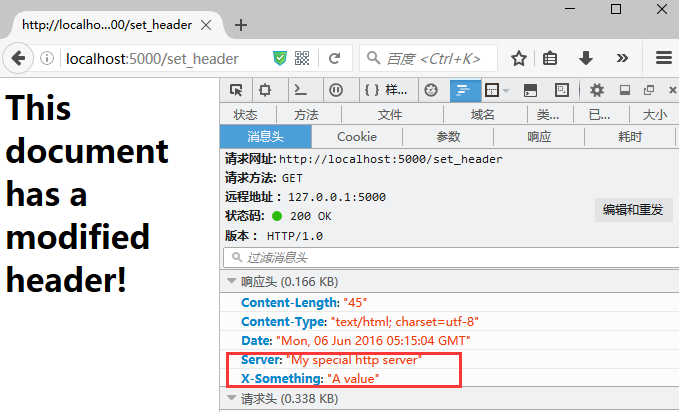
可以自定义HTTP响应头中的数据,这在开发过程中也是一种常见的操作,比如我们希望在HTTP头部传递一些普通用户看不到的数据。设置HTTP头需要使用到flask的make_response功能。
from flask import make_response
...
@app.route('/set_header')
def set_header():
    resp = make_response('<h1>This document has a modified header!</h1>')
    resp.headers['X-Something'] = 'A value'
    resp.headers['Server'] = 'My special http server'
return resp访问http://localhost:5000/set_header,我们看到如下的内容:
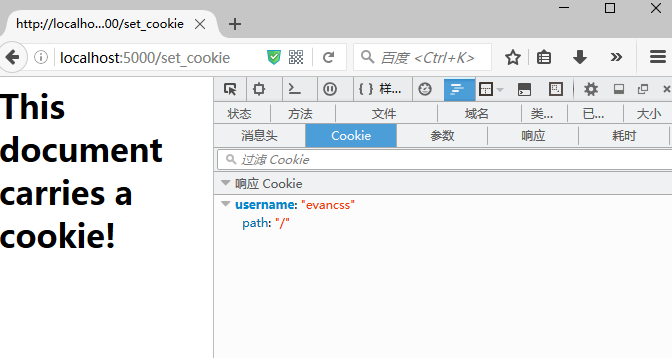
在Web应用中,使用Cookie跟踪用户状态是非常常见的操作,在Flask中设置Cookie也非常简单。下面的代码演示如何设置一个名称为username,值为evancss的Cookie。设置Cookie同样需要flask的make_response功能。
from flask import make_response
...
@app.route('/set_cookie')
def set_cookie():
    response = make_response('<h1>This document carries a cookie!</h1>')
    response.set_cookie('username', 'evancss')
return response访问http://localhost:5000/set_cookie,我们看到如下的内容:
在处理一些客户端请求时,不需要输出文本的情况也非常常见,比如我们把用户重定向到另外一个页面上,或者告诉用户页面出错了。
重定向指让浏览器打开另外一个URL,使用Flask的redirect功能可以非常方便实现重定向。
from flask import redirect
...
@app.route('/redir')
def redir():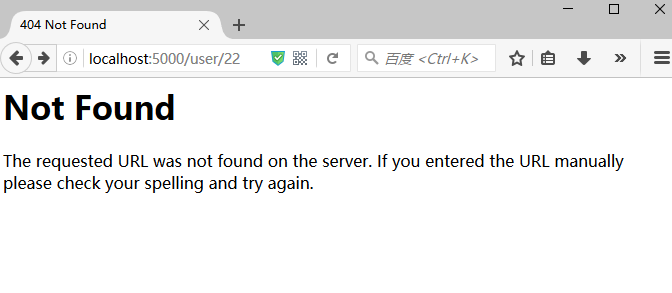
return redirect('http://www.baidu.com')可以使用Abort不把控制权交还给调用它的函数,而是抛出异常把控制权交给Web服务器。下面的代码会显示服务器默认的404页面。可以注意到,后面的return函数实际上没有被执行,因为执行到abort时,该函数的运行流程已经中断了。
from flask import abort
...
@app.route('/user/<id>')
def get_user(id):
    if int(id)>10:
        abort(404)
return '<h1>Hello, %s</h1>' % id在浏览器中输入http://localhost:5000/user/22,可以看到return这句代码并未执行,显示如下:
一种更为高级的输出方案是使用模板,Flask内置了jinja2模板,当然也可以使用其它的模板语言,但jinja2应当已经能够满足你的全部需求了,详情见下节。
#-*- encoding: utf-8 -*-

from flask import Flask,make_response,redirect,abort
import json

app = Flask(__name__)        #创建一个wsgi应用

@app.route('/')             #添加路由:根
def hello_world():
    return 'Hello World!'   #输出一个字符串

@app.route('/hello')           #添加路由:hello
def do_hello():
    return '<h1>Hello, stranger!</h1>'      #输出一个字符串

@app.route('/json')
def do_json():
    hello = {"name":"stranger", "say":"hello"}
    return json.dumps(hello)

@app.route('/status_500')
def status_500():
    return "hello",500

@app.route('/set_header')
def set_header():
    resp = make_response('<h1>This document has a modified header!</h1>')
    resp.headers['X-Something'] = 'A value'
    resp.headers['Server'] = 'My special http server'
    return resp

@app.route('/set_cookie')
def set_cookie():
    resp = make_response('<h1>This document carries a cookie!</h1>')
    resp.set_cookie('username', 'evancss')
    return resp

@app.route('/redir')
def redir():
    return redirect('http://www.baidu.com')

@app.route('/user/<id>')
def get_user(id):
    if int(id)>10:
        abort(404)
    return '<h1>Hello, %s</h1>' % id

if __name__ == '__main__':
app.run(debug=True) #启动app的调试模式如果觉得我的文章对您有用,请随意打赏。你的支持将鼓励我继续创作!