社区微信群开通啦,扫一扫抢先加入社区官方微信群

社区微信群
做着纯属训练自己的技能,首先说下具体实现功能就是,从客户端传送一张身份证的正面照片给服务器,然后返回身份证的号码回来。部分代码在上一篇文章稍作修改,话不多说看代码:
先看下server做了哪些修改:
# -*- coding:utf-8 -*-
import imagerecognition_pb2
import imagerecognition_pb2_grpc
import time
import os

from opencvfun import get_IDnum

_ONE_DAY_IN_SECONDS = 60*60*24

class ImageRecognition(imagerecognition_pb2.BetaImageRecognitionServicer):
	def PositiveID(self, request_iterator, context):
		count = 0
		with open("./image/img_file", "wb") as f:
			for line in request_iterator:
				num = f.write(line.img)
				count += num
				filename = line.filename
				filetype = line.filetype

		tmp_file = "./image/positiveid" + filetype
		os.rename("./image/img_file", tmp_file)
		num = get_IDnum(tmp_file)
		return imagerecognition_pb2.PositiveIDInfo(name="***",
			sex="*", nation="**", age="12345678", addr="****************",
			IDnumber=num)

	def ReverseID(self, request_iterator, context):
		count = 0
		with open("./image/img_file", "wb") as f:
			for line in request_iterator:
				num = f.write(line.img)
				count += num
				filename = line.filename
				filetype = line.filetype

		tmp_file = "./image/reverseid" + filetype
		os.rename("./image/img_file", tmp_file)
		return imagerecognition_pb2.ReverseIDInfo(organization="郸城县公安局",
			effectivedate="19902.15-1621.5")


server = imagerecognition_pb2.beta_create_ImageRecognition_server(ImageRecognition())
server.add_insecure_port('[::]:50051')
server.start()

try:
	while True:
		time.sleep(_ONE_DAY_IN_SECONDS)
except KeyboardInterrupt:
	server.stop()
主要实现了一个get_IDnum的功能,这个函数写在了opencv文件中:
如下:
import cv2
import numpy as np
import pytesseract

def process_img(img):
	kernel = np.ones((9,9), np.uint8)
	img = cv2.cvtColor(img, cv2.COLOR_BGR2GRAY) # 灰度图像
	img = cv2.GaussianBlur(img, (7,7), 0)# 高斯滤波
	retval, img = cv2.threshold(img, 165, 255, cv2.THRESH_BINARY_INV)# 二值化
	img = cv2.dilate(img, kernel, iterations=1)# 膨胀操作
	img = cv2.morphologyEx(img, cv2.MORPH_GRADIENT, kernel)
	return img

def get_rect_box(contours):
	ws = []
	valid_contours = []
	for contour in contours:
		x,y,w,h = cv2.boundingRect(contour)
		if w < 7:
			continue
		valid_contours.append(contour)

	result = []
	for contour in valid_contours:
		x,y,w,h = cv2.boundingRect(contour)
		box = np.int0([[x,y],[x+w,y],[x+w,y+h],[x,y+h]])
		result.append(box)

	result = sorted(result, key=lambda x: x[0][0])
	return result

def get_box_xy_and_wh(box):# 获取轮廓起点个高宽
	x, y = box[0][0], box[0][1]
	w = box[2][0] - box[0][0]
	h = box[2][1] - box[0][1]
	return x, y, w, h

def get_rectimg_from_img(img, box):# 裁剪图像
	x, y, w, h = get_box_xy_and_wh(box)
	return img[y: y+h, x:x+w]

#----------------------------------------
def get_IDnum(filename):
	img = cv2.imread(filename)# 读取文件
	img1 = process_img(img)# 进一步降噪滤波等操作
	img2, contours, hierarchy = cv2.findContours(img1, cv2.RETR_EXTERNAL, cv2.CHAIN_APPROX_SIMPLE)# 找到轮廓
	boxes = get_rect_box(contours)# 获取轮廓的矩形参数
	for box in boxes:
		cv2.drawContours(img, [box], 0, (0,0,255), 2)
		x, y, w, h = get_box_xy_and_wh(box)
		if w > h*6:# 找到身份证号码对应的轮廓,进行识别
			resultimg = get_rectimg_from_img(img, box)
			text = pytesseract.image_to_string(resultimg, lang='eng')# 数字和字母的识别
			if text[-1] in "0123456789":
				return text
			else:
				return text[0:-1]+'X'
通过tesseract这个库进行了识别号码的功能。
客户端变化不大,主要是讲相关的参数传给server即可:
# -*- coding:utf-8 -*-
from __future__ import print_function
import grpc
import imagerecognition_pb2
import imagerecognition_pb2_grpc
import os
def get_img_data(filepath):
(filename, filetype) = os.path.splitext(os.path.basename(os.path.realpath(filepath)))
with open(filepath, "rb") as f:
for line in f.readlines():
yield imagerecognition_pb2.ImgRequest(filename=filename,filetype=filetype,img=line)
def run():
with grpc.insecure_channel('localhost:50051') as channel:
stub = imagerecognition_pb2_grpc.ImageRecognitionStub(channel)
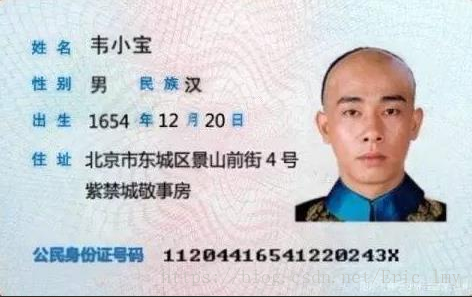
ret = stub.PositiveID(get_img_data("../image/xiaob.jpg"))# 网上搜了一张小宝的身份证
print(ret.IDnumber)# 打印出结果
if __name__ == '__main__':
run()
目前只做了一个身份证号码的识别,后期将继续完善,识别身份证上的所有信息。欢迎指正谢谢。
然后运行server.py
在运行client.py
图像:
结果:
如果觉得我的文章对您有用,请随意打赏。你的支持将鼓励我继续创作!