社区微信群开通啦,扫一扫抢先加入社区官方微信群

社区微信群
作为一个编程小白,刚刚入门学习了python,在学习过程中,想实现一些有趣的功能,但是由于自身能力目前又想,于是参考了参考了网上的程序,实现了该功能。现将实现过程中出现的问题进行列举以及解决方法:
(修改.avi文件的读取路径与生成字符视频的存储路径以及读取生成字符图片的数量即可)
# -*- coding: utf-8 -*-
import cv2
import os
from PIL import Image, ImageDraw, ImageFont
WIDTH = 80 # 定义输出画面的宽度
HEIGHT = 45 # 定义
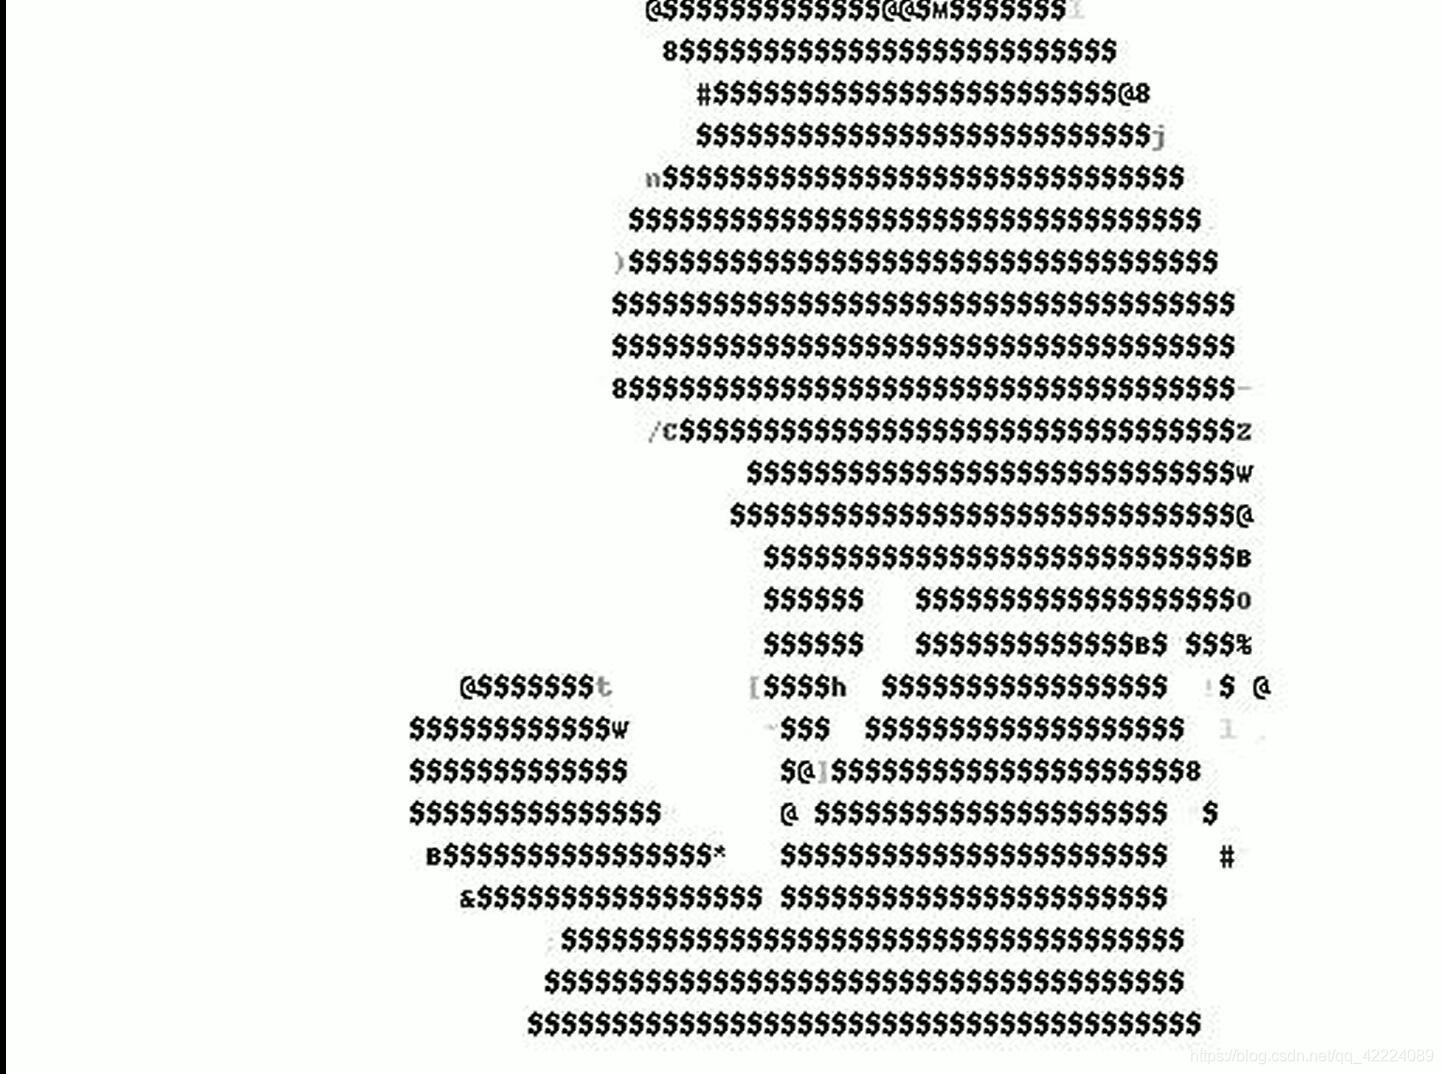
ascii_char = list("$@B%8&WM#*oahkbdpqwmZO0QLCJUYXzcvunxrjft/|()1{}[]?-_+~<>i!lI;:,"^`'. ") # 所用字符列表
# 将256灰度映射到70个字符上
def get_char(r, g, b, alpha=256): # alpha透明度
if alpha == 0:
return ' '
length = len(ascii_char)
gray = int(0.2126 * r + 0.7152 * g + 0.0722 * b) # 计算灰度
unit = (256.0 + 1) / length
return ascii_char[int(gray / unit)] # 不同的灰度对应着不同的字符
# 通过灰度来区分色块
# 该部分以下和灰度值字符画区别所在
def PictureToChar(sourcePath, storagePath):
print("开始将图片转为字符型:")
# 循环最多读取6566张图片,自己可更改
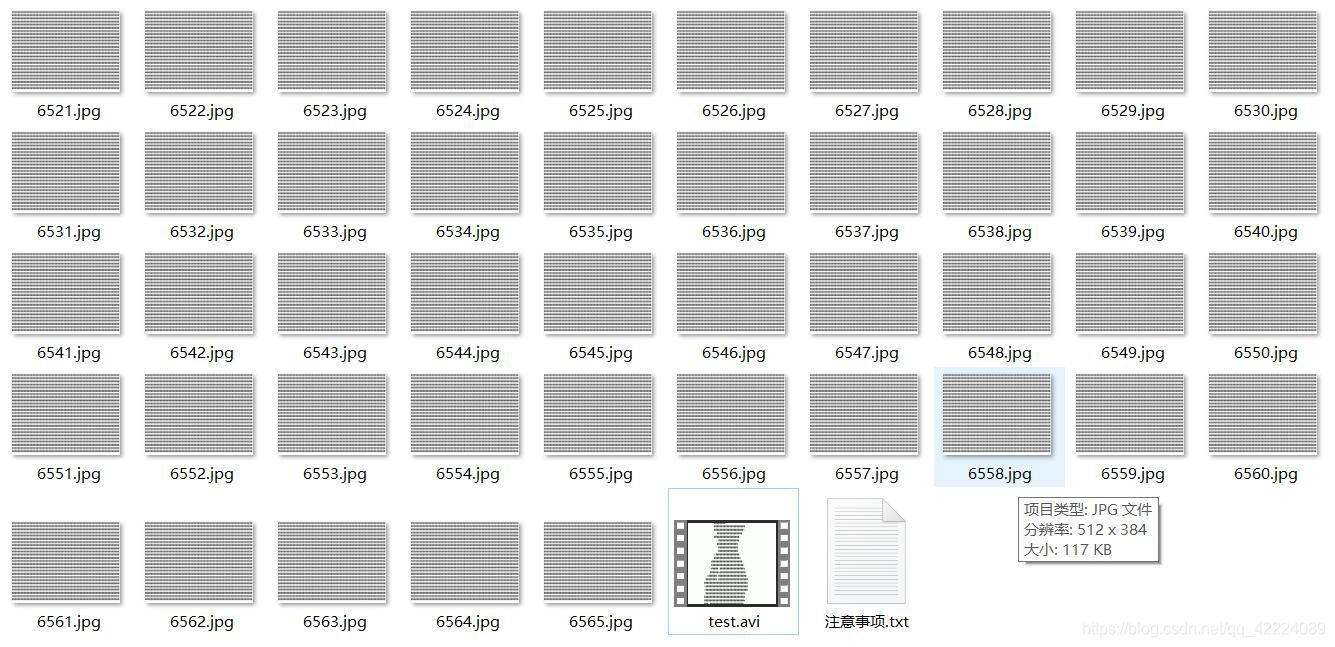
for icount in range(1, 6566):
IMG = sourcePath + str(icount) + '.jpg' # 文件路径
if os.path.exists(IMG):
im = Image.open(IMG)
# 视频分割后图片的长与宽,与合成视频时要相统一,保存下来,合成字符视频时用到
sourceImage = im
WIDTH = int(im.width / 6) # 高度比例为原图的1/6较好,由于字体宽度
HEIGHT = int(im.height / 15) # 高度比例为原图的1/15较好,由于字体高度
im_txt = Image.new("RGB", (im.width, im.height), (255, 255, 255))
im = im.resize((WIDTH, HEIGHT), Image.NEAREST)
txt = ""
colors = []
for i in range(HEIGHT):
for j in range(WIDTH):
pixel = im.getpixel((j, i))
colors.append((pixel[0], pixel[1], pixel[2])) # 记录像素颜色信息
if (len(pixel) == 4):
txt += get_char(pixel[0], pixel[1], pixel[2], pixel[3])
else:
txt += get_char(pixel[0], pixel[1], pixel[2])
txt += 'n'
colors.append((255, 255, 255))
dr = ImageDraw.Draw(im_txt)
font = ImageFont.load_default().font # 获取字体
x = y = 0
# 获取字体的宽高
font_w, font_h = font.getsize(txt[1])
font_h *= 1.37 # 调整后更佳
# ImageDraw为每个ascii码进行上色
for i in range(len(txt)):
if (txt[i] == 'n'):
x += font_h
y = -font_w
dr.text([y, x], txt[i], colors[i])
y += font_w
# 输出
name = str(icount) + '.jpg'
print(name)
im_txt.save(storagePath + str(icount) + '.jpg')
return sourceImage
def charToVideo(storagePath, sourceImage):
# 设置视频编码器,这里使用使用MJPG编码器
# fourcc = cv2.VideoWriter_fourcc(*'MJPG')
# 这里是mp4格式
fourcc = cv2.VideoWriter_fourcc('I','4','2','0') # 将编码格式设置为.avi视频编码格式
(可以查找其他视频编码格式进行实验)
print("开始将字符型图片变为视频:")
# 输出视频参数设置,包含视频文件名、编码器、帧率、视频宽高(此处参数需和字符图片大小一致)
videoWriter = cv2.VideoWriter(storagePath + 'test.avi', fourcc, 30.0, (sourceImage.width, sourceImage.height))
# 循环最多读取1100张图片,自己可更改
for i in range(1, 6566):
filename = storagePath + str(i) + '.jpg'
# 判断图片是否存在
if os.path.exists(filename):
img = cv2.imread(filename=filename)
# 在一个给定的时间内(单位ms)等待用户按键触发,100ms
cv2.waitKey(100)
# 将图片写入视频中
videoWriter.write(img)
print(str(i) + '.jpg' + ' done!')
# 视频释放
videoWriter.release()
print("字符视频已成功生成!!!")
def VideoToPicture(path):
# 在当前目录下新建文件夹
folder_path = "imgbear/"
os.makedirs(folder_path)
# 进行视频的载入
vc = cv2.VideoCapture(path)
print("开始将原视频分割为图片:")
c = 0
# 判断载入的视频是否可以打开
ret = vc.isOpened()
# 循环读取视频帧
while ret:
c = c + 1
# 进行单张图片的读取,ret的值为True或者Flase,frame表示读入的图片
ret, frame = vc.read()
if ret:
# 存储为图像
cv2.imwrite(folder_path + str(c) + '.jpg', frame)
# 输出图像名称
print(folder_path + str(c) + '.jpg')
# 在一个给定的时间内(单位ms)等待用户按键触发,1ms
cv2.waitKey(1)
else:
break
# 视频释放
vc.release()
return folder_path
if __name__ == '__main__':
# 视频所在路径
path = 'C://Users//118//Desktop//BadApple.avi'
# 存储路径,路径上的文件夹必须已经存在
storagePath = 'C://Users//118//Desktop//Movie//'
sourcePath = VideoToPicture(path)
sourceImage = PictureToChar(sourcePath, storagePath)
charToVideo(storagePath, sourceImage)

对于编程小白来说,实现了自己想要实现的功能,还是挺开心的,虽然对于程序中引用的库、语法没有进行详细的解析,但是对自己的学习也是一个激励。这里的采用的视频是BadApple.mp4,也可以采用自己的视频,但是要修改生遍历图片的次数,修改为自己视频生成的图片数量,否则无法生成与之前视频一样长度的视频。
本文源代码来自博客
https://blog.csdn.net/songsongL/article/details/99237559
如果觉得我的文章对您有用,请随意打赏。你的支持将鼓励我继续创作!
