社区微信群开通啦,扫一扫抢先加入社区官方微信群

社区微信群
首先Spring Boot项目中都会如下启动类:
@SpringBootApplication
public class Application {
    public static void main(String[] args) {
        SpringApplication.run(Application.class, args);
    }
}
从上面代码可以看出,注解@SpringBootApplication和SpringApplication.run()方法是最为重要的部分。这里主要来看看@SpringBootApplication注解部分。
@Target({ElementType.TYPE})
@Retention(RetentionPolicy.RUNTIME)
@Documented
@Inherited
@SpringBootConfiguration
@EnableAutoConfiguration
@ComponentScan(
    excludeFilters = {@Filter(
    type = FilterType.CUSTOM,
    classes = {TypeExcludeFilter.class}
), @Filter(
    type = FilterType.CUSTOM,
    classes = {AutoConfigurationExcludeFilter.class}
)}
)
public @interface SpringBootApplication {
	...
}
虽然定义使用了多个Annotation进行了原信息标注,但实际上重要的只有三个Annotation:
如果在启动类使用这个三个注解,整个SpringBoot应用依然可以与之前的启动类功能一样。但每次写这3个比较啰嗦,所以写一个@SpringBootApplication方便点。
这三个注解中@Configuration和@ComponentScan对我们来说并不陌生,今天我们的主角是@EnableAutoConfiguration。
@Target(ElementType.TYPE)
@Retention(RetentionPolicy.RUNTIME)
@Documented
@Inherited
@AutoConfigurationPackage
@Import(AutoConfigurationImportSelector.class)
public @interface EnableAutoConfiguration {
    String ENABLED_OVERRIDE_PROPERTY = "spring.boot.enableautoconfiguration";

    Class<?>[] exclude() default {};

    String[] excludeName() default {};
}
其中最关键的要属@Import(AutoConfigurationImportSelector.class),借助AutoConfigurationImportSelector,@EnableAutoConfiguration可以帮助SpringBoot应用将所有符合条件的@Configuration配置都加载到当前SpringBoot创建并使用的IoC容器。
借助于Spring框架原有的一个工具类:SpringFactoriesLoader的支持,@EnableAutoConfiguration可以智能的自动配置功效才得以大功告成!
在AutoConfigurationImportSelector类中可以看到通过 SpringFactoriesLoader.loadFactoryNames()
把 spring-boot-autoconfigure.jar/META-INF/spring.factories中每一个xxxAutoConfiguration文件都加载到容器中,spring.factories文件里每一个xxxAutoConfiguration文件一般都会有下面的条件注解:
...
org.springframework.boot.autoconfigure.EnableAutoConfiguration=
org.springframework.boot.autoconfigure.admin.SpringApplicationAdminJmxAutoConfiguration,
org.springframework.boot.autoconfigure.aop.AopAutoConfiguration,
org.springframework.boot.autoconfigure.amqp.RabbitAutoConfiguration,
org.springframework.boot.autoconfigure.batch.BatchAutoConfiguration,
org.springframework.boot.autoconfigure.cache.CacheAutoConfiguration,
org.springframework.boot.autoconfigure.cassandra.CassandraAutoConfiguration,
org.springframework.boot.autoconfigure.web.WebMvcAutoConfiguration,
...
SpringFactoriesLoader属于Spring框架私有的一种扩展方案(类似于Java的SPI方案java.util.ServiceLoader),其主要功能就是从指定的配置文件META-INF/spring-factories加载配置,spring-factories是一个典型的java properties文件,只不过Key和Value都是Java类型的完整类名,比如:
example.MyService=example.MyServiceImpl1,example.MyServiceImpl2
对于@EnableAutoConfiguration来说,SpringFactoriesLoader的用途稍微不同一些,其本意是为了提供SPI扩展的场景,而在@EnableAutoConfiguration场景中,它更多提供了一种配置查找的功能支持,即根据@EnableAutoConfiguration的完整类名org.springframework.boot.autoconfig.EnableAutoConfiguration作为查找的Key,获得对应的一组@Configuration类。
SpringFactoriesLoader是一个抽象类,类中定义的静态属性定义了其加载资源的路径public static final String FACTORIES_RESOURCE_LOCATION = "META-INF/spring.factories",此外还有三个静态方法:
在loadFactories方法中调用了loadFactoryNames以及instantiateFactory方法。
public static <T> List<T> loadFactories(Class<T> factoryClass, ClassLoader classLoader) {
   Assert.notNull(factoryClass, "'factoryClass' must not be null");
   ClassLoader classLoaderToUse = classLoader;
   if (classLoaderToUse == null) {
      classLoaderToUse = SpringFactoriesLoader.class.getClassLoader();
   }
   List<String> factoryNames = loadFactoryNames(factoryClass, classLoaderToUse);
   if (logger.isTraceEnabled()) {
      logger.trace("Loaded [" + factoryClass.getName() + "] names: " + factoryNames);
   }
   List<T> result = new ArrayList<T>(factoryNames.size());
   for (String factoryName : factoryNames) {
      result.add(instantiateFactory(factoryName, factoryClass, classLoaderToUse));
   }
   AnnotationAwareOrderComparator.sort(result);
   return result;
}
loadFactories方法首先获取类加载器,然后调用loadFactoryNames方法获取所有的指定资源的名称集合、接着调用instantiateFactory方法实例化这些资源类并将其添加到result集合中。最后调用AnnotationAwareOrderComparator.sort方法进行集合的排序。
上面介绍了很多原理的知识,下面结合一个例子来加深理解,例子展示的是当项目启动时如果某个类存在就自动配置这个Bean,并且这个属性可以在application.properties中配置
新建一个Maven项目,pom.xml文件如下:
<?xml version="1.0" encoding="UTF-8"?>

<project xmlns="http://maven.apache.org/POM/4.0.0" xmlns:xsi="http://www.w3.org/2001/XMLSchema-instance"
         xsi:schemaLocation="http://maven.apache.org/POM/4.0.0 http://maven.apache.org/xsd/maven-4.0.0.xsd">
    <modelVersion>4.0.0</modelVersion>

    <groupId>com.chm.test</groupId>
    <artifactId>spring-boot-starter-hello</artifactId>
    <version>1.0-SNAPSHOT</version>
    <packaging>jar</packaging>

    <name>spring-boot-starter-hello</name>
    <!-- FIXME change it to the project's website -->
    <url>http://www.example.com</url>

    <properties>
        <project.build.sourceEncoding>UTF-8</project.build.sourceEncoding>
        <maven.compiler.source>1.8</maven.compiler.source>
        <maven.compiler.target>1.8</maven.compiler.target>
    </properties>

    <dependencies>
        <dependency>
            <groupId>junit</groupId>
            <artifactId>junit</artifactId>
            <version>4.11</version>
            <scope>test</scope>
        </dependency>
        <dependency>
            <groupId>org.springframework.boot</groupId>
            <artifactId>spring-boot-autoconfigure</artifactId>
            <version>2.0.4.RELEASE</version>
        </dependency>
        <dependency>
            <groupId>org.springframework.boot</groupId>
            <artifactId>spring-boot-configuration-processor</artifactId>
            <version>2.0.4.RELEASE</version>
            <optional>true</optional>
        </dependency>
    </dependencies>
</project>
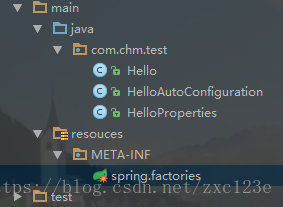
项目目录结构如下:
Hello.java
public class Hello {

    private String msg;

    public String sayHello() {
        return "hello " + msg;
    }

    public String getMsg() {
        return msg;
    }

    public void setMsg(String msg) {
        this.msg = msg;
    }
}
HelloProperties.java
@ConfigurationProperties(prefix = "hello") //获取属性值
public class HelloProperties {

    private static final String MSG = "world";

    private String msg = MSG ;

    public String getMsg() {
        return msg;
    }

    public void setMsg(String msg) {
        this.msg = msg;
    }

}
HelloAutoConfiguration.java
@Configuration
//为带有@ConfigurationProperties注解的Bean提供有效的支持。
// 这个注解可以提供一种方便的方式来将带有@ConfigurationProperties注解的类注入为Spring容器的Bean。
@EnableConfigurationProperties(HelloProperties.class)//开启属性注入,通过@autowired注入
@ConditionalOnClass(Hello.class)//判断这个类是否在classpath中存在,如果存在,才会实例化一个Bean
// The Hello bean will be created if the hello.enable property exists and has a value other than false
// or the property doesn't exist at all.
@ConditionalOnProperty(prefix="hello", value="enabled", matchIfMissing = true)
public class HelloAutoConfiguration {

    @Autowired
    private HelloProperties helloProperties;

    @Bean
    @ConditionalOnMissingBean(Hello.class)//容器中如果没有Hello这个类,那么自动配置这个Hello
    public Hello hello() {
        Hello hello = new Hello();
        hello.setMsg(helloProperties.getMsg());
        return hello;
    }

}
spring.factories
org.springframework.boot.autoconfigure.EnableAutoConfiguration=
com.chm.test.HelloAutoConfiguration
最后使用mvn package将上面项目打包,使用mvn install:install-file命令将打包文件上传到本地Maven仓库进行测试。下面再新建一个Maven项目用于测试。
pom.xml文件
<?xml version="1.0" encoding="UTF-8"?>

<project xmlns="http://maven.apache.org/POM/4.0.0" xmlns:xsi="http://www.w3.org/2001/XMLSchema-instance"
  xsi:schemaLocation="http://maven.apache.org/POM/4.0.0 http://maven.apache.org/xsd/maven-4.0.0.xsd">
  <modelVersion>4.0.0</modelVersion>

  <groupId>com.chm.test</groupId>
  <artifactId>test-starter</artifactId>
  <version>1.0-SNAPSHOT</version>

  <name>test-starter</name>
  <!-- FIXME change it to the project's website -->
  <url>http://www.example.com</url>

  <properties>
    <project.build.sourceEncoding>UTF-8</project.build.sourceEncoding>
    <maven.compiler.source>1.8</maven.compiler.source>
    <maven.compiler.target>1.8</maven.compiler.target>
    <boot.version>2.0.4.RELEASE</boot.version>
  </properties>

  <dependencies>
    <dependency>
      <groupId>junit</groupId>
      <artifactId>junit</artifactId>
      <version>4.11</version>
      <scope>test</scope>
    </dependency>
    <dependency>
      <groupId>com.chm.test</groupId>
      <artifactId>spring-boot-starter-hello</artifactId>
      <version>0.0.1-SNAPSHOT</version>
    </dependency>
    <dependency>
      <groupId>org.springframework.boot</groupId>
      <artifactId>spring-boot-starter-web</artifactId>
      <version>${boot.version}</version>
    </dependency>
    <dependency>
      <groupId>org.springframework.boot</groupId>
      <artifactId>spring-boot-starter-test</artifactId>
      <version>${boot.version}</version>
      <scope>test</scope>
    </dependency>
  </dependencies>
</project>
App.java
@SpringBootApplication
@RestController
public class App {

    @Autowired
    private Hello hello;

    @RequestMapping("/")
    public String index() {
        return hello.sayHello();
    }

    public static void main(String[] args) {
        SpringApplication.run(App.class, args);
    }
}
application.properties
#可以不配置
hello.enabled=true

hello.msg=charmingfst

#以debug模式运行
debug=true
以debug模式运行,可以看到我们的配置:
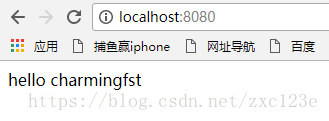
启动项目,打开浏览器,运行结果如下:
参考文章
如果觉得我的文章对您有用,请随意打赏。你的支持将鼓励我继续创作!